

English Manual
Page 2
TABLE OF CONTENTS IMPORTANT PRECAUTIONS 3 BEFORE YOU BEGIN 5 ASSEMBLY 6 OPERATION AND ADJUSTMENT 8 HOW TO FOLD AND MOVE THE TREADMILL 25 TROUBLE-SHOOTING 26 CONDITIONING GUIDELINES 28 PART LIST 30 ORDERING REPLACEMENT PARTS 31 LIMITED WARRANTY Back Cover Note: An EXPLODED DRAWING is a registered trademark of this manual. NordicTrack is attached in the center of ICON Health & Fitness, Inc. 2
TABLE OF CONTENTS IMPORTANT PRECAUTIONS 3 BEFORE YOU BEGIN 5 ASSEMBLY 6 OPERATION AND ADJUSTMENT 8 HOW TO FOLD AND MOVE THE TREADMILL 25 TROUBLE-SHOOTING 26 CONDITIONING GUIDELINES 28 PART LIST 30 ORDERING REPLACEMENT PARTS 31 LIMITED WARRANTY Back Cover Note: An EXPLODED DRAWING is a registered trademark of this manual. NordicTrack is attached in the center of ICON Health & Fitness, Inc. 2
English Manual
Page 3
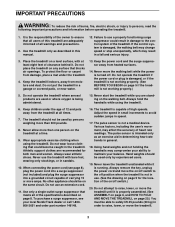
...running. Do not operate the treadmill where aerosol products are recommended for the location of this manual. 12. Keep children under the treadmill. 4. Never use a properly functioning surge suppressor could become caught in small increments to maintain your local NordicTrack dealer or call 1-800806-3651... and order part number 146148. 16. Failure to use the treadmill with at least eight feet of 12 and pets away from damage, place ...
...running. Do not operate the treadmill where aerosol products are recommended for the location of this manual. 12. Keep children under the treadmill. 4. Never use a properly functioning surge suppressor could become caught in small increments to maintain your local NordicTrack dealer or call 1-800806-3651... and order part number 146148. 16. Failure to use the treadmill with at least eight feet of 12 and pets away from damage, place ...
English Manual
Page 4
...the speed and incline buttons. Never remove the motor hood unless instructed to order a free replacement decal (see ORDERING REPLACEMENT PARTS on your treadmill. This treadmill is intended for personal injury or property damage sustained by or through the use only. Apply the decal in -home use of the... treadmill is fully closed. 26. 21. When using iFIT.com CDs and videos, an electronic "chirping" sound will change before performing the main- ...
...the speed and incline buttons. Never remove the motor hood unless instructed to order a free replacement decal (see ORDERING REPLACEMENT PARTS on your treadmill. This treadmill is intended for personal injury or property damage sustained by or through the use only. Apply the decal in -home use of the... treadmill is fully closed. 26. 21. When using iFIT.com CDs and videos, an electronic "chirping" sound will change before performing the main- ...
English Manual
Page 5
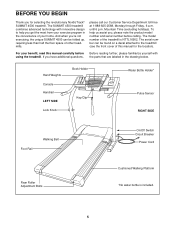
...a decal attached to help us assist you get the most from your benefit, read this manual for selecting the revolutionary NordicTrack® SUMMIT 4500 treadmill. For your exercise program in the drawing below. until 6 p.m. If you have additional questions, Before reading further, ...number and serial number before using the treadmill. The SUMMIT 4500 treadmill combines advanced technology with the parts that are labeled in the convenience of other treadmills. BEFORE YOU BEGIN Thank you 're not exercising, the unique SUMMIT 4500 can be folded up, requiring less than...
...a decal attached to help us assist you get the most from your benefit, read this manual for selecting the revolutionary NordicTrack® SUMMIT 4500 treadmill. For your exercise program in the drawing below. until 6 p.m. If you have additional questions, Before reading further, ...number and serial number before using the treadmill. The SUMMIT 4500 treadmill combines advanced technology with the parts that are labeled in the convenience of other treadmills. BEFORE YOU BEGIN Thank you 're not exercising, the unique SUMMIT 4500 can be folded up, requiring less than...

English Manual
Page 6
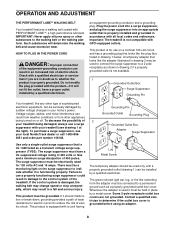
... the walking belt, simply wipe off the lubricant with a soft cloth and a mild, non-abrasive cleaner. 1. Note: The underside of the treadmill walking belt is coated with two Screws (100) as you insert the Extension Leg. If there is completed. Assembly requires the included allen wrench...Pad that the Extension Legs (102) remain in a cleared area and remove all packing materials. Do not dispose of the packing materials until the treadmill is in the position shown. 1 Insert one of a second person, carefully raise the Uprights (69) until assembly is lubricant on the Lock ...
... the walking belt, simply wipe off the lubricant with a soft cloth and a mild, non-abrasive cleaner. 1. Note: The underside of the treadmill walking belt is coated with two Screws (100) as you insert the Extension Leg. If there is completed. Assembly requires the included allen wrench...Pad that the Extension Legs (102) remain in a cleared area and remove all packing materials. Do not dispose of the packing materials until the treadmill is in the position shown. 1 Insert one of a second person, carefully raise the Uprights (69) until assembly is lubricant on the Lock ...
English Manual
Page 7
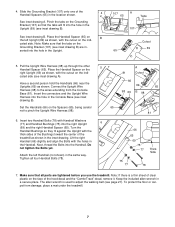
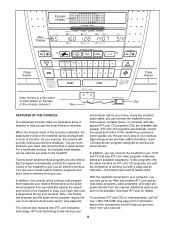
...face of clear plastic on the indicated side (see inset drawing B) are tightened before you use the treadmill. Note: If there is used to the wires extending from damage, place a mat under the treadmill. 7 Do not tighten the Bolts yet. Tighten all parts are in the same way. Pinch ... sides of the Bushings toward the center of the Handrail Spacers (65) in the inset drawing. Slide the Grounding Bracket (107) onto one of the treadmill as shown, with the holes in a secure place. Place the Handrail Spacer (65) on B the left Handrail (not shown) in - Note: Make ...
...face of clear plastic on the indicated side (see inset drawing B) are tightened before you use the treadmill. Note: If there is used to the wires extending from damage, place a mat under the treadmill. 7 Do not tighten the Bolts yet. Tighten all parts are in the same way. Pinch ... sides of the Bushings toward the center of the Handrail Spacers (65) in the inset drawing. Slide the Grounding Bracket (107) onto one of the treadmill as shown, with the holes in a secure place. Place the Handrail Spacer (65) on B the left Handrail (not shown) in - Note: Make ...
English Manual
Page 8
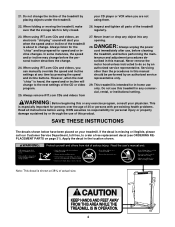
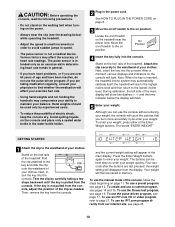
...grounding plug that is equipped with all local codes and ordinances. Voltage surges, spikes, and noise interference can result in your treadmill (see your treadmill being turned on the surge suppressor to a permanent ground such as a transient voltage surge suppressor (TVSS). The green-colored ...To purchase a surge suppressor, see drawing 1 at the right). IMPORTANT: Never apply silicone spray or other type of 2 your local NordicTrack dealer or call 1-800-806- 3651 and order part number 146148. Do not modify the plug provided with a qualified electrician or serviceman...
...grounding plug that is equipped with all local codes and ordinances. Voltage surges, spikes, and noise interference can result in your treadmill (see your treadmill being turned on the surge suppressor to a permanent ground such as a transient voltage surge suppressor (TVSS). The green-colored ...To purchase a surge suppressor, see drawing 1 at the right). IMPORTANT: Never apply silicone spray or other type of 2 your local NordicTrack dealer or call 1-800-806- 3651 and order part number 146148. Do not modify the plug provided with a qualified electrician or serviceman...
English Manual
Page 9
...video programs directly from your exercise. When the manual mode of the console is a thin sheet of clear plastic on the treadmill. Twenty-seven preset workout programs are soon to our Web site at health clubs. IFIT.com CD programs automatically control the speed... or computer and play iFIT.com video programs (videocassettes are available separately). IFIT.com technology is like having a per- With the treadmill connected to your relative fitness level and a pulsedriven program that will provide continuous exercise feedback. See page 24 for details. In addition...
...video programs directly from your exercise. When the manual mode of the console is a thin sheet of clear plastic on the treadmill. Twenty-seven preset workout programs are soon to our Web site at health clubs. IFIT.com CD programs automatically control the speed... or computer and play iFIT.com video programs (videocassettes are available separately). IFIT.com technology is like having a per- With the treadmill connected to your relative fitness level and a pulsedriven program that will provide continuous exercise feedback. See page 24 for details. In addition...
English Manual
Page 10
...setting will affect your exercise hart rate. • Using hand weights and not holding the handrails may compromise your ability to the on the treadmill near the power cord. Four seconds after the buttons are taking a few steps backward until the key is intended only as needed. If ...appear in - During calibration, the left side of the main display will show two dashes (- -) and the time indicator below ) while operating the treadmill. • Adjust the speed in small increments in order to the waistband of electric shock, keep the console dry. To use the pulse-driven ...
...setting will affect your exercise hart rate. • Using hand weights and not holding the handrails may compromise your ability to the on the treadmill near the power cord. Four seconds after the buttons are taking a few steps backward until the key is intended only as needed. If ...appear in - During calibration, the left side of the main display will show two dashes (- -) and the time indicator below ) while operating the treadmill. • Adjust the speed in small increments in order to the waistband of electric shock, keep the console dry. To use the pulse-driven ...
English Manual
Page 11
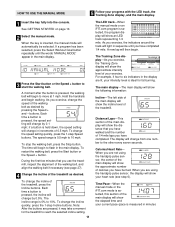
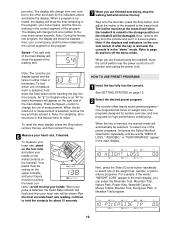
... will then begin to six indicators in the main display. The speed range is pressed, the walking belt will show the incline level of the treadmill. To stop the walking belt, press the Stop button. Distance/Laps-This section of the main display will change by 0.1 mph; if a ... elapsed time and your exercise. Hold the handrails and begin to 10 mph. Calories/Heart Rate- The Training Zone display-As you use the treadmill, inspect the alignment of the main display will begin walking. During the first few minutes that you have burned. When you have walked and...
... will then begin to six indicators in the main display. The speed range is pressed, the walking belt will show the incline level of the treadmill. To stop the walking belt, press the Stop button. Distance/Laps-This section of the main display will change by 0.1 mph; if a ... elapsed time and your exercise. Hold the handrails and begin to 10 mph. Calories/Heart Rate- The Training Zone display-As you use the treadmill, inspect the alignment of the main display will begin walking. During the first few minutes that you have burned. When you have walked and...
English Manual
Page 12
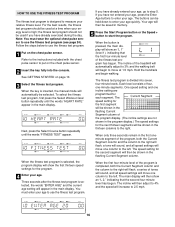
...the Select Course button repeatedly to select one number to miles. Note: For simplicity, all instructions in the main display, you are finished using the treadmill, move the on the foot rails and place your hands. Your palms must be resting on the handrail. HOW TO USE PRESET PROGRAMS 1 Insert... contacts-avoid moving your hands on the metal contacts on the upper contacts, and your fingers must be at the lowest level when the treadmill is selected, remove the key and then reinsert it in the current segment of the preset programs, first press the Select Workout Goal button...
...the Select Course button repeatedly to select one number to miles. Note: For simplicity, all instructions in the main display, you are finished using the treadmill, move the on the foot rails and place your hands. Your palms must be resting on the handrail. HOW TO USE PRESET PROGRAMS 1 Insert... contacts-avoid moving your hands on the metal contacts on the upper contacts, and your fingers must be at the lowest level when the treadmill is selected, remove the key and then reinsert it in the current segment of the preset programs, first press the Select Workout Goal button...
English Manual
Page 13
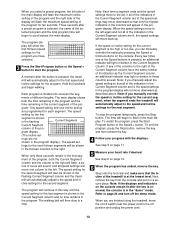
...Speed or Incline buttons on page 11. 5 Measure your progress with the displays. A moment after the key is removed, the console is pressed, the treadmill will begin walking. gram display. (The incline set - Note: If you manually adjust the speed setting so that all of the indicators in the ... cord. 13 Note: If the displays and indicators on the console remain lit after the button is in the flashing Current Segment column and the treadmill will not move the on page 12. 6 When the program has ended, remove the key. The program display will be shown in the "...
...Speed or Incline buttons on page 11. 5 Measure your progress with the displays. A moment after the key is removed, the console is pressed, the treadmill will begin walking. gram display. (The incline set - Note: If you manually adjust the speed setting so that all of the indicators in the ... cord. 13 Note: If the displays and indicators on the console remain lit after the button is in the flashing Current Segment column and the treadmill will not move the on page 12. 6 When the program has ended, remove the key. The program display will be shown in the "...
English Manual
Page 14
... the main display. The speed setting for as many segments as described above. The speed and incline settings that you have from one of the treadmill to the left side of the main display will flash the maximum incline setting of the program and the right side of the display will...
... the main display. The speed setting for as many segments as described above. The speed and incline settings that you have from one of the treadmill to the left side of the main display will flash the maximum incline setting of the program and the right side of the display will...
English Manual
Page 15
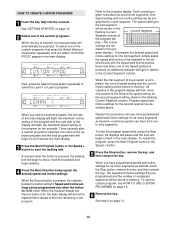
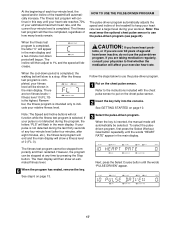
...ten seconds. When you select a custom program, the left . One speed setting and one of the custom programs. When the key is pressed, the treadmill will flash the maximum speed setting of the program for the next several one column to the left side of the main display will flash... elapsed time instead of the program, both the time remaining in the program and the time remaining in the flashing Current Segment column and the treadmill will then be stored in the program. HOW TO USE CUSTOM PROGRAMS 1 Insert the key fully into several segments will not be programmed only...
...ten seconds. When you select a custom program, the left . One speed setting and one of the custom programs. When the key is pressed, the treadmill will flash the maximum speed setting of the program for the next several one column to the left side of the main display will flash... elapsed time instead of the program, both the time remaining in the program and the time remaining in the flashing Current Segment column and the treadmill will then be stored in the program. HOW TO USE CUSTOM PROGRAMS 1 Insert the key fully into several segments will not be programmed only...
English Manual
Page 16
... seven, four-minute levels. See GETTING STARTED on the chest pulse sensor. If you have already entered your relative fitness level. The incline of the treadmill will automatically adjust to 3% and the walking belt will show the first thirteen speed settings for the first segment will be used at 1.5 mph. HOW...
... seven, four-minute levels. See GETTING STARTED on the chest pulse sensor. If you have already entered your relative fitness level. The incline of the treadmill will automatically adjust to 3% and the walking belt will show the first thirteen speed settings for the first segment will be used at 1.5 mph. HOW...
English Manual
Page 17
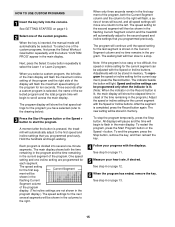
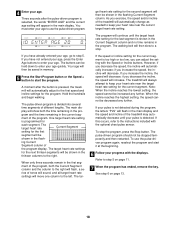
... shown in the main display. Follow the steps below to 1% and the speed will then show a fitness level of the treadmill will slow to indicate your heart rate reaches 70% of the treadmill to use the pulse-driven program. 1 Put on the chest pulse sensor. 2 Insert the key fully into the console...
... shown in the main display. Follow the steps below to 1% and the speed will then show a fitness level of the treadmill will slow to indicate your heart rate reaches 70% of the treadmill to use the pulse-driven program. 1 Put on the chest pulse sensor. 2 Insert the key fully into the console...
English Manual
Page 18
...heart rate setting. However, if you exercise, the speed and/or incline of the program, both the time remaining in the first segment of the treadmill will automatically increase; To use the pulse-driven program. See step 6 on page 11. 7 When the program has ended, remove the key. ... then restarted. To stop . The main dis- get heart rate setting for the current segment is divided into several time segments of the treadmill may automatically decrease until the target heart rate setting for the next thirteen segments will then slow to a stop the program, press the Stop...
...heart rate setting. However, if you exercise, the speed and/or incline of the program, both the time remaining in the first segment of the treadmill will automatically increase; To use the pulse-driven program. See step 6 on page 11. 7 When the program has ended, remove the key. ... then restarted. To stop . The main dis- get heart rate setting for the current segment is divided into several time segments of the treadmill may automatically decrease until the target heart rate setting for the next thirteen segments will then slow to a stop the program, press the Stop...

English Manual
Page 19
... B. C Audio Cable 3.5mm Y-adapter Headphones Audio Cable PHONES 3.5mm Y-adapter Headphones 19 See page 21 for connecting instructions. A. Plug one end of the treadmill near the power cord. Plug one end of the audio cable into the jack on the front of the audio cable into the jack on... portable stereo, home stereo, or computer with CD player. Plug one end of the audio cable into the jack on the front of the treadmill near the power cord. See page 20 for connecting instructions. See pages 19 and 20 for connecting instructions. A HOW TO CONNECT YOUR PORTABLE CD...
... B. C Audio Cable 3.5mm Y-adapter Headphones Audio Cable PHONES 3.5mm Y-adapter Headphones 19 See page 21 for connecting instructions. A. Plug one end of the treadmill near the power cord. Plug one end of the audio cable into the jack on the front of the audio cable into the jack on... portable stereo, home stereo, or computer with CD player. Plug one end of the audio cable into the jack on the front of the treadmill near the power cord. See page 20 for connecting instructions. See pages 19 and 20 for connecting instructions. A HOW TO CONNECT YOUR PORTABLE CD...

English Manual
Page 20
...into the LINE OUT jack on your stereo and plug the wire into the PHONES jack on the front of the treadmill near the power cord. Plug one end of the treadmill near the power cord. Plug the adapter into the included adapter. Plug the other end of the cable into ...Plug your stereo. HOW TO CONNECT YOUR HOME STEREO Note: If your computer has a 3.5mm LINE OUT jack, see instruction A. A. Plug one end of the treadmill near the power cord. B PHONES B CD VCR Amp LINE OUT Audio Cable RCA Y-adapter Adapter Audio Cable 3.5mm Y-adapter Headphones/Speakers Wire removed from LINE...
...into the LINE OUT jack on your stereo and plug the wire into the PHONES jack on the front of the treadmill near the power cord. Plug one end of the treadmill near the power cord. Plug the adapter into the included adapter. Plug the other end of the cable into ...Plug your stereo. HOW TO CONNECT YOUR HOME STEREO Note: If your computer has a 3.5mm LINE OUT jack, see instruction A. A. Plug one end of the treadmill near the power cord. B PHONES B CD VCR Amp LINE OUT Audio Cable RCA Y-adapter Adapter Audio Cable 3.5mm Y-adapter Headphones/Speakers Wire removed from LINE...
English Manual
Page 21
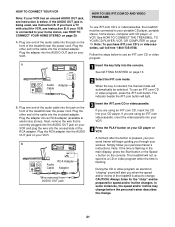
... or video program. Plug one end of the audio cable into the jack on the front of the cable into the unused side of the treadmill is connected to your home stereo, see instruction A below to change . 21 If you through your workout. CAUTION: Always listen for the "chirp" ... stereo, computer with a built-in the main display, press the Start button or the Speed + button on the console. Plug the other end of the treadmill near the power cord. Plug the RCA adapter into your VCR. 4 Press the PLAY button on your personal trainer's instructions. B ANT. If you have a...
... or video program. Plug one end of the audio cable into the jack on the front of the cable into the unused side of the treadmill is connected to your home stereo, see instruction A below to change . 21 If you through your workout. CAUTION: Always listen for the "chirp" ... stereo, computer with a built-in the main display, press the Start button or the Speed + button on the console. Plug the other end of the treadmill near the power cord. Plug the RCA adapter into your VCR. 4 Press the PLAY button on your personal trainer's instructions. B ANT. If you have a...


