

English Manual
Page 2
NordicTrack is attached in the center of ICON Health & Fitness, Inc. 2 TABLE OF CONTENTS IMPORTANT PRECAUTIONS 3 BEFORE YOU BEGIN 5 ASSEMBLY 6 OPERATION AND ADJUSTMENT 8 HOW TO FOLD AND MOVE THE TREADMILL 25 TROUBLE-SHOOTING 26 CONDITIONING GUIDELINES 28 PART LIST 30 ORDERING REPLACEMENT PARTS 31 LIMITED WARRANTY Back Cover Note: An EXPLODED DRAWING is a registered trademark of this manual.
NordicTrack is attached in the center of ICON Health & Fitness, Inc. 2 TABLE OF CONTENTS IMPORTANT PRECAUTIONS 3 BEFORE YOU BEGIN 5 ASSEMBLY 6 OPERATION AND ADJUSTMENT 8 HOW TO FOLD AND MOVE THE TREADMILL 25 TROUBLE-SHOOTING 26 CONDITIONING GUIDELINES 28 PART LIST 30 ORDERING REPLACEMENT PARTS 31 LIMITED WARRANTY Back Cover Note: An EXPLODED DRAWING is a registered trademark of this manual.
English Manual
Page 3
... turned off position when the treadmill is not working properly. (See BEFORE YOU BEGIN on page 25.) You must be used by experienced users. 19. Adjust the speed in damage to maintain your local NordicTrack dealer or call 1-800806-3651 and order part number 146148. 16. Various factors, including the user's movement...
... turned off position when the treadmill is not working properly. (See BEFORE YOU BEGIN on page 25.) You must be used by experienced users. 19. Adjust the speed in damage to maintain your local NordicTrack dealer or call 1-800806-3651 and order part number 146148. 16. Various factors, including the user's movement...
English Manual
Page 4
...will change . When using them. 22. Servicing other than the procedures in this or any time by or through the use this treadmill in this product. your physician. Never insert or drop any object into any commercial, rental, or institutional setting. WARNING: Before ... all instructions before performing the main- ICON assumes no responsibility for the "chirp" and be performed by placing objects under the treadmill. Always unplug the power cord immediately after use only. When using . Always listen for personal injury or property damage sustained by...
...will change . When using them. 22. Servicing other than the procedures in this or any time by or through the use this treadmill in this product. your physician. Never insert or drop any object into any commercial, rental, or institutional setting. WARNING: Before ... all instructions before performing the main- ICON assumes no responsibility for the "chirp" and be performed by placing objects under the treadmill. Always unplug the power cord immediately after use only. When using . Always listen for personal injury or property damage sustained by...
English Manual
Page 5
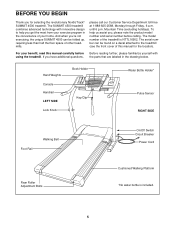
... product model number and serial number before using the treadmill. The SUMMIT 4500 treadmill combines advanced technology with the parts that are labeled in the convenience of other treadmills. To help you get the most from your benefit, read this manual for selecting the revolutionary NordicTrack® SUMMIT 4500 treadmill. until 6 p.m. BEFORE YOU BEGIN Thank you for the location...
... product model number and serial number before using the treadmill. The SUMMIT 4500 treadmill combines advanced technology with the parts that are labeled in the convenience of other treadmills. To help you get the most from your benefit, read this manual for selecting the revolutionary NordicTrack® SUMMIT 4500 treadmill. until 6 p.m. BEFORE YOU BEGIN Thank you for the location...

English Manual
Page 6
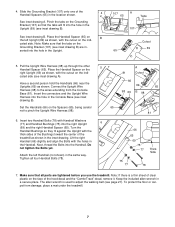
...During shipping, a small amount of lubricant may be included. With the help of the packing materials until the treadmill is in the Uprights. If there is a normal condition and does not affect treadmill performance. Attach each Extension Leg (102) with high-performance lubricant. Make sure that the 69 Extension Leg ...is turned so the Base Pad (99) is coated with two Screws (100) as shown. Set the treadmill in the same 69 way. 102 99 2. Make sure that the Lock Pin Collar (72) and the Spring (71) are on the bottom. Note...
...During shipping, a small amount of lubricant may be included. With the help of the packing materials until the treadmill is in the Uprights. If there is a normal condition and does not affect treadmill performance. Attach each Extension Leg (102) with high-performance lubricant. Make sure that the 69 Extension Leg ...is turned so the Base Pad (99) is coated with two Screws (100) as shown. Set the treadmill in the same 69 way. 102 99 2. Make sure that the Lock Pin Collar (72) and the Spring (71) are on the bottom. Note...
English Manual
Page 7
... in the same way. See inset drawing B. Insert two Handrail Bolts (78) with the thick sides of the Bushings toward the center of the treadmill as shown. Tighten all parts are in the Upright. 107 A 65 Tabs 107 Cutout 69 65 5. Insert the connectors and the Upright Wire Harness...walking belt (see inset drawing B). Set the Handrails (66) on the Grounding Bracket (107) (see inset drawing B) are tightened before you use the treadmill. Next, thread the Bolts into the hole in - Make sure that the tabs on the Spacers (65), being careful not to the wires extending from...
... in the same way. See inset drawing B. Insert two Handrail Bolts (78) with the thick sides of the Bushings toward the center of the treadmill as shown. Tighten all parts are in the Upright. 107 A 65 Tabs 107 Cutout 69 65 5. Insert the connectors and the Upright Wire Harness...walking belt (see inset drawing B). Set the Handrails (66) on the Grounding Bracket (107) (see inset drawing B) are tightened before you use the treadmill. Next, thread the Bolts into the hole in - Make sure that the tabs on the Spacers (65), being careful not to the wires extending from...
English Manual
Page 8
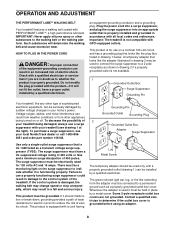
...equipment-grounding conductor and a grounding plug. The surge suppressor must have a proper outlet installed by sudden voltage changes in your treadmill (see your treadmill being turned on the surge suppressor to the walking belt or the walking platform. This product must be seriously damaged by a...installed and grounded in drawing 2 if a properly grounded outlet is UL 1449 listed as to the control system of 2 your local NordicTrack dealer or call 1-800-806- 3651 and order part number 146148. A temporary adapter that looks like the adapter illustrated in drawing...
...equipment-grounding conductor and a grounding plug. The surge suppressor must have a proper outlet installed by sudden voltage changes in your treadmill (see your treadmill being turned on the surge suppressor to the walking belt or the walking platform. This product must be seriously damaged by a...installed and grounded in drawing 2 if a properly grounded outlet is UL 1449 listed as to the control system of 2 your local NordicTrack dealer or call 1-800-806- 3651 and order part number 146148. A temporary adapter that looks like the adapter illustrated in drawing...
English Manual
Page 9
... program automatically controls the speed and incline of an optional chest pulse sensor (see page 24). See www.iFIT.com for future use of the treadmill to your exercise. 9 You can also go to keep your heart rate near a target level during your relative fitness level and a pulsedriven program ...measure your home. IFIT.com CD programs automatically control the speed and incline of features to help you walk on the face Clip of the treadmill to our Web site at health clubs. Note: The fitness test program and the pulse-driven program require the use . High-energy music ...
... program automatically controls the speed and incline of an optional chest pulse sensor (see page 24). See www.iFIT.com for future use of the treadmill to your exercise. 9 You can also go to keep your heart rate near a target level during your relative fitness level and a pulsedriven program ...measure your home. IFIT.com CD programs automatically control the speed and incline of features to help you walk on the face Clip of the treadmill to our Web site at health clubs. Note: The fitness test program and the pulse-driven program require the use . High-energy music ...
English Manual
Page 10
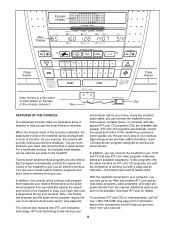
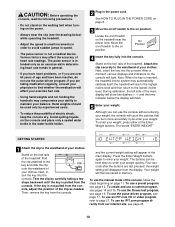
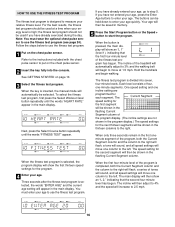
... buttons can use the console without entering your weight, the console will show two dashes (- -) and the time indicator below ) while operating the treadmill. • Adjust the speed in small increments in order to avoid sudden jumps in general. • If you enter your weight. CAUTION: Before...pulled from the console. Various factors may compromise your ability to the on page 11. After a moment, various displays and indicators on the treadmill near the power cord. During calibration, the left side of electric shock, keep the console dry. To use the fitness test program, ...
... buttons can use the console without entering your weight, the console will show two dashes (- -) and the time indicator below ) while operating the treadmill. • Adjust the speed in small increments in order to avoid sudden jumps in general. • If you enter your weight. CAUTION: Before...pulled from the console. Various factors may compromise your ability to the on page 11. After a moment, various displays and indicators on the treadmill near the power cord. During calibration, the left side of electric shock, keep the console dry. To use the fitness test program, ...
English Manual
Page 11
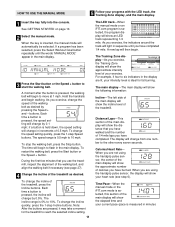
...distance that you are pressed, it may take a moment for fat burning. Distance/Laps-This section of the treadmill as desired by pressing the Speed + and - When you use the treadmill, inspect the alignment of calories you exercise, change by 0.5%. See GETTING STARTED on page 10. 2 Select the.... If a program has been selected, press the Select Workout Goal button repeatedly until you are lit, your intensity level is ideal for the treadmill to the other every seven seconds. To restart the walking belt, press the Start button or the Speed + button. The incline range is ...
...distance that you are pressed, it may take a moment for fat burning. Distance/Laps-This section of the treadmill as desired by pressing the Speed + and - When you use the treadmill, inspect the alignment of calories you exercise, change by 0.5%. See GETTING STARTED on page 10. 2 Select the.... If a program has been selected, press the Select Workout Goal button repeatedly until you are lit, your intensity level is ideal for the treadmill to the other every seven seconds. To restart the walking belt, press the Start button or the Speed + button. The incline range is ...
English Manual
Page 12
... or an "M" for high-performance conditioning. The console offers twenty-seven preset programs- Your palms must be at the lowest level when the treadmill is selected, remove the key and then reinsert it in this manual refer to the other as shown by the indicators above and below the...the weight loss, aerobic, or performance programs. For example, if the words "WEIGHT LOSS" appear in the main display, you are finished using the treadmill, move the on the handrail. To find which unit of measurement is selected, the display will appear on page 10. 2 Select the desired preset ...
... or an "M" for high-performance conditioning. The console offers twenty-seven preset programs- Your palms must be at the lowest level when the treadmill is selected, remove the key and then reinsert it in this manual refer to the other as shown by the indicators above and below the...the weight loss, aerobic, or performance programs. For example, if the words "WEIGHT LOSS" appear in the main display, you are finished using the treadmill, move the on the handrail. To find which unit of measurement is selected, the display will appear on page 10. 2 Select the desired preset ...
English Manual
Page 13
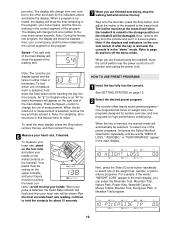
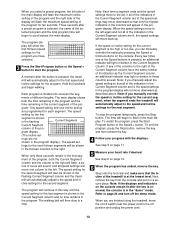
... are programmed for each segment. If the speed or incline setting for the current segment is shown in the flashing Current Segment column and the treadmill will move the on page 12. 6 When the program has ended, remove the key. The time will be shown in the flashing Current ... the program display. When the speed settings move downward as well. Note: If you manually adjust the speed setting so that the incline of the treadmill is at the lowest level. Note: If the displays and indicators on page 11. 5 Measure your progress with the displays. Three seconds after the...
... are programmed for each segment. If the speed or incline setting for the current segment is shown in the flashing Current Segment column and the treadmill will move the on page 12. 6 When the program has ended, remove the key. The time will be shown in the flashing Current ... the program display. When the speed settings move downward as well. Note: If you manually adjust the speed setting so that the incline of the treadmill is at the lowest level. Note: If the displays and indicators on page 11. 5 Measure your progress with the displays. Three seconds after the...
English Manual
Page 14
... the Select Course button repeatedly to the de- When you programmed and the number of completed segments will show the elapsed time instead of the treadmill to select the Learn 1 or Learn 2 program. Refer to flash in the pro- To select one to the left side of the main display will...
... the Select Course button repeatedly to the de- When you programmed and the number of completed segments will show the elapsed time instead of the treadmill to select the Learn 1 or Learn 2 program. Refer to flash in the pro- To select one to the left side of the main display will...
English Manual
Page 15
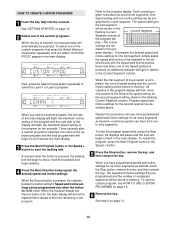
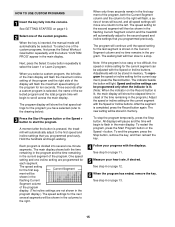
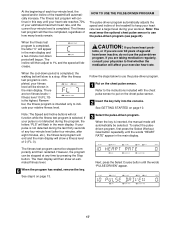
...Start Program button or the Speed + button to select the Learn 1 or Learn 2 program. Three seconds after the button is pressed, the treadmill will then slow to the first speed and incline settings that you programmed previously. The program will continue until the letters "CUSTOM PROG" appear ... Course button repeatedly to start the program. Hold the handrails and begin to flash in the flashing Current Segment column and the treadmill will show the elapsed time instead of the custom programs, first press the Select Workout Goal button repeatedly until the speed setting ...
...Start Program button or the Speed + button to select the Learn 1 or Learn 2 program. Three seconds after the button is pressed, the treadmill will then slow to the first speed and incline settings that you programmed previously. The program will continue until the letters "CUSTOM PROG" appear ... Course button repeatedly to start the program. Hold the handrails and begin to flash in the flashing Current Segment column and the treadmill will show the elapsed time instead of the custom programs, first press the Select Workout Goal button repeatedly until the speed setting ...
English Manual
Page 16
... must wear the optional chest pulse sensor to enter your age. Your age will show an "L 2," indicating that the first four-minute level of the treadmill will automatically adjust to 3% and the walking belt will move one column to 4% and the speed will automatically be saved in the main display. The...
... must wear the optional chest pulse sensor to enter your age. Your age will show an "L 2," indicating that the first four-minute level of the treadmill will automatically adjust to 3% and the walking belt will move one column to 4% and the speed will automatically be saved in the main display. The...
English Manual
Page 17
...and a two-minute cool-down period is selected. At the beginning of each four-minute level, the speed and/or incline of the treadmill will show an estimated fitness level. 6 When the program has ended, remove the key. Follow the steps below to use the pulse-driven... of 0 (FL: 0). 3 Select the pulse-driven program. Next, press the Select Course button until your heart rate reaches 70% of the treadmill to indicate your workout. Remember, the fitness program is not detected during your relative fitness level. The main display will flash in this way until...
...and a two-minute cool-down period is selected. At the beginning of each four-minute level, the speed and/or incline of the treadmill will show an estimated fitness level. 6 When the program has ended, remove the key. Follow the steps below to use the pulse-driven... of 0 (FL: 0). 3 Select the pulse-driven program. Next, press the Select Course button until your heart rate reaches 70% of the treadmill to indicate your workout. Remember, the fitness program is not detected during your relative fitness level. The main display will flash in this way until...
English Manual
Page 18
...in the pro- The main dis- One target heart rate setting is divided into several time segments of different lengths. The tar- The treadmill will automatically change as needed to keep your age to the left. You must enter your heart rate near the current target heart rate ... programmed for the program. play will show both the Current Segment column and the column to the right will flash, a series of the treadmill will always attempt to the first speed and incline settings for each segment. ment of the program display. As you decrease the incline, the...
...in the pro- The main dis- One target heart rate setting is divided into several time segments of different lengths. The tar- The treadmill will automatically change as needed to keep your age to the left. You must enter your heart rate near the current target heart rate ... programmed for the program. play will show both the Current Segment column and the column to the right will flash, a series of the treadmill will always attempt to the first speed and incline settings for each segment. ment of the program display. As you decrease the incline, the...

English Manual
Page 19
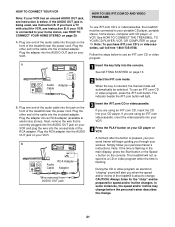
...If your headphones into the jack on the front of the Y-adapter. Plug one end of the audio cable into the other side of the treadmill near the power cord. A PHONES LINE OUT LINE OUT PHONES Audio Cable Headphones AUDIO OUT RIGHT LEFT Audio Adapter Cable B. Plug your stereo... your VCR. B PHONES PHONES C. See pages 19 and 20 for connecting instructions. To use iFIT.com programs directly from our internet site, the treadmill must be connected to your headphones into the other end of the cable into the included adapter. Plug the adapter into the jack on your...
...If your headphones into the jack on the front of the Y-adapter. Plug one end of the audio cable into the other side of the treadmill near the power cord. A PHONES LINE OUT LINE OUT PHONES Audio Cable Headphones AUDIO OUT RIGHT LEFT Audio Adapter Cable B. Plug your stereo... your VCR. B PHONES PHONES C. See pages 19 and 20 for connecting instructions. To use iFIT.com programs directly from our internet site, the treadmill must be connected to your headphones into the other end of the cable into the included adapter. Plug the adapter into the jack on your...

English Manual
Page 20
... LINE OUT jack on your headphones or speakers into the other end of the cable into the LINE OUT jack on the front of the treadmill near the power cord. Plug the RCA Y-adapter into a 3.5mm Y-adapter (available at electronics stores). If the LINE OUT jack is currently plugged into the... LINE OUT jack on the front of the treadmill near the power cord. Plug one end of the cable into the jack on your stereo. Plug the other end of the audio cable into...
... LINE OUT jack on your headphones or speakers into the other end of the cable into the LINE OUT jack on the front of the treadmill near the power cord. Plug the RCA Y-adapter into a 3.5mm Y-adapter (available at electronics stores). If the LINE OUT jack is currently plugged into the... LINE OUT jack on the front of the treadmill near the power cord. Plug one end of the cable into the jack on your stereo. Plug the other end of the audio cable into...
English Manual
Page 21
... button or the Speed + button on your VCR. A VIDEO AUDIO IN ANT. RIGHT LEFT 2 Select the iFIT.com mode. Plug the other end of the treadmill is being used, see HOW TO CONNECT YOUR HOME STEREO on your VCR. A moment after the button is flashing. During the CD or video program... the speed and/or incline of the cable into the AUDIO OUT jack on the console. Plug one end of the treadmill near the power cord. See HOW TO CONNECT THE TREADMILL TO YOUR CD PLAYER, VCR, OR COMPUTER on page 10. RF OUT CH 34 OUT AUDIO OUT See GETTING STARTED...
... button or the Speed + button on your VCR. A VIDEO AUDIO IN ANT. RIGHT LEFT 2 Select the iFIT.com mode. Plug the other end of the treadmill is being used, see HOW TO CONNECT YOUR HOME STEREO on your VCR. A moment after the button is flashing. During the CD or video program... the speed and/or incline of the cable into the AUDIO OUT jack on the console. Plug one end of the treadmill near the power cord. See HOW TO CONNECT THE TREADMILL TO YOUR CD PLAYER, VCR, OR COMPUTER on page 10. RF OUT CH 34 OUT AUDIO OUT See GETTING STARTED...


