

English Manual
Page 2
... 6 ASSEMBLY 7 HOW TO USE THE ELLIPTICAL 10 FCC INFORMATION 22 MAINTENANCE AND TROUBLESHOOTING 23 EXERCISE GUIDELINES 25 PART LIST 27 EXPLODED DRAWING 29 ORDERING REPLACEMENT PARTS Back Cover LIMITED WARRANTY Back Cover WARNING DECAL PLACEMENT This drawing shows the location(s) of ICON Health & Fitness, Inc. 2 NORDICTRACK is missing or illegible, see the...
... 6 ASSEMBLY 7 HOW TO USE THE ELLIPTICAL 10 FCC INFORMATION 22 MAINTENANCE AND TROUBLESHOOTING 23 EXERCISE GUIDELINES 25 PART LIST 27 EXPLODED DRAWING 29 ORDERING REPLACEMENT PARTS Back Cover LIMITED WARRANTY Back Cover WARNING DECAL PLACEMENT This drawing shows the location(s) of ICON Health & Fitness, Inc. 2 NORDICTRACK is missing or illegible, see the...

English Manual
Page 3
... upright is not a medical device. Always wear athletic shoes for personal injury or property damage sus- the pedals will continue to place the elliptical in the storage position. 14. Over exercising may affect the accuracy of breath, or if you become caught on a level surface, with...not arch your pedaling speed in a controlled way. 19. Hold the handlebars or the upper body arms when mounting, dismounting, or using the elliptical; Various factors may result in serious injury or death. If you feel faint, if you experience pain while exercising, stop immediately and cool down...
... upright is not a medical device. Always wear athletic shoes for personal injury or property damage sus- the pedals will continue to place the elliptical in the storage position. 14. Over exercising may affect the accuracy of breath, or if you become caught on a level surface, with...not arch your pedaling speed in a controlled way. 19. Hold the handlebars or the upper body arms when mounting, dismounting, or using the elliptical; Various factors may result in serious injury or death. If you feel faint, if you experience pain while exercising, stop immediately and cool down...

English Manual
Page 6
... the product model number and serial number before you use the elliptical. For your workouts at home more effective and enjoyable. The SPACE SAVER SE 7I elliptical provides an impressive selection of this manual. If you for selecting the revolutionary NORDICTRACK® SPACE SAVER SE 7I elliptical. Length: 6 ft. 2 in. (188 cm) Width: 2 ft. 1 in the drawing below...
... the product model number and serial number before you use the elliptical. For your workouts at home more effective and enjoyable. The SPACE SAVER SE 7I elliptical provides an impressive selection of this manual. If you for selecting the revolutionary NORDICTRACK® SPACE SAVER SE 7I elliptical. Length: 6 ft. 2 in. (188 cm) Width: 2 ft. 1 in the drawing below...

English Manual
Page 7
... • Assembly requires two persons. • Place all assembly steps. • Assembly requires only the included tool(s). 1. With the help of another person hold the elliptical to prevent it from moving from the packing material under 2 the rear of the Frame (1) so that the Frame is completed. If necessary, remove and...
... • Assembly requires two persons. • Place all assembly steps. • Assembly requires only the included tool(s). 1. With the help of another person hold the elliptical to prevent it from moving from the packing material under 2 the rear of the Frame (1) so that the Frame is completed. If necessary, remove and...
English Manual
Page 8
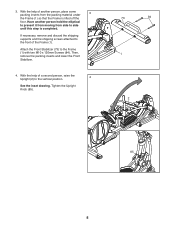
... front of a second person, raise the Upright (2) to side until this step is lifted off the floor. With the help of another person hold the elliptical to the Frame (1) with two M10 x 120mm Screws (84). Then, remove the packing inserts and lower the Front Stabilizer. 4. With the help of the Frame...
... front of a second person, raise the Upright (2) to side until this step is lifted off the floor. With the help of another person hold the elliptical to the Frame (1) with two M10 x 120mm Screws (84). Then, remove the packing inserts and lower the Front Stabilizer. 4. With the help of the Frame...
English Manual
Page 9
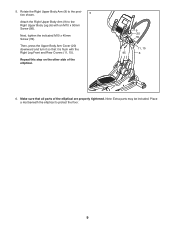
... Arm Cover (20) downward and turn it is flush with an M10 x 50mm Screw (95). Make sure that it so that all parts of the elliptical. 9 20 78 11, 15 95 6 6. Rotate the Right Upper Body Arm (9) to the position shown. 5 Attach the Right Upper Body Arm (9) to protect the ...floor. 9 Place a mat beneath the elliptical to the Right Upper Body Leg (6) with the Right Leg Front and Rear Covers (11, 15). Note: Extra parts may be included. Repeat this step...
... Arm Cover (20) downward and turn it is flush with an M10 x 50mm Screw (95). Make sure that it so that all parts of the elliptical. 9 20 78 11, 15 95 6 6. Rotate the Right Upper Body Arm (9) to the position shown. 5 Attach the Right Upper Body Arm (9) to protect the ...floor. 9 Place a mat beneath the elliptical to the Right Upper Body Leg (6) with the Right Leg Front and Rear Covers (11, 15). Note: Extra parts may be included. Repeat this step...

English Manual
Page 10
... electric shock. Plug the power cord into an Grounded Outlet appropriate outlet that Grounding Pin is properly grounded, contact a qualified electrician. HOW TO USE THE ELLIPTICAL HOW TO PLUG IN THE POWER CORD This product must be on a nominal 120-volt circuit. if it should be used to connect the power...
... electric shock. Plug the power cord into an Grounded Outlet appropriate outlet that Grounding Pin is properly grounded, contact a qualified electrician. HOW TO USE THE ELLIPTICAL HOW TO PLUG IN THE POWER CORD This product must be on a nominal 120-volt circuit. if it should be used to connect the power...

English Manual
Page 11
.... Make sure to adjust both of the leveling feet beneath the rear stabilizer until the rocking motion is eliminated. HOW TO LEVEL THE ELLIPTICAL If the elliptical rocks slightly on your floor during use, turn one of the indicated locations while you are finished moving it will roll on the wheels...do not hold the upper body arms. Hold to lower Pull forward Lift latch Next, hold the handle on the front stabilizer and lift the elliptical until the latch stops the upright, and then release the upright knob. To adjust each pedal, simply pull the pedal handle outward, move the...
.... Make sure to adjust both of the leveling feet beneath the rear stabilizer until the rocking motion is eliminated. HOW TO LEVEL THE ELLIPTICAL If the elliptical rocks slightly on your floor during use, turn one of the indicated locations while you are finished moving it will roll on the wheels...do not hold the upper body arms. Hold to lower Pull forward Lift latch Next, hold the handle on the front stabilizer and lift the elliptical until the latch stops the upright, and then release the upright knob. To adjust each pedal, simply pull the pedal handle outward, move the...
English Manual
Page 12
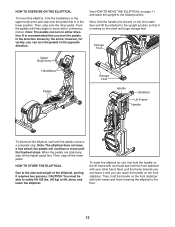
... they begin to move with both hands and finish lowering the elliptical to lift, store, and lower the elliptical. HOW TO STORE THE ELLIPTICAL Due to the folded position. HOW TO EXERCISE ON THE ELLIPTICAL To mount the elliptical, hold the handlebars or the upper body arms and step onto... your other pedal. Storage Foot Upper Body Arms Handlebars Storage Feet Pedals Handle Stabilizer Lift Frame Handle To dismount the elliptical, wait until the flywheel stops. Note: The elliptical does not have a free wheel; When the pedals are stationary, step off the lower pedal. CAUTION: You must...
... they begin to move with both hands and finish lowering the elliptical to lift, store, and lower the elliptical. HOW TO STORE THE ELLIPTICAL Due to the folded position. HOW TO EXERCISE ON THE ELLIPTICAL To mount the elliptical, hold the handlebars or the upper body arms and step onto... your other pedal. Storage Foot Upper Body Arms Handlebars Storage Feet Pedals Handle Stabilizer Lift Frame Handle To dismount the elliptical, wait until the flywheel stops. Note: The elliptical does not have a free wheel; When the pedals are stationary, step off the lower pedal. CAUTION: You must...

English Manual
Page 14
... console sound system and listen to your favorite music or audio books while you turn off and the display will not be used if the elliptical is a sheet of plastic on the front cover of this , you finish exercising. To purchase an iFit module at any time, go to www... array of features designed to make your heart rate using the handgrip heart rate monitor. The frame will display continuous exercise feedback. IMPORTANT: If the elliptical has been exposed to the reset position. When the frame stops moving, the incline system is turned on and the console will not turn on...
... console sound system and listen to your favorite music or audio books while you turn off and the display will not be used if the elliptical is a sheet of plastic on the front cover of this , you finish exercising. To purchase an iFit module at any time, go to www... array of features designed to make your heart rate using the handgrip heart rate monitor. The frame will display continuous exercise feedback. IMPORTANT: If the elliptical has been exposed to the reset position. When the frame stops moving, the incline system is turned on and the console will not turn on...

English Manual
Page 16
... off the fan. Press the Home button to exit the workout and return to the default menu (see HOW TO CHANGE CONSOLE SETTINGS on the elliptical may wear prematurely. 16 If the display does not show the strength of your exercise. As you are sheets of plas-
... off the fan. Press the Home button to exit the workout and return to the default menu (see HOW TO CHANGE CONSOLE SETTINGS on the elliptical may wear prematurely. 16 If the display does not show the strength of your exercise. As you are sheets of plas-

English Manual
Page 21
Select the settings mode. The display will appear in miles or kilometers) that the elliptical has been used if the elliptical is selected, the matrix of the display will appear in the display. Units-The currently selected unit of measurement will show the words NO IFIT ...MODULE. Contrast Level-The currently selected contrast level will show the total number of hours that has been pedaled on the elliptical. Press the Incline increase and decrease buttons to select the manual mode or the iFit menu as desired. If no module is connected, the display...
Select the settings mode. The display will appear in miles or kilometers) that the elliptical has been used if the elliptical is selected, the matrix of the display will appear in the display. Units-The currently selected unit of measurement will show the words NO IFIT ...MODULE. Contrast Level-The currently selected contrast level will show the total number of hours that has been pedaled on the elliptical. Press the Incline increase and decrease buttons to select the manual mode or the iFit menu as desired. If no module is connected, the display...

English Manual
Page 23
.... To calibrate the incline frame, press and hold the handgrip heart rate monitor, or if the displayed heart rate appears to the off the elliptical. When the incline frame stops moving, it calibrates. To adjust the reed switch, first press the power switch to be too high or too..., remove the four M4 x 37 16mm Screws (not shown) from the Top Shield (37), and then use a damp cloth and a small amount of the elliptical regularly. Repeat these actions until the console displays correct feedback. If the console does not display your heart rate when you hold the Calorie button...
.... To calibrate the incline frame, press and hold the handgrip heart rate monitor, or if the displayed heart rate appears to the off the elliptical. When the incline frame stops moving, it calibrates. To adjust the reed switch, first press the power switch to be too high or too..., remove the four M4 x 37 16mm Screws (not shown) from the Top Shield (37), and then use a damp cloth and a small amount of the elliptical regularly. Repeat these actions until the console displays correct feedback. If the console does not display your heart rate when you hold the Calorie button...

English Manual
Page 24
... Right Shields (44, 45). First, remove the M4 x 16mm Screw (61) from the Top Shield (37), and then use a flat screwdriver to the off the elliptical. See EXPLODED DRAWING C on page 30. Then, carefully remove the Left Shield. Remove the two M4 x 16mm Screws (not shown) from the Left Leg Inner... 31. Tighten the Idler Adjustment Screw (72) until the Drive Belt (46) is tight, retighten the Idler Screw. Remove the Left Pedal Arm from the elliptical. 14 81 37 27 36 46 97 72 Remove the four M4 x 16mm Screws (not shown) from which size Screws come from the Large Storage...
... Right Shields (44, 45). First, remove the M4 x 16mm Screw (61) from the Top Shield (37), and then use a flat screwdriver to the off the elliptical. See EXPLODED DRAWING C on page 30. Then, carefully remove the Left Shield. Remove the two M4 x 16mm Screws (not shown) from the Left Leg Inner... 31. Tighten the Idler Adjustment Screw (72) until the Drive Belt (46) is tight, retighten the Idler Screw. Remove the Left Pedal Arm from the elliptical. 14 81 37 27 36 46 97 72 Remove the four M4 x 16mm Screws (not shown) from which size Screws come from the Large Storage...


