

Instruction Manual
Page 2
... CONTENTS WARNING DECAL PLACEMENT 2 IMPORTANT PRECAUTIONS 3 BEFORE YOU BEGIN 5 PART IDENTIFICATION CHART 6 ASSEMBLY 7 THE CHEST HEART RATE MONITOR 16 HOW TO USE THE TREADMILL 17 HOW TO FOLD AND MOVE THE TREADMILL 29 MAINTENANCE AND TROUBLESHOOTING 30 EXERCISE GUIDELINES 33 PART LIST 34 EXPLODED DRAWING 36 ORDERING REPLACEMENT PARTS Back Cover RECYCLING INFORMATION Back Cover WARNING DECAL PLACEMENT This drawing shows the locations of Wi-Fi Alliance. and other countries. WPA and WPA2...
... CONTENTS WARNING DECAL PLACEMENT 2 IMPORTANT PRECAUTIONS 3 BEFORE YOU BEGIN 5 PART IDENTIFICATION CHART 6 ASSEMBLY 7 THE CHEST HEART RATE MONITOR 16 HOW TO USE THE TREADMILL 17 HOW TO FOLD AND MOVE THE TREADMILL 29 MAINTENANCE AND TROUBLESHOOTING 30 EXERCISE GUIDELINES 33 PART LIST 34 EXPLODED DRAWING 36 ORDERING REPLACEMENT PARTS Back Cover RECYCLING INFORMATION Back Cover WARNING DECAL PLACEMENT This drawing shows the locations of Wi-Fi Alliance. and other countries. WPA and WPA2...
Instruction Manual
Page 3
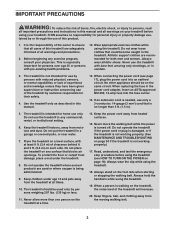
... wear the clip while using the treadmill (see page 17), plug the power cord into the fuse carrier. 14. It is being administered. 9. Never move the walking belt while the power is turned off. Keep the power cord away from the treadmill at a time. 15. No other appliance should be on the treadmill at all important precautions and instructions in the power cord adapter, insert an ASTA-approved...
... wear the clip while using the treadmill (see page 17), plug the power cord into the fuse carrier. 14. It is being administered. 9. Never move the walking belt while the power is turned off. Keep the power cord away from the treadmill at a time. 15. No other appliance should be on the treadmill at all important precautions and instructions in the power cord adapter, insert an ASTA-approved...
Instruction Manual
Page 4
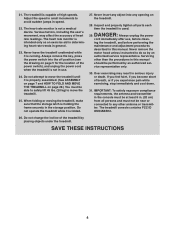
... only as an exercise aid in determining heart rate trends in this manual should be near or connected to avoid sudden jumps in the storage position. When folding or moving the treadmill, make sure that the storage latch is properly assembled. (See ASSEMBLY on page 7 and HOW TO FOLD AND MOVE THE TREADMILL on page 5 for the location of the power switch), and unplug the power cord when the treadmill is not...
... only as an exercise aid in determining heart rate trends in this manual should be near or connected to avoid sudden jumps in the storage position. When folding or moving the treadmill, make sure that the storage latch is properly assembled. (See ASSEMBLY on page 7 and HOW TO FOLD AND MOVE THE TREADMILL on page 5 for the location of the power switch), and unplug the power cord when the treadmill is not...
Instruction Manual
Page 5
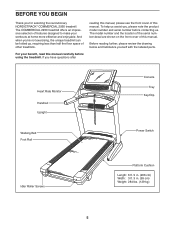
Heart Rate Monitor Handrail Upright Walking Belt Foot Rail Console Tray Key/Clip Power Switch Idler Roller Screws Platform Cushion Length: 6 ft. 9 in. (206 cm) Width: 3 ft. 3 in. (99 cm) Weight: 284 lbs. (129 kg) 5 For your workouts at home more effective and enjoyable. The COMMERCIAL 2950 treadmill offers an impressive selection of this manual carefully before contacting us. If you 're not exercising, the unique treadmill can be folded up...
Heart Rate Monitor Handrail Upright Walking Belt Foot Rail Console Tray Key/Clip Power Switch Idler Roller Screws Platform Cushion Length: 6 ft. 9 in. (206 cm) Width: 3 ft. 3 in. (99 cm) Weight: 284 lbs. (129 kg) 5 For your workouts at home more effective and enjoyable. The COMMERCIAL 2950 treadmill offers an impressive selection of this manual carefully before contacting us. If you 're not exercising, the unique treadmill can be folded up...

Instruction Manual
Page 7
... of the treadmill. If 1 you do not use power tools. 1. Make sure that the power cord is normal. To register your product and activate your warranty in Australia, email or post the following tools: the included hex key one adjustable wrench one Phillips screwdriver To avoid damaging parts, do not have internet access, call Customer Service (see the front cover of...
... of the treadmill. If 1 you do not use power tools. 1. Make sure that the power cord is normal. To register your product and activate your warranty in Australia, email or post the following tools: the included hex key one adjustable wrench one Phillips screwdriver To avoid damaging parts, do not have internet access, call Customer Service (see the front cover of...

Instruction Manual
Page 11
... person, hold the console assembly (K) near the Handrails (74). start all four Screws, and then tighten them. 2 6 8 Then, tighten the other two 5/16" x 2" Screws (2). 2 74 11. 10. IMPORTANT: To avoid damaging the Pulse Crossbar (80), do not use power tools, and do not, turn one connector and try again. Next, connect the ground wire (N) from the Upright Wire (83) and the fan wires (H, O), and insert the...
... person, hold the console assembly (K) near the Handrails (74). start all four Screws, and then tighten them. 2 6 8 Then, tighten the other two 5/16" x 2" Screws (2). 2 74 11. 10. IMPORTANT: To avoid damaging the Pulse Crossbar (80), do not use power tools, and do not, turn one connector and try again. Next, connect the ground wire (N) from the Upright Wire (83) and the fan wires (H, O), and insert the...

Instruction Manual
Page 18
... treadmill as it guides you exercise, the console will display instant exercise feedback. Each workout automatically controls the speed and incline of a button. To turn on the power, see page 20. 18 To set up the console, see page 19. In addition, the console features a selection of features designed to make your workouts more effective and enjoyable. When you use the touch screen, see page 19. You can change...
... treadmill as it guides you exercise, the console will display instant exercise feedback. Each workout automatically controls the speed and incline of a button. To turn on the power, see page 20. 18 To set up the console, see page 19. In addition, the console features a selection of features designed to make your workouts more effective and enjoyable. When you use the touch screen, see page 19. You can change...

Instruction Manual
Page 19
... kilometers. 19 To use multiple capital characters, touch the arrow button again. Press the power switch into the con- You can display speed and distance in either miles or kilometers. Note: The console can slide or flick your fingers on the treadmill frame near the power cord. To find which unit of measurement is selected, see HOW TO USE THE EQUIPMENT SETTINGS SECTION on the...
... kilometers. 19 To use multiple capital characters, touch the arrow button again. Press the power switch into the con- You can display speed and distance in either miles or kilometers. Note: The console can slide or flick your fingers on the treadmill frame near the power cord. To find which unit of measurement is selected, see HOW TO USE THE EQUIPMENT SETTINGS SECTION on the...

Instruction Manual
Page 20
... the Settings button, and then scroll to select the settings main menu. First, touch the profile button. Tour the console. To adjust the angle of the walking belt, and center the walking belt if necessary (see page 28. See step 3 on page 26 for firmware updates. The first time you to calibrate the incline system. Next, select the maintenance section. To use the sound system with an audio cable...
... the Settings button, and then scroll to select the settings main menu. First, touch the profile button. Tour the console. To adjust the angle of the walking belt, and center the walking belt if necessary (see page 28. See step 3 on page 26 for firmware updates. The first time you to calibrate the incline system. Next, select the maintenance section. To use the sound system with an audio cable...
Instruction Manual
Page 21
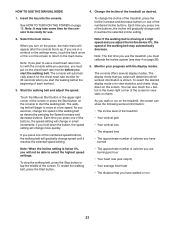
... change the incline of the treadmill, press the Incline increase and decrease buttons or one of each workout. 3. If you walk or run 21 To stop the walking belt, press the Stop button or tap the middle of the screen to use a chest heart rate monitor with the display modes. Note: If you hold down on the console to the main menu. Start the walking belt and adjust the speed. if you plan to view stats or charts...
... change the incline of the treadmill, press the Incline increase and decrease buttons or one of each workout. 3. If you walk or run 21 To stop the walking belt, press the Stop button or tap the middle of the screen to use a chest heart rate monitor with the display modes. Note: If you hold down on the console to the main menu. Start the walking belt and adjust the speed. if you plan to view stats or charts...

Instruction Manual
Page 22
... finished using the treadmill, press the power switch into the off the fan. 8. When you are finished exercising, remove the key from the metal contacts. Note: The console is detected, your palms for future use the handgrip heart rate monitor and the chest heart rate monitor at the same time, the chest heart rate monitor will appear on the screen. You may wear prematurely. 22 Turn on the console. Next, touch the Finish button...
... finished using the treadmill, press the power switch into the off the fan. 8. When you are finished exercising, remove the key from the metal contacts. Note: The console is detected, your palms for future use the handgrip heart rate monitor and the chest heart rate monitor at the same time, the chest heart rate monitor will appear on the screen. You may wear prematurely. 22 Turn on the console. Next, touch the Finish button...

Instruction Manual
Page 23
... the button, the walking belt will appear on the screen. Then, tap the screen to 22). Turn on page 22. 3. See step 8 on the fan if desired. HOW TO USE A DRAW YOUR OWN MAP WORKOUT 1. Select a draw your workout. The workout will display the elevation and distance statistics for your workout. See HOW TO TURN ON THE POWER on page 22. 7. Draw your heart rate if...
... the button, the walking belt will appear on the screen. Then, tap the screen to 22). Turn on page 22. 3. See step 8 on the fan if desired. HOW TO USE A DRAW YOUR OWN MAP WORKOUT 1. Select a draw your workout. The workout will display the elevation and distance statistics for your workout. See HOW TO TURN ON THE POWER on page 22. 7. Draw your heart rate if...

Instruction Manual
Page 24
... other device, open an internet browser, go to iFit.com, and sign in to download a distance or time workout from the console. Touch the Start button on page 21. Hold the handrails and begin to view your iFit account. Then, navigate to Menu > Schedule to move. See HOW TO TURN ON THE POWER on iFit.com. Measure your progress with the display modes. If you...
... other device, open an internet browser, go to iFit.com, and sign in to download a distance or time workout from the console. Touch the Start button on page 21. Hold the handrails and begin to view your iFit account. Then, navigate to Menu > Schedule to move. See HOW TO TURN ON THE POWER on iFit.com. Measure your progress with the display modes. If you...

Instruction Manual
Page 26
.... To avoid damaging the treadmill, do not turn off and then turn off the power or remove the key while the firmware is calibrating. Set up a wireless network connection. 1. Exit the maintenance section. When the update is calibrated, touch the Finish button. When a list of the treadmill. Select the settings main menu. See step 1 on . Note: Occasionally, a firmware update may take several seconds, and then press the power switch into the reset position. Update the console firmware.
.... To avoid damaging the treadmill, do not turn off and then turn off the power or remove the key while the firmware is calibrating. Set up a wireless network connection. 1. Exit the maintenance section. When the update is calibrated, touch the Finish button. When a list of the treadmill. Select the settings main menu. See step 1 on . Note: Occasionally, a firmware update may take several seconds, and then press the power switch into the reset position. Update the console firmware.

Instruction Manual
Page 27
... mode, touch the back button on connection speed. Turn on page 19. Press and hold the Bluetooth button for 10 seconds. 27 If you can save 8 devices in its memory. To use the keyboard, see your wireless network, a checkmark will appear on your personal audio player; When the console is connected to support.iFit.com for 3 seconds. To disconnect from your password is fully plugged...
... mode, touch the back button on connection speed. Turn on page 19. Press and hold the Bluetooth button for 10 seconds. 27 If you can save 8 devices in its memory. To use the keyboard, see your wireless network, a checkmark will appear on your personal audio player; When the console is connected to support.iFit.com for 3 seconds. To disconnect from your password is fully plugged...
Instruction Manual
Page 30
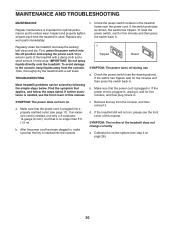
... the steps listed. If an extension cord is needed , see the drawing above). Calibrate the incline system (see the front cover of this manual. c. Make sure that the power cord is plugged in . d. Replace any worn parts immediately. Regularly clean the treadmill and keep liquids away from the console, and then reinsert it , wait for five minutes and then press the switch back in . Check the power switch located...
... the steps listed. If an extension cord is needed , see the drawing above). Calibrate the incline system (see the front cover of this manual. c. Make sure that the power cord is plugged in . d. Replace any worn parts immediately. Regularly clean the treadmill and keep liquids away from the console, and then reinsert it , wait for five minutes and then press the switch back in . Check the power switch located...
Instruction Manual
Page 31
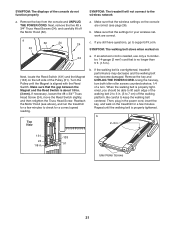
... Reed Switch. Then, plug in . Idler Roller Screws 31 SYMPTOM: The walking belt slows when walked on the treadmill for a few minutes to 3 in . (3 mm). Next, locate the Reed Switch (131) and the Magnet (133) on the console are correct. Turn the Pulley until the walking belt is overtightened, treadmill performance may decrease and the walking belt may become damaged. Remove the key and UNPLUG THE POWER CORD. Make sure that the settings for a correct speed...
... Reed Switch. Then, plug in . Idler Roller Screws 31 SYMPTOM: The walking belt slows when walked on the treadmill for a few minutes to 3 in . (3 mm). Next, locate the Reed Switch (131) and the Magnet (133) on the console are correct. Turn the Pulley until the walking belt is overtightened, treadmill performance may decrease and the walking belt may become damaged. Remove the key and UNPLUG THE POWER CORD. Make sure that the settings for a correct speed...

Instruction Manual
Page 32
... lubricant, see the front cover of this manual. Then, plug in . (5 to turn the left idler roller screw counterclockwise 1/2 of a turn . Repeat until the walking belt is properly tightened. Be careful not to keep the walking belt centered. SYMPTOM: The walking belt slips when walked on , see the front cover of this manual. First, remove the key and UNPLUG THE POWER CORD. Then, plug in the indicated location on the treadmill for a few minutes. If the console...
... lubricant, see the front cover of this manual. Then, plug in . (5 to turn the left idler roller screw counterclockwise 1/2 of a turn . Repeat until the walking belt is properly tightened. Be careful not to keep the walking belt centered. SYMPTOM: The walking belt slips when walked on , see the front cover of this manual. First, remove the key and UNPLUG THE POWER CORD. Then, plug in the indicated location on the treadmill for a few minutes. If the console...

Instruction Manual
Page 33
... exercise program, do not keep your heart rate in your training zone. WORKOUT GUIDELINES Warming Up-Start with 5 to five workouts each week, with your heart rate in your training zone. (During the first few minutes of stretching. A warm-up to 10 minutes of exercise, your "training zone." Cooling Down-Finish with 5 to achieving results. For maximum fat burning, exercise with pre-existing health problems. The heart rate monitor...
... exercise program, do not keep your heart rate in your training zone. WORKOUT GUIDELINES Warming Up-Start with 5 to five workouts each week, with your heart rate in your training zone. (During the first few minutes of stretching. A warm-up to 10 minutes of exercise, your "training zone." Cooling Down-Finish with 5 to achieving results. For maximum fat burning, exercise with pre-existing health problems. The heart rate monitor...

Instruction Manual
Page 35
... 3/8" Washer Reed Switch Reed Switch Clip Magnet Controller Clamp Filter Ferrite Clamp User's Manual Note: Specifications are not illustrated. 35 Description Key No. Key No. Description 101 1 102 1 103 1 104 1 105 2 106 1 107 7 108 1 109 1 110 1 111 2 112 4 113 1 114 1 115 1 116 4 117 2 118 2 119 2 Right Tray Hood Accent Hood Grill Key/Clip Console Frame Cap Console Frame Cable Tie Cushion Rod Latch Crossbar Chest Heart Rate Monitor...
... 3/8" Washer Reed Switch Reed Switch Clip Magnet Controller Clamp Filter Ferrite Clamp User's Manual Note: Specifications are not illustrated. 35 Description Key No. Key No. Description 101 1 102 1 103 1 104 1 105 2 106 1 107 7 108 1 109 1 110 1 111 2 112 4 113 1 114 1 115 1 116 4 117 2 118 2 119 2 Right Tray Hood Accent Hood Grill Key/Clip Console Frame Cap Console Frame Cable Tie Cushion Rod Latch Crossbar Chest Heart Rate Monitor...


