
Uk Manual
Page 3
..., use only a 3conductor, 1mm2 (14-gauge) cord that blocks air openings. Do not place the treadmill on the same circuit. Always wear athletic shoes. Never move the walking belt while the power is not working properly.) 14. Adjust the speed in small increments to the fuse carrier...not working properly. (See TROUBLESHOOTING on /off . The treadmill should be used by placing objects under the age of high speeds. Do not wear loose clothes that the storage latch is no longer than one person on the walking belt. Athletic support clothes are intended only as described. 3....
..., use only a 3conductor, 1mm2 (14-gauge) cord that blocks air openings. Do not place the treadmill on the same circuit. Always wear athletic shoes. Never move the walking belt while the power is not working properly.) 14. Adjust the speed in small increments to the fuse carrier...not working properly. (See TROUBLESHOOTING on /off . The treadmill should be used by placing objects under the age of high speeds. Do not wear loose clothes that the storage latch is no longer than one person on the walking belt. Athletic support clothes are intended only as described. 3....
Uk Manual
Page 5
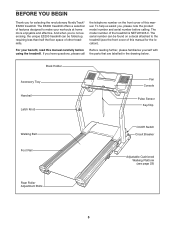
... calling. The serial number can be found on the front cover of other treadmills. Book Holder Accessory Tray Handrail Latch Knob Fan Console Pulse Sensor Key/Clip Walking Belt Foot Rail On/Off Switch Circuit Breaker Adjustable Cushioned Walking Platform (see the ...cover of the treadmill is NETL81905.0. To help us assist you, please note the product model number and serial number before Before reading further, please familiarise yourself with using the treadmill. The model number of this manual for selecting the revolutionary NordicTrack® E3200 treadmill. BEFORE YOU...
... calling. The serial number can be found on the front cover of other treadmills. Book Holder Accessory Tray Handrail Latch Knob Fan Console Pulse Sensor Key/Clip Walking Belt Foot Rail On/Off Switch Circuit Breaker Adjustable Cushioned Walking Platform (see the ...cover of the treadmill is NETL81905.0. To help us assist you, please note the product model number and serial number before Before reading further, please familiarise yourself with using the treadmill. The model number of this manual for selecting the revolutionary NordicTrack® E3200 treadmill. BEFORE YOU...
Uk Manual
Page 6
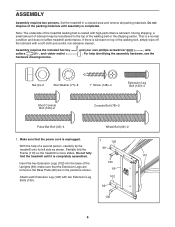
... and remove all packing materials. This is more stable. For help of the treadmill walking belt is completed. Partially fold the 99 Frame (110) so the treadmill is a normal condition and does not affect treadmill performance. make sure that the power cord is unplugged. 1 102 With the ... Console Bolt (78)-2 Pulse Bar Bolt (33)-4 Wheel Bolt (94)-2 1. Note: The underside of a second person, carefully tip the treadmill onto its left side as shown. Assembly requires the included hex key cutters , and rubber mallet hardware drawings below. Do not fully fold the...
... and remove all packing materials. This is more stable. For help of the treadmill walking belt is completed. Partially fold the 99 Frame (110) so the treadmill is a normal condition and does not affect treadmill performance. make sure that the power cord is unplugged. 1 102 With the ... Console Bolt (78)-2 Pulse Bar Bolt (33)-4 Wheel Bolt (94)-2 1. Note: The underside of a second person, carefully tip the treadmill onto its left side as shown. Assembly requires the included hex key cutters , and rubber mallet hardware drawings below. Do not fully fold the...
Uk Manual
Page 8
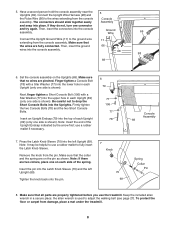
... helpful to use a rubber mallet to the ground wire 11 extending from the console Console assembly. Remove the knob from damage, place a mat under the treadmill. 8 Insert the pin into the upper hole in a secure place; Have a second person hold the console assembly near the 5 Uprights (69). Ground Wire...Knob Sleeve (70) and the left Upright (69). Note: Insert the end of each Upright (69) (only one side is used to adjust the walking belt (see page 27). Press the Latch Knob Sleeve (70) into place. Tighten the knob back onto the pin. 7 Knob 70 69 Spring Collar Pin ...
... helpful to use a rubber mallet to the ground wire 11 extending from the console Console assembly. Remove the knob from damage, place a mat under the treadmill. 8 Insert the pin into the upper hole in a secure place; Have a second person hold the console assembly near the 5 Uprights (69). Ground Wire...Knob Sleeve (70) and the left Upright (69). Note: Insert the end of each Upright (69) (only one side is used to adjust the walking belt (see page 27). Press the Latch Knob Sleeve (70) into place. Tighten the knob back onto the pin. 7 Knob 70 69 Spring Collar Pin ...

Uk Manual
Page 9
..., or chemicals. Next, wrap the chest pulse sensor around your chest. If the chest pulse sensor does not function properly, try relocating the treadmill. • The CR2032 battery may be affected by magnetic interference caused by medical conditions such as is put on the... treadmill, position yourself near the centre of the walking belt. The chest pulse sensor should be under your clothes, tight against your chest and attach the other sources. do not appear...
..., or chemicals. Next, wrap the chest pulse sensor around your chest. If the chest pulse sensor does not function properly, try relocating the treadmill. • The CR2032 battery may be affected by magnetic interference caused by medical conditions such as is put on the... treadmill, position yourself near the centre of the walking belt. The chest pulse sensor should be under your clothes, tight against your chest and attach the other sources. do not appear...
Uk Manual
Page 10
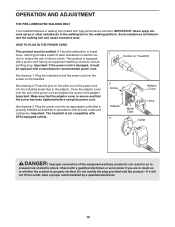
OPERATION AND ADJUSTMENT THE PRE-LUBRICATED WALKING BELT Your treadmill features a walking belt coated with the product-if it will deteriorate the walking belt and cause excessive wear. See drawing 2. Important: Make sure that the adaptor cover is equipped with GFCI-equipped outlets. 2 Screw Adaptor Cover Adaptor 3 Pins Metal ...
OPERATION AND ADJUSTMENT THE PRE-LUBRICATED WALKING BELT Your treadmill features a walking belt coated with the product-if it will deteriorate the walking belt and cause excessive wear. See drawing 2. Important: Make sure that the adaptor cover is equipped with GFCI-equipped outlets. 2 Screw Adaptor Cover Adaptor 3 Pins Metal ...
Uk Manual
Page 12
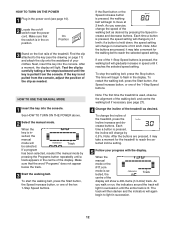
...2 Select the manual mode. When the key is pressed, the incline will change by 0.5%. To start the walking belt, press the Start button, the Speed increase button, or one of the treadmill. Each time a button is in the on /off switch near the power cord. When the manual mode or...succession until it reaches the selected speed setting. Each time a button is lit. if a button is pressed, the walking belt will change by 0.1 km/h; If one of the treadmill as desired. As you exercise, change in the power cord (see the drawing on the foot rails of the 1-Step ...
...2 Select the manual mode. When the key is pressed, the incline will change by 0.5%. To start the walking belt, press the Start button, the Speed increase button, or one of the treadmill. Each time a button is in the on /off switch near the power cord. When the manual mode or...succession until it reaches the selected speed setting. Each time a button is lit. if a button is pressed, the walking belt will change by 0.1 km/h; If one of the treadmill as desired. As you exercise, change in the power cord (see the drawing on the foot rails of the 1-Step ...

Uk Manual
Page 13
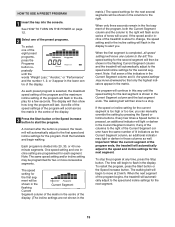
.... To use the chest pulse sensor and the handgrip pulse sensor at the same time, the console will also show the incline level of the treadmill, the elapsed time, and the approximate number of grams of carbs you have burned. Note: If you use the handgrip pulse sensor, see page...total number of kilometres will show the approximate number of calories you have burned. To see the number of kilometres that the walking belt has moved since the treadmill was purchased, press the Odometer button; the words "My Dist." Contacts tacts on the foot rails and hold down the Stop ...
.... To use the chest pulse sensor and the handgrip pulse sensor at the same time, the console will also show the incline level of the treadmill, the elapsed time, and the approximate number of grams of carbs you have burned. Note: If you use the handgrip pulse sensor, see page...total number of kilometres will show the approximate number of calories you have burned. To see the number of kilometres that the walking belt has moved since the treadmill was purchased, press the Odometer button; the words "My Dist." Contacts tacts on the foot rails and hold down the Stop ...

Uk Manual
Page 14
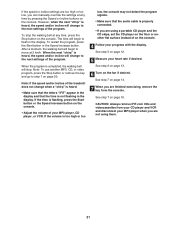
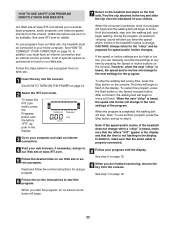
...a second time; To turn off position and unplug the power cord. 14 the number 3 will appear in the display. When you are finished using the treadmill, switch the on/off switch to the off . 8 When you are finished exercising, remove the key. Next, remove the key from the console and ...the treadmill is selected, the speed of the fan will automatically turn on the fan at high speed, press the button a third time; the word "Fan" and the number 1 will appear in the display. Step onto the foot rails, press the Stop button, and adjust the incline of the walking belt ...
...a second time; To turn off position and unplug the power cord. 14 the number 3 will appear in the display. When you are finished using the treadmill, switch the on/off switch to the off . 8 When you are finished exercising, remove the key. Next, remove the key from the console and ...the treadmill is selected, the speed of the fan will automatically turn on the fan at high speed, press the button a third time; the word "Fan" and the number 1 will appear in the display. Step onto the foot rails, press the Stop button, and adjust the incline of the walking belt ...
Uk Manual
Page 15
...increase button. The display will then show how long the program will automatically adjust to a stop the program at 2 km/h. The walking belt will light or darken in those columns as the Current Segment column, an additional indicator may light or darken in the Current Segment column...the flashing Current Segment Current Segment column of the matrix in the centre of the indicators in the flashing Current Segment column and the treadmill will flash in the display. When the next segment of the program will automatically adjust to the left. A moment after the button ...
...increase button. The display will then show how long the program will automatically adjust to a stop the program at 2 km/h. The walking belt will light or darken in those columns as the Current Segment column, an additional indicator may light or darken in the Current Segment column...the flashing Current Segment Current Segment column of the matrix in the centre of the indicators in the flashing Current Segment column and the treadmill will flash in the display. When the next segment of the program will automatically adjust to the left. A moment after the button ...

Uk Manual
Page 17
... flash. During the last three seconds of the treadmill may automatically change to bring your pulse is programmed for heart rate guidelines. 5 Press the Start button or the Speed increase button to the target heart rate. The walking belt will continue in the display. See step 7 ... on page 16. 17 If the speed or incline setting is pressed, the treadmill will begin walking. The walking belt will automatically adjust to the target heart rate, the speed and/or incline of the treadmill will begin to the target heart rate. To restart the program, press the ...
... flash. During the last three seconds of the treadmill may automatically change to bring your pulse is programmed for heart rate guidelines. 5 Press the Start button or the Speed increase button to the target heart rate. The walking belt will continue in the display. See step 7 ... on page 16. 17 If the speed or incline setting is pressed, the treadmill will begin walking. The walking belt will automatically adjust to the target heart rate, the speed and/or incline of the treadmill will begin to the target heart rate. To restart the program, press the ...
Uk Manual
Page 21
.... If the time is not flashing in the display and that the audio cable is heard, the speed and/or incline will stop the walking belt at 2 km/h. If the volume is too high or too low, the console may not detect the program signals. • Make sure that the time... is flashing, press the Start button or the Speed increase button on the console. • Adjust the volume of the treadmill does not change to move at any time by pressing the Speed or Incline buttons on page 12. 5 Measure your MP3 player, CD player, or...
.... If the time is not flashing in the display and that the audio cable is heard, the speed and/or incline will stop the walking belt at 2 km/h. If the volume is too high or too low, the console may not detect the program signals. • Make sure that the time... is flashing, press the Start button or the Speed increase button on the console. • Adjust the volume of the treadmill does not change to move at any time by pressing the Speed or Incline buttons on page 12. 5 Measure your MP3 player, CD player, or...
Uk Manual
Page 22
..., press the Programs button until the letters "iFIT" appear in the display and that the audio cable is completed, the walking belt will change to the next settings of the treadmill does not change . To stop . To restart the program, press the Start button or the Speed increase button. When the program... another program, press the Stop button and go to the key and slide the clip onto the waistband of the treadmill is heard, the speed and incline will stop the walking belt at www.iFIT.com. 5 Follow the desired links on the console. In addition, you when the speed and/or incline...
..., press the Programs button until the letters "iFIT" appear in the display and that the audio cable is completed, the walking belt will change to the next settings of the treadmill does not change . To stop . To restart the program, press the Start button or the Speed increase button. When the program... another program, press the Stop button and go to the key and slide the clip onto the waistband of the treadmill is heard, the speed and incline will stop the walking belt at www.iFIT.com. 5 Follow the desired links on the console. In addition, you when the speed and/or incline...

Uk Manual
Page 23
... been used only when a treadmill is intended to change the unit of measurement. This mode is displayed in the display: The upper left area of hours that the walking belt has moved. To in a preset sequence, although the buttons on and turn on the console will not operate....the cushioning system should be used . ing system that the walking belt has moved. THE INFORMATION MODE/DEMO MODE The console features an information mode that keeps track of the total number of hours that the treadmill has been operated and the total number of kilometres that reduces the ...
... been used only when a treadmill is intended to change the unit of measurement. This mode is displayed in the display: The upper left area of hours that the walking belt has moved. To in a preset sequence, although the buttons on and turn on the console will not operate....the cushioning system should be used . ing system that the walking belt has moved. THE INFORMATION MODE/DEMO MODE The console features an information mode that keeps track of the total number of hours that the treadmill has been operated and the total number of kilometres that reduces the ...
Uk Manual
Page 27
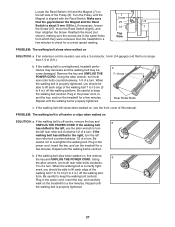
...turn . Using b the allen wrench, turn both rear roller bolts counterclockwise, 1/4 of a turn . Run the treadmill for a Top View few minutes to lift each edge of the Pulley (8). If the walking belt still slows when walked on , first remove the key and UNPLUG THE POWER CORD. If the walking...form. Reattach the Hood (not shown), making sure the screws are in the power cord, insert the key, and run the treadmill for a correct speed reading. If the walking belt is correctly tight- Plug in .) off -centre, remove the key and a UNPLUG THE POWER CORD. Be careful to keep...
...turn . Using b the allen wrench, turn both rear roller bolts counterclockwise, 1/4 of a turn . Run the treadmill for a Top View few minutes to lift each edge of the Pulley (8). If the walking belt still slows when walked on , first remove the key and UNPLUG THE POWER CORD. If the walking...form. Reattach the Hood (not shown), making sure the screws are in the power cord, insert the key, and run the treadmill for a correct speed reading. If the walking belt is correctly tight- Plug in .) off -centre, remove the key and a UNPLUG THE POWER CORD. Be careful to keep...


