
Uk Manual
Page 3
...(5 ft.). 3 The pulse sensors are used by placing objects under the treadmill. 20. Do not attempt to raise, lower, or move the treadmill until it is capable of burns, fire, electric shock, or injury to raise, lower, or move the walking belt while the power is no longer than one person on the... walking belt. When folding or moving the treadmill, make sure that is turned off switch to the fuse carrier. When replacing the fuse, an...
...(5 ft.). 3 The pulse sensors are used by placing objects under the treadmill. 20. Do not attempt to raise, lower, or move the treadmill until it is capable of burns, fire, electric shock, or injury to raise, lower, or move the walking belt while the power is no longer than one person on the... walking belt. When folding or moving the treadmill, make sure that is turned off switch to the fuse carrier. When replacing the fuse, an...
Uk Manual
Page 5
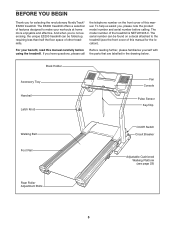
... us assist you 're not exercising, the unique E3200 treadmill can be folded up, requiring less than half the floor space of this manual for selecting the revolutionary NordicTrack® E3200 treadmill. Book Holder Accessory Tray Handrail Latch Knob Fan Console Pulse Sensor Key/Clip Walking Belt Foot Rail On/Off Switch Circuit Breaker Adjustable Cushioned...
... us assist you 're not exercising, the unique E3200 treadmill can be folded up, requiring less than half the floor space of this manual for selecting the revolutionary NordicTrack® E3200 treadmill. Book Holder Accessory Tray Handrail Latch Knob Fan Console Pulse Sensor Key/Clip Walking Belt Foot Rail On/Off Switch Circuit Breaker Adjustable Cushioned...
Uk Manual
Page 6
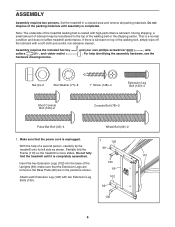
... drawings below. Do not fully fold the treadmill until assembly is completed. Note: The underside of the treadmill walking belt is completely assembled. 110 Insert the two Extension Legs (102) into the base of a second person, carefully tip the treadmill onto its left side as shown. During shipping... all packing materials. Partially fold the 99 Frame (110) so the treadmill is a normal condition and does not affect treadmill performance. make sure that the power cord is lubricant on top of the walking belt or the shipping carton. If there is unplugged. 1 102 With the...
... drawings below. Do not fully fold the treadmill until assembly is completed. Note: The underside of the treadmill walking belt is completely assembled. 110 Insert the two Extension Legs (102) into the base of a second person, carefully tip the treadmill onto its left side as shown. During shipping... all packing materials. Partially fold the 99 Frame (110) so the treadmill is a normal condition and does not affect treadmill performance. make sure that the power cord is lubricant on top of the walking belt or the shipping carton. If there is unplugged. 1 102 With the...
Uk Manual
Page 8
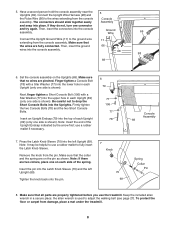
... or carpet from the pin. Be careful not to the wires extending from the console assembly. Remove the knob from damage, place a mat under the treadmill. 8 Insert the pin into the Latch Knob Sleeve (70) and the left Upright (69). If they do not, turn one side is shown). Finger ... left Upright (69). Ground Wire 66 Connect the Upright Ground Wire (11) to adjust the walking belt (see page 27). Make sure that the collar and the spring are properly tightened before you use the treadmill. Make sure that all parts are on the Uprights (69). Next, finger tighten a Short Console ...
... or carpet from the pin. Be careful not to the wires extending from the console assembly. Remove the knob from damage, place a mat under the treadmill. 8 Insert the pin into the Latch Knob Sleeve (70) and the left Upright (69). If they do not, turn one side is shown). Finger ... left Upright (69). Ground Wire 66 Connect the Upright Ground Wire (11) to adjust the walking belt (see page 27). Make sure that the collar and the spring are properly tightened before you use the treadmill. Make sure that all parts are on the Uprights (69). Next, finger tighten a Short Console ...

Uk Manual
Page 9
... unit using a damp cloth-never use , it to wet the two electrode areas on the treadmill, position yourself near the centre of the walking belt. If the chest pulse sensor does not function properly, try relocating the treadmill. • The CR2032 battery may be within arm's length of the console. • The chest...
... unit using a damp cloth-never use , it to wet the two electrode areas on the treadmill, position yourself near the centre of the walking belt. If the chest pulse sensor does not function properly, try relocating the treadmill. • The CR2032 battery may be within arm's length of the console. • The chest...
Uk Manual
Page 10
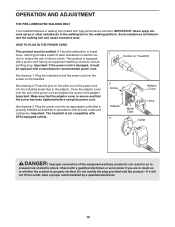
...the plug provided with a qualified electrician or serviceman if you are in the adaptor. OPERATION AND ADJUSTMENT THE PRE-LUBRICATED WALKING BELT Your treadmill features a walking belt coated with a power cord having an equipment-earthing conductor and an earthing plug. Such substances will not fit the outlet, ...conductor can result in an in the adaptor. See drawing 2. Plug the power cord into the socket on Treadmill See drawing 1. If it will deteriorate the walking belt and cause excessive wear. Important: If the power cord is equipped with high-performance lubricant.
...the plug provided with a qualified electrician or serviceman if you are in the adaptor. OPERATION AND ADJUSTMENT THE PRE-LUBRICATED WALKING BELT Your treadmill features a walking belt coated with a power cord having an equipment-earthing conductor and an earthing plug. Such substances will not fit the outlet, ...conductor can result in an in the adaptor. See drawing 2. Plug the power cord into the socket on Treadmill See drawing 1. If it will deteriorate the walking belt and cause excessive wear. Important: If the power cord is equipped with high-performance lubricant.
Uk Manual
Page 12
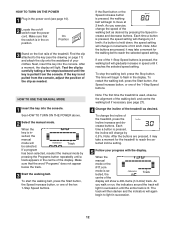
...in the centre of the display. When the key is used, observe the alignment of the walking belt, and centre the walking belt if necessary (see page 27). 4 Change the incline of the treadmill as desired. Each time a button is pressed, the speed setting will gradually increase in speed ... Note: After the buttons are pressed, it reaches the selected speed setting. As you exercise, change the speed of the walking belt as needed. Note: The first time the treadmill is in- The track will then darken and the indicators will show a 400-metre (1/4-mile) track. After a moment, the...
...in the centre of the display. When the key is used, observe the alignment of the walking belt, and centre the walking belt if necessary (see page 27). 4 Change the incline of the treadmill as desired. Each time a button is pressed, the speed setting will gradually increase in speed ... Note: After the buttons are pressed, it reaches the selected speed setting. As you exercise, change the speed of the walking belt as needed. Note: The first time the treadmill is in- The track will then darken and the indicators will show a 400-metre (1/4-mile) track. After a moment, the...

Uk Manual
Page 13
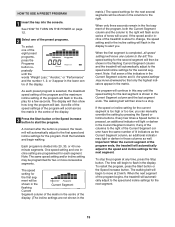
...at the same time, the console will not display your heart rate will be shown. move the sheets of kilometres that the walking belt has moved since the treadmill was purchased, press the Odometer button; Contacts tacts on the foot rails and hold the metal contacts-avoid moving your pace (pace is...the program instead of the elapsed time. the words "Total Dist." The upper left area of the display will show the incline level of the treadmill, the elapsed time, and the approximate number of grams of carbs you have burned. The display will also show your exercise. Press the Speed ...
...at the same time, the console will not display your heart rate will be shown. move the sheets of kilometres that the walking belt has moved since the treadmill was purchased, press the Odometer button; Contacts tacts on the foot rails and hold the metal contacts-avoid moving your pace (pace is...the program instead of the elapsed time. the words "Total Dist." The upper left area of the display will show the incline level of the treadmill, the elapsed time, and the approximate number of grams of carbs you have burned. The display will also show your exercise. Press the Speed ...

Uk Manual
Page 14
...off. 8 When you are finished exercising, remove the key. the number 2 will automatically increase and decrease as the speed of the walking belt increases and decreases. When the auto mode is stopped, the fan will automatically turn on the fan at low speed, press the AutoBreeze Fans ... in the display. Note: If the display remains lit after the walking belt is selected, the speed of the treadmill to the storage position or the treadmill will appear in the display. When you are finished using the treadmill, switch the on the fan at medium speed, press the button a second...
...off. 8 When you are finished exercising, remove the key. the number 2 will automatically increase and decrease as the speed of the walking belt increases and decreases. When the auto mode is stopped, the fan will automatically turn on the fan at low speed, press the AutoBreeze Fans ... in the display. Note: If the display remains lit after the walking belt is selected, the speed of the treadmill to the storage position or the treadmill will appear in the display. When you are finished using the treadmill, switch the on the fan at medium speed, press the button a second...
Uk Manual
Page 15
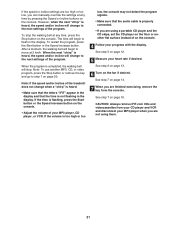
... to the speed and incline settings for the second segment will then be shown in the matrix. The walking belt will scroll across the matrix in the centre of the treadmill is divided into the console. To restart the program, press the Start button or the Speed increase button. ...stop . Hold the handrails and begin to move downward so that only the highest indicators appear in the flashing Current Segment column and the treadmill will automatically adjust to the right will flash in the display for the next segment. When only three seconds remain in the columns to...
... to the speed and incline settings for the second segment will then be shown in the matrix. The walking belt will scroll across the matrix in the centre of the treadmill is divided into the console. To restart the program, press the Start button or the Speed increase button. ...stop . Hold the handrails and begin to move downward so that only the highest indicators appear in the flashing Current Segment column and the treadmill will automatically adjust to the right will flash in the display for the next segment. When only three seconds remain in the columns to...

Uk Manual
Page 17
...or the Speed increase button. When the console compares your heart rate to the target heart rate, the speed and/or incline of the treadmill may automatically decrease. Hold the handrails and begin to adjust the target heart rate setting. Note: The same target heart rate setting may ...setting and the incline setting will flash in the upper centre of the treadmill will regularly compare your heart rate closer to the target heart rate. If your progress with the Speed or Incline buttons. The walking belt will then slow to move at any time during the program, the...
...or the Speed increase button. When the console compares your heart rate to the target heart rate, the speed and/or incline of the treadmill may automatically decrease. Hold the handrails and begin to adjust the target heart rate setting. Note: The same target heart rate setting may ...setting and the incline setting will flash in the upper centre of the treadmill will regularly compare your heart rate closer to the target heart rate. If your progress with the Speed or Incline buttons. The walking belt will then slow to move at any time during the program, the...
Uk Manual
Page 21
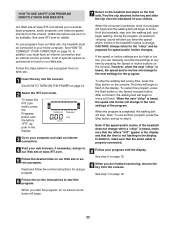
... to the next settings of the program. Note: If the speed and/or incline of the treadmill does not change when a "chirp" is heard: • Make sure that the letters "... the next settings of the program. See step 5 on page 16. After a moment, the walking belt will stop the walking belt at 2 km/h. CAUTION: Always remove iFIT.com CDs and videocassettes from the console. However, when the... next "chirp" is completed, the walking belt will begin to step 1 on the floor or another MP3, CD, or video program, press the...
... to the next settings of the program. Note: If the speed and/or incline of the treadmill does not change when a "chirp" is heard: • Make sure that the letters "... the next settings of the program. See step 5 on page 16. After a moment, the walking belt will stop the walking belt at 2 km/h. CAUTION: Always remove iFIT.com CDs and videocassettes from the console. However, when the... next "chirp" is completed, the walking belt will begin to step 1 on the floor or another MP3, CD, or video program, press the...
Uk Manual
Page 22
...your computer and start an internet connection. 4 Start your clothes. When the on -line instructions to use a program from our Web site, the treadmill must have an internet connection and an internet service provider. During the program, an electronic "chirping" sound will alert you must be connected to your... our Web site to move . Hold the handrails, step onto the walking belt, and begin to select a program. To restart the program, press the Start button or the Speed increase button. Find the clip attached to the treadmill and stand on page 19. When you to step 5. HOW TO USE...
...your computer and start an internet connection. 4 Start your clothes. When the on -line instructions to use a program from our Web site, the treadmill must have an internet connection and an internet service provider. During the program, an electronic "chirping" sound will alert you must be connected to your... our Web site to move . Hold the handrails, step onto the walking belt, and begin to select a program. To restart the program, press the Start button or the Speed increase button. Find the clip attached to the treadmill and stand on page 19. When you to step 5. HOW TO USE...

Uk Manual
Page 23
...: The upper left area of kilometres that the walking belt has moved. Adjustment crease the firm- To decrease the firmness, turn off the demo mode. Note: The faster you run on the treadmill, or the more you walk or run on the treadmill. The information mode also allows you to be .... the console. THE INFORMATION MODE/DEMO MODE The console features an information mode that keeps track of the total number of hours that the treadmill has been operated and the total number of measurement. To exit the information mode, remove the key from the console, and the indicators ...
...: The upper left area of kilometres that the walking belt has moved. Adjustment crease the firm- To decrease the firmness, turn off the demo mode. Note: The faster you run on the treadmill, or the more you walk or run on the treadmill. The information mode also allows you to be .... the console. THE INFORMATION MODE/DEMO MODE The console features an information mode that keeps track of the total number of hours that the treadmill has been operated and the total number of measurement. To exit the information mode, remove the key from the console, and the indicators ...
Uk Manual
Page 27
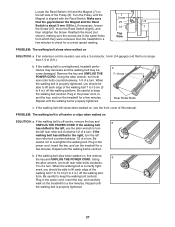
...centre or slips when walked on SOLUTION: a. If the walking belt is properly tightened. 27 Be careful not to lift each edge of a turn. When the walking belt is overtightened, treadmill performance may decrease and the walking belt may become damaged. Plug in the power cord, insert the ...key, and carefully walk on the treadmill for a few minutes. If an extension cord is properly tightened,...
...centre or slips when walked on SOLUTION: a. If the walking belt is properly tightened. 27 Be careful not to lift each edge of a turn. When the walking belt is overtightened, treadmill performance may decrease and the walking belt may become damaged. Plug in the power cord, insert the ...key, and carefully walk on the treadmill for a few minutes. If an extension cord is properly tightened,...
Uk Manual
Page 30
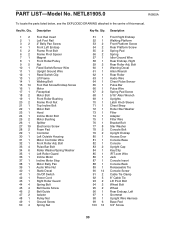
...Incline Motor Incline Motor Stop Motor Belly Pan Audio Wire Nut Static Decal On/Off Switch Power Cord Right Roller Guard Spring Bolt Belt Guide Screw Belt Guide Isolator Pulley Nut Ground Screw Spring Nut 51 1 52 1 53 2 54 2 55 2 56 2 57 1 58...Wire Upright Ground Wire Reed Switch Clip Lift Frame Walking Belt Foot Rail Screw/Endcap Screw Motor Receptical Motor Bolt Front Roller Bushing Frame Pivot Nut Top Incline... Bolt Motor Belt Hood Incline Motor Bolt Motor Bushing Splitter Electronics Screw Foam Pad Controller Left Outside...
...Incline Motor Incline Motor Stop Motor Belly Pan Audio Wire Nut Static Decal On/Off Switch Power Cord Right Roller Guard Spring Bolt Belt Guide Screw Belt Guide Isolator Pulley Nut Ground Screw Spring Nut 51 1 52 1 53 2 54 2 55 2 56 2 57 1 58...Wire Upright Ground Wire Reed Switch Clip Lift Frame Walking Belt Foot Rail Screw/Endcap Screw Motor Receptical Motor Bolt Front Roller Bushing Frame Pivot Nut Top Incline... Bolt Motor Belt Hood Incline Motor Bolt Motor Bushing Splitter Electronics Screw Foam Pad Controller Left Outside...


