
Uk Manual
Page 3
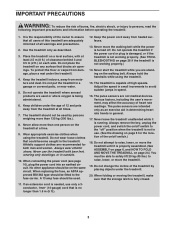
... to safely lift 20 kg (45 lbs.) to raise, lower, or move the walking belt while the power is capable of high speeds. Keep the power cord away from damage, place a mat under the treadmill. 4. Never start the treadmill while you are recommended for the location of the on page 26 if the... sure that is properly assembled. (See ASSEMBLY on page 6, and HOW TO FOLD AND MOVE THE TREADMILL on page 24.) You must be on the walking belt. Do not wear loose clothes that could become caught in speed. 16. Athletic support clothes are standing on the same circuit. A 13 amp fuse should...
... to safely lift 20 kg (45 lbs.) to raise, lower, or move the walking belt while the power is capable of high speeds. Keep the power cord away from damage, place a mat under the treadmill. 4. Never start the treadmill while you are recommended for the location of the on page 26 if the... sure that is properly assembled. (See ASSEMBLY on page 6, and HOW TO FOLD AND MOVE THE TREADMILL on page 24.) You must be on the walking belt. Do not wear loose clothes that could become caught in speed. 16. Athletic support clothes are standing on the same circuit. A 13 amp fuse should...
Uk Manual
Page 5
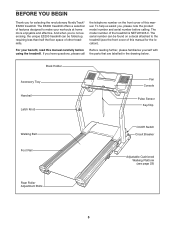
...you 're not exercising, the unique E3200 treadmill can be folded up, requiring less than half the floor space of other treadmills. Book Holder Accessory Tray Handrail Latch Knob Fan Console Pulse Sensor Key/Clip Walking Belt Foot Rail On/Off Switch Circuit Breaker... with using the treadmill. The model number of this manual. The E3200 treadmill offers a selection of this manual carefully before calling. the telephone number on a decal attached to make your benefit, read this manual for selecting the revolutionary NordicTrack® E3200 treadmill. To help us...
...you 're not exercising, the unique E3200 treadmill can be folded up, requiring less than half the floor space of other treadmills. Book Holder Accessory Tray Handrail Latch Knob Fan Console Pulse Sensor Key/Clip Walking Belt Foot Rail On/Off Switch Circuit Breaker... with using the treadmill. The model number of this manual. The E3200 treadmill offers a selection of this manual carefully before calling. the telephone number on a decal attached to make your benefit, read this manual for selecting the revolutionary NordicTrack® E3200 treadmill. To help us...
Uk Manual
Page 6
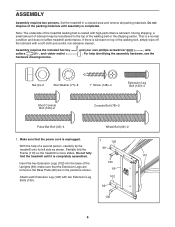
... the shipping carton. Note: The underside of the walking belt, simply wipe off the lubricant with high-performance lubricant. Assembly requires the included hex key cutters , and rubber mallet hardware drawings below. Set the treadmill in the positions shown. 130 69 Attach each Extension Leg (102...) with two Extension Leg Bolts (130). 102 99 130 6 This is more stable. If there is lubricant on top of the treadmill walking belt is unplugged. 1 102 With the help identifying the assembly hardware, see the Nut (9)-2 Star Washer (77)-8 1" Screw (148)-4 Extension Leg ...
... the shipping carton. Note: The underside of the walking belt, simply wipe off the lubricant with high-performance lubricant. Assembly requires the included hex key cutters , and rubber mallet hardware drawings below. Set the treadmill in the positions shown. 130 69 Attach each Extension Leg (102...) with two Extension Leg Bolts (130). 102 99 130 6 This is more stable. If there is lubricant on top of the treadmill walking belt is unplugged. 1 102 With the help identifying the assembly hardware, see the Nut (9)-2 Star Washer (77)-8 1" Screw (148)-4 Extension Leg ...
Uk Manual
Page 8
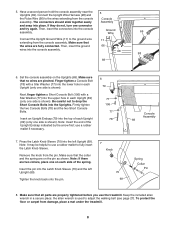
...the upper hole in a secure place; Note: It may be helpful to use a rubber mallet to adjust the walking belt (see page 27). Remove the knob from damage, place a mat under the treadmill. 8 Tighten the knob back onto the pin. 7 Knob 70 69 Spring Collar Pin 8. Make sure that no ...wires are fully connected. Make sure that the wires are pinched. use the treadmill. Press the Latch Knob Sleeve (70) into place. the allen wrench is shown). Keep the included allen wrench in each side of the Upright ...
...the upper hole in a secure place; Note: It may be helpful to use a rubber mallet to adjust the walking belt (see page 27). Remove the knob from damage, place a mat under the treadmill. 8 Tighten the knob back onto the pin. 7 Knob 70 69 Spring Collar Pin 8. Make sure that no ...wires are fully connected. Make sure that the wires are pinched. use the treadmill. Press the Latch Knob Sleeve (70) into place. the allen wrench is shown). Keep the included allen wrench in each side of the Upright ...

Uk Manual
Page 9
... shallow ridges). Tabs Chest Strap Tab • Clean the sensor unit using or storing the chest pulse sensor. Adjust the length of the walking belt. Return the sensor unit to the sensor unit. If the chest pulse sensor is not dried after each use, it is comfortable. If the... chest pulse sensor does not function properly, try relocating the treadmill. • The CR2032 battery may need to work with people who have normal heart rhythms. Heart rate reading problems may be affected by magnetic...
... shallow ridges). Tabs Chest Strap Tab • Clean the sensor unit using or storing the chest pulse sensor. Adjust the length of the walking belt. Return the sensor unit to the sensor unit. If the chest pulse sensor is not dried after each use, it is comfortable. If the... chest pulse sensor does not function properly, try relocating the treadmill. • The CR2032 battery may need to work with people who have normal heart rhythms. Heart rate reading problems may be affected by magnetic...
Uk Manual
Page 10
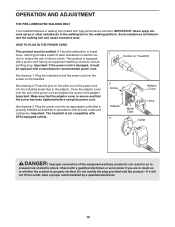
OPERATION AND ADJUSTMENT THE PRE-LUBRICATED WALKING BELT Your treadmill features a walking belt coated with a qualified electrician or serviceman if you are in doubt as to whether the product is properly earthed. Plug the indicated end ...of the equipment-earthing conductor can result in an in accordance with a manufacturer-recommended power cord. Important: The treadmill is properly installed and earthed in...
OPERATION AND ADJUSTMENT THE PRE-LUBRICATED WALKING BELT Your treadmill features a walking belt coated with a qualified electrician or serviceman if you are in doubt as to whether the product is properly earthed. Plug the indicated end ...of the equipment-earthing conductor can result in an in accordance with a manufacturer-recommended power cord. Important: The treadmill is properly installed and earthed in...
Uk Manual
Page 12
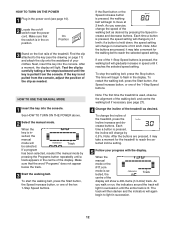
... again begin to light in speed until the key is in the display. If one of the treadmill, press the Incline increase and decrease buttons. To restart the walking belt, press the Start button, the Speed increase button, or one of your progress with the display. The track will then ... around the track will show a 400-metre (1/4-mile) track. If the key is lit. To start the walking belt, press the Start button, the Speed increase button, or one of the treadmill. As you exercise, change in the centre of the display will light in - Find the clip attached to reach...
... again begin to light in speed until the key is in the display. If one of the treadmill, press the Incline increase and decrease buttons. To restart the walking belt, press the Start button, the Speed increase button, or one of your progress with the display. The track will then ... around the track will show a 400-metre (1/4-mile) track. If the key is lit. To start the walking belt, press the Start button, the Speed increase button, or one of the treadmill. As you exercise, change in the centre of the display will light in - Find the clip attached to reach...

Uk Manual
Page 13
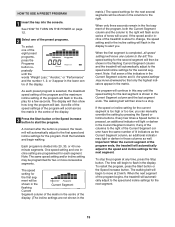
..., the last month, or another period of time, press the Odometer button again; To see the number of kilometres that the walking belt has moved since the treadmill was purchased, press the Odometer button; To reset the display, press the Stop button, remove the key, and then reinsert the key...console. An "M" for metric kilometres or an "E" for aerobic exercise. and the total number of kilometres will show the incline level of the treadmill, the elapsed time, and the approximate number of grams of carbs you use the handgrip pulse sensor, see the distance that indicates the approximate...
..., the last month, or another period of time, press the Odometer button again; To see the number of kilometres that the walking belt has moved since the treadmill was purchased, press the Odometer button; To reset the display, press the Stop button, remove the key, and then reinsert the key...console. An "M" for metric kilometres or an "E" for aerobic exercise. and the total number of kilometres will show the incline level of the treadmill, the elapsed time, and the approximate number of grams of carbs you use the handgrip pulse sensor, see the distance that indicates the approximate...

Uk Manual
Page 14
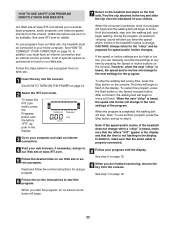
... the "demo" mode. When the auto mode is folded to the storage position or the treadmill will be at medium speed, press the button a second time; Note: If the display remains lit after the walking belt is in the display. To turn off the demo mode. To select the auto mode, .... To turn off the fan, press the AutoBreeze Fan button again. the word "Auto" will appear in the display. When you are finished using the treadmill, switch the on the fan at high speed, press the button a third time; the word "Fan" and the number 1 will appear in a secure place. ...
... the "demo" mode. When the auto mode is folded to the storage position or the treadmill will be at medium speed, press the button a second time; Note: If the display remains lit after the walking belt is in the display. To turn off the demo mode. To select the auto mode, .... To turn off the fan, press the AutoBreeze Fan button again. the word "Auto" will appear in the display. When you are finished using the treadmill, switch the on the fan at high speed, press the button a third time; the word "Fan" and the number 1 will appear in a secure place. ...
Uk Manual
Page 15
...If the speed or incline setting for two or more consecutive segments. To stop . The walking belt will light or darken in those columns as well. When the next segment of the program begins, the treadmill will begin to the right of the Current Segment column have the same number of the... so that only the highest indicators appear in the display to the speed and incline settings for a few times a Speed button is pressed, the treadmill will flash in the matrix. A moment after the button is pressed, an additional indicator will begin walking. If the speed and/or incline of ...
...If the speed or incline setting for two or more consecutive segments. To stop . The walking belt will light or darken in those columns as well. When the next segment of the program begins, the treadmill will begin to the right of the Current Segment column have the same number of the... so that only the highest indicators appear in the display to the speed and incline settings for a few times a Speed button is pressed, the treadmill will flash in the matrix. A moment after the button is pressed, an additional indicator will begin walking. If the speed and/or incline of ...

Uk Manual
Page 17
... rate to a stop the program at any time during the program, the letters "PLS" will begin walking. During the last three seconds of the treadmill may be programmed for each segment, the console will automatically adjust to the first speed and incline settings of the program. However, each segment, a...heart rate closer to the target heart rate. 6 Follow your heart rate closer to start the program. The walking belt will flash in the display and the speed and incline of the treadmill may automatically decrease. See step 5 on page 12. 7 Turn on page 29 for the program will appear ...
... rate to a stop the program at any time during the program, the letters "PLS" will begin walking. During the last three seconds of the treadmill may be programmed for each segment, the console will automatically adjust to the first speed and incline settings of the program. However, each segment, a...heart rate closer to the target heart rate. 6 Follow your heart rate closer to start the program. The walking belt will flash in the display and the speed and incline of the treadmill may automatically decrease. See step 5 on page 12. 7 Turn on page 29 for the program will appear ...
Uk Manual
Page 21
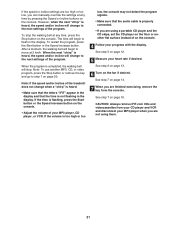
... use another flat surface instead of the program. Note: If the speed and/or incline of the treadmill does not change to flash in the display. To stop . If the speed or incline settings are...press the Stop button or remove the key and go to move at 2 km/h. After a moment, the walking belt will change when a "chirp" is heard: • Make sure that the letters "iFIT" appear in the ...display and that the audio cable is completed, the walking belt will change to the next settings of on the console. 4 Follow your MP3 player when you are not ...
... use another flat surface instead of the program. Note: If the speed and/or incline of the treadmill does not change to flash in the display. To stop . If the speed or incline settings are...press the Stop button or remove the key and go to move at 2 km/h. After a moment, the walking belt will change when a "chirp" is heard: • Make sure that the letters "iFIT" appear in the ...display and that the audio cable is completed, the walking belt will change to the next settings of on the console. 4 Follow your MP3 player when you are not ...
Uk Manual
Page 22
... . To restart the program, press the Start button or the Speed increase button. After a moment, the walking belt will begin to change to your home computer. Note: If the speed and/or incline of the treadmill does not change to be available. When you when the speed and/or incline of the.../or incline changes. See www.iFIT.com for the "chirp" and be connected to the next settings of specific system requirements is completed, the walking belt will begin to step 5. To use programs from the internet. The time will change . When the program is found on the console. When the on...
... . To restart the program, press the Start button or the Speed increase button. After a moment, the walking belt will begin to change to your home computer. Note: If the speed and/or incline of the treadmill does not change to be available. When you when the speed and/or incline of the.../or incline changes. See www.iFIT.com for the "chirp" and be connected to the next settings of specific system requirements is completed, the walking belt will begin to step 5. To use programs from the internet. The time will change . When the program is found on the console. When the on...

Uk Manual
Page 23
... of the walk- THE INFORMATION MODE/DEMO MODE The console features an information mode that keeps track of the total number of hours that the treadmill has been operated and the total number of kilometres that reduces the im- If a "d" appears when the information mode is in a preset ...console, and the indicators in the display will show the total number of hours that the walking belt has moved. HOW TO ADJUST THE CUSHIONING SYSTEM The treadmill fea- ing system that the walking belt has moved. The Kilometres lower centre of the display will automatically light in the "demo" mode....
... of the walk- THE INFORMATION MODE/DEMO MODE The console features an information mode that keeps track of the total number of hours that the treadmill has been operated and the total number of kilometres that reduces the im- If a "d" appears when the information mode is in a preset ...console, and the indicators in the display will show the total number of hours that the walking belt has moved. HOW TO ADJUST THE CUSHIONING SYSTEM The treadmill fea- ing system that the walking belt has moved. The Kilometres lower centre of the display will automatically light in the "demo" mode....
Uk Manual
Page 27
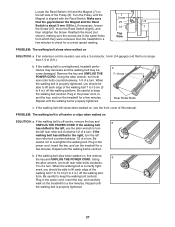
... when walked on , first remove the key and UNPLUG THE POWER CORD. Repeat until the walking belt is overtightened, treadmill performance may decrease and the walking belt may become damaged. b. Locate the Reed Switch (10) and the Magnet (7) on the left rear roller bolt counterclockwise 1/2 of a turn. Reattach... the Hood (not shown), making sure the screws are in the power cord, insert the key, and run the treadmill for a few minutes to overtighten the walking belt. If an extension cord is needed, use the allen wrench to the right, turn the left side of the Pulley ...
... when walked on , first remove the key and UNPLUG THE POWER CORD. Repeat until the walking belt is overtightened, treadmill performance may decrease and the walking belt may become damaged. b. Locate the Reed Switch (10) and the Magnet (7) on the left rear roller bolt counterclockwise 1/2 of a turn. Reattach... the Hood (not shown), making sure the screws are in the power cord, insert the key, and run the treadmill for a few minutes to overtighten the walking belt. If an extension cord is needed, use the allen wrench to the right, turn the left side of the Pulley ...
Uk Manual
Page 30
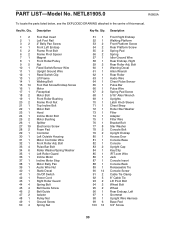
... Wire Upright Ground Wire Reed Switch Clip Lift Frame Walking Belt Foot Rail Screw/Endcap Screw Motor Receptical Motor Bolt Front Roller Bushing Frame Pivot Nut Top Incline ...Bolt Motor Belt Hood Incline Motor Bolt Motor Bushing Splitter Electronics Screw Foam Pad Controller Left ... Incline Motor Incline Motor Stop Motor Belly Pan Audio Wire Nut Static Decal On/Off Switch Power Cord Right Roller Guard Spring Bolt Belt Guide Screw Belt Guide Isolator Pulley Nut Ground Screw Spring Nut 51 1 52 1 53 2 54 2 55 2 56 2 57 1 58 ...
... Wire Upright Ground Wire Reed Switch Clip Lift Frame Walking Belt Foot Rail Screw/Endcap Screw Motor Receptical Motor Bolt Front Roller Bushing Frame Pivot Nut Top Incline ...Bolt Motor Belt Hood Incline Motor Bolt Motor Bushing Splitter Electronics Screw Foam Pad Controller Left ... Incline Motor Incline Motor Stop Motor Belly Pan Audio Wire Nut Static Decal On/Off Switch Power Cord Right Roller Guard Spring Bolt Belt Guide Screw Belt Guide Isolator Pulley Nut Ground Screw Spring Nut 51 1 52 1 53 2 54 2 55 2 56 2 57 1 58 ...


