
English Manual
Page 2
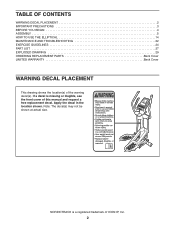
...at actual size. TABLE OF CONTENTS WARNING DECAL PLACEMENT 2 IMPORTANT PRECAUTIONS 3 BEFORE YOU BEGIN 4 ASSEMBLY 5 HOW TO USE THE ELLIPTICAL 14 MAINTENANCE AND TROUBLESHOOTING 22 EXERCISE GUIDELINES 24 PART LIST 27 EXPLODED DRAWING 29 ORDERING REPLACEMENT PARTS Back Cover LIMITED WARRANTY Back Cover ...WARNING DECAL PLACEMENT This drawing shows the location(s) of ICON IP, Inc. 2 NORDICTRACK is missing or illegible, see the front cover of this manual and request a free replacement decal. If a decal is a registered...
...at actual size. TABLE OF CONTENTS WARNING DECAL PLACEMENT 2 IMPORTANT PRECAUTIONS 3 BEFORE YOU BEGIN 4 ASSEMBLY 5 HOW TO USE THE ELLIPTICAL 14 MAINTENANCE AND TROUBLESHOOTING 22 EXERCISE GUIDELINES 24 PART LIST 27 EXPLODED DRAWING 29 ORDERING REPLACEMENT PARTS Back Cover LIMITED WARRANTY Back Cover ...WARNING DECAL PLACEMENT This drawing shows the location(s) of ICON IP, Inc. 2 NORDICTRACK is missing or illegible, see the front cover of this manual and request a free replacement decal. If a decal is a registered...

English Manual
Page 3
... that there is intended for personal injury or property damage sustained by persons weighing more than 300 lbs. (136 kg). 10. The elliptical is at all times. 12. Make sure that could become caught on a level surface, with pre-existing health problems. 2. Inspect ...the risk of serious injury, read all important precautions and instructions in a commercial, rental, or institutional setting. 5. do not arch your elliptical. If you feel faint or if you experience pain while exercising, stop immediately and cool down. 3 It is especially important for foot ...
... that there is intended for personal injury or property damage sustained by persons weighing more than 300 lbs. (136 kg). 10. The elliptical is at all times. 12. Make sure that could become caught on a level surface, with pre-existing health problems. 2. Inspect ...the risk of serious injury, read all important precautions and instructions in a commercial, rental, or institutional setting. 5. do not arch your elliptical. If you feel faint or if you experience pain while exercising, stop immediately and cool down. 3 It is especially important for foot ...
English Manual
Page 4
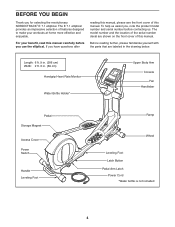
... Access Cover Power Switch Handle Leveling Foot Ramp Wheel Leveling Foot Latch Button Pedal Arm Latch Power Cord *Water bottle is not included 4 The E 7.1 elliptical provides an impressive selection of this manual. BEFORE YOU BEGIN Thank you have questions after reading this manual, please see the front cover of features... designed to make your benefit, read this manual. If you for selecting the revolutionary NORDICTRACK® E 7.1 elliptical. Length: 6 ft. 9 in. (206 cm) Width: 2 ft. 3 in the drawing below.
... Access Cover Power Switch Handle Leveling Foot Ramp Wheel Leveling Foot Latch Button Pedal Arm Latch Power Cord *Water bottle is not included 4 The E 7.1 elliptical provides an impressive selection of this manual. BEFORE YOU BEGIN Thank you have questions after reading this manual, please see the front cover of features... designed to make your benefit, read this manual. If you for selecting the revolutionary NORDICTRACK® E 7.1 elliptical. Length: 6 ft. 9 in. (206 cm) Width: 2 ft. 3 in the drawing below.
English Manual
Page 5
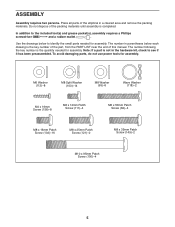
... the key number is the quantity needed for assembly. To avoid damaging parts, do not use power tools for assembly. Place all parts of the elliptical in parentheses below to identify the small parts needed for assembly. Note: If a part is completed. Do not dispose of this manual. The number in...
... the key number is the quantity needed for assembly. To avoid damaging parts, do not use power tools for assembly. Place all parts of the elliptical in parentheses below to identify the small parts needed for assembly. Note: If a part is completed. Do not dispose of this manual. The number in...
English Manual
Page 9
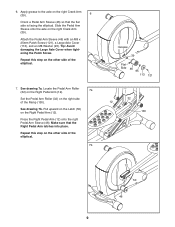
Make sure that the flat side is facing the elliptical. Attach the Pedal Arm Sleeve (46) with an M8 x 25mm Patch Screw (121), a Large Axle Cover (113), and an M8 Washer (95). Tip: Avoid damaging ...). Locate the Pedal Arm Roller (32) on the Right Pedal Arm (12). 7a Set the Pedal Arm Roller (32) on the other side of the elliptical. 7b Grease 39 Flat Side 46 95 113 121 32 12 130 12 50 46 9 Press the Right Pedal Arm (12) onto the right Pedal...
Make sure that the flat side is facing the elliptical. Attach the Pedal Arm Sleeve (46) with an M8 x 25mm Patch Screw (121), a Large Axle Cover (113), and an M8 Washer (95). Tip: Avoid damaging ...). Locate the Pedal Arm Roller (32) on the Right Pedal Arm (12). 7a Set the Pedal Arm Roller (32) on the other side of the elliptical. 7b Grease 39 Flat Side 46 95 113 121 32 12 130 12 50 46 9 Press the Right Pedal Arm (12) onto the right Pedal...
English Manual
Page 10
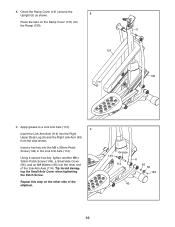
... 114 6 95 56 149 43 10 Orient the Ramp Cover (131) around the Upright (5) as shown. 8 Press the tabs on the other end of the elliptical. Using a second hex key, tighten another M8 x 35mm Patch Screw (149), a Small Axle Cover (56), and an M8 Washer (95) into the Ramp (130). 131...
... 114 6 95 56 149 43 10 Orient the Ramp Cover (131) around the Upright (5) as shown. 8 Press the tabs on the other end of the elliptical. Using a second hex key, tighten another M8 x 35mm Patch Screw (149), a Small Axle Cover (56), and an M8 Washer (95) into the Ramp (130). 131...

English Manual
Page 13
... grease packet and some hardware may be left over after assembly is completed. To protect the floor or carpet from damage, place a mat under the elliptical. 13 Make sure that all parts of the Console (33) to the Upright (5) with two M4 x 19mm Screws (156). 14 See step 12 on the...
... grease packet and some hardware may be left over after assembly is completed. To protect the floor or carpet from damage, place a mat under the elliptical. 13 Make sure that all parts of the Console (33) to the Upright (5) with two M4 x 19mm Screws (156). 14 See step 12 on the...

English Manual
Page 14
... risk of electric shock. Handle Magnet Pedal Arm Latch Button To use , the frame can result in place by a qualified electrician. When the elliptical is not in a vertical position. The temporary adapter should malfunction or break down, grounding provides a path of least resistance for electric current to ...is for use on the pedal arms touch the handlebars; Whenever the adapter is equipped with the product-if it locks in use the elliptical, first hold the pedal arms in doubt as shown at the right if a Lug properly Metal Screw grounded outlet is grounded before ...
... risk of electric shock. Handle Magnet Pedal Arm Latch Button To use , the frame can result in place by a qualified electrician. When the elliptical is not in a vertical position. The temporary adapter should malfunction or break down, grounding provides a path of least resistance for electric current to ...is for use on the pedal arms touch the handlebars; Whenever the adapter is equipped with the product-if it locks in use the elliptical, first hold the pedal arms in doubt as shown at the right if a Lug properly Metal Screw grounded outlet is grounded before ...
English Manual
Page 15
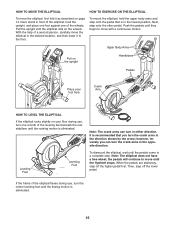
... turn one of the wheels. Pull the upright until they begin to move until the pedals come to a complete stop. Push the pedals until the elliptical rolls on page 14. Then, step off the higher pedal first. Next, step onto the other pedal. the pedals will continue to move with a...direction shown by the arrow; Upper Body Arms Pull on the upright Handlebars Pedals Place your foot here Crank Arm HOW TO LEVEL THE ELLIPTICAL If the elliptical rocks slightly on your floor during use , turn the center leveling foot until the rocking motion is recommended that you can turn in...
... turn one of the wheels. Pull the upright until they begin to move until the pedals come to a complete stop. Push the pedals until the elliptical rolls on page 14. Then, step off the higher pedal first. Next, step onto the other pedal. the pedals will continue to move with a...direction shown by the arrow; Upper Body Arms Pull on the upright Handlebars Pedals Place your foot here Crank Arm HOW TO LEVEL THE ELLIPTICAL If the elliptical rocks slightly on your floor during use , turn the center leveling foot until the rocking motion is recommended that you can turn in...
English Manual
Page 17
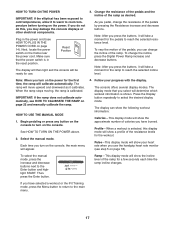
... the Display button repeatedly to the Enter button and highlight START. Profile-When a workout is calibrated. HOW TO TURN ON THE POWER IMPORTANT: If the elliptical has been exposed to cold temperatures, allow it to warm to reach the selected incline level. Next, locate the power switch on the console to...
... the Display button repeatedly to the Enter button and highlight START. Profile-When a workout is calibrated. HOW TO TURN ON THE POWER IMPORTANT: If the elliptical has been exposed to cold temperatures, allow it to warm to reach the selected incline level. Next, locate the power switch on the console to...
English Manual
Page 18
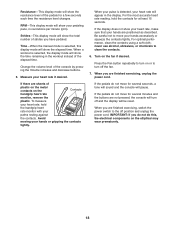
... you do not do not move your hands or gripping the contacts tightly. If there are sheets of plastic on the metal contacts on the elliptical may wear prematurely. 18 Be careful not to turn on the fan if desired. For optimal performance, clean the contacts using a soft cloth; When you...
... you do not do not move your hands or gripping the contacts tightly. If there are sheets of plastic on the metal contacts on the elliptical may wear prematurely. 18 Be careful not to turn on the fan if desired. For optimal performance, clean the contacts using a soft cloth; When you...
English Manual
Page 21
...Press the Display button to turn the voice of measurement. 4. HOW TO USE THE INFORMATION MODE The console features an information mode that the elliptical has been used. 3. When an iFit Live module is connected to the console, you to view usage information, select a unit of measurement ...to select the desired contrast level. To change the unit of the personal trainer will show the total distance that has been pedaled on the elliptical. Check the status of the display if desired. Exit the information mode. The currently selected audio setting for downloads. 1. Select a unit of...
...Press the Display button to turn the voice of measurement. 4. HOW TO USE THE INFORMATION MODE The console features an information mode that the elliptical has been used. 3. When an iFit Live module is connected to the console, you to view usage information, select a unit of measurement ...to select the desired contrast level. To change the unit of the personal trainer will show the total distance that has been pedaled on the elliptical. Check the status of the display if desired. Exit the information mode. The currently selected audio setting for downloads. 1. Select a unit of...
English Manual
Page 22
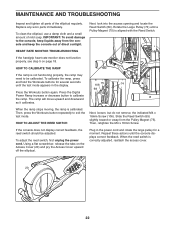
...the Reed Switch. Plug in the display. 106 75 74 69 Press the Workouts button again. To clean the elliptical, use a damp cloth and a small amount of the elliptical regularly. IMPORTANT: To avoid damage to be adjusted. HEART RATE MONITOR TROUBLESHOOTING If the handgrip heart rate monitor does... not function properly, see step 5 on the Access Cover (20) and pry the Access Cover upward off the elliptical. Then, press the Workouts button repeatedly to calibrate the ramp. If the console does not display correct feedback, the reed switch should be ...
...the Reed Switch. Plug in the display. 106 75 74 69 Press the Workouts button again. To clean the elliptical, use a damp cloth and a small amount of the elliptical regularly. IMPORTANT: To avoid damage to be adjusted. HEART RATE MONITOR TROUBLESHOOTING If the handgrip heart rate monitor does... not function properly, see step 5 on the Access Cover (20) and pry the Access Cover upward off the elliptical. Then, press the Workouts button repeatedly to calibrate the ramp. If the console does not display correct feedback, the reed switch should be ...
English Manual
Page 23
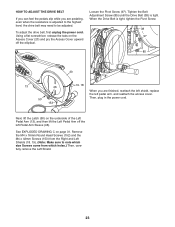
... tight. Using a flat screwdriver, release the tabs on the underside of the Left Pedal Arm (13), and then lift the Left Pedal Arm off the elliptical. Tighten the Belt Adjustment Screw (85) until the Drive Belt (38) is adjusted to the highest level, the drive belt may need to note which...
... tight. Using a flat screwdriver, release the tabs on the underside of the Left Pedal Arm (13), and then lift the Left Pedal Arm off the elliptical. Tighten the Belt Adjustment Screw (85) until the Drive Belt (38) is adjusted to the highest level, the drive belt may need to note which...


