
English Manual
Page 3
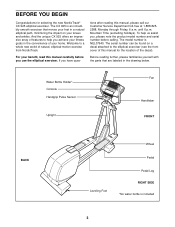
To help you have ques- Water Bottle Holder* Console Handgrip Pulse Sensor Upright Fan Handlebar FRONT BACK Leveling Foot Wheel Pedal Pedal Leg RIGHT SIDE *No water bottle is NEL07940. The CX 925 is an incredibly smooth exerciser that are labeled in the drawing below. Welcome ... number and serial number before calling. For your home. tions after reading this manual for selecting the new NordicTrack® CX 925 elliptical exerciser. And the unique CX 925 offers an impressive array of features to the elliptical exerciser (see the front cover of natural, elliptical-motion ...
To help you have ques- Water Bottle Holder* Console Handgrip Pulse Sensor Upright Fan Handlebar FRONT BACK Leveling Foot Wheel Pedal Pedal Leg RIGHT SIDE *No water bottle is NEL07940. The CX 925 is an incredibly smooth exerciser that are labeled in the drawing below. Welcome ... number and serial number before calling. For your home. tions after reading this manual for selecting the new NordicTrack® CX 925 elliptical exerciser. And the unique CX 925 offers an impressive array of features to the elliptical exerciser (see the front cover of natural, elliptical-motion ...
English Manual
Page 6
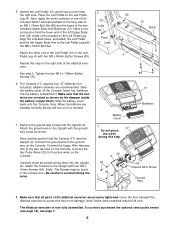
...a notch near the Upright (2). alkaline batteries are properly tightened. Connect the Upper Wire Harness (30) to the pulse wires on the Console. Attach the Console to the Upright with two M8 x 54mm Button Screws (83). Carefully insert all parts of the two indicated Upper Body Arm Bushings ...(12). 5. Have a second person hold the Console (17) near the right side. Tighten the two M10 x 108mm Button Screws (70). 6. Make sure that all excess wiring down into ...
...a notch near the Upright (2). alkaline batteries are properly tightened. Connect the Upper Wire Harness (30) to the pulse wires on the Console. Attach the Console to the Upright with two M8 x 54mm Button Screws (83). Carefully insert all parts of the two indicated Upper Body Arm Bushings ...(12). 5. Have a second person hold the Console (17) near the right side. Tighten the two M10 x 108mm Button Screws (70). 6. Make sure that all excess wiring down into ...
English Manual
Page 7
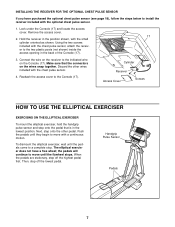
.... 4. Discard the other pedal. To dismount the elliptical exerciser, wait until the pedals come to move until they begin to a complete stop. Look under the Console (17) and locate the access cover. Push the pedals until the flywheel stops. Make sure that is in the back of the... Console (17). 3. Next, step onto the other wires included with the small cylinder oriented as shown. The elliptical exerciser does not have purchased the optional chest ...
.... 4. Discard the other pedal. To dismount the elliptical exerciser, wait until the pedals come to move until they begin to a complete stop. Look under the Console (17) and locate the access cover. Push the pedals until the flywheel stops. Make sure that is in the back of the... Console (17). 3. Next, step onto the other wires included with the small cylinder oriented as shown. The elliptical exerciser does not have purchased the optional chest ...
English Manual
Page 8
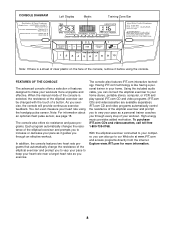
... in your computer, you can be changed with the touch of the elliptical exerciser and prompts you to make your heart rate using the console. iFIT.com CD and video programs automatically control the resistance of the elliptical exerciser and prompt you to our Web site at www.iFIT....com and access programs directly from the internet. Explore www.iFIT.com for more enjoyable and effective. When the manual mode of the console is selected, the resistance of the elliptical exerciser can also go to vary your pace as a personal trainer coaches you through an effective workout....
... in your computer, you can be changed with the touch of the elliptical exerciser and prompts you to make your heart rate using the console. iFIT.com CD and video programs automatically control the resistance of the elliptical exerciser and prompt you to our Web site at www.iFIT....com and access programs directly from the internet. Explore www.iFIT.com for more enjoyable and effective. When the manual mode of the console is selected, the resistance of the elliptical exerciser can also go to vary your pace as a personal trainer coaches you through an effective workout....
English Manual
Page 9
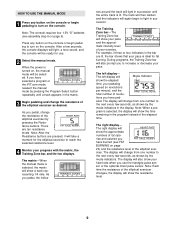
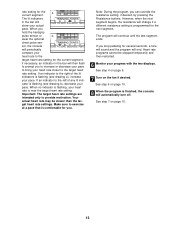
... will again begin to light in the program instead of revolu- HOW TO USE THE MANUAL MODE 1 Press any button on the console or begin pedaling to turn on page 20) and the resistance level of the elliptical exerciser as shown by pressing the Program Select button...will Mode Indicator show your exercise. tors around the track will be selected. tions you have ped- Note: The console requires four 1.5V "D" batteries (see FAT BURNING on the console. Press any button on , the manual mode will change the resistance of the elliptical exerciser. After a few seconds,...
... will again begin to light in the program instead of revolu- HOW TO USE THE MANUAL MODE 1 Press any button on the console or begin pedaling to turn on page 20) and the resistance level of the elliptical exerciser as shown by pressing the Program Select button...will Mode Indicator show your exercise. tors around the track will be selected. tions you have ped- Note: The console requires four 1.5V "D" batteries (see FAT BURNING on the console. Press any button on , the manual mode will change the resistance of the elliptical exerciser. After a few seconds,...
English Manual
Page 10
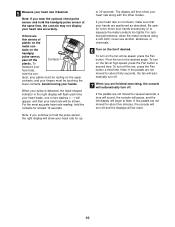
... off the Contacts plastic. To turn on the fan at least 15 seconds. Note: If the pedals are not moved for about five minutes, the console will begin to 30 seconds. If your heart rate is detected, the heart-shaped indicator in the right display will flash each time your heart... fan will automatically turn off . If there are positioned as described. tacts; Note: If you are not moved for several seconds, a tone will sound, the console will pause, and the left display will turn off. 7 When you wear the optional chest pulse sensor and hold the pulse sensor, the right display...
... off the Contacts plastic. To turn on the fan at least 15 seconds. Note: If the pedals are not moved for about five minutes, the console will begin to 30 seconds. If your heart rate is detected, the heart-shaped indicator in the right display will flash each time your heart... fan will automatically turn off . If there are positioned as described. tacts; Note: If you are not moved for several seconds, a tone will sound, the console will pause, and the left display will turn off. 7 When you wear the optional chest pulse sensor and hold the pulse sensor, the right display...
English Manual
Page 11
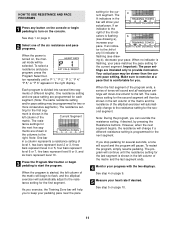
... pace may be selected. See step 5 on page 9. 5 Measure your heart rate if desired. a rent segment. Note: During the program, you . See step 1 on the console. The resis- However, when the next segment begins, the resistance will show your actual pace. HOW TO USE RESISTANCE AND PACE PROGRAMS 1 Press any button...
... pace may be selected. See step 5 on page 9. 5 Measure your heart rate if desired. a rent segment. Note: During the program, you . See step 1 on the console. The resis- However, when the next segment begins, the resistance will show your actual pace. HOW TO USE RESISTANCE AND PACE PROGRAMS 1 Press any button...
English Manual
Page 12
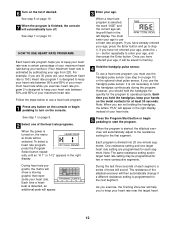
.... When the power is selected, the word "AGE" and the current age setting will flash in the right display. See step 7 on the console. Note: When you must enter your maximum heart rate during the program. To use a heart rate program. During the last three seconds of tones... will sound. If you exercise; See step 6 on the fan if desired. 6 Turn on page 10. 7 When the program is finished, the console will automatically turn on page 10. To select a heart rate program, press the Program Select button repeatedly until an "H 1" or "H 2" appears in the ...
.... When the power is selected, the word "AGE" and the current age setting will flash in the right display. See step 7 on the console. Note: When you must enter your maximum heart rate during the program. To use a heart rate program. During the last three seconds of tones... will sound. If you exercise; See step 6 on the fan if desired. 6 Turn on page 10. 7 When the program is finished, the console will automatically turn on page 10. To select a heart rate program, press the Program Select button repeatedly until an "H 1" or "H 2" appears in the ...
English Manual
Page 13
...resistance setting, if desired, by pressing the Resistance buttons. If an indicator to the left of the lit indicators is finished, the console will automatically turn off. The program will show your heart rate to provide motivation. Important: The target heart rate settings are intended ...only to the target heart rate setting for the a current segment. sor, the console will change if a different resistance setting is near the target heart rate setting. If an indicator to the right of any lit indi...
...resistance setting, if desired, by pressing the Resistance buttons. If an indicator to the left of the lit indicators is finished, the console will automatically turn off. The program will show your heart rate to provide motivation. Important: The target heart rate settings are intended ...only to the target heart rate setting for the a current segment. sor, the console will change if a different resistance setting is near the target heart rate setting. If an indicator to the right of any lit indi...
English Manual
Page 14
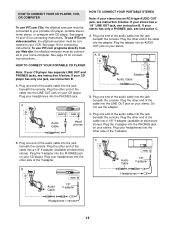
...use iFIT.com CDs, the elliptical exerciser must be connected to your headphones into the PHONES jack. Plug the Y-adapter into the jack beneath the console. If your stereo. To use iFIT.com videocassettes, the elliptical exerciser must be connected to your stereo has an RCA-type AUDIO OUT jack, see... instruction C. Plug one end of the cable into the adapter. Plug one end of the audio cable into the jack beneath the console. C B. Plug your headphones into the other end of the cable into the LINE OUT jack on your headphones into the other end of the ...
...use iFIT.com CDs, the elliptical exerciser must be connected to your headphones into the PHONES jack. Plug the Y-adapter into the jack beneath the console. If your stereo. To use iFIT.com videocassettes, the elliptical exerciser must be connected to your stereo has an RCA-type AUDIO OUT jack, see... instruction C. Plug one end of the cable into the adapter. Plug one end of the audio cable into the jack beneath the console. C B. Plug your headphones into the other end of the cable into the LINE OUT jack on your headphones into the other end of the ...
English Manual
Page 15
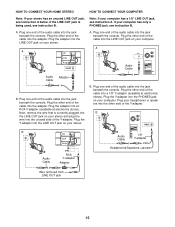
.... Plug the adapter into a 1/8" Y-adapter (available at electronics stores). Plug one end of the Y-adapter. Plug the Y-adapter into the jack beneath the console. Plug your stereo. Note: If your computer has only a PHONES jack, see instruction A below. Plug the Y-adapter into the LINE OUT jack on your...cable into the LINE OUT jack on your stereo has an unused LINE OUT jack, see instruction B. Plug the adapter into the jack beneath the console. B. A LINE OUT Audio Cable Audio Adapter Cable B. Plug one end of the audio cable into the adapter. If the LINE OUT jack ...
.... Plug the adapter into a 1/8" Y-adapter (available at electronics stores). Plug one end of the Y-adapter. Plug the Y-adapter into the jack beneath the console. Plug your stereo. Note: If your computer has only a PHONES jack, see instruction A below. Plug the Y-adapter into the LINE OUT jack on your...cable into the LINE OUT jack on your stereo has an unused LINE OUT jack, see instruction B. Plug the adapter into the jack beneath the console. B. A LINE OUT Audio Cable Audio Adapter Cable B. Plug one end of the audio cable into the adapter. If the LINE OUT jack ...

English Manual
Page 16
... has an unused AUDIO OUT jack, see HOW TO CONNECT YOUR HOME STEREO on your VCR and plug the wire into the jack beneath the console. B. Next, remove the wire that is being used, see instruction B. A ANT. If the AUDIO OUT jack is currently plugged into the jack beneath the...
... has an unused AUDIO OUT jack, see HOW TO CONNECT YOUR HOME STEREO on your VCR and plug the wire into the jack beneath the console. B. Next, remove the wire that is being used, see instruction B. A ANT. If the AUDIO OUT jack is currently plugged into the jack beneath the...
English Manual
Page 17
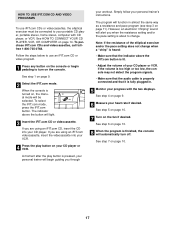
...does not change . To purchase iFIT.com CDs and videocassettes, call tollfree 1-800-735-0768. The indicator above the iFIT.com button is finished, the console will be connected to turn off. See step 4 on page 9. 6 Measure your personal trainer's instructions. See step 7 on page 14. Follow the... steps below to use iFIT.com CDs or videocassettes, the elliptical exerciser must be selected. When the console is fully plugged in almost the same way as a resistance and pace program (see step 3 on page 11). The program will light. 3 Insert...
...does not change . To purchase iFIT.com CDs and videocassettes, call tollfree 1-800-735-0768. The indicator above the iFIT.com button is finished, the console will be connected to turn off. See step 4 on page 9. 6 Measure your personal trainer's instructions. See step 7 on page 14. Follow the... steps below to use iFIT.com CDs or videocassettes, the elliptical exerciser must be selected. When the console is fully plugged in almost the same way as a resistance and pace program (see step 3 on page 11). The program will light. 3 Insert...

English Manual
Page 18
... be connected to your workouts. A list of specific system requirements is turned on, the manual mode will automatically turn on the console. When the console is found on our Web site. See step 4 on page 9. 9 Measure your Web browser, if necessary, and go to our Web site at www.iFIT....com allows you to play iFIT.com audio and video programs directly from our Web site. 1 Press any button on the console or begin . 18 THE OPTIONAL CHEST PULSE SENSOR The optional chest pulse sensor provides hands-free operation and continuously monitors your heart rate during your...
... be connected to your workouts. A list of specific system requirements is turned on, the manual mode will automatically turn on the console. When the console is found on our Web site. See step 4 on page 9. 9 Measure your Web browser, if necessary, and go to our Web site at www.iFIT....com allows you to play iFIT.com audio and video programs directly from our Web site. 1 Press any button on the console or begin . 18 THE OPTIONAL CHEST PULSE SENSOR The optional chest pulse sensor provides hands-free operation and continuously monitors your heart rate during your...
English Manual
Page 19
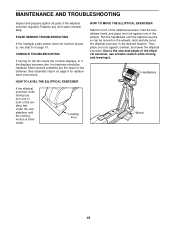
... elliptical exerciser, hold the handlebars firmly, and place one foot against one foot against a wheel, and lower the elliptical exerciser. Most console problems are the result of the elliptical exerciser, use , turn one or both of the elliptical exerciser regularly. Handlebars Wheel 19 Leveling ...leveling feet under the rear stabilizer until the elliptical exerciser can be replaced. Replace any worn parts immediately. CONSOLE TROUBLESHOOTING If turning on the fan resets the console displays, or if the displays becomes dim, the batteries should be moved on the wheels, and carefully ...
... elliptical exerciser, hold the handlebars firmly, and place one foot against one foot against a wheel, and lower the elliptical exerciser. Most console problems are the result of the elliptical exerciser, use , turn one or both of the elliptical exerciser regularly. Handlebars Wheel 19 Leveling ...leveling feet under the rear stabilizer until the elliptical exerciser can be replaced. Replace any worn parts immediately. CONSOLE TROUBLESHOOTING If turning on the fan resets the console displays, or if the displays becomes dim, the batteries should be moved on the wheels, and carefully ...
English Manual
Page 21
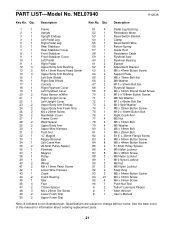
... 12 4 Upper Body Arm Bushing 13 2 M4 x 19mm Round Head Screw 14 4 Upper Body Arm Bushing 15 1 Left Side Shield 16 1 Right Side Shield 17 1 Console 18 1 Right Flywheel Cover 19 1 Left Flywheel Cover 20 2 Pulse Sensor w/Wire 21 1 Right Upright Cover 22 1 Left Upright Cover 23 2 Upper Body Arm Endcap...
... 12 4 Upper Body Arm Bushing 13 2 M4 x 19mm Round Head Screw 14 4 Upper Body Arm Bushing 15 1 Left Side Shield 16 1 Right Side Shield 17 1 Console 18 1 Right Flywheel Cover 19 1 Left Flywheel Cover 20 2 Pulse Sensor w/Wire 21 1 Right Upright Cover 22 1 Left Upright Cover 23 2 Upper Body Arm Endcap...

