
Instruction Manual
Page 2
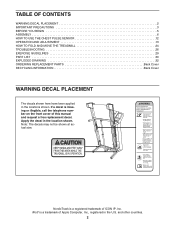
...THE CHEST PULSE SENSOR 12 OPERATION AND ADJUSTMENT 13 HOW TO FOLD AND MOVE THE TREADMILL 24 TROUBLESHOOTING 26 EXERCISE GUIDELINES 29 PART LIST 30 EXPLODED DRAWING 32 ORDERING REPLACEMENT PARTS Back Cover RECYCLING INFORMATION Back Cover WARNING DECAL PLACEMENT The decals shown here have ...been applied in the location shown. If a decal is a registered trademark of ICON IP, Inc. NordicTrack is missing or...
...THE CHEST PULSE SENSOR 12 OPERATION AND ADJUSTMENT 13 HOW TO FOLD AND MOVE THE TREADMILL 24 TROUBLESHOOTING 26 EXERCISE GUIDELINES 29 PART LIST 30 EXPLODED DRAWING 32 ORDERING REPLACEMENT PARTS Back Cover RECYCLING INFORMATION Back Cover WARNING DECAL PLACEMENT The decals shown here have ...been applied in the location shown. If a decal is a registered trademark of ICON IP, Inc. NordicTrack is missing or...
Instruction Manual
Page 4
... procedures in this manual should be able to safely lift 45 lbs. (20 kg) to the off position when the treadmill is intended for the location of the treadmill regularly. Do not use . (See the drawing on page 24.) You must be performed by an authorized ser- vice...MOVE THE TREADMILL on page 5 for in the storage position. 23. less instructed to raise, lower, or move the treadmill. 21. Never leave the treadmill unattended while it is held securely in -home use , before cleaning the treadmill, and before performing the mainte- Inspect and properly tighten all parts of the...
... procedures in this manual should be able to safely lift 45 lbs. (20 kg) to the off position when the treadmill is intended for the location of the treadmill regularly. Do not use . (See the drawing on page 24.) You must be performed by an authorized ser- vice...MOVE THE TREADMILL on page 5 for in the storage position. 23. less instructed to raise, lower, or move the treadmill. 21. Never leave the treadmill unattended while it is held securely in -home use , before cleaning the treadmill, and before performing the mainte- Inspect and properly tighten all parts of the...

Instruction Manual
Page 5
...iPod®. And when you have questions after read this manual carefully before contacting us assist you for selecting the revolutionary NordicTrack® C 2500 treadmill with Universal Dock for iPod offers a selection of the serial number decal are labeled in the drawing below. The model... number and the location of features designed to make your benefit, read - The C 2500 treadmill with the parts that are shown on the front cover of other treadmills. For your workouts at home more enjoyable and effective. Before reading further, please familiarize yourself with ...
...iPod®. And when you have questions after read this manual carefully before contacting us assist you for selecting the revolutionary NordicTrack® C 2500 treadmill with Universal Dock for iPod offers a selection of the serial number decal are labeled in the drawing below. The model... number and the location of features designed to make your benefit, read - The C 2500 treadmill with the parts that are shown on the front cover of other treadmills. For your workouts at home more enjoyable and effective. Before reading further, please familiarize yourself with ...
Instruction Manual
Page 6
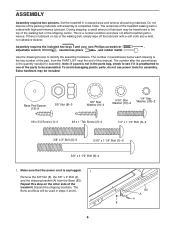
...the 3/8" Nut (8), the 3/8" x 2" Bolt (4), and the shipping bracket (A) from the PART LIST near the end of this step on top of the treadmill. ASSEMBLY Assembly requires two persons. Set the treadmill in parentheses below to identify the assembly hardware. The number in a cleared area and remove ...all packing materials. To avoid damaging plastic parts, do not use power tools for...
...the 3/8" Nut (8), the 3/8" x 2" Bolt (4), and the shipping bracket (A) from the PART LIST near the end of this step on top of the treadmill. ASSEMBLY Assembly requires two persons. Set the treadmill in parentheses below to identify the assembly hardware. The number in a cleared area and remove ...all packing materials. To avoid damaging plastic parts, do not use power tools for...

Instruction Manual
Page 11
Press the Left Accessory Tray (99) and the 14 Right Accessory Tray (106) into the Console Base (91). 91 99 106 15. Note: Extra hardware may be included. If there are properly tightened before you use the treadmill. one of clear plastic on the treadmill decals, remove the plastic. To protect the floor or carpet, place a mat under the treadmill. Make sure that all parts are sheets of the hex keys is used to adjust the walking belt (see pages 27 and 28). 11 Keep the included hex keys in a secure place; 14.
Press the Left Accessory Tray (99) and the 14 Right Accessory Tray (106) into the Console Base (91). 91 99 106 15. Note: Extra hardware may be included. If there are properly tightened before you use the treadmill. one of clear plastic on the treadmill decals, remove the plastic. To protect the floor or carpet, place a mat under the treadmill. Make sure that all parts are sheets of the hex keys is used to adjust the walking belt (see pages 27 and 28). 11 Keep the included hex keys in a secure place; 14.


