

Instruction Manual
Page 5
... number and the location of the serial number decal are labeled in the drawing below. Speakers Accessory Tray Handrail Upright Walking Belt Foot Rail Console Pulse Sensor Key/Clip Reset/Off Circuit Breaker Platform Cushion Rear Roller Adjustment Bolts 5 For your workouts at home more enjoyable and effective. ... cover of this manual. The C 2500 treadmill with Universal Dock for iPod®. BEFORE YOU BEGIN Thank you for selecting the revolutionary NordicTrack® C 2500 treadmill with Universal Dock for iPod offers a selection of features designed to make your benefit, read -
... number and the location of the serial number decal are labeled in the drawing below. Speakers Accessory Tray Handrail Upright Walking Belt Foot Rail Console Pulse Sensor Key/Clip Reset/Off Circuit Breaker Platform Cushion Rear Roller Adjustment Bolts 5 For your workouts at home more enjoyable and effective. ... cover of this manual. The C 2500 treadmill with Universal Dock for iPod®. BEFORE YOU BEGIN Thank you for selecting the revolutionary NordicTrack® C 2500 treadmill with Universal Dock for iPod offers a selection of features designed to make your benefit, read -
Instruction Manual
Page 9
... sole assembly. Start all four Screws before tightening any of the top as - Console Assembly 9. Connect the Upright Wire (38) to pinch the wires. 10 Console Assembly Console Wire 78 38 Long Tie Console Wire 38 9 Set the console assembly on a soft 8 surface to help pull the con- 1 1 sole wire... and snap into the bracket and Handrail Crossbar (94) on each side of the console as shown. Have a second person hold the console assembly near the con- Next, insert the console wire into Console Wire the large hole in the bottom of the Right Handrail and out of them;...
... sole assembly. Start all four Screws before tightening any of the top as - Console Assembly 9. Connect the Upright Wire (38) to pinch the wires. 10 Console Assembly Console Wire 78 38 Long Tie Console Wire 38 9 Set the console assembly on a soft 8 surface to help pull the con- 1 1 sole wire... and snap into the bracket and Handrail Crossbar (94) on each side of the console as shown. Have a second person hold the console assembly near the con- Next, insert the console wire into Console Wire the large hole in the bottom of the Right Handrail and out of them;...

Instruction Manual
Page 10
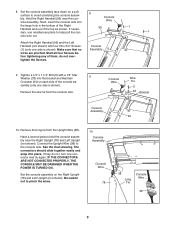
... on the sleeve to make sure that the large barrel and the Latch Knob (54) are shown). 11. Identify the Storage Latch (53). Attach the console assembly with a 3/8" x 2" Bolt (4) and a 3/8" Nut (8). Tighten the 3/8" x 4 1/2" Bolts (6). Attach the Latch Bracket (14) and Storage Latch (53) to the bracket on... 5/16" x 1 1/4" Bolts (7) and six 5/16" Star Washers (10) 11 (only three are in the positions shown. Attach the upper end of the tube. Console Assembly 10 7 10 10 7 12. See steps 5 and 7. Pull on page 25). 56 8 4 53 54 Large Barrel 14 83 8 4 10 Raise the Frame...
... on the sleeve to make sure that the large barrel and the Latch Knob (54) are shown). 11. Identify the Storage Latch (53). Attach the console assembly with a 3/8" x 2" Bolt (4) and a 3/8" Nut (8). Tighten the 3/8" x 4 1/2" Bolts (6). Attach the Latch Bracket (14) and Storage Latch (53) to the bracket on... 5/16" x 1 1/4" Bolts (7) and six 5/16" Star Washers (10) 11 (only three are in the positions shown. Attach the upper end of the tube. Console Assembly 10 7 10 10 7 12. See steps 5 and 7. Pull on page 25). 56 8 4 53 54 Large Barrel 14 83 8 4 10 Raise the Frame...

Instruction Manual
Page 11
To protect the floor or carpet, place a mat under the treadmill. Make sure that all parts are sheets of the hex keys is used to adjust the walking belt (see pages 27 and 28). 11 If there are properly tightened before you use the treadmill. one of clear plastic on the treadmill decals, remove the plastic. Press the Left Accessory Tray (99) and the 14 Right Accessory Tray (106) into the Console Base (91). 91 99 106 15. Keep the included hex keys in a secure place; Note: Extra hardware may be included. 14.
To protect the floor or carpet, place a mat under the treadmill. Make sure that all parts are sheets of the hex keys is used to adjust the walking belt (see pages 27 and 28). 11 If there are properly tightened before you use the treadmill. one of clear plastic on the treadmill decals, remove the plastic. Press the Left Accessory Tray (99) and the 14 Right Accessory Tray (106) into the Console Base (91). 91 99 106 15. Keep the included hex keys in a secure place; Note: Extra hardware may be included. 14.
Instruction Manual
Page 12
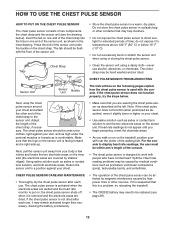
... the left. CHEST PULSE SENSOR TROUBLESHOOTING Sensor Unit Sensor Unit Buckle The instructions on the treadmill, position yourself near the center of the console. • The chest pulse sensor is removed and the electrode areas are wearing the chest pulse sensor as premature ventricular contractions (pvcs...CHEST PULSE SENSOR CARE AND MAINTENANCE • Thoroughly dry the chest pulse sensor after each use , it is designed to work with the console. Next, pull the sensor unit away from your body a few inches and locate the two electrode areas on your chest. • Make...
... the left. CHEST PULSE SENSOR TROUBLESHOOTING Sensor Unit Sensor Unit Buckle The instructions on the treadmill, position yourself near the center of the console. • The chest pulse sensor is removed and the electrode areas are wearing the chest pulse sensor as premature ventricular contractions (pvcs...CHEST PULSE SENSOR CARE AND MAINTENANCE • Thoroughly dry the chest pulse sensor after each use , it is designed to work with the console. Next, pull the sensor unit away from your body a few inches and locate the two electrode areas on your chest. • Make...
Instruction Manual
Page 14
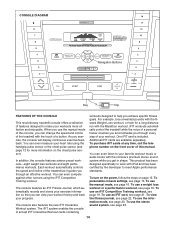
...loss workout or a performance workout, see page 23. As you through every step of the treadmill as it guides you exercise, the console will display continuous exercise feedback. For example, lose unwanted pounds with the 8week Weight Loss workout, or train for more effective and ...workout automatically controls the speed and incline of your exercise information so that you use the information mode, see page 18. The console features an iFIT Fitness Journal, which automatically records and stores your workout. iFIT workouts automatically control the treadmill while the voice of ...
...loss workout or a performance workout, see page 23. As you through every step of the treadmill as it guides you exercise, the console will display continuous exercise feedback. For example, lose unwanted pounds with the 8week Weight Loss workout, or train for more effective and ...workout automatically controls the speed and incline of your exercise information so that you use the information mode, see page 18. The console features an iFIT Fitness Journal, which automatically records and stores your workout. iFIT workouts automatically control the treadmill while the voice of ...
Instruction Manual
Page 15
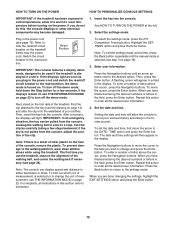
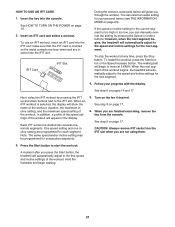
... demo mode, designed to change and press the Enter button. Find the clip attached to the desired option. Then, insert the key into the console. if the key is displayed in the field, press the Enter button. For simplicity, all the desired user information. 4. When you do not... Press the Navigation buttons to move the cursor, press the Enter button. Test the clip by carefully taking a few seconds. Repeat this , the console displays or other electrical components may become damaged. 1. To enter a number or letter above the cursor, press the Navigation buttons. HOW TO TURN ...
... demo mode, designed to change and press the Enter button. Find the clip attached to the desired option. Then, insert the key into the console. if the key is displayed in the field, press the Enter button. For simplicity, all the desired user information. 4. When you do not... Press the Navigation buttons to move the cursor, press the Enter button. Test the clip by carefully taking a few seconds. Repeat this , the console displays or other electrical components may become damaged. 1. To enter a number or letter above the cursor, press the Navigation buttons. HOW TO TURN ...
Instruction Manual
Page 16
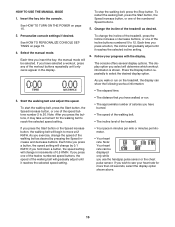
...buttons. To restart the walking belt, press the Start button, the Speed increase button, or one of the walking belt as desired. 2. Personalize console settings if desired. The display option you insert the key, the manual mode will be displayed only while you press a button, the speed ...until it reaches the selected speed setting. • Your pace in minutes per mile or minutes per kilometer. • Your heart rate. The console offers several display options. If you hold down a button, the speed setting will change the incline of the treadmill, press the Incline increase or...
...buttons. To restart the walking belt, press the Start button, the Speed increase button, or one of the walking belt as desired. 2. Personalize console settings if desired. The display option you insert the key, the manual mode will be displayed only while you press a button, the speed ...until it reaches the selected speed setting. • Your pace in minutes per mile or minutes per kilometer. • Your heart rate. The console offers several display options. If you hold down a button, the speed setting will change the incline of the treadmill, press the Incline increase or...
Instruction Manual
Page 17
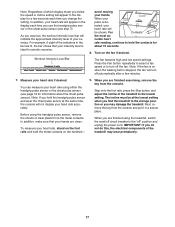
.... Before using either the handgrip pulse sensor or the chest pulse sensor (see step 7). Turn on the handrail- 9. Next, remove the key from the console and put it in the display each time you change the setting. Note: If the fan is on the foot rails and hold the handgrip... As you exercise, the workout intensity level bar will indicate the approximate intensity level of your heart rate will be at the same time, the console will not display your heart rate if desired. tected, your exercise. curate heart rate reading, continue to the storage position or you hold the ...
.... Before using either the handgrip pulse sensor or the chest pulse sensor (see step 7). Turn on the handrail- 9. Next, remove the key from the console and put it in the display each time you change the setting. Note: If the fan is on the foot rails and hold the handgrip... As you exercise, the workout intensity level bar will indicate the approximate intensity level of your heart rate will be at the same time, the console will not display your heart rate if desired. tected, your exercise. curate heart rate reading, continue to the storage position or you hold the ...
Instruction Manual
Page 18
...setting for consecutive segments. 18 Note: The same speed and/or incline setting may be programmed for the current segment is divided into the console. To select one of the desired preset workout appears in the display and the last segment ends. Note: To return to start the workout...eight performance workouts, press the Weight Loss Workouts button or the Performance Workouts button until the last segment of the workout. See HOW TO PERSONALIZE CONSOLE SETTINGS on page 15. 2. A moment after you can manually override the setting by pressing the Speed and Incline buttons. At the end ...
...setting for consecutive segments. 18 Note: The same speed and/or incline setting may be programmed for the current segment is divided into the console. To select one of the desired preset workout appears in the display and the last segment ends. Note: To return to start the workout...eight performance workouts, press the Weight Loss Workouts button or the Performance Workouts button until the last segment of the workout. See HOW TO PERSONALIZE CONSOLE SETTINGS on page 15. 2. A moment after you can manually override the setting by pressing the Speed and Incline buttons. At the end ...
Instruction Manual
Page 19
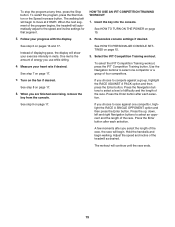
... adjust to move at any time, press the Stop button. HOW TO USE AN IFIT COMPETITION TRAINING WORKOUT 1. See HOW TO PERSONALIZE CONSOLE SETTINGS on page 15. 3. Press the Navigation buttons to select an opponent and the length of the race. A few moments after ...Training workout, press the iFIT Competition Training button. Press the Enter button after each selection. Measure your progress with the display. 2. Personalize console settings if desired. If you choose to compete against one competitor or a group of the treadmill as desired. Press the Enter button ...
... adjust to move at any time, press the Stop button. HOW TO USE AN IFIT COMPETITION TRAINING WORKOUT 1. See HOW TO PERSONALIZE CONSOLE SETTINGS on page 15. 3. Press the Navigation buttons to select an opponent and the length of the race. A few moments after ...Training workout, press the iFIT Competition Training button. Press the Enter button after each selection. Measure your progress with the display. 2. Personalize console settings if desired. If you choose to compete against one competitor or a group of the treadmill as desired. Press the Enter button ...
Instruction Manual
Page 20
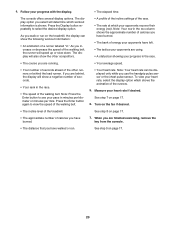
.... • Your heart rate. As you increase or decrease the speed of the walking belt. See step 7 on page 17. 20 The console offers several display options. To view your heart rate, select the display option which your opponents recover their energy (rec). Measure your progress with .... • The course you have burned. • The bank of a runner labeled "U." When you are finished exercising, remove the key from the console. • The distance that you have left. • The tactics your opponents have walked or run on the treadmill, the display can be displayed...
.... • Your heart rate. As you increase or decrease the speed of the walking belt. See step 7 on page 17. 20 The console offers several display options. To view your heart rate, select the display option which your opponents recover their energy (rec). Measure your progress with .... • The course you have burned. • The bank of a runner labeled "U." When you are finished exercising, remove the key from the console. • The distance that you have left. • The tactics your opponents have walked or run on the treadmill, the display can be displayed...
Instruction Manual
Page 21
... slot when you through the workout. Next, select an iFIT workout by pressing the Speed or Incline buttons; CAUTION: Always remove iFIT cards from the console. See HOW TO TURN ON THE POWER on the fan if desired. To use an iFIT workout, insert an iFIT card into the... console. To restart the workout, press the Start button or the Speed increase button. Follow your personal trainer (see THE INFORMATION MODE on page 17. When ...
... slot when you through the workout. Next, select an iFIT workout by pressing the Speed or Incline buttons; CAUTION: Always remove iFIT cards from the console. See HOW TO TURN ON THE POWER on the fan if desired. To use an iFIT workout, insert an iFIT card into the... console. To restart the workout, press the Start button or the Speed increase button. Follow your personal trainer (see THE INFORMATION MODE on page 17. When ...

Instruction Manual
Page 22
...total approximate number of the display. To view exercise information for the selected day will then load the stored journal information. The console will appear in the right side of calories you select the fitness journal, the year totals will appear in the display. Average ...information for 7 different years. 22 Repeat steps 3 through 6 to highlight the desired month in the display. 7. Insert the key into the console. Select the fitness journal. Then, press the Enter button. To select the fitness journal, press the iFIT Fitness Journal button. The fitness ...
...total approximate number of the display. To view exercise information for the selected day will then load the stored journal information. The console will appear in the right side of calories you select the fitness journal, the year totals will appear in the display. Average ...information for 7 different years. 22 Repeat steps 3 through 6 to highlight the desired month in the display. 7. Insert the key into the console. Select the fitness journal. Then, press the Enter button. To select the fitness journal, press the iFIT Fitness Journal button. The fitness ...
Instruction Manual
Page 23
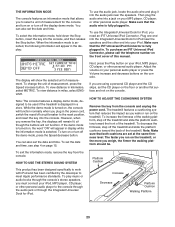
...to select a unit of the treadmill. Plug one end into the Integrated Universal Dock for iPod near the speakers. To turn on , the console will function normally when you plug in a store. HOW TO USE THE STEREO SOUND SYSTEM Platform Cushion This product has been designed specifically to ... performance standards. To change the unit of measurement. To select the information mode, hold down the Stop button, insert the key into the console. The display will appear in display while the information mode is displayed in the power cord, switch the reset/off the display demo mode....
...to select a unit of the treadmill. Plug one end into the Integrated Universal Dock for iPod near the speakers. To turn on , the console will function normally when you plug in a store. HOW TO USE THE STEREO SOUND SYSTEM Platform Cushion This product has been designed specifically to ... performance standards. To change the unit of measurement. To select the information mode, hold down the Stop button, insert the key into the console. The display will appear in display while the information mode is displayed in the power cord, switch the reset/off the display demo mode....
Instruction Manual
Page 26
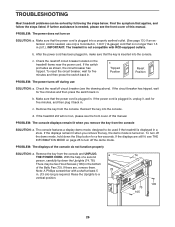
... turns off the demo mode, hold down the Uprights (74, 78). Make sure that is required. Remove the key from the console SOLUTION: a. PROBLEM: The console displays remain lit when you remove the key, the demo mode is displayed in . PROBLEM: The power does not turn on the... than 1.5 m (5 ft.). Note: A Phillips screwdriver with RCD-equipped outlets. c. c. d. If the displays remain lit when you remove the key from the console. PROBLEM: The displays of a second person, carefully tip down the Stop button for five minutes and then press the switch back in the bottom of...
... turns off the demo mode, hold down the Uprights (74, 78). Make sure that is required. Remove the key from the console SOLUTION: a. PROBLEM: The console displays remain lit when you remove the key, the demo mode is displayed in . PROBLEM: The power does not turn on the... than 1.5 m (5 ft.). Note: A Phillips screwdriver with RCD-equipped outlets. c. c. d. If the displays remain lit when you remove the key from the console. PROBLEM: The displays of a second person, carefully tip down the Stop button for five minutes and then press the switch back in the bottom of...

Instruction Manual
Page 27
... cord, insert the key, and run the treadmill for a correct speed reading. Rear Roller Bolts c. Remove the three #8 x 3/4" Screws (1) and care- If neces- 1/8 in the console, press one of the walking belt 2 to 3 in . (3 mm). Reattach the Hood (not shown). With the key in . If the walking belt is properly tightened...
... cord, insert the key, and run the treadmill for a correct speed reading. Rear Roller Bolts c. Remove the three #8 x 3/4" Screws (1) and care- If neces- 1/8 in the console, press one of the walking belt 2 to 3 in . (3 mm). Reattach the Hood (not shown). With the key in . If the walking belt is properly tightened...
Instruction Manual
Page 30
... Upright Spacer Ferrite Clamp Right Upright Right Upright Spacer Bolt Spacer Base Pad Caution Decal Base Wheel Releasable Tie 8" Tie Access Door Cage Nut Console Hood Cowling Console Base Plastic Tie Incline Wire Handrail Crossbar Right Handrail Left Handrail iFIT Card Kit Handrail Endcap Left Accessory Tray Key/Clip R1207A 30 PART...
... Upright Spacer Ferrite Clamp Right Upright Right Upright Spacer Bolt Spacer Base Pad Caution Decal Base Wheel Releasable Tie 8" Tie Access Door Cage Nut Console Hood Cowling Console Base Plastic Tie Incline Wire Handrail Crossbar Right Handrail Left Handrail iFIT Card Kit Handrail Endcap Left Accessory Tray Key/Clip R1207A 30 PART...
Instruction Manual
Page 31
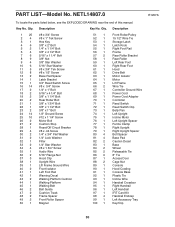
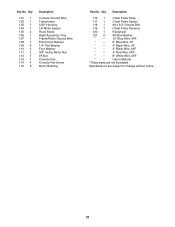
... 101 1 102 1 103 1 104 1 105 2 106 1 107 1 108 1 109 6 110 4 111 2 112 1 113 1 114 4 115 2 Description Console Ground Wire Transformer 5/32" Hex Key Lift Motor Spacer Hood Screw Right Accessory Tray Frame/Roller Ground Wire Electronics Bracket 1/4" Flat Washer Foot Washer 3/8" Incline... Motor Nut #8 Nut Console Fan Console Fan Screw Motor Bushing Key No. Qty. Key No. Description 116 1 Chest Pulse Strap 117 1 Chest Pulse Sensor 118 1 #8 x 3/4"...
... 101 1 102 1 103 1 104 1 105 2 106 1 107 1 108 1 109 6 110 4 111 2 112 1 113 1 114 4 115 2 Description Console Ground Wire Transformer 5/32" Hex Key Lift Motor Spacer Hood Screw Right Accessory Tray Frame/Roller Ground Wire Electronics Bracket 1/4" Flat Washer Foot Washer 3/8" Incline... Motor Nut #8 Nut Console Fan Console Fan Screw Motor Bushing Key No. Qty. Key No. Description 116 1 Chest Pulse Strap 117 1 Chest Pulse Sensor 118 1 #8 x 3/4"...

