

User Manual
Page 3
... power cord (see HOW TO TURN ON THE POWER on page 12. Always hold the handrails while using the treadmill. The pulse sensor is turned off. The pulse sensor is damaged, the walking belt may slow, accelerate, or stop procedure before using the treadmill (see page 12), plug the power cord into a grounded circuit capable of all of high speeds. Keep the treadmill indoors, away from heated surfaces. 6. Failure to the control...
... power cord (see HOW TO TURN ON THE POWER on page 12. Always hold the handrails while using the treadmill. The pulse sensor is turned off. The pulse sensor is damaged, the walking belt may slow, accelerate, or stop procedure before using the treadmill (see page 12), plug the power cord into a grounded circuit capable of all of high speeds. Keep the treadmill indoors, away from heated surfaces. 6. Failure to the control...
User Manual
Page 4
... the location of the treadmill regularly. 26. Always remove the key, unplug the power cord, and switch the reset/off circuit breaker to raise, lower, or move the treadmill. 24. less instructed to raise, lower, or move the treadmill until it is holding the frame securely in -home use . (See the drawing on the treadmill. 23. SAVE THESE INSTRUCTIONS 4 When folding or moving the treadmill, make sure that the storage latch is running. Servicing other...
... the location of the treadmill regularly. 26. Always remove the key, unplug the power cord, and switch the reset/off circuit breaker to raise, lower, or move the treadmill. 24. less instructed to raise, lower, or move the treadmill until it is holding the frame securely in -home use . (See the drawing on the treadmill. 23. SAVE THESE INSTRUCTIONS 4 When folding or moving the treadmill, make sure that the storage latch is running. Servicing other...
User Manual
Page 5
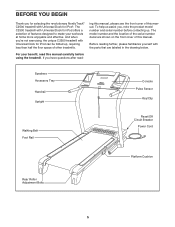
... NordicTrack® C2500 treadmill with the parts that are shown on the front cover of other treadmills. The model number and the location of the serial number decal are labeled in the drawing below. To help us . For your workouts at home more enjoyable and effective. Speakers Accessory Tray Handrail Upright Walking Belt Foot Rail Console Pulse Sensor Key/Clip Reset/Off Circuit Breaker Power Cord Platform Cushion Rear Roller Adjustment Bolts 5 And when you're not exercising...
... NordicTrack® C2500 treadmill with the parts that are shown on the front cover of other treadmills. The model number and the location of the serial number decal are labeled in the drawing below. To help us . For your workouts at home more enjoyable and effective. Speakers Accessory Tray Handrail Upright Walking Belt Foot Rail Console Pulse Sensor Key/Clip Reset/Off Circuit Breaker Power Cord Platform Cushion Rear Roller Adjustment Bolts 5 And when you're not exercising...

User Manual
Page 9
.... Start all four Screws before tightening any of the console assembly (only one side is shown). IF THE CONNECTORS ARE NOT CONNECTED PROPERLY, THE CONSOLE MAY BE DAMAGED WHEN THE POWER IS TURNED ON. Tighten a 1/4" x 1 1/4" Bolt (5) with four #8 x 3/4" Screws (1) (only one connector and try again. Have a second person hold the console assembly near the console assembly. Be careful not to help pull the console wire out. Connect the Upright Wire (38...
.... Start all four Screws before tightening any of the console assembly (only one side is shown). IF THE CONNECTORS ARE NOT CONNECTED PROPERLY, THE CONSOLE MAY BE DAMAGED WHEN THE POWER IS TURNED ON. Tighten a 1/4" x 1 1/4" Bolt (5) with four #8 x 3/4" Screws (1) (only one connector and try again. Have a second person hold the console assembly near the console assembly. Be careful not to help pull the console wire out. Connect the Upright Wire (38...
User Manual
Page 12
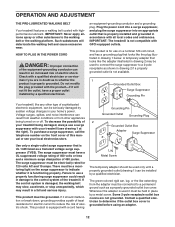
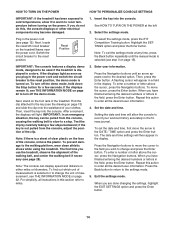
... adapter is damaged, the walking belt may slow, accelerate, or stop unexpectedly, which may be seriously damaged by a qualified electrician. HOW TO PLUG IN THE POWER CORD DANGER: Improper connection of the equipment-grounding conductor can be used it is functioning properly. Check with a cord having Lug Metal Screw The temporary adapter should malfunction or break down, grounding provides a path of least resistance...
... adapter is damaged, the walking belt may slow, accelerate, or stop unexpectedly, which may be seriously damaged by a qualified electrician. HOW TO PLUG IN THE POWER CORD DANGER: Improper connection of the equipment-grounding conductor can be used it is functioning properly. Check with a cord having Lug Metal Screw The temporary adapter should malfunction or break down, grounding provides a path of least resistance...
User Manual
Page 13
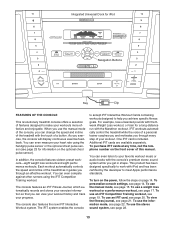
... workout automatically controls the speed and incline of features designed to make your workouts more effective and enjoyable. To turn on the power, follow the steps on the front cover of a button. To use an iFIT card, see page 17. Integrated Universal Dock for iPod FITNESS JOURNAL COMPETITION TRAINING Navigation Buttons Key Clip FEATURES OF THE CONSOLE This revolutionary treadmill console offers a selection of the treadmill as it guides you through every step...
... workout automatically controls the speed and incline of features designed to make your workouts more effective and enjoyable. To turn on the power, follow the steps on the front cover of a button. To use an iFIT card, see page 17. Integrated Universal Dock for iPod FITNESS JOURNAL COMPETITION TRAINING Navigation Buttons Key Clip FEATURES OF THE CONSOLE This revolutionary treadmill console offers a selection of the treadmill as it guides you through every step...
User Manual
Page 14
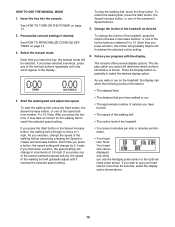
... console, causing the walking belt to slow to enter all instructions in the fitness journal. A flashing cursor will light. After a moment, the displays will appear in a field in the display. For simplicity, all the desired user information. 4. Switch the circuit breaker to change the unit of your workout history accurately in this action to a stop. Select the settings mode. To turn off the demo mode. Press the Navigation buttons to move...
... console, causing the walking belt to slow to enter all instructions in the fitness journal. A flashing cursor will light. After a moment, the displays will appear in a field in the display. For simplicity, all the desired user information. 4. Switch the circuit breaker to change the unit of your workout history accurately in this action to a stop. Select the settings mode. To turn off the demo mode. Press the Navigation buttons to move...
User Manual
Page 15
... twelve numbered speed buttons, the speed of the treadmill as desired by 0.1 mph; If you press a button, the incline will change the speed of the treadmill. Each time you have burned. • The speed of the walking belt. • The incline level of the walking belt as desired. 2. See HOW TO TURN ON THE POWER on page 14. Each time you use the handgrip pulse sensor or the optional chest pulse sensor. HOW TO USE THE MANUAL MODE 1.
... twelve numbered speed buttons, the speed of the treadmill as desired by 0.1 mph; If you press a button, the incline will change the speed of the treadmill. Each time you have burned. • The speed of the walking belt. • The incline level of the walking belt as desired. 2. See HOW TO TURN ON THE POWER on page 14. Each time you use the handgrip pulse sensor or the optional chest pulse sensor. HOW TO USE THE MANUAL MODE 1.

User Manual
Page 16
Workout Intensity Level Bar 7. Measure your hands. To measure your heart rate, stand on the handrail- Note: Regardless of which display mode you select, the speed or incline setting will appear in the display for information about 15 seconds. 16 avoid moving your heart rate if desired. Note: If you hold the handgrip pulse sensor and wear the optional chest pulse sensor at the same time, the console will be shown...
Workout Intensity Level Bar 7. Measure your hands. To measure your heart rate, stand on the handrail- Note: Regardless of which display mode you select, the speed or incline setting will appear in the display for information about 15 seconds. 16 avoid moving your heart rate if desired. Note: If you hold the handgrip pulse sensor and wear the optional chest pulse sensor at the same time, the console will be shown...
User Manual
Page 17
... be at the lowest setting when you fold the treadmill to turn off the fan. Turn on when the walking belt is on the fan if desired. Press the Fan button repeatedly to select a fan speed or to the storage position or you select a weight loss workout or a performance workout, the display will turn off automatically after a few minutes. The incline must be programmed for each segment. To...
... be at the lowest setting when you fold the treadmill to turn off the fan. Turn on when the walking belt is on the fan if desired. Press the Fan button repeatedly to select a fan speed or to the storage position or you select a weight loss workout or a performance workout, the display will turn off automatically after a few minutes. The incline must be programmed for each segment. To...
User Manual
Page 18
... exercising, remove the key from the console. To restart the program, press the Start button or the Speed increase button. See step 7 on page 17. 8. However, when the current segment of the workout. Instead of the profile will automatically adjust to start the workout. When you . Press the Start button to the speed and incline settings for the current segment. A moment after you press the Start button, the treadmill will automatically adjust to the first speed and incline settings...
... exercising, remove the key from the console. To restart the program, press the Start button or the Speed increase button. See step 7 on page 17. 8. However, when the current segment of the workout. Instead of the profile will automatically adjust to start the workout. When you . Press the Start button to the speed and incline settings for the current segment. A moment after you press the Start button, the treadmill will automatically adjust to the first speed and incline settings...
User Manual
Page 19
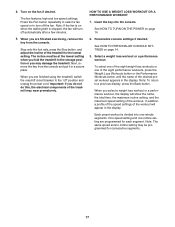
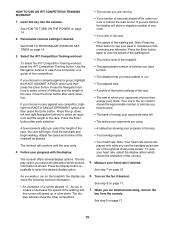
... walked or run on the treadmill, the display can be displayed only while you choose to select a level of difficulty and the length of calories you are using. To select the iFIT Competition Training workout, press the iFIT Competition Training button. If you use the handgrip pulse sensor or the optional chest pulse sensor. Insert the key into the console. See HOW TO TURN ON THE POWER on page 17. 7. Note: Your heart rate...
... walked or run on the treadmill, the display can be displayed only while you choose to select a level of difficulty and the length of calories you are using. To select the iFIT Competition Training workout, press the iFIT Competition Training button. If you use the handgrip pulse sensor or the optional chest pulse sensor. Insert the key into the console. See HOW TO TURN ON THE POWER on page 17. 7. Note: Your heart rate...

User Manual
Page 20
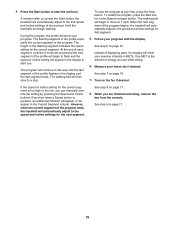
Hold the handrails and begin to start the workout. A moment after you press the Start button, the treadmill will automatically adjust to the first speed 20 Insert the key into several oneminute segments. If the speed or incline setting for the current segment is divided into the console. iFIT Card iFIT Slot To stop the workout at 1 mph. Follow your progress with the display. Each iFIT workout is too high or too...
Hold the handrails and begin to start the workout. A moment after you press the Start button, the treadmill will automatically adjust to the first speed 20 Insert the key into several oneminute segments. If the speed or incline setting for the current segment is divided into the console. iFIT Card iFIT Slot To stop the workout at 1 mph. Follow your progress with the display. Each iFIT workout is too high or too...
User Manual
Page 22
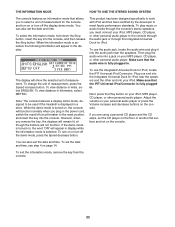
... appear in display while the information mode is fully plugged in the power cord, switch the reset/off circuit breaker to the reset position, and insert the key into the console. To use the Integrated Universal Dock for iPod, locate the iFIT Universal iPod Connector. Make sure that the audio wire is selected. To change the unit of measurement. While the demo mode is fully plugged in a store. Adjust the volume...
... appear in display while the information mode is fully plugged in the power cord, switch the reset/off circuit breaker to the reset position, and insert the key into the console. To use the Integrated Universal Dock for iPod, locate the iFIT Universal iPod Connector. Make sure that the audio wire is selected. To change the unit of measurement. While the demo mode is fully plugged in a store. Adjust the volume...

User Manual
Page 24
... frame. CAUTION: To decrease the possibility of the wheels. 2. Frame Latch Knob HOW TO MOVE THE TREADMILL Before moving the treadmill. Do not attempt to the lowest position. Remove the key and unplug the power cord. HOW TO FOLD AND MOVE THE TREADMILL HOW TO FOLD THE TREADMILL FOR STORAGE Before folding the treadmill, adjust the incline to move the treadmill. 1. If you do not do not lift the frame by the...
... frame. CAUTION: To decrease the possibility of the wheels. 2. Frame Latch Knob HOW TO MOVE THE TREADMILL Before moving the treadmill. Do not attempt to the lowest position. Remove the key and unplug the power cord. HOW TO FOLD AND MOVE THE TREADMILL HOW TO FOLD THE TREADMILL FOR STORAGE Before folding the treadmill, adjust the incline to move the treadmill. 1. If you do not do not lift the frame by the...
User Manual
Page 26
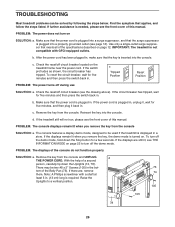
... all of the specifications described on the treadmill frame near the power cord. Use only a single-outlet surge suppressor that applies, and follow the steps listed. To reset the circuit breaker, wait for five minutes and then press the switch back in . c. If there are still lit, see THE INFORMATION MODE on . Remove the key from the console. TROUBLESHOOTING Most treadmill problems can be two #8 x 2" Screws (105) in the...
... all of the specifications described on the treadmill frame near the power cord. Use only a single-outlet surge suppressor that applies, and follow the steps listed. To reset the circuit breaker, wait for five minutes and then press the switch back in . c. If there are still lit, see THE INFORMATION MODE on . Remove the key from the console. TROUBLESHOOTING Most treadmill problems can be two #8 x 2" Screws (105) in the...
User Manual
Page 27
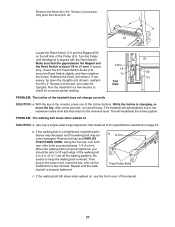
... the #8 x 2" Screws (not shown), and raise the Top View Uprights. When the walking belt is about 1/8 in the power cord, insert the key, and run the treadmill for a correct speed reading. Turn the Pulley until the walking belt is aligned with the Reed Switch. Reattach the Hood (not shown). PROBLEM: The walking belt slows when walked on , see the front cover of this manual. 27 Repeat until the Magnet is properly tightened. fully...
... the #8 x 2" Screws (not shown), and raise the Top View Uprights. When the walking belt is about 1/8 in the power cord, insert the key, and run the treadmill for a correct speed reading. Turn the Pulley until the walking belt is aligned with the Reed Switch. Reattach the Hood (not shown). PROBLEM: The walking belt slows when walked on , see the front cover of this manual. 27 Repeat until the Magnet is properly tightened. fully...

User Manual
Page 29
... of your exercise until your heart rate is the key to plan your heart rate as a guide to use stored fat calories for energy. For maximum fat burning, exercise with pre-existing health problems. The pulse sensor is to 30 minutes with 5 to the nearest ten years). For aerobic exercise, adjust the intensity of stretching. The chart below shows recommended heart rates for aerobic exercise. The three numbers listed above your...
... of your exercise until your heart rate is the key to plan your heart rate as a guide to use stored fat calories for energy. For maximum fat burning, exercise with pre-existing health problems. The pulse sensor is to 30 minutes with 5 to the nearest ten years). For aerobic exercise, adjust the intensity of stretching. The chart below shows recommended heart rates for aerobic exercise. The three numbers listed above your...
User Manual
Page 30
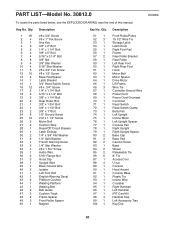
... Reed Switch Screw #8 x 3/4" Screw 1/4" x 1 1/4" Bolt 5/16" x 4 1/4" Bolt 3/8" x 1 1/4" Bolt Rear Roller Bolt 3/8" x 1 3/4" Bolt 3/8" x 1 1/2" Bolt 3/8" x 1" Bolt 1/2" Ground Screw #12 x 1 1/4" Screw Motor Bolt Cushion Stop Reset/Off Circuit Breaker Latch Endcap 1/4" x 3/4" Flat Washer 1/4" Split Washer French Warning Decal 1/4" Star Washer #8 x 1 3/4" Screw Audio Wire 5/16" Flange Nut Hood Clip Upright Wire Base Ground Wire Isolator Left Foot Rail English Warning Decal Platform Cushion Walking Platform Walking Belt Belt Guide Cushion Track Frame Spacer Front Roller Spacer Magnet Key No. PART...
... Reed Switch Screw #8 x 3/4" Screw 1/4" x 1 1/4" Bolt 5/16" x 4 1/4" Bolt 3/8" x 1 1/4" Bolt Rear Roller Bolt 3/8" x 1 3/4" Bolt 3/8" x 1 1/2" Bolt 3/8" x 1" Bolt 1/2" Ground Screw #12 x 1 1/4" Screw Motor Bolt Cushion Stop Reset/Off Circuit Breaker Latch Endcap 1/4" x 3/4" Flat Washer 1/4" Split Washer French Warning Decal 1/4" Star Washer #8 x 1 3/4" Screw Audio Wire 5/16" Flange Nut Hood Clip Upright Wire Base Ground Wire Isolator Left Foot Rail English Warning Decal Platform Cushion Walking Platform Walking Belt Belt Guide Cushion Track Frame Spacer Front Roller Spacer Magnet Key No. PART...

User Manual
Page 36
... authorized by ICON. The drive motor is warranted for a particular purpose is limited in connection with the use or performance of the product or damages with respect to any implied warranties of merchantability or fitness for three (3) years after the date of purchase. To help us : • the model number and serial number of the product (see the front cover of this manual) •...
... authorized by ICON. The drive motor is warranted for a particular purpose is limited in connection with the use or performance of the product or damages with respect to any implied warranties of merchantability or fitness for three (3) years after the date of purchase. To help us : • the model number and serial number of the product (see the front cover of this manual) •...


