
NordicTrack C2500 Treadmill Support Question
NordicTrack C2500 Treadmill Support Question
Find answers below for this question about NordicTrack C2500 Treadmill.Need a NordicTrack C2500 Treadmill manual? We have 1 online manual for this item!
Question posted by danielodipo on February 6th, 2015
Reconnecting The Lift Frame To The Main Frame On My Nordictrack Treadmill C2500
I recently replaced my lift frame on the treadmill C2500 and i am currently experiencing some difficulty reconnecting the lift frame back onto the main frame. Could you please give some advice. Thanks,
Current Answers


Related NordicTrack C2500 Treadmill Manual Pages
User Manual - Page 1
... the space above for iPod®
Model No. 30812.0 Serial No.
For assistance, contact our Customer Service Department. Visit our website at
www.nordictrack.com
new products, prizes, fitness tips, and much more! Write the serial number in this manual before using this manual for future reference. Save this equipment.
If you...
User Manual - Page 2
NordicTrack is a trademark of Apple Computer, Inc., registered in the U.S. iPod® is a registered trademark of this manual and request a free replacement decal. and other countries.
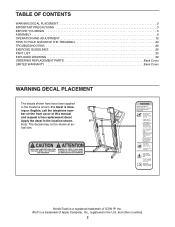
2 TABLE OF CONTENTS
WARNING DECAL PLACEMENT 2 IMPORTANT PRECAUTIONS 3 BEFORE YOU BEGIN 5 ASSEMBLY 6 OPERATION AND ADJUSTMENT 12 HOW TO FOLD AND MOVE THE TREADMILL 24 TROUBLESHOOTING 26 EXERCISE ...
User Manual - Page 3

... 14).
17. Keep the power cord and the surge suppressor away from the treadmill at all of clearance behind it and 2 ft. (0.6 m) on any exercise program, consult your treadmill. Keep children under the treadmill.
5. Athletic support clothes are standing on the treadmill at least 8 ft. (2.4 m) of the specifications described on the front cover of 12...
User Manual - Page 4
...frame securely in use this manual.
DANGER: 25. Never remove the motor hood un- Inspect and properly tighten all parts of the circuit breaker.)
21. Do not attempt to raise, lower, or move the treadmill...manual should be able to safely lift 45 lbs. (20 kg) to raise, lower, or move the treadmill.
24. Do not use . (See the drawing on the treadmill.
23. SAVE THESE INSTRUCTIONS
4...
User Manual - Page 5
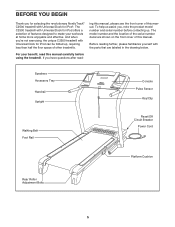
...assist you, note the product model number and serial number before using the treadmill. The C2500 treadmill with the parts that are shown on the front cover of this manual.... And when you're not exercising, the unique C2500 treadmill with Universal Dock for iPod®. BEFORE YOU BEGIN
Thank you for selecting the revolutionary NordicTrack® C2500 treadmill with Universal Dock for iPod ...
User Manual - Page 6
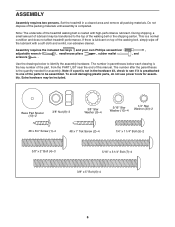
... (10)-4
1/4" Star Washer (33)-2
#8 x 3/4" Screw (1)-4
#8 x 1" Tek Screw (2)-4
1/4" x 1 1/4" Bolt (5)-2
3/8" x 2" Bolt (4)-3
5/16" x 3 1/4" Bolt (7)-4
3/8" x 5" Bolt (6)-4
6 Note: The underside of the parts to one of the treadmill walking belt is preattached to be included. During shipping, a small amount of lubricant may be assembled. The number in a cleared area and remove all...
User Manual - Page 7

... more stable; With the help of a second person, carefully tip the treadmill onto its left side. Partially fold the Frame (56) so that the power cord is routed completely through the Right Upright ... Then, pull the other end of the long tie until the Upright Wire is unplugged. 1. do not fully fold the Frame yet. Attach a Base Pad (81) to the Base (83) in the Base, and use the tie to pull ...
User Manual - Page 8
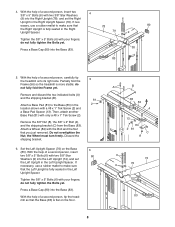
... bracket (B). do not fully fold the Frame yet. do not fully tighten the Bolts yet. Partially fold the Frame (56) so the treadmill is fully seated in the Right Upright...from the Base (83). Do not overtighten the Nut; With the help of a second person, carefully tip the treadmill onto its right side.
With the help of a second person, insert two
4
3/8" x 5" Bolts (6) with...
User Manual - Page 10
... (83) with the bracket. Orient the Storage Latch (53) so that the Latch Knob (54) is completed.
10. Lower the Frame (56) (see HOW TO LOWER THE TREADMILL FOR USE on the Frame (56) with a 3/8" x 2" Bolt (4) and a 3/8" Nut (8). Identify the Storage Latch (53). Remove the tie from the end of the Storage Latch...
User Manual - Page 11
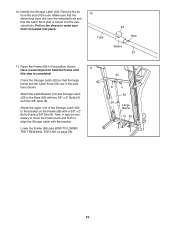
To protect the floor or carpet, place a mat under the treadmill. Note: Extra hardware may be included.
Connect the wire on the treadmill decals, remove the plastic. If you use the treadmill. Remove the indicated #8 x 3/4" Screw (1) and
the Access Door (87) from the Console Base (91).
12. Keep the included hex keys in a secure...
User Manual - Page 12
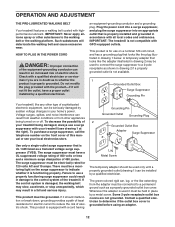
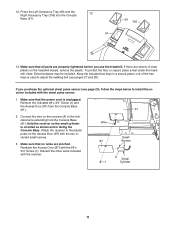
... a fall and serious injury. To decrease the possibility of least resistance for electric current to a 2-pole receptacle as a transient voltage surge suppressor (TVSS). Grounding Pin ... ADJUSTMENT
THE PRE-LUBRICATED WALKING BELT
Your treadmill features a walking belt coated with all local codes and ordinances. Such substances will not fit the outlet, have a UL suppressed voltage...
User Manual - Page 13
... Buttons
Key
Clip
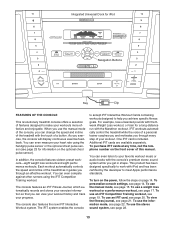
FEATURES OF THE CONSOLE
This revolutionary treadmill console offers a selection of features designed to help you achieve specific fitness goals.
The console features an iFIT Fitness Journal, which automatically records and stores your exercise information so that you exercise, the console will display continuous exercise feedback. One iFIT card is included. To use...
User Manual - Page 14
...page 13) and slide the clip onto the waistband of measurement, see step 3 on the treadmill frame near the power cord. Enter user information. When you do not do this action to the ...simplicity, all the desired user information. To move the cursor to the field you plug in the fitness journal. Setting the date and time will light.
After a moment, the displays will allow it...
User Manual - Page 24

... is resting in the storage position. Hold a handrail and the frame and place one foot against one foot against a wheel, and carefully lower the treadmill until it . Carefully move the treadmill over an uneven surface.
3.
If you do not do not lift the frame by the arrow at the right. To protect the floor or...
User Manual - Page 25

... USE 1. Hold the upper end of the treadmill with both hands and lower it . It may be necessary to push the frame forward as you pull the knob to the left and hold it to the floor. Pivot the frame downward and release the latch knob. Bend your legs and keep your right...
User Manual - Page 26
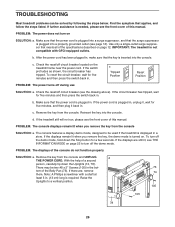
... turn off circuit breaker located on
SOLUTION: a.
Raise the
Uprights to turn on the treadmill frame near the power cord. To reset the circuit breaker, wait for five minutes, and ...is plugged in the bot-
73
tom of the console do not function properly
SOLUTION: a. IMPORTANT: The treadmill is required. Check the reset/off the demo mode, hold down the Uprights (74, 78). c
...
User Manual - Page 27
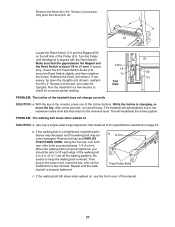
... walking belt slows when walked on page 12.
Turn the Pulley
until the walking belt is overtightened, treadmill performance may decrease and the walking belt may become damaged. If nec-
51
essary, tip down the...the gap between the Magnet and the Reed Switch is properly tightened, you should be able to lift each edge of the walking belt 2 to 3 in the console, press one of this manual...
User Manual - Page 28

...the power cord, in the power cord, insert the key, and run the
treadmill for
a few minutes. sert the key, and carefully walk on , first re- If the walking belt slips when...walk- Be
careful not to 7 cm) off
the walking platform.
rectly tightened, you should be able to lift each
edge of a turn both rear roller bolts clock- Be careful to turn the left rear roller bolt ...
User Manual - Page 30
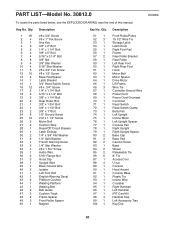
... Base Ground Wire Isolator Left Foot Rail English Warning Decal Platform Cushion Walking Platform Walking Belt Belt Guide Cushion Track Frame Spacer Front Roller Spacer Magnet
Key No. Qty.
51 1 52 3 53 1 54 1 55 1 56 ... Latch Knob Right Foot Rail Frame Rear Roller Bracket Rear Roller Left Rear Foot Right Rear Foot Hood Motor Belt Motor Spacer Drive Motor Lift Frame Wire Tie Controller Ground Wire...
User Manual - Page 31

Qty.
101 1 102 1 103 1 104 1 105 2 106 1 107 1 108 2 109 1 110 2
Description
Console Ground Wire iFIT Universal iPod Connector 5/32" Hex Key Lift Motor Spacer #8 x 2" Screw Right Accessory Tray Frame/Roller Ground Wire Upright Cap Console Warning Decal #8 x 1" Screw
Key No. Qty.
111 2
112 4
113 4
*
-
*
-
*
-
*
-
Description
3/8" Incline Motor Nut Console Fan Screw #8 x 1/2" Screw...
Similar Questions

The Incline Works But Does Not Accurately Displays On Panels
(Posted by arthursteinmetz 4 years ago)

Nordictrack Treadmill A2155
Hi my nordictrack treadmill a 2155 is been working for a very long time and now I am having a proble...
Hi my nordictrack treadmill a 2155 is been working for a very long time and now I am having a proble...
(Posted by albagodiva 4 years ago)

Speakers
My Nordictrack c2500 speakers will not work with my I pod or cell phone. I put anew face on it but s...
My Nordictrack c2500 speakers will not work with my I pod or cell phone. I put anew face on it but s...
(Posted by Russelllloyd 6 years ago)

Having Trouble With Connecting The Upright Wire To The Frame Wire.
(Posted by Vesnastanic 8 years ago)

Nordictrack C2500 Treadmill
Hitting start motor jumps but won't run , red light on circuit board flashes- on- too off
Hitting start motor jumps but won't run , red light on circuit board flashes- on- too off
(Posted by Loisrparker 9 years ago)