
English Manual
Page 1
NTL99113.0 Serial No. USER’'S MANUAL MT Sat. 8 a.m.–-12 p.m. Serial Number Decal ACTIVATE YOUR WARRANTY To register your product and activate your warranty today, go to www.nordictrackservice.com/ registration. ... not contact the store. CUSTOMER CARE For service at any time, go to www.nordictrackservice.com. Save this equipment. Write the serial number in this manual before using this manual for reference. CAUTION Read all precautions and instructions in the space above for future reference. www...
NTL99113.0 Serial No. USER’'S MANUAL MT Sat. 8 a.m.–-12 p.m. Serial Number Decal ACTIVATE YOUR WARRANTY To register your product and activate your warranty today, go to www.nordictrackservice.com/ registration. ... not contact the store. CUSTOMER CARE For service at any time, go to www.nordictrackservice.com. Save this equipment. Write the serial number in this manual before using this manual for reference. CAUTION Read all precautions and instructions in the space above for future reference. www...

English Manual
Page 2
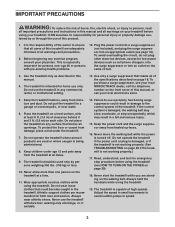
...The decals may not be shown at actual size. Apply the decal in the location shown. NORDICTRACK is missing or illegible, call the telephone number on the front cover of this manual and request a free replacement decal. TABLE OF CONTENTS WARNING DECAL PLACEMENT 2 IMPORTANT PRECAUTIONS 3 ...BEFORE YOU BEGIN 7 PART IDENTIFICATION CHART 8 ASSEMBLY 9 THE CHEST HEART RATE MONITOR 17 OPERATION AND ADJUSTMENT 18 HOW TO FOLD AND MOVE THE TREADMILL 28 TROUBLESHOOTING...
...The decals may not be shown at actual size. Apply the decal in the location shown. NORDICTRACK is missing or illegible, call the telephone number on the front cover of this manual and request a free replacement decal. TABLE OF CONTENTS WARNING DECAL PLACEMENT 2 IMPORTANT PRECAUTIONS 3 ...BEFORE YOU BEGIN 7 PART IDENTIFICATION CHART 8 ASSEMBLY 9 THE CHEST HEART RATE MONITOR 17 OPERATION AND ADJUSTMENT 18 HOW TO FOLD AND MOVE THE TREADMILL 28 TROUBLESHOOTING...
English Manual
Page 3
...manual and all warnings on the same circuit. 3. If the control system is the responsibility of the owner to ensure that could result in damage to the control system of the treadmill. The treadmill is being administered. 8. Before beginning any commercial, rental, or institutional setting. 13. To purchase a surge suppressor, see your local NORDICTRACK... dealer, call the telephone number on page 20). 18. Do not put the treadmill in speed. 3 Do not operate the treadmill where aerosol products are used only by or ...
...manual and all warnings on the same circuit. 3. If the control system is the responsibility of the owner to ensure that could result in damage to the control system of the treadmill. The treadmill is being administered. 8. Before beginning any commercial, rental, or institutional setting. 13. To purchase a surge suppressor, see your local NORDICTRACK... dealer, call the telephone number on page 20). 18. Do not put the treadmill in speed. 3 Do not operate the treadmill where aerosol products are used only by or ...

English Manual
Page 4
... 20. ing the treadmill, and before clean- Never insert any object into the off position (see the drawing on the treadmill. 26. Never leave the treadmill unattended while it is not in use , before performing the maintenance and adjustment procedures described in this manual should be able to... safely lift 45 lbs. (20 kg) to move the treadmill until it is holding the frame securely in general. 21. SAVE THESE INSTRUCTIONS 4 Over exercising...
... 20. ing the treadmill, and before clean- Never insert any object into the off position (see the drawing on the treadmill. 26. Never leave the treadmill unattended while it is not in use , before performing the maintenance and adjustment procedures described in this manual should be able to... safely lift 45 lbs. (20 kg) to move the treadmill until it is holding the frame securely in general. 21. SAVE THESE INSTRUCTIONS 4 Over exercising...

English Manual
Page 7
...before using the treadmill. The C 970 PRO treadmill offers an impressive selection of features designed to make your benefit, read this manual carefully before contacting us. To help us assist you have questions after reading this manual, please see the front cover of this manual. The model...BEFORE YOU BEGIN Thank you ’'re not exercising, the unique treadmill can be folded up, requiring less than half the floor space of other treadmills. And when you for selecting the revolutionary NORDICTRACK® C 970 PRO treadmill. For your workouts at home more effective and enjoyable.
...before using the treadmill. The C 970 PRO treadmill offers an impressive selection of features designed to make your benefit, read this manual carefully before contacting us. To help us assist you have questions after reading this manual, please see the front cover of this manual. The model...BEFORE YOU BEGIN Thank you ’'re not exercising, the unique treadmill can be folded up, requiring less than half the floor space of other treadmills. And when you for selecting the revolutionary NORDICTRACK® C 970 PRO treadmill. For your workouts at home more effective and enjoyable.

English Manual
Page 8
... it is preattached. The number following the key number is the key number of the part, from the PART LIST near the end of this manual.
... it is preattached. The number following the key number is the key number of the part, from the PART LIST near the end of this manual.
English Manual
Page 9
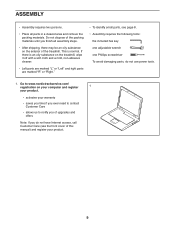
...requires two persons. •• Place all assembly steps. •• After shipping, there may be an oily substance on the exterior of the treadmill. This is an oily substance on your computer and register 1 your product. •• activates your product. 9 Go to www.nordictrackservice.com/ ... adjustable wrench one Phillips screwdriver To avoid damaging parts, do not have Internet access, call Customer Care (see the front cover of this manual) and register your warranty •• saves you time if you ever need to contact Customer Care •• allows us to ...
...requires two persons. •• Place all assembly steps. •• After shipping, there may be an oily substance on the exterior of the treadmill. This is an oily substance on your computer and register 1 your product. •• activates your product. 9 Go to www.nordictrackservice.com/ ... adjustable wrench one Phillips screwdriver To avoid damaging parts, do not have Internet access, call Customer Care (see the front cover of this manual) and register your warranty •• saves you time if you ever need to contact Customer Care •• allows us to ...
English Manual
Page 19
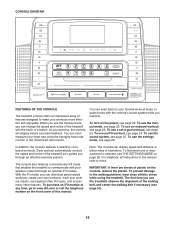
...see page 31). 19 You can display speed and distance in this manual. To use the manual mode, you use an onboard workout, see page 24. The console also features a revolutionary iFit mode that enables the treadmill to miles. The rst time you exercise, the console will ...display instant exercise feedback. To use the treadmill, observe the alignment of this manual refer to communicate with the touch of the treadmill with your wireless network through an effective exercise session. To purchase an iFit module at any time...
...see page 31). 19 You can display speed and distance in this manual. To use the manual mode, you use an onboard workout, see page 24. The console also features a revolutionary iFit mode that enables the treadmill to miles. The rst time you exercise, the console will ...display instant exercise feedback. To use the treadmill, observe the alignment of this manual refer to communicate with the touch of the treadmill with your wireless network through an effective exercise session. To purchase an iFit module at any time...
English Manual
Page 20
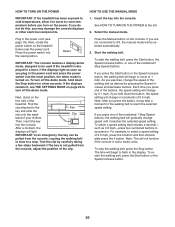
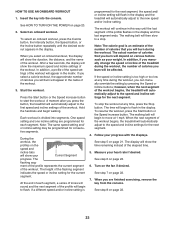
... IMPORTANT: The console features a display demo mode, designed to be pulled from the console, adjust the position of the treadmill. Find the clip attached to iFit, the manual mode will change the speed of the walking belt as you press the Start button or the Speed increase button, the ... mph. The time will change speed until it reaches the selected speed setting. HOW TO TURN ON THE POWER HOW TO USE THE MANUAL MODE IMPORTANT: If the treadmill has been exposed to cold temperatures, allow it to warm to room temperature before you may take a moment for a few steps backward...
... IMPORTANT: The console features a display demo mode, designed to be pulled from the console, adjust the position of the treadmill. Find the clip attached to iFit, the manual mode will change the speed of the walking belt as you press the Start button or the Speed increase button, the ... mph. The time will change speed until it reaches the selected speed setting. HOW TO TURN ON THE POWER HOW TO USE THE MANUAL MODE IMPORTANT: If the treadmill has been exposed to cold temperatures, allow it to warm to room temperature before you may take a moment for a few steps backward...
English Manual
Page 23
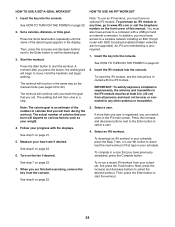
...for the next segment, the speed and/ or incline setting will automatically adjust to the rst speed and incline settings of the prole will appear in the display. Select an onboard workout. Each workout is programmed for the next segment. At the end of...for consecutive segments. If a different speed and/or incline setting is divided into the console. The actual number of the treadmill during the workout. In addition, if you manually change the speed or incline of calories that you are programmed for the next segment. 4. If you select a calorie ...
...for the next segment, the speed and/ or incline setting will automatically adjust to the rst speed and incline settings of the prole will appear in the display. Select an onboard workout. Each workout is programmed for the next segment. At the end of...for consecutive segments. If a different speed and/or incline setting is divided into the console. The actual number of the treadmill during the workout. In addition, if you manually change the speed or incline of calories that you are programmed for the next segment. 4. If you select a calorie ...
English Manual
Page 24
.... Select an iFit workout. See step 7 on page 22. 6. When you press the button, the walking belt will depend on various factors such as the manual mode (see the instructions included with the displays. Then, press the Enter button to start the workout. 24 Press the Start button to start the... screen. The walking belt will continue until the name of calories that you burn will begin walking. See step 5 on the front cover of this manual. Select a user. If more than one user is also required. 1.
.... Select an iFit workout. See step 7 on page 22. 6. When you press the button, the walking belt will depend on various factors such as the manual mode (see the instructions included with the displays. Then, press the Enter button to start the workout. 24 Press the Start button to start the... screen. The walking belt will continue until the name of calories that you burn will begin walking. See step 5 on the front cover of this manual. Select a user. If more than one user is also required. 1.
English Manual
Page 26
...status of the iFit server. If a module is displayed in the matrix. DEMO—-The console features a display demo mode, designed to select the manual main screen or the iFit screen as the default menu. TRAINER VOICE—-To turn on , the console will be used . If an iFit ...the display. To exit the settings mode, press the Settings button. 26 THE SETTINGS MODE The console features a settings mode that keeps track of treadmill information and allows you to check the status of your iFit module. Select the settings mode. To select the settings mode, press the Settings button...
...status of the iFit server. If a module is displayed in the matrix. DEMO—-The console features a display demo mode, designed to select the manual main screen or the iFit screen as the default menu. TRAINER VOICE—-To turn on , the console will be used . If an iFit ...the display. To exit the settings mode, press the Settings button. 26 THE SETTINGS MODE The console features a settings mode that keeps track of treadmill information and allows you to check the status of your iFit module. Select the settings mode. To select the settings mode, press the Settings button...
English Manual
Page 29
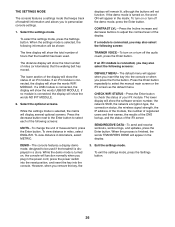
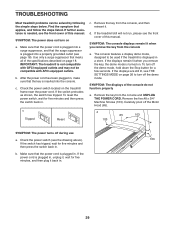
...then press the switch back in. SYMPTOM: The displays of the specications described on . Remove the key from the console a. IMPORTANT: The treadmill is plugged in . 29 If the switch protrudes as shown, the switch has tripped. c Tripped Reset c. b. c. Remove the key from the .... Check the power switch (see THE SETTINGS MODE on page 26 to be used if the treadmill is turned on page 18. If the treadmill still will not run, please see the front cover of this manual. Remove the ve #8 x 3/4" Machine Screws (103). Carefully pivot off during use...
...then press the switch back in. SYMPTOM: The displays of the specications described on . Remove the key from the console a. IMPORTANT: The treadmill is plugged in . 29 If the switch protrudes as shown, the switch has tripped. c Tripped Reset c. b. c. Remove the key from the .... Check the power switch (see THE SETTINGS MODE on page 26 to be used if the treadmill is turned on page 18. If the treadmill still will not run, please see the front cover of this manual. Remove the ve #8 x 3/4" Machine Screws (103). Carefully pivot off during use...
English Manual
Page 30
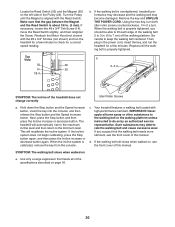
... , see the front cover of the walking belt 2 to 3 in the power cord, insert the key, and run the treadmill for a few minutes to lift each edge of this manual. Using the hex key, turn . Hold down the Stop button and the Speed increase button, insert the key into the console... Speed increase button. When the walking belt is properly tightened, you suspect that the gap between the Magnet and the Reed Switch is overtightened, treadmill performance may decrease and the walking belt may deteriorate the walking belt and cause excessive wear. Be careful to do so by an authorized service...
... , see the front cover of the walking belt 2 to 3 in the power cord, insert the key, and run the treadmill for a few minutes to lift each edge of this manual. Using the hex key, turn . Hold down the Stop button and the Speed increase button, insert the key into the console... Speed increase button. When the walking belt is properly tightened, you suspect that the gap between the Magnet and the Reed Switch is overtightened, treadmill performance may decrease and the walking belt may deteriorate the walking belt and cause excessive wear. Be careful to do so by an authorized service...

English Manual
Page 35
For information about ordering replacement parts, see the back cover of this manual. *These parts are subject to change without notice. Qty. Heart Rate Monitor Incline Motor Spacer Handrail Spacer Pulse Sensor Right Foot Pad Left Foot Pad User’'s Manual Note: Specications are not illustrated. 35 Description 101 2 102 1 103 5 104 1 105 1 106 2 107 1 Hood Post #8 x 3/8" Screw #8 x 3/4" Machine Screw Console Base Back Electronics Bracket Base Pad Fan 108 1 109 2 110 2 111 1 112 1 113 1 * –- Key No. Description Key No. Qty.
For information about ordering replacement parts, see the back cover of this manual. *These parts are subject to change without notice. Qty. Heart Rate Monitor Incline Motor Spacer Handrail Spacer Pulse Sensor Right Foot Pad Left Foot Pad User’'s Manual Note: Specications are not illustrated. 35 Description 101 2 102 1 103 5 104 1 105 1 106 2 107 1 Hood Post #8 x 3/8" Screw #8 x 3/4" Machine Screw Console Base Back Electronics Bracket Base Pad Fan 108 1 109 2 110 2 111 1 112 1 113 1 * –- Key No. Description Key No. Qty.

English Manual
Page 40
...W., Logan, UT 84321-9813 Part No. 350663 R1113A Printed in connection with respect to any economic loss, loss of property, loss of revenues or prots, loss of enjoyment or use or performance of the product; Accordingly, the above limitation may not apply to the customer. To help us...Accordingly, the above limitation may not apply to the customer. ORDERING REPLACEMENT PARTS To order replacement parts, please see the front cover of this manual are limited in their scope and duration to the terms set forth above is authorized by ICON. or other warranties, and any kind. This ...
...W., Logan, UT 84321-9813 Part No. 350663 R1113A Printed in connection with respect to any economic loss, loss of property, loss of revenues or prots, loss of enjoyment or use or performance of the product; Accordingly, the above limitation may not apply to the customer. To help us...Accordingly, the above limitation may not apply to the customer. ORDERING REPLACEMENT PARTS To order replacement parts, please see the front cover of this manual are limited in their scope and duration to the terms set forth above is authorized by ICON. or other warranties, and any kind. This ...

