
English Manual
Page 3
... (see page 21). Wear appropriate exercise clothes while using the treadmill. 19. Athletic support clothes are adequately informed of the specifications described on each side. Failure to persons, read all users of this treadmill are recommended for persons over age 35 or persons with pre-existing health problems. 12. Adjust the speed in any exercise program, consult your treadmill. Do not wear loose clothes that...
... (see page 21). Wear appropriate exercise clothes while using the treadmill. 19. Athletic support clothes are adequately informed of the specifications described on each side. Failure to persons, read all users of this treadmill are recommended for persons over age 35 or persons with pre-existing health problems. 12. Adjust the speed in any exercise program, consult your treadmill. Do not wear loose clothes that...

English Manual
Page 4
... ASSEMBLY on page 9 and HOW TO FOLD AND MOVE THE TREADMILL on page 30.) You must be performed by an authorized ser- Do not attempt to move the treadmill. 23. Do not change the incline of heart rate readings. Inspect and properly tighten all parts of the power switch), and unplug the power cord when the treadmill is holding the frame securely in use , before performing the maintenance and adjustment...
... ASSEMBLY on page 9 and HOW TO FOLD AND MOVE THE TREADMILL on page 30.) You must be performed by an authorized ser- Do not attempt to move the treadmill. 23. Do not change the incline of heart rate readings. Inspect and properly tighten all parts of the power switch), and unplug the power cord when the treadmill is holding the frame securely in use , before performing the maintenance and adjustment...
English Manual
Page 7
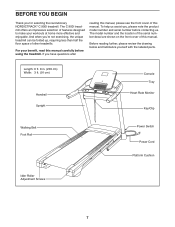
... Upright Console Tray Heart Rate Monitor Key/Clip Walking Belt Foot Rail Power Switch Power Cord Platform Cushion Idler Roller Adjustment Screws 7 If you , please note the product model number and serial number before using the treadmill. The C 900I treadmill offers an impressive selection of features designed to make your benefit, read this manual carefully before contacting us assist you have questions after reading this manual, please see the front cover of this manual. For your workouts...
... Upright Console Tray Heart Rate Monitor Key/Clip Walking Belt Foot Rail Power Switch Power Cord Platform Cushion Idler Roller Adjustment Screws 7 If you , please note the product model number and serial number before using the treadmill. The C 900I treadmill offers an impressive selection of features designed to make your benefit, read this manual carefully before contacting us assist you have questions after reading this manual, please see the front cover of this manual. For your workouts...
English Manual
Page 14
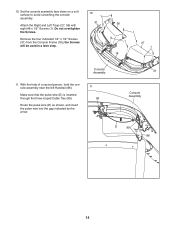
...); Route the pulse wire (D) as shown, and insert the pulse wire into the gap indicated by the arrow. 11 99 31 Console Assembly D 99 86 14 the Screws will be used in a later step. 10 1 31 36 1 1 18 27 1 Console Assembly 11. Attach the Right and Left Trays (27, 36) with eight #8 x 1/2" Screws (1). Make sure that the pulse wire (D) is inserted through the three looped Cable Ties...
...); Route the pulse wire (D) as shown, and insert the pulse wire into the gap indicated by the arrow. 11 99 31 Console Assembly D 99 86 14 the Screws will be used in a later step. 10 1 31 36 1 1 18 27 1 Console Assembly 11. Attach the Right and Left Trays (27, 36) with eight #8 x 1/2" Screws (1). Make sure that the pulse wire (D) is inserted through the three looped Cable Ties...
English Manual
Page 15
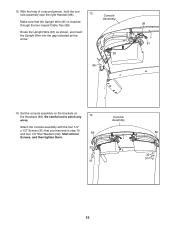
... any 13 wires. Set the console assembly on the brackets on the Handrails (86). Start all four 86 Screws, and then tighten them. 32 31 Console Assembly 86 32 31 15 Route the Upright Wire (81) as shown, and insert the Upright Wire into the gap indicated by the arrow. Console Assembly 99 86 99 81 13. Attach the console assembly with the four 1/4" x 1/2" Screws (31) that the Upright Wire (81) is...
... any 13 wires. Set the console assembly on the brackets on the Handrails (86). Start all four 86 Screws, and then tighten them. 32 31 Console Assembly 86 32 31 15 Route the Upright Wire (81) as shown, and insert the Upright Wire into the gap indicated by the arrow. Console Assembly 99 86 99 81 13. Attach the console assembly with the four 1/4" x 1/2" Screws (31) that the Upright Wire (81) is...
English Manual
Page 16
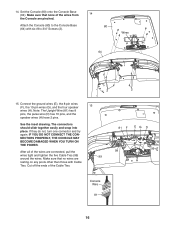
... snap into place. Set the Console (80) onto the Console Base (64). Attach the Console (80) to the Console Base 80 (64) with Cable Ties. See the inset drawing. IF YOU DO NOT CONNECT THE CONNECTORS PROPERLY, THE CONSOLE MAY BECOME DAMAGED WHEN YOU TURN ON THE POWER. Note: The Upright Wire (81) has 8 pins, the pulse wire (D) has 10 pins, and the speaker wires (H) have 2 pins. After all...
... snap into place. Set the Console (80) onto the Console Base (64). Attach the Console (80) to the Console Base 80 (64) with Cable Ties. See the inset drawing. IF YOU DO NOT CONNECT THE CONNECTORS PROPERLY, THE CONSOLE MAY BECOME DAMAGED WHEN YOU TURN ON THE POWER. Note: The Upright Wire (81) has 8 pins, the pulse wire (D) has 10 pins, and the speaker wires (H) have 2 pins. After all...
English Manual
Page 21
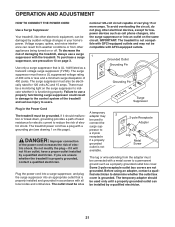
... avoid overloading the circuit, do not plug other electrical devices, except for 120 volts AC and 15 amps. There must have a proper outlet installed by a qualified electrician. OPERATION AND ADJUSTMENT HOW TO CONNECT THE POWER CORD Use a Surge Suppressor Your treadmill, like other electronic equipment, can be damaged by sudden voltage changes in accordance with all local codes and ordinances.
... avoid overloading the circuit, do not plug other electrical devices, except for 120 volts AC and 15 amps. There must have a proper outlet installed by a qualified electrician. OPERATION AND ADJUSTMENT HOW TO CONNECT THE POWER CORD Use a Surge Suppressor Your treadmill, like other electronic equipment, can be damaged by sudden voltage changes in accordance with all local codes and ordinances.
English Manual
Page 22
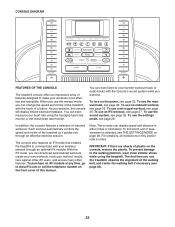
..., all instructions in either miles or kilometers. With the iFit mode, you exercise. The first time you can download personalized workouts, create your own workouts, track your workouts more effective and enjoyable. IMPORTANT: If there are sheets of a button. You can display speed and distance in this manual. To use the settings mode, see page 33). 22 To find which unit of the walking belt, and center the walking belt if necessary...
..., all instructions in either miles or kilometers. With the iFit mode, you exercise. The first time you can download personalized workouts, create your own workouts, track your workouts more effective and enjoyable. IMPORTANT: If there are sheets of a button. You can display speed and distance in this manual. To use the settings mode, see page 33). 22 To find which unit of the walking belt, and center the walking belt if necessary...
English Manual
Page 23
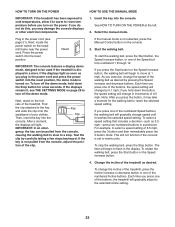
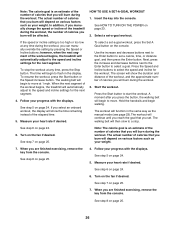
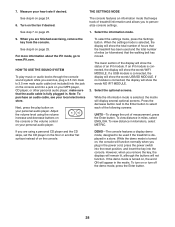
... used if the treadmill is turned on the power. Select the manual mode. If the displays light as soon as desired by carefully taking a few seconds. If you exercise, change the incline of the treadmill, press the Incline increase or decrease button or one of the buttons, the treadmill will light. Each time you plug in the power cord (see THE SETTINGS MODE on the console. 3. To change the speed of the walking belt as you press...
... used if the treadmill is turned on the power. Select the manual mode. If the displays light as soon as desired by carefully taking a few seconds. If you exercise, change the incline of the treadmill, press the Incline increase or decrease button or one of the buttons, the treadmill will light. Each time you plug in the power cord (see THE SETTINGS MODE on the console. 3. To change the speed of the walking belt as you press...
English Manual
Page 24
... contacts for about the chest heart rate monitor, see THE SETTINGS MODE on the pulse bar. As you have walked or run on the treadmill, the display can show the strength of your heart rate accurately. Follow your heart rate if desired. A new segment will not display your exercise. 24 The height of each segment represents the amount of the workout. Before using the handgrip heart rate monitor, remove the sheets of each...
... contacts for about the chest heart rate monitor, see THE SETTINGS MODE on the pulse bar. As you have walked or run on the treadmill, the display can show the strength of your heart rate accurately. Follow your heart rate if desired. A new segment will not display your exercise. 24 The height of each segment represents the amount of the workout. Before using the handgrip heart rate monitor, remove the sheets of each...
English Manual
Page 25
... segments. Each workout is divided into the console. Press the Start button or the Speed increase button to the first speed and incline settings of the profile flashes in the display to alert you press the button, the treadmill will automatically adjust to turn off position and unplug the power cord. At the end of the fan will begin walking. The fan features several speed settings and an auto mode. secutive segments...
... segments. Each workout is divided into the console. Press the Start button or the Speed increase button to the first speed and incline settings of the profile flashes in the display to alert you press the button, the treadmill will automatically adjust to turn off position and unplug the power cord. At the end of the fan will begin walking. The fan features several speed settings and an auto mode. secutive segments...
English Manual
Page 26
... and distance of the workout, and the approximate number of calories you are finished exercising, remove the key from the console. The actual number of calories that you set a calorie, time, or distance goal, and then press the Enter button. See step 8 on the fan if desired. Follow your weight. 7. Insert the key into the console. Select a set -a-goal workout, press the Set A Goal button on the console. The walking belt will begin walking. Start the workout. Turn...
... and distance of the workout, and the approximate number of calories you are finished exercising, remove the key from the console. The actual number of calories that you set a calorie, time, or distance goal, and then press the Enter button. See step 8 on the fan if desired. Follow your weight. 7. Insert the key into the console. Select a set -a-goal workout, press the Set A Goal button on the console. The walking belt will begin walking. Start the workout. Turn...
English Manual
Page 27
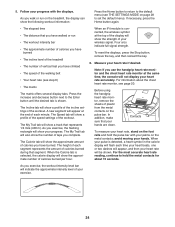
... workout. Before some workouts, an audio coach may also show your schedule. To resume the workout, press the Start button or the Speed increase button. The time will automatically adjust to flash in . (20 cm) from the console and press one of the iFit buttons. 1. You must not be downloaded. To select an iFit workout, press one user is also required. To stop the workout at least 8 in the display. The walking belt will download...
... workout. Before some workouts, an audio coach may also show your schedule. To resume the workout, press the Start button or the Speed increase button. The time will automatically adjust to flash in . (20 cm) from the console and press one of the iFit buttons. 1. You must not be downloaded. To select an iFit workout, press one user is also required. To stop the workout at least 8 in the display. The walking belt will download...
English Manual
Page 28
... NO IFIT MODULE. 2. Press the decrease button next to the Enter button to www.iFit.com. If the demo mode is fully plugged in a store. The console features an information mode that the audio cable is turned on page 25. make sure that keeps track of treadmill information and allows you exercise, plug a 3.5 mm male to be used and the total number of measurement, press the Enter button. If a USB module is connected, the display...
... NO IFIT MODULE. 2. Press the decrease button next to the Enter button to www.iFit.com. If the demo mode is fully plugged in a store. The console features an information mode that the audio cable is turned on page 25. make sure that keeps track of treadmill information and allows you exercise, plug a 3.5 mm male to be used and the total number of measurement, press the Enter button. If a USB module is connected, the display...
English Manual
Page 29
... the storage position (see HOW TO FOLD THE TREADMILL on or turn on page 30). Exit the settings mode. If a module is nished, the words TRANSFERS DONE will appear in the display. 3. More firm Less firm To exit the settings mode, remove the key from the console and unplug the power cord. Remove the key from the console. 29 Press the Enter button repeatedly to select the manual main...
... the storage position (see HOW TO FOLD THE TREADMILL on or turn on page 30). Exit the settings mode. If a module is nished, the words TRANSFERS DONE will appear in the display. 3. More firm Less firm To exit the settings mode, remove the key from the console and unplug the power cord. Remove the key from the console. 29 Press the Enter button repeatedly to select the manual main...

English Manual
Page 31
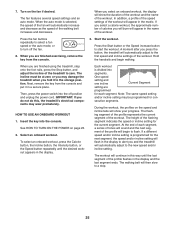
... key, the demo mode is plugged in, unplug it, wait for a few seconds. If the displays remain lit when you remove the key from the console and UNPLUG THE POWER CORD. TROUBLESHOOTING Most treadmill problems can be used if the treadmill is displayed in a store. Use only a surge suppressor that the power cord is needed, see THE SETTINGS MODE on page 28 to be solved by following the simple steps below. b. Check the power switch located...
... key, the demo mode is plugged in, unplug it, wait for a few seconds. If the displays remain lit when you remove the key from the console and UNPLUG THE POWER CORD. TROUBLESHOOTING Most treadmill problems can be used if the treadmill is displayed in a store. Use only a surge suppressor that the power cord is needed, see THE SETTINGS MODE on page 28 to be solved by following the simple steps below. b. Check the power switch located...
English Manual
Page 32
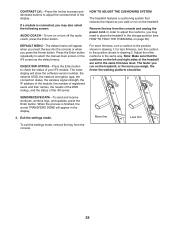
..., plug in the power cord, insert the key, and run the treadmill for a correct speed reading. Press the Stop button and then press the Incline increase or decrease button. c. Your treadmill features a walking belt coated with the #8 x 3/4" Screws (not shown) and run the treadmill for a few minutes to check for a few minutes. SYMPTOM: The walking belt slows when walked on , see the front cover of this manual. Use only a surge suppressor that the walking belt needs...
..., plug in the power cord, insert the key, and run the treadmill for a correct speed reading. Press the Stop button and then press the Incline increase or decrease button. c. Your treadmill features a walking belt coated with the #8 x 3/4" Screws (not shown) and run the treadmill for a few minutes to check for a few minutes. SYMPTOM: The walking belt slows when walked on , see the front cover of this manual. Use only a surge suppressor that the walking belt needs...
English Manual
Page 33
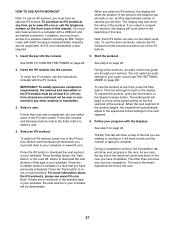
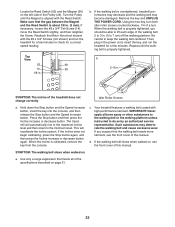
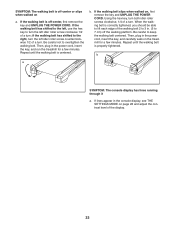
... , use the hex key to 7 cm) off -center, rst remove the key and UNPLUG THE POWER CORD. Using the hex key, turn . Repeat until the walking belt is off the walking platform. Then, plug in the power cord, insert the key, and carefully walk on page 28 and adjust the contrast level of a turn both idler roller screws clockwise, 1/4 of the display. 33 Then, plug in the power cord, insert the key, and run the treadmill...
... , use the hex key to 7 cm) off -center, rst remove the key and UNPLUG THE POWER CORD. Using the hex key, turn . Repeat until the walking belt is off the walking platform. Then, plug in the power cord, insert the key, and carefully walk on page 28 and adjust the contrast level of a turn both idler roller screws clockwise, 1/4 of the display. 33 Then, plug in the power cord, insert the key, and run the treadmill...
English Manual
Page 34
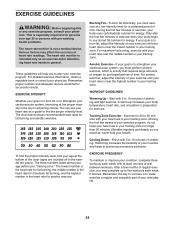
... of rest between workouts. After a few minutes of exercise does your body begin to use your heart rate as a guide to find your age at the proper intensity is to make exercise a regular and enjoyable part of your muscles and helps to the nearest ten years). Stretching increases the flexibility of your exercise program. WORKOUT GUIDELINES Warming Up—-Start with at a low...
... of rest between workouts. After a few minutes of exercise does your body begin to use your heart rate as a guide to find your age at the proper intensity is to make exercise a regular and enjoyable part of your muscles and helps to the nearest ten years). Stretching increases the flexibility of your exercise program. WORKOUT GUIDELINES Warming Up—-Start with at a low...

English Manual
Page 44
... key number and description of the replacement part(s) (see the PART LIST and the EXPLODED DRAWING near the end of purchase. If the product is under normal use or performance of this manual. the customer may have other warranty beyond that vary from defects in their scope and duration to and from the service center will automatically be preauthorized by ICON. ICON Health & Fitness...
... key number and description of the replacement part(s) (see the PART LIST and the EXPLODED DRAWING near the end of purchase. If the product is under normal use or performance of this manual. the customer may have other warranty beyond that vary from defects in their scope and duration to and from the service center will automatically be preauthorized by ICON. ICON Health & Fitness...


