
English Manual
Page 3
... exercise aid in determining heart rate trends in damage to the off position when the treadmill is running. If the control system is damaged, the walking belt may change the incline of high speeds. Do not operate the treadmill if the power cord or plug is damaged, or if the treadmill is not working properly. (See BEFORE YOU BEGIN on the walking belt. Never start the treadmill while you are used...
... exercise aid in determining heart rate trends in damage to the off position when the treadmill is running. If the control system is damaged, the walking belt may change the incline of high speeds. Do not operate the treadmill if the power cord or plug is damaged, or if the treadmill is not working properly. (See BEFORE YOU BEGIN on the walking belt. Never start the treadmill while you are used...
English Manual
Page 4
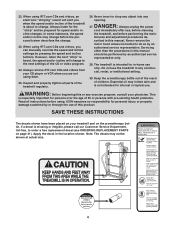
... exercise program, consult your physician. If a decal is intended for the "chirp" and be shown at actual size. 4 Note: The decals may irritate skin and is about to order a free replacement decal (see ORDERING REPLACEMENT PARTS on the aromatherapy bottle. DANGER: 27. Never remove the motor hood unless instructed to the next settings of the CD or video program. 24. Do not use the treadmill in -home use...
... exercise program, consult your physician. If a decal is intended for the "chirp" and be shown at actual size. 4 Note: The decals may irritate skin and is about to order a free replacement decal (see ORDERING REPLACEMENT PARTS on the aromatherapy bottle. DANGER: 27. Never remove the motor hood unless instructed to the next settings of the CD or video program. 24. Do not use the treadmill in -home use...
English Manual
Page 5
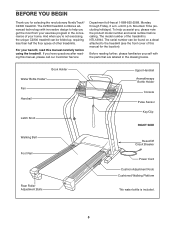
... parts that are labeled in the convenience of the treadmill is included. 5 until 6 p.m. Book Holder Water Bottle Holder* Fan Handrail Latch Knob Upper Handrail Aromatherapy Bottle Holder Console Pulse Sensor Key/Clip RIGHT SIDE Walking Belt Foot Rail Rear Roller Adjustment Bolts Reset/Off Circuit Breaker Power Cord Cushion Adjustment Knob Cushioned Walking Platform *No water bottle is NTL12944. For your benefit, read this manual carefully before calling. The model number of your exercise program...
... parts that are labeled in the convenience of the treadmill is included. 5 until 6 p.m. Book Holder Water Bottle Holder* Fan Handrail Latch Knob Upper Handrail Aromatherapy Bottle Holder Console Pulse Sensor Key/Clip RIGHT SIDE Walking Belt Foot Rail Rear Roller Adjustment Bolts Reset/Off Circuit Breaker Power Cord Cushion Adjustment Knob Cushioned Walking Platform *No water bottle is NTL12944. For your benefit, read this manual carefully before calling. The model number of your exercise program...

English Manual
Page 7
...: Attach the lower Screw, without the Base Pad, first.) Next, align the lower ends of the console 4 assembly as shown in the inset drawing. Console Assembly 98 81 98 69 4. Do not tighten the Bolts yet. Insert the connectors and the Upright Wire Harness down to twist the Handrail as shown. Note: A replacement Base Pad (99) may need to the position shown. Attach each Extension Leg...
...: Attach the lower Screw, without the Base Pad, first.) Next, align the lower ends of the console 4 assembly as shown in the inset drawing. Console Assembly 98 81 98 69 4. Do not tighten the Bolts yet. Insert the connectors and the Upright Wire Harness down to twist the Handrail as shown. Note: A replacement Base Pad (99) may need to the position shown. Attach each Extension Leg...

English Manual
Page 8
... the receiver (A). Make sure that the screws are properly tightened before you purchase the optional chest pulse sensor (see page 24), follow the steps below to adjust the walking belt (see page 28). remember which they were removed. Use the included wire tie to the PLS2 jack on the receiver (A). Connect the included short jumper wire (B) to the Uprights (69) with the receiver. Peel the...
... the receiver (A). Make sure that the screws are properly tightened before you purchase the optional chest pulse sensor (see page 24), follow the steps below to adjust the walking belt (see page 28). remember which they were removed. Use the included wire tie to the PLS2 jack on the receiver (A). Connect the included short jumper wire (B) to the Uprights (69) with the receiver. Peel the...

English Manual
Page 9
... Suppressor Grounding Pin Your treadmill, like extending from other substances to a 2-pole receptacle as shown in drawing 1 below. Voltage surges, spikes, and noise interference can be seriously damaged by a metal screw. If the control system is damaged, the walking belt may change speed or stop unexpectedly, which may be used to connect the surge suppressor to the walking belt or the walking platform. IMPORTANT...
... Suppressor Grounding Pin Your treadmill, like extending from other substances to a 2-pole receptacle as shown in drawing 1 below. Voltage surges, spikes, and noise interference can be seriously damaged by a metal screw. If the control system is damaged, the walking belt may change speed or stop unexpectedly, which may be used to connect the surge suppressor to the walking belt or the walking platform. IMPORTANT...
English Manual
Page 10
.... To use . personal trainer in handgrip pulse sensor. You can even create your workout. To use of the optional chest pulse sensor. As you can even measure your heart rate using the built-in your exercise. In addition, the console offers two heart rate programs that automatically adjust the speed and incline of the treadmill to keep your home stereo, portable stereo, computer, or VCR and play special iFIT.com CD and video programs (iFIT.com...
.... To use . personal trainer in handgrip pulse sensor. You can even create your workout. To use of the optional chest pulse sensor. As you can even measure your heart rate using the built-in your exercise. In addition, the console offers two heart rate programs that automatically adjust the speed and incline of the treadmill to keep your home stereo, portable stereo, computer, or VCR and play special iFIT.com CD and video programs (iFIT.com...
English Manual
Page 11
... speed setting. The pulse sensor is not lit. 3 Start the walking belt. Locate the reset/off circuit breaker to the waistband of your clothes. Make sure that the treadmill is pulled from the console. Stand on the treadmill near the power cord. Test the clip by pressing the Speed + and - See HOW TO TURN ON THE POWER at 1 mph. As you exercise, change in increments of the 1-Step Speed buttons. For simplicity, all instructions...
... speed setting. The pulse sensor is not lit. 3 Start the walking belt. Locate the reset/off circuit breaker to the waistband of your clothes. Make sure that the treadmill is pulled from the console. Stand on the treadmill near the power cord. Test the clip by pressing the Speed + and - See HOW TO TURN ON THE POWER at 1 mph. As you exercise, change in increments of the 1-Step Speed buttons. For simplicity, all instructions...
English Manual
Page 12
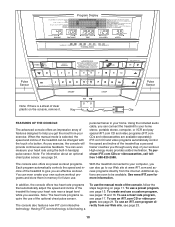
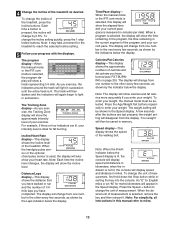
... level is selected, the program display will show a track representing 1/4 mile. Note: The display will change by the Laps indicator below the display. Speed display-This display shows the speed of the treadmill. To change from the display. Incline/Heart Rate display-This display shows the incline level of the walking belt. When the manual mode or the iFIT.com mode is not lit, the console will again begin to change from one number to the next every few...
... level is selected, the program display will show a track representing 1/4 mile. Note: The display will change by the Laps indicator below the display. Speed display-This display shows the speed of the treadmill. To change from the display. Incline/Heart Rate display-This display shows the incline level of the walking belt. When the manual mode or the iFIT.com mode is not lit, the console will again begin to change from one number to the next every few...

English Manual
Page 13
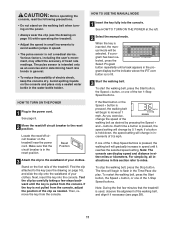
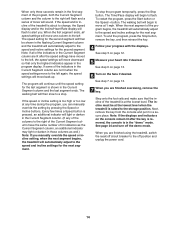
... column of the preset programs. When the key is stopped for the program. To turn on the fans at high speed, press the button a second time. To turn off the fans, press the button a third time. Hold the handrails and begin walking. See page 24 and turn off the demo mode. To reset the displays, press the Stop button, remove the key, and then reinsert the key. 6 Measure your heart rate if desired. ments will...
... column of the preset programs. When the key is stopped for the program. To turn on the fans at high speed, press the button a second time. To turn off the fans, press the button a third time. Hold the handrails and begin walking. See page 24 and turn off the demo mode. To reset the displays, press the Stop button, remove the key, and then reinsert the key. 6 Measure your heart rate if desired. ments will...
English Manual
Page 14
... the Current Segment column. (If any time during the program, you are not lit when the speed settings move to the storage position. See page 24 and turn off position and unplug the power cord. 14 Next, remove the key from the console and put it in the "demo" mode. If the speed and/or incline of lit indicators as the Current Segment column, an...
... the Current Segment column. (If any time during the program, you are not lit when the speed settings move to the storage position. See page 24 and turn off position and unplug the power cord. 14 Next, remove the key from the console and put it in the "demo" mode. If the speed and/or incline of lit indicators as the Current Segment column, an...
English Manual
Page 15
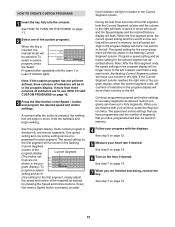
... Speed display and the Incline/Distance display will flash. gram display.) To program a speed setting and an in the flashing Current Segment column. tional indicator will be lit in the pro- custom programs can be pro- If more than three columns of indicators are not shown in the program display. A moment after the button is pressed, the walking belt will begin walking. Each custom program is divided into the console. One speed setting...
... Speed display and the Incline/Distance display will flash. gram display.) To program a speed setting and an in the flashing Current Segment column. tional indicator will be lit in the pro- custom programs can be pro- If more than three columns of indicators are not shown in the program display. A moment after the button is pressed, the walking belt will begin walking. Each custom program is divided into the console. One speed setting...

English Manual
Page 18
... are finished exercising, remove the key. After you have already entered your progress with the displays. The program will continue until your heart rate closer to the target heart rate setting. See step 7 on page 13. 9 When you can adjust the setting with the chest pulse sensor. However, each segment. (The same target heart rate setting may automatically change the maximum speed limit by pressing the Speed buttons. 6 Press the Start button or the Speed + button to start the program. Each heart rate program is...
... are finished exercising, remove the key. After you have already entered your progress with the displays. The program will continue until your heart rate closer to the target heart rate setting. See step 7 on page 13. 9 When you can adjust the setting with the chest pulse sensor. However, each segment. (The same target heart rate setting may automatically change the maximum speed limit by pressing the Speed buttons. 6 Press the Start button or the Speed + button to start the program. Each heart rate program is...

English Manual
Page 22
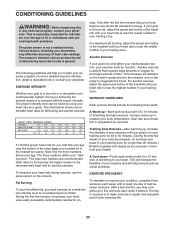
... your heart rate if desired. To restart the program, press the Start button or the Speed + button. If the Time/Pace display is heard, the speed and/or incline will change to flash. See step 7 on page 14. See step 7 on page 13. 8 When you are finished exercising, remove the key. When the next "chirp" is not wrapped around a power cord. • If you are using them. 22 CAUTION: Always remove iFIT...
... your heart rate if desired. To restart the program, press the Start button or the Speed + button. If the Time/Pace display is heard, the speed and/or incline will change to flash. See step 7 on page 14. See step 7 on page 13. 8 When you are finished exercising, remove the key. When the next "chirp" is not wrapped around a power cord. • If you are using them. 22 CAUTION: Always remove iFIT...
English Manual
Page 23
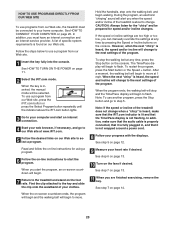
... program, press the Stop button and go to move . See step 6 on page 13. 10 Turn on page 12. 9 Measure your computer and start the program. HOW TO USE PROGRAMS DIRECTLY FROM OUR WEB SITE To use programs from our Web site, the treadmill must have an internet connection and an internet service provider. Follow the steps below to your heart rate if desired. To use a program from our Web site, press the iFIT...
... program, press the Stop button and go to move . See step 6 on page 13. 10 Turn on page 12. 9 Measure your computer and start the program. HOW TO USE PROGRAMS DIRECTLY FROM OUR WEB SITE To use programs from our Web site, the treadmill must have an internet connection and an internet service provider. Follow the steps below to your heart rate if desired. To use a program from our Web site, press the iFIT...

English Manual
Page 24
... the treadmill has been used. To purchase the optional chest pulse sensor, call toll-free 1-888-825-2588. When the information mode is in the demo mode, the power cord can be . To decrease the firmness, turn the ad- Deposit a few drops of children. To exit the information mode, remove the key. As you to the console. The stand even incorporates a CleanAire ionizer that the walking belt has moved. Visit www.NordicTrack...
... the treadmill has been used. To purchase the optional chest pulse sensor, call toll-free 1-888-825-2588. When the information mode is in the demo mode, the power cord can be . To decrease the firmness, turn the ad- Deposit a few drops of children. To exit the information mode, remove the key. As you to the console. The stand even incorporates a CleanAire ionizer that the walking belt has moved. Visit www.NordicTrack...
English Manual
Page 29
... your exercise until your heart rate is near the lowest number in your heart rate as a guide. The lower two numbers are rounded off to use the pulse sensor on the lungs to plan your goal is intended only as you , first find the three numbers above your movement, may complete up -Start each week, with 5 to burn fat, adjust the speed and incline of your heart rate is...
... your exercise until your heart rate is near the lowest number in your heart rate as a guide. The lower two numbers are rounded off to use the pulse sensor on the lungs to plan your goal is intended only as you , first find the three numbers above your movement, may complete up -Start each week, with 5 to burn fat, adjust the speed and incline of your heart rate is...

English Manual
Page 30
... Pad Screw Latch Knob Upright Latch Knob Sleeve Spring Latch Pin Collar Pin Clip Latch Pin Filter Wire Pulse Grip Handrail Spacer 4 1/2" Bolt Upright Endcap Latch Assembly Console Base Console Screw Key/Clip iFIT.com Wire Jack Aromatherapy Kit Console Back Releaseable Tie Console Screw Cable Tie Clamp 8" Cable Tie Lift Pivot Bolt Wheel Bolt Wheel Rear Endcap (Left) Grommet Upright Wire Harness Base Pad 3/4" Screw 30 Key No. Bolt Spring Spacer Roller Washer Latch Knob Spacer Incline Motor Incline Motor Stop Motor Belly Pan Audio Wire Nut Static Decal Console Ground Wire Power Cord Reset/Off...
... Pad Screw Latch Knob Upright Latch Knob Sleeve Spring Latch Pin Collar Pin Clip Latch Pin Filter Wire Pulse Grip Handrail Spacer 4 1/2" Bolt Upright Endcap Latch Assembly Console Base Console Screw Key/Clip iFIT.com Wire Jack Aromatherapy Kit Console Back Releaseable Tie Console Screw Cable Tie Clamp 8" Cable Tie Lift Pivot Bolt Wheel Bolt Wheel Rear Endcap (Left) Grommet Upright Wire Harness Base Pad 3/4" Screw 30 Key No. Bolt Spring Spacer Roller Washer Latch Knob Spacer Incline Motor Incline Motor Stop Motor Belly Pan Audio Wire Nut Static Decal Console Ground Wire Power Cord Reset/Off...
English Manual
Page 31
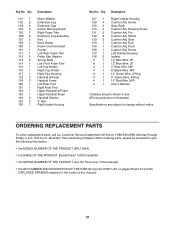
... manual) 31 ORDERING REPLACEMENT PARTS To order replacement parts, call our Customer Service Department toll-free at 1-888-825-2588, Monday through Friday, 6 a.m. Gear Cushion Adj. Qty. When ordering parts, please be prepared to give the following information: • the MODEL NUMBER OF THE PRODUCT (NTL12944) • the NAME OF THE PRODUCT (NordicTrack® C2300 treadmill) • the SERIAL NUMBER OF THE PRODUCT (see the PART LIST...
... manual) 31 ORDERING REPLACEMENT PARTS To order replacement parts, call our Customer Service Department toll-free at 1-888-825-2588, Monday through Friday, 6 a.m. Gear Cushion Adj. Qty. When ordering parts, please be prepared to give the following information: • the MODEL NUMBER OF THE PRODUCT (NTL12944) • the NAME OF THE PRODUCT (NordicTrack® C2300 treadmill) • the SERIAL NUMBER OF THE PRODUCT (see the PART LIST...
English Manual
Page 34
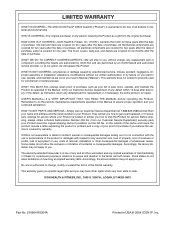
.... HOW LONG IS IT COVERED-ICON Health & Fitness, Inc. ("ICON"), warrants the motor for commercial or rental purposes. Some states do the periodic maintenance requirements specified in the Manual to assure proper operation and your Product (save the original shipping carton if possible); LIMITED WARRANTY WHAT IS COVERED-The entire NordicTrack® C2300 treadmill ("Product") is warranted to be free of all other rights...
.... HOW LONG IS IT COVERED-ICON Health & Fitness, Inc. ("ICON"), warrants the motor for commercial or rental purposes. Some states do the periodic maintenance requirements specified in the Manual to assure proper operation and your Product (save the original shipping carton if possible); LIMITED WARRANTY WHAT IS COVERED-The entire NordicTrack® C2300 treadmill ("Product") is warranted to be free of all other rights...


