
English Manual
Page 3
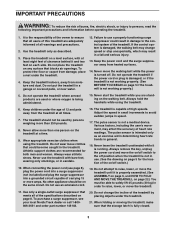
... the treadmill. Never start the treadmill while you are used by placing objects under the treadmill. 4. Keep children under the age of heart rate readings. Never allow more than 250 pounds. 8. Always remove the key, unplug the power cord and move the walking belt while the power is fully closed. 3 Use only a single-outlet surge suppressor that the storage latch is turned off position when the treadmill is not working properly...
... the treadmill. Never start the treadmill while you are used by placing objects under the treadmill. 4. Keep children under the age of heart rate readings. Never allow more than 250 pounds. 8. Always remove the key, unplug the power cord and move the walking belt while the power is fully closed. 3 Use only a single-outlet surge suppressor that the storage latch is turned off position when the treadmill is not working properly...
English Manual
Page 4
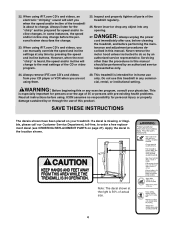
... this manual. tenance and adjustment procedures de- Do not use only. 22. If a decal is about to order a free replacement decal (see ORDERING REPLACEMENT PARTS on your CD player or VCR when you are not using iFIT.com CD's and videos, you when the speed and/or incline of the CD or video program. 25. When using . Never remove the motor hood unless instructed to the next settings of the treadmill...
... this manual. tenance and adjustment procedures de- Do not use only. 22. If a decal is about to order a free replacement decal (see ORDERING REPLACEMENT PARTS on your CD player or VCR when you are not using iFIT.com CD's and videos, you when the speed and/or incline of the CD or video program. 25. When using . Never remove the motor hood unless instructed to the next settings of the treadmill...

English Manual
Page 5
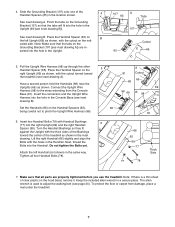
... your exercise program in the drawing below. For your home. please call our Customer Service Department toll-free at 1-888-825-2588, Monday through Friday, 6 a.m. Book Holder Hand Weight Holder* Console Handrail LEFT SIDE Lock Knob Water Bottle Holder† Pulse Sensor Key/Clip RIGHT SIDE Walking Belt Foot Rail On/Off Switch Circuit Breaker Power Cord Rear Roller Adjustment Bolts *For information about optional hand weights, see the front cover of the treadmill...
... your exercise program in the drawing below. For your home. please call our Customer Service Department toll-free at 1-888-825-2588, Monday through Friday, 6 a.m. Book Holder Hand Weight Holder* Console Handrail LEFT SIDE Lock Knob Water Bottle Holder† Pulse Sensor Key/Clip RIGHT SIDE Walking Belt Foot Rail On/Off Switch Circuit Breaker Power Cord Rear Roller Adjustment Bolts *For information about optional hand weights, see the front cover of the treadmill...
English Manual
Page 7
...B the left Handrail (not shown) in the inset drawing. Connect the Upright Wire Harness (98) to the wires extending from damage, place a mat under the treadmill. 7 Tighten all parts are in the Upright. 107 A 65 Tabs 107 Cutout 65 69 5. Set the Handrails (66) on the Grounding Bracket (107 [see ...65), being careful not to adjust the walking belt (see page 24). Lift the right Handrail (66) slightly and align the Bolts with the holes in a secure place. To protect the floor or carpet from the Console Base (81). 4. Attach the left Upright (69) as shown, with ...
...B the left Handrail (not shown) in the inset drawing. Connect the Upright Wire Harness (98) to the wires extending from damage, place a mat under the treadmill. 7 Tighten all parts are in the Upright. 107 A 65 Tabs 107 Cutout 65 69 5. Set the Handrails (66) on the Grounding Bracket (107 [see ...65), being careful not to adjust the walking belt (see page 24). Lift the right Handrail (66) slightly and align the Bolts with the holes in a secure place. To protect the floor or carpet from the Console Base (81). 4. Attach the left Upright (69) as shown, with ...

English Manual
Page 8
... to the walking belt or the walking platform. an equipment-grounding conductor and a grounding plug. Plug the power cord into a surge suppressor, and plug the surge suppressor into an appropriate outlet that looks like any other substances to whether the product is UL 1449 listed as a properly grounded outlet box cover. A temporary adapter that is damaged, the walking belt may change speed or stop unexpectedly, which...
... to the walking belt or the walking platform. an equipment-grounding conductor and a grounding plug. Plug the power cord into a surge suppressor, and plug the surge suppressor into an appropriate outlet that looks like any other substances to whether the product is UL 1449 listed as a properly grounded outlet box cover. A temporary adapter that is damaged, the walking belt may change speed or stop unexpectedly, which...

English Manual
Page 9
.... For information about an optional chest pulse sensor, see page 12. To use the manual mode of working out with a touch of a button. As you an effective workout. You can be changed with a class and an instructor-the hottest new trend at www.iFIT.com and access programs directly from your exercise. The console also offers four preset workout programs and two heart rate programs. Each program automatically controls the speed and incline of clear...
.... For information about an optional chest pulse sensor, see page 12. To use the manual mode of working out with a touch of a button. As you an effective workout. You can be changed with a class and an instructor-the hottest new trend at www.iFIT.com and access programs directly from your exercise. The console also offers four preset workout programs and two heart rate programs. Each program automatically controls the speed and incline of clear...

English Manual
Page 10
... button is pulled from the console, adjust the position of heart rate readings. The pulse sensor is used, observe the alignment of the walking belt, and align it may take a moment for the treadmill to the key (see the drawing on page 9), and slide the clip onto the waistband of the treadmill. See HOW TO TURN ON THE POWER at 1 mph. As you exercise, change by pressing the Speed...
... button is pulled from the console, adjust the position of heart rate readings. The pulse sensor is used, observe the alignment of the walking belt, and align it may take a moment for the treadmill to the key (see the drawing on page 9), and slide the clip onto the waistband of the treadmill. See HOW TO TURN ON THE POWER at 1 mph. As you exercise, change by pressing the Speed...
English Manual
Page 11
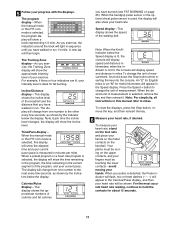
... walking belt. Calories/Pulse display-This display shows the approximate numbers of the program, and your progress with the displays. To measure your heart rate, stand on page 25). To reset the displays, press the Stop button, remove the key, and then reinsert the key. 6 Measure your heart rate. The program display-When the manual mode or the iFIT.com mode is used, the display will then begin. When the handgrip pulse sensor or the optional chest pulse sensor is selected, the program display will display speed...
... walking belt. Calories/Pulse display-This display shows the approximate numbers of the program, and your progress with the displays. To measure your heart rate, stand on page 25). To reset the displays, press the Stop button, remove the key, and then reinsert the key. 6 Measure your heart rate. The program display-When the manual mode or the iFIT.com mode is used, the display will then begin. When the handgrip pulse sensor or the optional chest pulse sensor is selected, the program display will display speed...

English Manual
Page 12
... TO TURN ON THE POWER on page 10. 2 Select one incline setting are pro- A moment after the key is removed, the console is in the current segment.) One speed setting and one of the program display. (The incline set- ments of the treadmill to the lowest level. 7 When you are finished using the treadmill, move the on/off switch near the power cord to the off the demo mode. Note: If the displays and...
... TO TURN ON THE POWER on page 10. 2 Select one incline setting are pro- A moment after the key is removed, the console is in the current segment.) One speed setting and one of the program display. (The incline set- ments of the treadmill to the lowest level. 7 When you are finished using the treadmill, move the on/off switch near the power cord to the off the demo mode. Note: If the displays and...

English Manual
Page 14
..., press the Start button (pressing the Start button at this time will begin walking. When a heart rate program is shown. After you are over 60 years of the two heart rate program indicators lights. If desired, change the maximum speed limit by pressing the 1-step Speed buttons. 6 Press the Start button or the Speed + button to start the program). See the instructions included with the optional chest pulse sensor. 2 Insert the key fully into 20, oneminute segments. (The Time/Pace display will be programmed...
..., press the Start button (pressing the Start button at this time will begin walking. When a heart rate program is shown. After you are over 60 years of the two heart rate program indicators lights. If desired, change the maximum speed limit by pressing the 1-step Speed buttons. 6 Press the Start button or the Speed + button to start the program). See the instructions included with the optional chest pulse sensor. 2 Insert the key fully into 20, oneminute segments. (The Time/Pace display will be programmed...

English Manual
Page 15
... speed and incline of the treadmill will automatically increase or decrease to bring your progress with the chest pulse sensor. If your pulse is not detected during the program, the letters PLS will flash in the program. During the program, the console will regularly compare your heart rate is completed, remove the key from the console. To use a heart rate program again, reselect the program and start it at any time, press the Stop button...
... speed and incline of the treadmill will automatically increase or decrease to bring your progress with the chest pulse sensor. If your pulse is not detected during the program, the letters PLS will flash in the program. During the program, the console will regularly compare your heart rate is completed, remove the key from the console. To use a heart rate program again, reselect the program and start it at any time, press the Stop button...

English Manual
Page 18
.... Plug one end of the treadmill near the power cord. B ANT. If your VCR is flashing. When the key is inserted, the manual mode will not respond to a CD or video program when the Time/Pace display is connected to change . 18 Note: If the Time/Pace display is being used, see instruction A below to 18. If the AUDIO OUT jack is flashing, press the Start button or the Speed + button...
.... Plug one end of the treadmill near the power cord. B ANT. If your VCR is flashing. When the key is inserted, the manual mode will not respond to a CD or video program when the Time/Pace display is connected to change . 18 Note: If the Time/Pace display is being used, see instruction A below to 18. If the AUDIO OUT jack is flashing, press the Start button or the Speed + button...
English Manual
Page 19
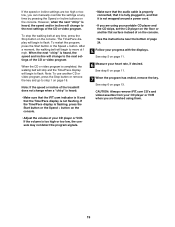
... that it is fully plugged in, and that the Time/Pace display is heard, the speed and/or incline will stop the walking belt at any time by pressing the Speed or Incline buttons on the console. • See the instructions near the bottom of the CD or video program. If the Time/Pace display is completed, the walking belt will change to the next settings of page 24. 5 Follow...
... that it is fully plugged in, and that the Time/Pace display is heard, the speed and/or incline will stop the walking belt at any time by pressing the Speed or Incline buttons on the console. • See the instructions near the bottom of the CD or video program. If the Time/Pace display is completed, the walking belt will change to the next settings of page 24. 5 Follow...

English Manual
Page 20
... the console. During the program, an electronic "chirping" sound will change to start an internet connection. 4 Start your progress with the displays. See HOW TO TURN ON THE POWER on -line instructions to the next settings of the treadmill does not change . Read and follow the on-line instructions for using a program. 6 Follow the on page 10. 2 Select the iFIT.com mode. When the program is not wrapped around a power cord...
... the console. During the program, an electronic "chirping" sound will change to start an internet connection. 4 Start your progress with the displays. See HOW TO TURN ON THE POWER on -line instructions to the next settings of the treadmill does not change . Read and follow the on-line instructions for using a program. 6 Follow the on page 10. 2 Select the iFIT.com mode. When the program is not wrapped around a power cord...

English Manual
Page 21
... Incline/Distance display will be removed from the console. 21 Press the Speed + button to the console. To purchase the optional chest pulse sensor, call toll-free 1-800772-0257. When the information mode is in the demo mode, the power cord can be plugged in a preset sequence, although the buttons on the console will show the total number of miles or kilometers that the treadmill has been operated. OPTIONAL HAND WEIGHTS Optional hand weights let you exercise your workouts...
... Incline/Distance display will be removed from the console. 21 Press the Speed + button to the console. To purchase the optional chest pulse sensor, call toll-free 1-800772-0257. When the information mode is in the demo mode, the power cord can be plugged in a preset sequence, although the buttons on the console will show the total number of miles or kilometers that the treadmill has been operated. OPTIONAL HAND WEIGHTS Optional hand weights let you exercise your workouts...

English Manual
Page 24
... -center, remove the key and UN- Using the allen b wrench, turn both rear roller adjustment bolts counterclockwise, 1/4 of the walking belt 3 to the right, turn the left rear roller bolt clockwise 1/2 of the Incline buttons. Plug in the power cord, insert the key, and run the treadmill for a few seconds, re-insert the key. Use only a single-outlet surge suppressor that meets all of the treadmill does not change correctly or does not change when iFIT.com...
... -center, remove the key and UN- Using the allen b wrench, turn both rear roller adjustment bolts counterclockwise, 1/4 of the walking belt 3 to the right, turn the left rear roller bolt clockwise 1/2 of the Incline buttons. Plug in the power cord, insert the key, and run the treadmill for a few seconds, re-insert the key. Use only a single-outlet surge suppressor that meets all of the treadmill does not change correctly or does not change when iFIT.com...
English Manual
Page 25
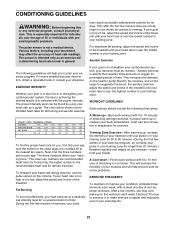
..., adjust the speed and incline of exercise, your body Training Zone Exercise-After warming up -Start each week, with 5 to the muscles, and on the console. The three numbers define your exercise must exercise at least one day of oxygen for energy. The lower two numbers are rounded off to five workouts each week if desired. The sensor is near the highest number in your body temperature, heart rate and...
..., adjust the speed and incline of exercise, your body Training Zone Exercise-After warming up -Start each week, with 5 to the muscles, and on the console. The three numbers define your exercise must exercise at least one day of oxygen for energy. The lower two numbers are rounded off to five workouts each week if desired. The sensor is near the highest number in your body temperature, heart rate and...

English Manual
Page 26
... Power Cord On/Off Switch Spring Bolt Belt Guide Screw Belt Guide Isolator Motor Star Washer Spring Washer Spring Nut Right Foot Rail Cap Key No. Bolt Warning Decal Allen Wrench Rear Roller Audio Wire Catch Handrail Spacer Handrail Spring Pad Screw Lock Knob Upright Lock Knob Sleeve Spring Lock Pin Collar Pin Clip Lock Pin Filter Wire Pulse Grip Handrail Bushing Handrail Bolt Upright Endcap Latch Assembly Console Base Console Belly Pan Screw Key/Clip IFIT.com Wire Jack Handrail Endcap Console Back Releaseable Tie 1" Console Screw Cable...
... Power Cord On/Off Switch Spring Bolt Belt Guide Screw Belt Guide Isolator Motor Star Washer Spring Washer Spring Nut Right Foot Rail Cap Key No. Bolt Warning Decal Allen Wrench Rear Roller Audio Wire Catch Handrail Spacer Handrail Spring Pad Screw Lock Knob Upright Lock Knob Sleeve Spring Lock Pin Collar Pin Clip Lock Pin Filter Wire Pulse Grip Handrail Bushing Handrail Bolt Upright Endcap Latch Assembly Console Base Console Belly Pan Screw Key/Clip IFIT.com Wire Jack Handrail Endcap Console Back Releaseable Tie 1" Console Screw Cable...

English Manual
Page 27
... NAME OF THE PRODUCT (NordicTrack® C 1800s treadmill) • the SERIAL NUMBER OF THE PRODUCT (see the front cover of this manual) • the KEY NUMBER AND DESCRIPTION OF THE PART(S) (see the PART LIST on pages 26 and 27 and the EXPLODED DRAWING attached in box # These parts are not illustrated ORDERING REPLACEMENT PARTS To order replacement parts, call our Customer Service Department toll-free at 1-888-825-2588...
... NAME OF THE PRODUCT (NordicTrack® C 1800s treadmill) • the SERIAL NUMBER OF THE PRODUCT (see the front cover of this manual) • the KEY NUMBER AND DESCRIPTION OF THE PART(S) (see the PART LIST on pages 26 and 27 and the EXPLODED DRAWING attached in box # These parts are not illustrated ORDERING REPLACEMENT PARTS To order replacement parts, call our Customer Service Department toll-free at 1-888-825-2588...

English Manual
Page 28
.... notify our Customer Service Department of any defect within 10 days after the date of purchase. LIMITED WARRANTY WHAT IS COVERED-The entire NordicTrack® C 1800s treadmill ("Product") is warranted to be free of all other warranties and any implied warranties of merchantability or fitness for indirect, special or consequential damages arising out of or in connection with the use or performance of...
.... notify our Customer Service Department of any defect within 10 days after the date of purchase. LIMITED WARRANTY WHAT IS COVERED-The entire NordicTrack® C 1800s treadmill ("Product") is warranted to be free of all other warranties and any implied warranties of merchantability or fitness for indirect, special or consequential damages arising out of or in connection with the use or performance of...


