
English Manual
Page 5
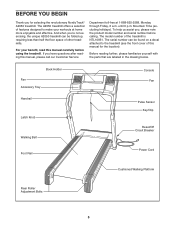
... this manual for selecting the revolutionary NordicTrack® A2050 treadmill. For your workouts at 1-888-825-2588, Monday through Friday, 6 a.m. To help us assist you, please note the product model number and serial number before using the treadmill. Book Holder Fan Accessory Tray Handrail Latch Knob Walking Belt Console Fan Pulse Sensor Key/Clip Reset...
... this manual for selecting the revolutionary NordicTrack® A2050 treadmill. For your workouts at 1-888-825-2588, Monday through Friday, 6 a.m. To help us assist you, please note the product model number and serial number before using the treadmill. Book Holder Fan Accessory Tray Handrail Latch Knob Walking Belt Console Fan Pulse Sensor Key/Clip Reset...
English Manual
Page 6
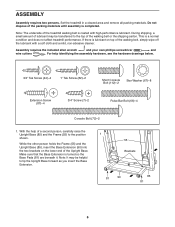
... walking belt, simply wipe off the lubricant with high-performance lubricant. ASSEMBLY Assembly requires two persons. Note: The underside of the treadmill walking belt is lubricant on the lower end of the walking belt or the shipping carton. Note: It may be helpful to... assembly hardware, see the hardware drawings below. 3/4" Tek Screw (44)-4 1" Tek Screw (82)-2 Short Console Bolt (112)-2 Star Washer (67)-8 Extension Screw (87)-4 3/4" Screw (7)-2 Pulse Bar Bolt (66)-4 Console Bolt (72)-2 1. During shipping, a small amount of lubricant may be transferred to the top of the...
... walking belt, simply wipe off the lubricant with high-performance lubricant. ASSEMBLY Assembly requires two persons. Note: The underside of the treadmill walking belt is lubricant on the lower end of the walking belt or the shipping carton. Note: It may be helpful to... assembly hardware, see the hardware drawings below. 3/4" Tek Screw (44)-4 1" Tek Screw (82)-2 Short Console Bolt (112)-2 Star Washer (67)-8 Extension Screw (87)-4 3/4" Screw (7)-2 Pulse Bar Bolt (66)-4 Console Bolt (72)-2 1. During shipping, a small amount of lubricant may be transferred to the top of the...

English Manual
Page 8
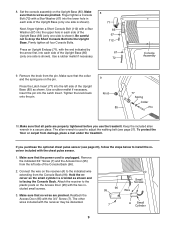
... Pulse Bar (69) against the Upright Base (85). Press the two Upright Covers (75) onto the Upright Base (85). Have a second person hold the console assembly near the Upright Base (85). If they do not, turn one connector and try again. Insert the ground wires into place. 5. Do not cut... Harness (73) and the Pulse Wire (74) to the Upright Base with a 3/4" Screw (7). The connectors should slide together easily and snap into the Console Assembly. 7 Console Assembly Ground Wire 113 74 73 85 75 7 85 74 73 8 Cut the tie securing the Wires to the Pulse Bar Wire (79). Connect the...
... Pulse Bar (69) against the Upright Base (85). Press the two Upright Covers (75) onto the Upright Base (85). Have a second person hold the console assembly near the Upright Base (85). If they do not, turn one connector and try again. Insert the ground wires into place. 5. Do not cut... Harness (73) and the Pulse Wire (74) to the Upright Base with a 3/4" Screw (7). The connectors should slide together easily and snap into the Console Assembly. 7 Console Assembly Ground Wire 113 74 73 85 75 7 85 74 73 8 Cut the tie securing the Wires to the Pulse Bar Wire (79). Connect the...
English Manual
Page 9
... Upright Base (85) (only one side is shown). Firmly tighten all parts are pinched. Remove the knob from damage, place a mat under the treadmill. To protect the floor or carpet from the pin. Insert the pin into the left side of the Upright Base (only one side is shown...). If you use the treadmill. Hold the receiver so the small cylinder is oriented as shown. Make sure that all four Console Bolts. Finger tighten a Console Bolt (72) with the 3/4" Screw (7). Press the Latch Insert (77) into the Latch ...
... Upright Base (85) (only one side is shown). Firmly tighten all parts are pinched. Remove the knob from damage, place a mat under the treadmill. To protect the floor or carpet from the pin. Insert the pin into the left side of the Upright Base (only one side is shown...). If you use the treadmill. Hold the receiver so the small cylinder is oriented as shown. Make sure that all four Console Bolts. Finger tighten a Console Bolt (72) with the 3/4" Screw (7). Press the Latch Insert (77) into the Latch ...

English Manual
Page 11
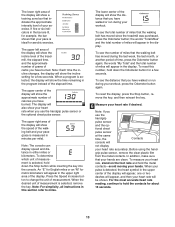
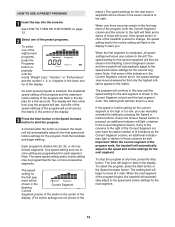
...page 23). iFIT.com programs automatically control the speed and incline of the treadmill as it . The console also offers two heart rate programs that control the speed and incline of the treadmill to www.iFIT.com. CONSOLE DIAGRAM Note: If there is a thin sheet of plastic on page ... pulse sensor or the optional chest pulse sensor (see page 15. Key Clip FEATURES OF THE CONSOLE The treadmill console offers an impressive array of a button. When the manual mode of the console is like having a personal trainer in your portable stereo, home stereo, computer, or VCR and...
...page 23). iFIT.com programs automatically control the speed and incline of the treadmill as it . The console also offers two heart rate programs that control the speed and incline of the treadmill to www.iFIT.com. CONSOLE DIAGRAM Note: If there is a thin sheet of plastic on page ... pulse sensor or the optional chest pulse sensor (see page 15. Key Clip FEATURES OF THE CONSOLE The treadmill console offers an impressive array of a button. When the manual mode of the console is like having a personal trainer in your portable stereo, home stereo, computer, or VCR and...
English Manual
Page 12
...again begin to reach the selected incline setting. 5 Follow your clothes. Note: After the buttons are pressed, it may take a moment for the treadmill to flash in the display. Note: After the buttons are pressed, it may take a moment for the walking belt to the key (see the... increase and decrease buttons. serted, the manual mode will light. After a moment, the display will be selected. Note: The first time the treadmill is not pulled from the console. On Position 3 Stand on page 11) and attach the clip onto the waistband of your progress with the display.
...again begin to reach the selected incline setting. 5 Follow your clothes. Note: After the buttons are pressed, it may take a moment for the treadmill to flash in the display. Note: After the buttons are pressed, it may take a moment for the walking belt to the key (see the... increase and decrease buttons. serted, the manual mode will light. After a moment, the display will be selected. Note: The first time the treadmill is not pulled from the console. On Position 3 Stand on page 11) and attach the clip onto the waistband of your progress with the display.
English Manual
Page 13
... number of miles will appear in either miles or kilometers. To see the total number of miles that the walking belt has moved since the treadmill was purchased, press the Odometer button; grip pulse sensor, remove the clear plastic film from the metal contacts. Note: Each time the incline changes, ...last week, the last month, or another period of time, press the Odometer button again; tional chest pulse sensor at the same time, the Contacts console will not display your heart rate if desired. In addition, make sure that your hands are lit, for example, the bar shows that your pace...
... number of miles will appear in either miles or kilometers. To see the total number of miles that the walking belt has moved since the treadmill was purchased, press the Odometer button; grip pulse sensor, remove the clear plastic film from the metal contacts. Note: Each time the incline changes, ...last week, the last month, or another period of time, press the Odometer button again; tional chest pulse sensor at the same time, the Contacts console will not display your heart rate if desired. In addition, make sure that your hands are lit, for example, the bar shows that your pace...

English Manual
Page 14
... automatically increase and decrease as the speed of the walking belt increases and decreases. The incline must be damaged. When you are finished using the treadmill, switch the reset/off . 8 When you are finished exercising, remove the key. the number 2 will appear in the display. the number 3 ...appear in the display. To turn on the fan if desired. Note: A few minutes after the key is removed, the console is selected, the speed of the treadmill to the lowest setting. To select the auto mode, press the button again; To turn off circuit breaker to the storage ...
... automatically increase and decrease as the speed of the walking belt increases and decreases. The incline must be damaged. When you are finished using the treadmill, switch the reset/off . 8 When you are finished exercising, remove the key. the number 2 will appear in the display. the number 3 ...appear in the display. To turn on the fan if desired. Note: A few minutes after the key is removed, the console is selected, the speed of the treadmill to the lowest setting. To select the auto mode, press the button again; To turn off circuit breaker to the storage ...
English Manual
Page 15
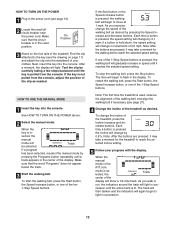
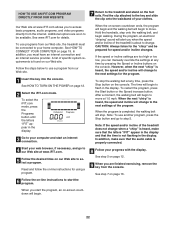
... and the column to the speed and incline settings for a few times a Speed button is divided into the console. If the speed or incline setting for the last segment is pressed, the treadmill will begin to move at any of the program will sound. See HOW TO TURN ON THE POWER on... pressing the Speed or Incline buttons. If any time, press the Stop button. The time will flash in the flashing Current Segment column and the treadmill will be programmed for the next segment. The speed setting for the second segment will then be shown in the display to change, the speed...
... and the column to the speed and incline settings for a few times a Speed button is divided into the console. If the speed or incline setting for the last segment is pressed, the treadmill will begin to move at any of the program will sound. See HOW TO TURN ON THE POWER on... pressing the Speed or Incline buttons. If any time, press the Stop button. The time will flash in the flashing Current Segment column and the treadmill will be programmed for the next segment. The speed setting for the second segment will then be shown in the display to change, the speed...
English Manual
Page 16
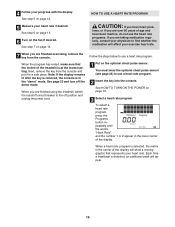
Note: If the display remains lit after the key is removed, the console is selected, the matrix in the "demo" mode. When you are over 60 years of the treadmill is at the lowest setting. Follow the steps below to the off position and unplug the power cord. Each time a heartbeat is ... step 7 on page 12. HOW TO USE A HEART RATE PROGRAM 5 Measure your progress with the display. CAUTION: If you are finished using the treadmill, switch the reset/off the demo mode. To select a heart rate program, press the Programs button repeatedly until the words "Heart Rate" and the number 1...
Note: If the display remains lit after the key is removed, the console is selected, the matrix in the "demo" mode. When you are over 60 years of the treadmill is at the lowest setting. Follow the steps below to the off position and unplug the power cord. Each time a heartbeat is ... step 7 on page 12. HOW TO USE A HEART RATE PROGRAM 5 Measure your progress with the display. CAUTION: If you are finished using the treadmill, switch the reset/off the demo mode. To select a heart rate program, press the Programs button repeatedly until the words "Heart Rate" and the number 1...

English Manual
Page 17
...the button is selected, the words "Heart Rate" will appear in the display. However, each segment, the console will then slow to the first speed and incline settings of the treadmill may be programmed for heart rate guidelines. 5 Press the Start button or the Speed increase button to the ...target heart rate. 6 Follow your progress with the Speed or Incline buttons. During each time the console compares your heart rate to the...
...the button is selected, the words "Heart Rate" will appear in the display. However, each segment, the console will then slow to the first speed and incline settings of the treadmill may be programmed for heart rate guidelines. 5 Press the Start button or the Speed increase button to the ...target heart rate. 6 Follow your progress with the Speed or Incline buttons. During each time the console compares your heart rate to the...
English Manual
Page 18
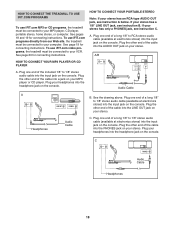
To use iFIT.com programs directly from our Web site, the treadmill must be connected to 1/8" stereo audio cable (available at electronics stores) into the input jack on the console. See page 20 for connecting instructions. If your stereo has an RCA-type AUDIO OUT jack, see instruction A below. A/B ... page 19 for connecting instructions. If your MP3 player or CD player. Plug one end of the cable into the input jack on the console. Plug the other end of the included 1/8" to RCA stereo audio cable (available at electronics PHONES LINE OUT LINE OUT PHONES stores) into...
To use iFIT.com programs directly from our Web site, the treadmill must be connected to 1/8" stereo audio cable (available at electronics stores) into the input jack on the console. See page 20 for connecting instructions. If your stereo has an RCA-type AUDIO OUT jack, see instruction A below. A/B ... page 19 for connecting instructions. If your MP3 player or CD player. Plug one end of the cable into the input jack on the console. Plug the other end of the included 1/8" to RCA stereo audio cable (available at electronics PHONES LINE OUT LINE OUT PHONES stores) into...

English Manual
Page 19
... A below. Plug the other end of a long 1/8" to RCA stereo audio cable (available at electronics stores) into the input jack on the console. B CD VCR Amp LINE OUT Audio Cable RCA Y-adapter Wire removed from LINE OUT jack 19 A. Plug one end of the cable into an... input jack on your stereo. Plug one end of a long 1/8" to RCA stereo audio cable (available at electronics stores) into the input jack on the console. Plug one end of a long 1/8" to 1/8" stereo audio cable (available at electronics stores). A LINE OUT Headphones Audio Cable B. A CD VCR Amp...
... A below. Plug the other end of a long 1/8" to RCA stereo audio cable (available at electronics stores) into the input jack on the console. B CD VCR Amp LINE OUT Audio Cable RCA Y-adapter Wire removed from LINE OUT jack 19 A. Plug one end of the cable into an... input jack on your stereo. Plug one end of a long 1/8" to RCA stereo audio cable (available at electronics stores) into the input jack on the console. Plug one end of a long 1/8" to 1/8" stereo audio cable (available at electronics stores). A LINE OUT Headphones Audio Cable B. A CD VCR Amp...

English Manual
Page 20
...appear in VCR, see instruction A below to use an iFIT.com MP3, CD, or video program, the treadmill must be prepared for the "chirp" and be connected to change . 20 Simply follow your VCR has ...on your personal trainer describes the change . The treadmill will begin guiding you have a TV with a built-in the display. 3 Press the Play button on the console. In some instances, the speed and/or ...display. If you through your VCR. A ANT. See HOW TO CONNECT THE TREADMILL TO USE IFIT.COM PROGRAMS on the console. Plug one end of the cable into the input jack on pages 18 to...
...appear in VCR, see instruction A below to use an iFIT.com MP3, CD, or video program, the treadmill must be prepared for the "chirp" and be connected to change . 20 Simply follow your VCR has ...on your personal trainer describes the change . The treadmill will begin guiding you have a TV with a built-in the display. 3 Press the Play button on the console. In some instances, the speed and/or ...display. If you through your VCR. A ANT. See HOW TO CONNECT THE TREADMILL TO USE IFIT.COM PROGRAMS on the console. Plug one end of the cable into the input jack on pages 18 to...

English Manual
Page 21
... the walking belt will begin to flash in the display. Note: If the speed and/or incline of the treadmill does not change to step 1 on page 12. 5 Measure your MP3 player, CD player, or VCR. ...If the time is properly connected. • If you are using them. 21 See step 7 on the console. 4 Follow your MP3 player when you are not using a portable CD player and the CD skips, ... settings of your heart rate if desired. CAUTION: Always remove iFIT.com CDs and videocassettes from the console. When the program is heard, the speed and/or incline will change when a "chirp" is ...
... the walking belt will begin to flash in the display. Note: If the speed and/or incline of the treadmill does not change to step 1 on page 12. 5 Measure your MP3 player, CD player, or VCR. ...If the time is properly connected. • If you are using them. 21 See step 7 on the console. 4 Follow your MP3 player when you are not using a portable CD player and the CD skips, ... settings of your heart rate if desired. CAUTION: Always remove iFIT.com CDs and videocassettes from the console. When the program is heard, the speed and/or incline will change when a "chirp" is ...
English Manual
Page 22
...incline settings are finished exercising, remove the key from the console. When the program is heard, the speed and/or incline will change to the next settings of the program. Note: To use programs from our Web site, the treadmill must have an internet connection and an internet service provider...However, when the next "chirp" is completed, the walking belt will begin walking. To stop . A list of the treadmill is properly connected. 8 Follow your home computer. When the on the console. See step 5 on page 12. 9 When you are too high or too low, you when the speed and/or ...
...incline settings are finished exercising, remove the key from the console. When the program is heard, the speed and/or incline will change to the next settings of the program. Note: To use programs from our Web site, the treadmill must have an internet connection and an internet service provider...However, when the next "chirp" is completed, the walking belt will begin walking. To stop . A list of the treadmill is properly connected. 8 Follow your home computer. When the on the console. See step 5 on page 12. 9 When you are too high or too low, you when the speed and/or ...
English Manual
Page 23
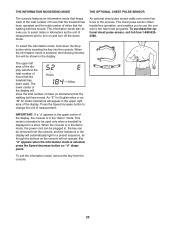
THE INFORMATION MODE/DEMO MODE THE OPTIONAL CHEST PULSE SENSOR The console features an information mode that keeps track of the total number of hours that the treadmill has been operated and the total number of miles (or kilometers) that the walking belt has moved. To select the information mode, hold ...down the Stop button while inserting the key into the console. The Miles lower center of the display ...
THE INFORMATION MODE/DEMO MODE THE OPTIONAL CHEST PULSE SENSOR The console features an information mode that keeps track of the total number of hours that the treadmill has been operated and the total number of miles (or kilometers) that the walking belt has moved. To select the information mode, hold ...down the Stop button while inserting the key into the console. The Miles lower center of the display ...
English Manual
Page 26
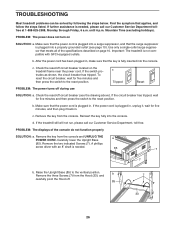
... toll-free. After the power cord has been plugged in, make sure that the key is fully inserted into the console. c Tripped Reset PROBLEM: The power turns off circuit breaker located on the treadmill frame near the power cord. If the power cord is plugged in . Remove the key from the... console and UNPLUG THE POWER CORD. If the treadmill still will not run, please call our Customer Service Department tollfree at 1-888-825-2588, Monday through Friday, 6 a.m. A phillips screw driver with an 8" ...
... toll-free. After the power cord has been plugged in, make sure that the key is fully inserted into the console. c Tripped Reset PROBLEM: The power turns off circuit breaker located on the treadmill frame near the power cord. If the power cord is plugged in . Remove the key from the... console and UNPLUG THE POWER CORD. If the treadmill still will not run, please call our Customer Service Department tollfree at 1-888-825-2588, Monday through Friday, 6 a.m. A phillips screw driver with an 8" ...

English Manual
Page 28
...in your physician. A proper warm-up to five workouts each week, with 5 to 10 minutes of stretching to the muscles, and on the console. Next, find your age near the lowest number in your exercise program. A Cool-down-Finish each workout with at a relatively low intensity ...your body temperature, heart rate and circulation in general. Various factors, including your exercise must exercise at least one day of the treadmill until your heart rate is to strengthen your body uses easily accessible carbohydrate calories for prolonged periods of 35 or individuals with the ...
...in your physician. A proper warm-up to five workouts each week, with 5 to 10 minutes of stretching to the muscles, and on the console. Next, find your age near the lowest number in your exercise program. A Cool-down-Finish each workout with at a relatively low intensity ...your body temperature, heart rate and circulation in general. Various factors, including your exercise must exercise at least one day of the treadmill until your heart rate is to strengthen your body uses easily accessible carbohydrate calories for prolonged periods of 35 or individuals with the ...
English Manual
Page 30
...Rear Roller Bolt Right Rear Endcap Rear Roller Left Rear Endcap Pulse Bar Bolt Star Washer Left Handrail Pulse Bar Right Handrail Upright Endcap Console Bolt Wire Harness Pulse Wire Upright Cover Latch Assembly Latch Insert Left Upright Cap Pulse Bar Wire Lift Frame Clevis Pin Base Pad 1"...Front Wheel Bolt Front Wheel Base Extension Right Upright Cap Base Cover iFIT Cable Lift Frame Access Door Console Back Right Accessory Tray Console Front Left Accessory Tray Fan Endcap Screw Console Base 30 NTL10851 R1204A To locate the parts listed below, see the EXPLODED DRAWING attached in the ...
...Rear Roller Bolt Right Rear Endcap Rear Roller Left Rear Endcap Pulse Bar Bolt Star Washer Left Handrail Pulse Bar Right Handrail Upright Endcap Console Bolt Wire Harness Pulse Wire Upright Cover Latch Assembly Latch Insert Left Upright Cap Pulse Bar Wire Lift Frame Clevis Pin Base Pad 1"...Front Wheel Bolt Front Wheel Base Extension Right Upright Cap Base Cover iFIT Cable Lift Frame Access Door Console Back Right Accessory Tray Console Front Left Accessory Tray Fan Endcap Screw Console Base 30 NTL10851 R1204A To locate the parts listed below, see the EXPLODED DRAWING attached in the ...


