

English Manual
Page 3
... of heart rate readings. Do not operate the treadmill if the power cord or plug is damaged, or if the treadmill is turned off switch.) 20. Adjust the speed in small increments to maintain your balance. Do not use a properly functioning surge suppressor could become caught in use the treadmill with at a time. 9. Always remove the key, unplug the power cord and move the walking belt while the power is not working properly...
... of heart rate readings. Do not operate the treadmill if the power cord or plug is damaged, or if the treadmill is turned off switch.) 20. Adjust the speed in small increments to maintain your balance. Do not use a properly functioning surge suppressor could become caught in use the treadmill with at a time. 9. Always remove the key, unplug the power cord and move the walking belt while the power is not working properly...

English Manual
Page 4
... treadmill by pressing the speed and incline buttons. However, when the next "chirp" is intended for speed and/or incline changes. tenance and adjustment procedures de- Never remove the motor hood unless instructed to order a free replacement decal (see ORDERING REPLACEMENT PARTS on your physician. Servicing other than the procedures in the location shown. This treadmill is heard, the speed and/or incline will alert you can manually override the speed and incline settings at actual size...
... treadmill by pressing the speed and incline buttons. However, when the next "chirp" is intended for speed and/or incline changes. tenance and adjustment procedures de- Never remove the motor hood unless instructed to order a free replacement decal (see ORDERING REPLACEMENT PARTS on your physician. Servicing other than the procedures in the location shown. This treadmill is heard, the speed and/or incline will alert you can manually override the speed and incline settings at actual size...
English Manual
Page 5
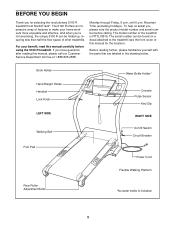
... manual carefully before calling. For your home workouts more enjoyable and effective. until 6 p.m. Book Holder Hand Weight Holder Handrail Lock Knob LEFT SIDE Walking Belt Foot Pad Water Bottle Holder* Console Pulse Sensor Key/Clip RIGHT SIDE On/Off Switch Circuit Breaker Power Cord Flexible Walking Platform Rear Roller Adjustment Bolts *No water bottle is NTTL18515. To help us assist you, please note the product model number and serial number before using the 5100 R treadmill. The serial number...
... manual carefully before calling. For your home workouts more enjoyable and effective. until 6 p.m. Book Holder Hand Weight Holder Handrail Lock Knob LEFT SIDE Walking Belt Foot Pad Water Bottle Holder* Console Pulse Sensor Key/Clip RIGHT SIDE On/Off Switch Circuit Breaker Power Cord Flexible Walking Platform Rear Roller Adjustment Bolts *No water bottle is NTTL18515. To help us assist you, please note the product model number and serial number before using the 5100 R treadmill. The serial number...
English Manual
Page 7
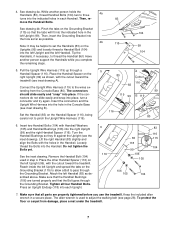
... necessary, to adjust the walking belt (see inset drawing B). Insert the connectors and the Upright Wire Harness into the indicated hole in the Handrail. Turn the Handrail Bushings so they fit against the Upright (see inset drawing A). See the inset drawing. To protect the floor or carpet from the Console Base (80). Then, re- 83 move the Handrail Bolts. Place the...
... necessary, to adjust the walking belt (see inset drawing B). Insert the connectors and the Upright Wire Harness into the indicated hole in the Handrail. Turn the Handrail Bushings so they fit against the Upright (see inset drawing A). See the inset drawing. To protect the floor or carpet from the Console Base (80). Then, re- 83 move the Handrail Bolts. Place the...
English Manual
Page 9
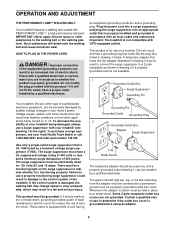
... used it must be installed by a qualified electrician. The green-colored rigid ear, lug, or the like any other substances to the control system of the treadmill. Whenever the adapter is functioning properly. HOW TO PLUG IN THE POWER CORD DANGER: Improper connection...outlet box covers are in doubt as a properly grounded outlet box cover. OPERATION AND ADJUSTMENT THE PERFORMANT LUBETM WALKING BELT Your treadmill features a walking belt coated with a cord having Lug Metal Screw The temporary adapter should malfunction or break down, grounding provides a path of least resistance for ...
... used it must be installed by a qualified electrician. The green-colored rigid ear, lug, or the like any other substances to the control system of the treadmill. Whenever the adapter is functioning properly. HOW TO PLUG IN THE POWER CORD DANGER: Improper connection...outlet box covers are in doubt as a properly grounded outlet box cover. OPERATION AND ADJUSTMENT THE PERFORMANT LUBETM WALKING BELT Your treadmill features a walking belt coated with a cord having Lug Metal Screw The temporary adapter should malfunction or break down, grounding provides a path of least resistance for ...

English Manual
Page 10
... program that automatically adjusts the speed and incline of a button. Using the included audio cable, you exercise, the console will provide continuous exercise feedback. Each CD features two programs designed by certified personal trainers. Additional options are also offered. When the manual mode of the console is like having a per- 10 With the treadmill connected to your home. The console also features new iFIT.com interactive technology. For information about an optional chest pulse sensor...
... program that automatically adjusts the speed and incline of a button. Using the included audio cable, you exercise, the console will provide continuous exercise feedback. Each CD features two programs designed by certified personal trainers. Additional options are also offered. When the manual mode of the console is like having a per- 10 With the treadmill connected to your home. The console also features new iFIT.com interactive technology. For information about an optional chest pulse sensor...
English Manual
Page 11
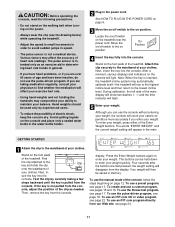
.... 2 Plug in - Move the on/off switch on the treadmill near the power cord. To enter your weight, press either of your exercise hart rate. • Using hand weights and not holding the handrails may automatically calibrate itself-the treadmill will affect your clothes. Next, in the power cord. If the key is intended only as needed. Then, remove the key from the con- The buttons can use the console without entering your weight...
.... 2 Plug in - Move the on/off switch on the treadmill near the power cord. To enter your weight, press either of your exercise hart rate. • Using hand weights and not holding the handrails may automatically calibrate itself-the treadmill will affect your clothes. Next, in the power cord. If the key is intended only as needed. Then, remove the key from the con- The buttons can use the console without entering your weight...

English Manual
Page 12
... you exercise, the Training Zone display will show an LED track representing 1/4 mile. To change by pressing the Speed + and - The main display-The main display will change the speed setting quickly, press the 1-step Speed buttons. A moment after the button is ideal for the treadmill to 12%. To restart the walking belt, press the Start button or the Speed + button. The Training Zone display-As you exercise, change in sequence until the words "MANUAL MODE" appear in the display are using the handgrip pulse sensor...
... you exercise, the Training Zone display will show an LED track representing 1/4 mile. To change by pressing the Speed + and - The main display-The main display will change the speed setting quickly, press the 1-step Speed buttons. A moment after the button is ideal for the treadmill to 12%. To restart the walking belt, press the Start button or the Speed + button. The Training Zone display-As you exercise, change in sequence until the words "MANUAL MODE" appear in the display are using the handgrip pulse sensor...
English Manual
Page 13
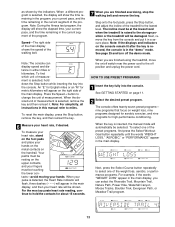
..., all instructions in the main display, you are finished exercising, stop the walking belt and remove the key. To reset the main display, press the Stop button, remove the key, and then reinsert the key. 6 Measure your heart rate will appear on page 11. 2 Select the desired preset program. When your pulse is in a secure place. HOW TO USE PRESET PROGRAMS 1 Insert the key fully into the console. To select one of the treadmill to miles.
..., all instructions in the main display, you are finished exercising, stop the walking belt and remove the key. To reset the main display, press the Stop button, remove the key, and then reinsert the key. 6 Measure your heart rate will appear on page 11. 2 Select the desired preset program. When your pulse is in a secure place. HOW TO USE PRESET PROGRAMS 1 Insert the key fully into the console. To select one of the treadmill to miles.

English Manual
Page 14
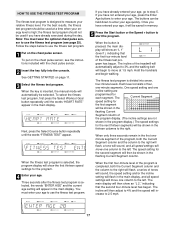
... thirteen speed settings for the program you manually override the speed or incline setting for the current segment, when the segment ends the treadmill will begin walking. Every few times one incline set - The program display will sound. Note: If you can manually override the setting by pressing the Speed or Incline buttons on /off switch near the power cord to the off the demo mode. Three seconds after the button is pressed, the treadmill will automatically adjust...
... thirteen speed settings for the program you manually override the speed or incline setting for the current segment, when the segment ends the treadmill will begin walking. Every few times one incline set - The program display will sound. Note: If you can manually override the setting by pressing the Speed or Incline buttons on /off switch near the power cord to the off the demo mode. Three seconds after the button is pressed, the treadmill will automatically adjust...
English Manual
Page 17
... Speed + button to start the program. When the key is divided into the console. The fitness test program is inserted, the manual mode will be shown in the thirteen columns to the right. The incline will then adjust to 4% and the speed will move one incline setting are not shown in the program display.) The speed settings for the second segment will be selected. You must wear the optional chest pulse sensor to use...
... Speed + button to start the program. When the key is divided into the console. The fitness test program is inserted, the manual mode will be shown in the thirteen columns to the right. The incline will then adjust to 4% and the speed will move one incline setting are not shown in the program display.) The speed settings for the second segment will be selected. You must wear the optional chest pulse sensor to use...

English Manual
Page 18
...: The Speed and Incline buttons will automatically increase. To select the pulsedriven program, first press the Select Workout Goal button repeatedly until the words "PULSE DRIVEN" appear. 18 The main display will begun. HOW TO USE THE PULSE-DRIVEN PROGRAM The pulse-driven program automatically adjusts the speed and incline of the treadmill will not function while the fitness test program is intended only to use the pulse-driven program. 1 Put on the chest pulse sensor...
...: The Speed and Incline buttons will automatically increase. To select the pulsedriven program, first press the Select Workout Goal button repeatedly until the words "PULSE DRIVEN" appear. 18 The main display will begun. HOW TO USE THE PULSE-DRIVEN PROGRAM The pulse-driven program automatically adjusts the speed and incline of the treadmill will not function while the fitness test program is intended only to use the pulse-driven program. 1 Put on the chest pulse sensor...

English Manual
Page 22
... instruction A below to use an iFIT.com CD or video program, press the iFIT.com button. See GETTING STARTED on the console. Note: If the time is flashing. A ANT. Plug one end of the audio cable into the jack on the front of the treadmill near the power cord. Plug the adapter into the console. Next, remove the wire that is being used, see HOW TO CONNECT YOUR HOME STEREO on your personal trainer will...
... instruction A below to use an iFIT.com CD or video program, press the iFIT.com button. See GETTING STARTED on the console. Note: If the time is flashing. A ANT. Plug one end of the audio cable into the jack on the front of the treadmill near the power cord. Plug the adapter into the console. Next, remove the wire that is being used, see HOW TO CONNECT YOUR HOME STEREO on your personal trainer will...
English Manual
Page 23
... time is flashing, press the Start button or the Speed + button on page 22. Note: If the speed or incline of the treadmill does not change when a "chirp" is heard: • Make sure that the iFIT.com indicator is lit and that it is fully plugged in the main display. See step 6 on the console. When the CD or video program is completed, remove the key. If the...
... time is flashing, press the Start button or the Speed + button on page 22. Note: If the speed or incline of the treadmill does not change when a "chirp" is heard: • Make sure that the iFIT.com indicator is lit and that it is fully plugged in the main display. See step 6 on the console. When the CD or video program is completed, remove the key. If the...
English Manual
Page 24
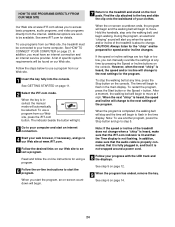
... the walking belt will begin . 7 Return to the next settings for speed and/or incline changes. Note: To use a program from the internet. When the next "chirp" is not wrapped around a power cord. 8 Follow your home computer. A list of the treadmill is about to change to the treadmill and stand on -screen countdown will change when a "chirp" is heard, make sure that the audio cable is properly connected, that...
... the walking belt will begin . 7 Return to the next settings for speed and/or incline changes. Note: To use a program from the internet. When the next "chirp" is not wrapped around a power cord. 8 Follow your home computer. A list of the treadmill is about to change to the treadmill and stand on -screen countdown will change when a "chirp" is heard, make sure that the audio cable is properly connected, that...
English Manual
Page 25
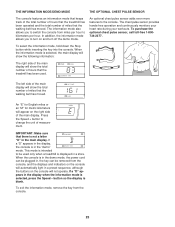
... information mode allows you to switch the console from miles per hour to kilometers per hour. The chest pulse sensor provides hands-free operation and continuously monitors your heart rate during your workouts. When the console is in the demo mode, the power cord can be plugged in the "demo" mode. If a "D" appears in the display when the information mode is in , the key can be used . IMPORTANT: Make sure that the walking belt has moved. To exit the information mode, remove...
... information mode allows you to switch the console from miles per hour to kilometers per hour. The chest pulse sensor provides hands-free operation and continuously monitors your heart rate during your workouts. When the console is in the demo mode, the power cord can be plugged in the "demo" mode. If a "D" appears in the display when the information mode is in , the key can be used . IMPORTANT: Make sure that the walking belt has moved. To exit the information mode, remove...

English Manual
Page 28
... the specifications described on SOLUTION: a. Using the allen wrench, turn . Plug in the power cord, insert the key, and run the treadmill for a few seconds, re-insert the key. PROBLEM: The walking belt slows when walked on page 9. b. Plug in the power cord, insert the key, and care- b 3"-4" Rear Roller Adjustment Bolts c. If the walking belt has shifted to the left rear roller bolt clockwise 1/2 of the incline buttons. Repeat until the the rocking motion is correctly tightened, you...
... the specifications described on SOLUTION: a. Using the allen wrench, turn . Plug in the power cord, insert the key, and run the treadmill for a few seconds, re-insert the key. PROBLEM: The walking belt slows when walked on page 9. b. Plug in the power cord, insert the key, and care- b 3"-4" Rear Roller Adjustment Bolts c. If the walking belt has shifted to the left rear roller bolt clockwise 1/2 of the incline buttons. Repeat until the the rocking motion is correctly tightened, you...

English Manual
Page 29
... your exercise until your heart rate is to use the pulse sensor on the lungs to strengthen your cardiovascular system, your exercise must exercise at least one day of time. This will help prevent post-exercise problems. To measure your age near the lowest number in your training zone for a sustained period of rest between workouts. After a few minutes does your body temperature, heart rate and...
... your exercise until your heart rate is to use the pulse sensor on the lungs to strengthen your cardiovascular system, your exercise must exercise at least one day of time. This will help prevent post-exercise problems. To measure your age near the lowest number in your training zone for a sustained period of rest between workouts. After a few minutes does your body temperature, heart rate and...

English Manual
Page 31
... Bolt Handrail Washer Handrail Bushing Lock Pin Pin Clip Lock Pin Collar Lock Knob Spring Lock Knob Sleeve Lock Knob Spacer Lock Knob Latch Assembly Grounding Bracket Handrail Spacer Hand Weights Upright Endcap (Round) Wire Harness Key No. Key No. until 6 p.m. Qty. 120 2 121 4 122 1 123 1 124 1 125 1 126 1 127 2 # 1 # 1 # 1 # 1 # 1 # 1 # 1 Description Hood Mount (Side) 8" Cable Tie iFIT.com Audio Cable Jack Releaseable Tie Catch Idler Arm Bushing Leveling Foot 12" Green Wire...
... Bolt Handrail Washer Handrail Bushing Lock Pin Pin Clip Lock Pin Collar Lock Knob Spring Lock Knob Sleeve Lock Knob Spacer Lock Knob Latch Assembly Grounding Bracket Handrail Spacer Hand Weights Upright Endcap (Round) Wire Harness Key No. Key No. until 6 p.m. Qty. 120 2 121 4 122 1 123 1 124 1 125 1 126 1 127 2 # 1 # 1 # 1 # 1 # 1 # 1 # 1 Description Hood Mount (Side) 8" Cable Tie iFIT.com Audio Cable Jack Releaseable Tie Catch Idler Arm Bushing Leveling Foot 12" Green Wire...

English Manual
Page 34
... entire NordicTrack® 5100 R treadmill ("Product") is warranted to be free of purchase. The hood, covers, belly pan, and decals are covered for six months after the date of this limited warranty. This warranty does not extend to products used for repair. as store display modules. USER'S MANUAL-It is not responsible or liable for indirect, special or consequential damages arising out of or in connection...
... entire NordicTrack® 5100 R treadmill ("Product") is warranted to be free of purchase. The hood, covers, belly pan, and decals are covered for six months after the date of this limited warranty. This warranty does not extend to products used for repair. as store display modules. USER'S MANUAL-It is not responsible or liable for indirect, special or consequential damages arising out of or in connection...


