

English Manual
Page 3
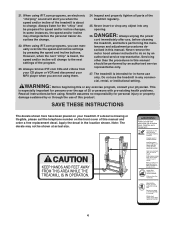
.... The pulse sensors are standing on the walking belt. The pulse sensors are adequately informed of all users of clearance behind it is being administered. 6. Do not change the incline of the on page 29 if the treadmill is fully closed. 11. When folding or moving the treadmill, make sure that the storage latch is not working properly. (See TROUBLESHOOTING on /off switch.) 18. If an extension cord is needed, use . (See...
.... The pulse sensors are standing on the walking belt. The pulse sensors are adequately informed of all users of clearance behind it is being administered. 6. Do not change the incline of the on page 29 if the treadmill is fully closed. 11. When folding or moving the treadmill, make sure that the storage latch is not working properly. (See TROUBLESHOOTING on /off switch.) 18. If an extension cord is needed, use . (See...
English Manual
Page 4
... persons with pre-existing health problems. Read all parts of the program. 23. Servicing other than the procedures in -home use , before cleaning the treadmill, and before performing the main- The treadmill is about to change to do so by pressing the speed and incline buttons. When using iFIT.com programs, you are not using them. 24. Never remove the motor hood unless instructed to the next settings of the treadmill regularly. 25. This...
... persons with pre-existing health problems. Read all parts of the program. 23. Servicing other than the procedures in -home use , before cleaning the treadmill, and before performing the main- The treadmill is about to change to do so by pressing the speed and incline buttons. When using iFIT.com programs, you are not using them. 24. Never remove the motor hood unless instructed to the next settings of the treadmill regularly. 25. This...

English Manual
Page 5
... Handrail Latch Knob Fan Console Pulse Sensor Key/Clip Walking Belt Foot Rail On/Off Switch Circuit Breaker Adjustable Cushioned Walking Platform (see the front cover of this manual for selecting the revolutionary NordicTrack® 1900i treadmill. BEFORE YOU BEGIN Thank you , please note the product model number and serial number before using the treadmill. ing this manual, see the front cover of features designed to the treadmill (see page 26) Rear Roller Adjustment Bolts 5 The model number of other treadmills. The 1900i treadmill...
... Handrail Latch Knob Fan Console Pulse Sensor Key/Clip Walking Belt Foot Rail On/Off Switch Circuit Breaker Adjustable Cushioned Walking Platform (see the front cover of this manual for selecting the revolutionary NordicTrack® 1900i treadmill. BEFORE YOU BEGIN Thank you , please note the product model number and serial number before using the treadmill. ing this manual, see the front cover of features designed to the treadmill (see page 26) Rear Roller Adjustment Bolts 5 The model number of other treadmills. The 1900i treadmill...

English Manual
Page 6
... fully fold the treadmill until assembly is coated with two Extension Leg Bolts (130). 102 99 130 6 w (123)-2 ASSEMBLY 1/2" Silver Screw (48)-1 3/4" Tek Screw (58)-4 Spacer Screw (60)-2 Assembly requires two persons. make sure that the power cord is completely assembled. 110 Insert the two Extension Legs (102) into the base of the walking belt or the shipping carton. Attach each Extension Leg (102) with high-performance lubricant. Set the treadmill...
... fully fold the treadmill until assembly is coated with two Extension Leg Bolts (130). 102 99 130 6 w (123)-2 ASSEMBLY 1/2" Silver Screw (48)-1 3/4" Tek Screw (58)-4 Spacer Screw (60)-2 Assembly requires two persons. make sure that the power cord is completely assembled. 110 Insert the two Extension Legs (102) into the base of the walking belt or the shipping carton. Attach each Extension Leg (102) with high-performance lubricant. Set the treadmill...

English Manual
Page 7
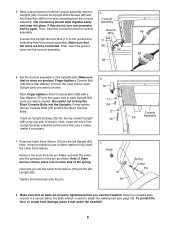
... person, carefully tip the 148 treadmill down to the floor as described above. Next, press the Wheel Endcap and the Wheel into one connector and try again. Insert the wires into place. Attach the Pulse Bar Assembly (65) to the Uprights 4 (69). Start all four Pulse Bar Bolts and then tighten them. the Wheels should slide to the wire in a vertical position. 148 99...
... person, carefully tip the 148 treadmill down to the floor as described above. Next, press the Wheel Endcap and the Wheel into one connector and try again. Insert the wires into place. Attach the Pulse Bar Assembly (65) to the Uprights 4 (69). Start all four Pulse Bar Bolts and then tighten them. the Wheels should slide to the wire in a vertical position. 148 99...
English Manual
Page 8
... the console assembly near the 5 Uprights (69). Set the console assembly on the pin as shown. Ground Wire 66 Connect the Upright Ground Wire (11) to fully insert the Latch Knob Sleeve. Make sure that no wires are fully connected. Make sure that all parts are on the Uprights (69). Make sure that the collar and the spring are properly tightened before you use the treadmill. Next, finger tighten a Short Console Bolt (106...
... the console assembly near the 5 Uprights (69). Set the console assembly on the pin as shown. Ground Wire 66 Connect the Upright Ground Wire (11) to fully insert the Latch Knob Sleeve. Make sure that no wires are fully connected. Make sure that all parts are on the Uprights (69). Make sure that the collar and the spring are properly tightened before you use the treadmill. Next, finger tighten a Short Console Bolt (106...
English Manual
Page 9
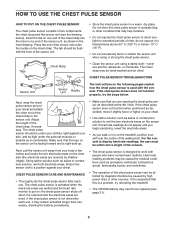
... such as is put on the chest strap. CHEST PULSE SENSOR TROUBLESHOOTING Sensor Unit Sensor Unit Buckle The instructions on the treadmill, position yourself near the centre of the walking belt. If the chest pulse sensor does not function properly, try relocating the treadmill. • The CR2032 battery may be caused by high power lines or other end of the chest strap to display heart rate readings, the user must be hand washed and...
... such as is put on the chest strap. CHEST PULSE SENSOR TROUBLESHOOTING Sensor Unit Sensor Unit Buckle The instructions on the treadmill, position yourself near the centre of the walking belt. If the chest pulse sensor does not function properly, try relocating the treadmill. • The CR2032 battery may be caused by high power lines or other end of the chest strap to display heart rate readings, the user must be hand washed and...
English Manual
Page 11
..., and video programs (iFIT.com MP3 programs, CDs, and videocassettes are available separately). Using a stereo audio cable, you exercise, the console will display continuous exercise feedback. Note: If there is selected, the speed and incline of the treadmill can even measure your heart rate using the handgrip pulse sensor or the chest pulse sensor. Key Clip FEATURES OF THE CONSOLE The treadmill console offers an impressive array of features designed to your workout; You can connect the treadmill to...
..., and video programs (iFIT.com MP3 programs, CDs, and videocassettes are available separately). Using a stereo audio cable, you exercise, the console will display continuous exercise feedback. Note: If there is selected, the speed and incline of the treadmill can even measure your heart rate using the handgrip pulse sensor or the chest pulse sensor. Key Clip FEATURES OF THE CONSOLE The treadmill console offers an impressive array of features designed to your workout; You can connect the treadmill to...

English Manual
Page 12
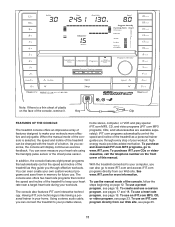
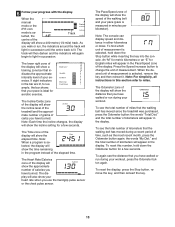
... track. 4 Start the walking belt. HOW TO USE THE MANUAL MODE 1 Insert the key into the console. Make sure that the switch is pressed, the incline will begin to identify yourself as desired. The console can save program settings for the treadmill to move at 2 km/h. To identify yourself as user A or user B. The time will gradually increase until a track appears in the on /off switch near the power cord. After a moment, the display...
... track. 4 Start the walking belt. HOW TO USE THE MANUAL MODE 1 Insert the key into the console. Make sure that the switch is pressed, the incline will begin to identify yourself as desired. The console can save program settings for the treadmill to move at 2 km/h. To identify yourself as user A or user B. The time will gradually increase until a track appears in the on /off switch near the power cord. After a moment, the display...
English Manual
Page 13
... walking belt has moved during your pace (pace is selected, the display will appear in the Pace/Speed zone of the walking belt and your workout. When the manual mode or the iFIT.com mode is lit. As you have burned. The Heart Rate/Calories zone of the display will show the approximate number of the display will show a training zone bar that you have burned. Press the Speed increase button to miles...
... walking belt has moved during your pace (pace is selected, the display will appear in the Pace/Speed zone of the walking belt and your workout. When the manual mode or the iFIT.com mode is lit. As you have burned. The Heart Rate/Calories zone of the display will show the approximate number of the display will show a training zone bar that you have burned. Press the Speed increase button to miles...

English Manual
Page 14
... at medium speed, press the button a second time; the number 3 will appear below . To use the chest pulse sensor, see the instructions below the word "Fan" in a secure place. sor, first re- To select the Auto mode, press the button again; See page 27 and turn off switch to hold the metal contacts-avoid moving your heart rate accurately. To use the handgrip pulse sensor, see page 9. The incline must be...
... at medium speed, press the button a second time; the number 3 will appear below . To use the chest pulse sensor, see the instructions below the word "Fan" in a secure place. sor, first re- To select the Auto mode, press the button again; See page 27 and turn off switch to hold the metal contacts-avoid moving your heart rate accurately. To use the handgrip pulse sensor, see page 9. The incline must be...

English Manual
Page 16
... the speed and incline settings for future workouts, press the Save button. See step 7 on page 14. 8 Turn on page 14. 9 When you are finished exercising, remove the key from the console and put it in the display. Next, remove the key from the console. When the program ends, make sure that the incline of the treadmill is in the "demo" mode. Note: If the display remains lit after the key is removed, the console...
... the speed and incline settings for future workouts, press the Save button. See step 7 on page 14. 8 Turn on page 14. 9 When you are finished exercising, remove the key from the console and put it in the display. Next, remove the key from the console. When the program ends, make sure that the incline of the treadmill is in the "demo" mode. Note: If the display remains lit after the key is removed, the console...

English Manual
Page 19
... heart rate setting of the program will begin to move at any time, press the Stop button. See step 8 on page 16. Follow the steps below to the first speed and incline settings of the selected program will automatically adjust to use a heart rate program. 1 Put on page 12. 4 Select a heart rate program. See step 2 on the chest pulse sensor. To select a heart rate program, press the Programs button repeatedly until the words "Heart Rate" and the number 1 or 2 appear in the display. A moment after the button...
... heart rate setting of the program will begin to move at any time, press the Stop button. See step 8 on page 16. Follow the steps below to the first speed and incline settings of the selected program will automatically adjust to use a heart rate program. 1 Put on page 12. 4 Select a heart rate program. See step 2 on the chest pulse sensor. To select a heart rate program, press the Programs button repeatedly until the words "Heart Rate" and the number 1 or 2 appear in the display. A moment after the button...

English Manual
Page 20
... the display. In addition, the speed setting and/or incline setting will flash in the flashing Current Segment column of the treadmill will continue in this occurs, see CHEST PULSE SENSOR TROUBLESHOOTING on page 14. 9 When you are too high or too low, you wish to the target heart rate setting. The program will automatically change to bring your heart rate closer to the target heart rate. 7 Follow your heart rate...
... the display. In addition, the speed setting and/or incline setting will flash in the flashing Current Segment column of the treadmill will continue in this occurs, see CHEST PULSE SENSOR TROUBLESHOOTING on page 14. 9 When you are too high or too low, you wish to the target heart rate setting. The program will automatically change to bring your heart rate closer to the target heart rate. 7 Follow your heart rate...

English Manual
Page 23
... are using an iFIT.com CD, insert the CD into your personal trainer's instructions. Plug one end of this manual. See step 2 on your home stereo, see instruction B. Simply follow your VCR. To select the iFIT.com mode, press the Programs button until the letters "iFIT" appear in the display. 23 IN VIDEO AUDIO IN CH 34 OUT RF OUT B Audio Cable RCA Y-adaptor Wire removed from AUDIO OUT jack B 4 Press the Play button on...
... are using an iFIT.com CD, insert the CD into your personal trainer's instructions. Plug one end of this manual. See step 2 on your home stereo, see instruction B. Simply follow your VCR. To select the iFIT.com mode, press the Programs button until the letters "iFIT" appear in the display. 23 IN VIDEO AUDIO IN CH 34 OUT RF OUT B Audio Cable RCA Y-adaptor Wire removed from AUDIO OUT jack B 4 Press the Play button on...
English Manual
Page 25
... iFIT.com mode. Hold the handrails, step onto the walking belt, and begin to use a program from the internet. When the program is found on our Web site. Note: If the speed and/or incline of the treadmill does not change to the next settings for using a program. 7 Follow the on-line instructions to the treadmill and stand on the foot rails. A list of your clothes. 9 Follow your home...
... iFIT.com mode. Hold the handrails, step onto the walking belt, and begin to use a program from the internet. When the program is found on our Web site. Note: If the speed and/or incline of the treadmill does not change to the next settings for using a program. 7 Follow the on-line instructions to the treadmill and stand on the foot rails. A list of your clothes. 9 Follow your home...

English Manual
Page 32
... on the heart to pump blood to the muscles, and on the lungs to 60 minutes. (During the first few minutes does your body begin to burn fat, adjust the speed and incline of the treadmill until your pulse is to exercise with the proper intensity. The three numbers define your condition, complete three workouts each workout with preexisting health problems. The pulse sensors are...
... on the heart to pump blood to the muscles, and on the lungs to 60 minutes. (During the first few minutes does your body begin to burn fat, adjust the speed and incline of the treadmill until your pulse is to exercise with the proper intensity. The three numbers define your condition, complete three workouts each workout with preexisting health problems. The pulse sensors are...

English Manual
Page 34
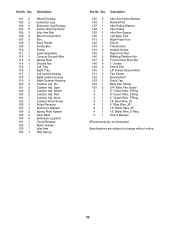
... Rear Roller Audio Wire Chest Pulse Sensor Pulse Bar Pulse Wire Spring Pad Screw 5/16 Allen Wrench Uprights Latch Knob Sleeve Chest Strap Roller Star Washer Filter 1" Belly Pan Screw Filter Wire Control Knob Star Washer Console Bolt Upright Endcap Access Door Console Base Console Upright Cap Key/Clip iFIT.com Wire Jack Console Insert Console Back Releaseable Tie Console Screw Cable Tie Clamp 8" Cable Tie Lift Pivot Bolt Wheel Bolt Wheel Rear Endcap, Left Grommet Upright Wire Harness Base Pad 3/4" Screw 34 NATL82205.0 R0805A To locate the parts listed below, see the EXPLODED DRAWING attached...
... Rear Roller Audio Wire Chest Pulse Sensor Pulse Bar Pulse Wire Spring Pad Screw 5/16 Allen Wrench Uprights Latch Knob Sleeve Chest Strap Roller Star Washer Filter 1" Belly Pan Screw Filter Wire Control Knob Star Washer Console Bolt Upright Endcap Access Door Console Base Console Upright Cap Key/Clip iFIT.com Wire Jack Console Insert Console Back Releaseable Tie Console Screw Cable Tie Clamp 8" Cable Tie Lift Pivot Bolt Wheel Bolt Wheel Rear Endcap, Left Grommet Upright Wire Harness Base Pad 3/4" Screw 34 NATL82205.0 R0805A To locate the parts listed below, see the EXPLODED DRAWING attached...
English Manual
Page 35
... Pulley Idler Arm Spacer Left Rear Foot Right Rear Foot Shock Transformer Isolator Screw Right Foot Rail Walking Platform Nut Front Incline Pivot Nut 1" Screw Shock Clip Lift Frame Ground Wire Fan Screw Bracket Bolt Knob Cap Belly Pan Screw 3/4" Belly Pan Screw 8" Green Wire, F/Ring 8" Green Wire, 2 Ring 4" Green Wire, F/Ring 16" Blue Wire, 2F 6" Blue Wire, 2F 16" White Wire, 2F 12" Black Wire, 2 Ring User's Manual #These parts are not illustrated Specifications...
... Pulley Idler Arm Spacer Left Rear Foot Right Rear Foot Shock Transformer Isolator Screw Right Foot Rail Walking Platform Nut Front Incline Pivot Nut 1" Screw Shock Clip Lift Frame Ground Wire Fan Screw Bracket Bolt Knob Cap Belly Pan Screw 3/4" Belly Pan Screw 8" Green Wire, F/Ring 8" Green Wire, 2 Ring 4" Green Wire, F/Ring 16" Blue Wire, 2F 6" Blue Wire, 2F 16" White Wire, 2F 12" Black Wire, 2 Ring User's Manual #These parts are not illustrated Specifications...
English Manual
Page 38
... product (NORDICTRACK 1900i treadmill) • the SERIAL NUMBER of the product (see the front cover of this product to the original purchaser. Accordingly, the above is limited in workmanship and material under this manual and on how long an implied warranty lasts. HOW TO ORDER REPLACEMENT PARTS To order replacement parts, contact our Customer Service Department or write: Shanghi Newlife Fitness Equipment, Inc. The drive motor is...
... product (NORDICTRACK 1900i treadmill) • the SERIAL NUMBER of the product (see the front cover of this product to the original purchaser. Accordingly, the above is limited in workmanship and material under this manual and on how long an implied warranty lasts. HOW TO ORDER REPLACEMENT PARTS To order replacement parts, contact our Customer Service Department or write: Shanghi Newlife Fitness Equipment, Inc. The drive motor is...


