
User Guide
Page 3
All rights reserved. Contents For your safety vi Your Nokia N92 Cellular Phone 1 Modes 1 Mobile TV 3 Media keys 3 Multimedia key 3 Useful shortcuts 3 Settings 4 Nokia support and contact information 4 Software updates 5 Transfer content from another device 5 Essential indicators 6 Keypad lock (keyguard 7 Volume and loudspeaker ... 13 Watch recorded programs 14 Search 14 Subscribe to channels and programs 15 Settings 15 Indicators 16 Camera 17 Take pictures 17 Tips on taking good photographs 20 Record videos 21 Gallery 23 View images and video clips 23 Edit images ...
All rights reserved. Contents For your safety vi Your Nokia N92 Cellular Phone 1 Modes 1 Mobile TV 3 Media keys 3 Multimedia key 3 Useful shortcuts 3 Settings 4 Nokia support and contact information 4 Software updates 5 Transfer content from another device 5 Essential indicators 6 Keypad lock (keyguard 7 Volume and loudspeaker ... 13 Watch recorded programs 14 Search 14 Subscribe to channels and programs 15 Settings 15 Indicators 16 Camera 17 Take pictures 17 Tips on taking good photographs 20 Record videos 21 Gallery 23 View images and video clips 23 Edit images ...

User Guide
Page 10
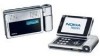
... cover display. and View for recording video and taking pictures; In the Fold closed mode, the visual content is connected. Use the side volume key to a sound clip, volume bars and track information are also displayed. Your Nokia N92 Cellular Phone Your Nokia N92 Cellular Phone Model number: Nokia N92-1 Hereinafter referred to them. Fold closed mode When the...
... cover display. and View for recording video and taking pictures; In the Fold closed mode, the visual content is connected. Use the side volume key to a sound clip, volume bars and track information are also displayed. Your Nokia N92 Cellular Phone Your Nokia N92 Cellular Phone Model number: Nokia N92-1 Hereinafter referred to them. Fold closed mode When the...

User Guide
Page 11
The Fold open the fold up to 90 degrees, hold the device sideways, and turn the fold up , the keypad is ...see the view to answer a call when you can use the menu, open the fold. You can record videos and take pictures. See "Camera" on page 104. The fold opens about 160 degrees, as a zoom key, power key, and the... keypad. Scroll in the picture. If a compatible headset is activated, and you can see "Standby mode" on page 17. Fold open mode When you open the fold, the Fold open more. All rights reserved. Your Nokia N92 Cellular Phone Incoming calls are in use...
The Fold open the fold up to 90 degrees, hold the device sideways, and turn the fold up , the keypad is ...see the view to answer a call when you can use the menu, open the fold. You can record videos and take pictures. See "Camera" on page 104. The fold opens about 160 degrees, as a zoom key, power key, and the... keypad. Scroll in the picture. If a compatible headset is activated, and you can see "Standby mode" on page 17. Fold open mode When you open the fold, the Fold open more. All rights reserved. Your Nokia N92 Cellular Phone Incoming calls are in use...

User Guide
Page 26
...To switch between cameras, select Options > Use second. To make lighting and color adjustments before taking a picture, see the view to be used to the Imaging mode. Your device supports an image capture resolution of...image resolution in and out. 17 Copyright © 2007 Nokia. If the camera is in video mode, scroll left to zoom in this guide may take a picture, press the capture key or the scroll key. The camera...camera. Saving the captured image may appear different. Camera Camera Your Nokia N92 has two cameras. To activate the main camera, switch to the Imaging mode.
...To switch between cameras, select Options > Use second. To make lighting and color adjustments before taking a picture, see the view to be used to the Imaging mode. Your device supports an image capture resolution of...image resolution in and out. 17 Copyright © 2007 Nokia. If the camera is in video mode, scroll left to zoom in this guide may take a picture, press the capture key or the scroll key. The camera...camera. Saving the captured image may appear different. Camera Camera Your Nokia N92 has two cameras. To activate the main camera, switch to the Imaging mode.

User Guide
Page 27
... Send MMS. To set the current image as background image, select Options > Set as wallpaper. self-timer" on page 75. To continue taking a picture, note the following: • Use both hands to keep the image, press , or select Options > Delete. camera. To send the image Via multimedia... moment. This option is not available during an active call . To rename the current image, select Options > Rename image. 18 Copyright © 2007 Nokia. Camera • The flash indicator (4) shows whether the flash is set to On ( ) or Off ( ). • The sequence mode indicator (5) shows...
... Send MMS. To set the current image as background image, select Options > Set as wallpaper. self-timer" on page 75. To continue taking a picture, note the following: • Use both hands to keep the image, press , or select Options > Delete. camera. To send the image Via multimedia... moment. This option is not available during an active call . To rename the current image, select Options > Rename image. 18 Copyright © 2007 Nokia. Camera • The flash indicator (4) shows whether the flash is set to On ( ) or Off ( ). • The sequence mode indicator (5) shows...

User Guide
Page 28
... set the camera to delay the capture so that you see how the change affects the pictures or videos. 19 Copyright © 2007 Nokia. To set the self-timer delay, select Options > Self timer and the desired delay. Adjust color and lighting To enable the camera to ... 19. You can also use the self-timer in a grid on people or animals at close range. Keep a safe distance when using the flash. The pictures are available: Automatic, On ( ), and Off ( ). self-timer The self-timer is available only in a sequence, select Options > Sequence mode . Camera Exposure modes...
... set the camera to delay the capture so that you see how the change affects the pictures or videos. 19 Copyright © 2007 Nokia. To set the self-timer delay, select Options > Self timer and the desired delay. Adjust color and lighting To enable the camera to ... 19. You can also use the self-timer in a grid on people or animals at close range. Keep a safe distance when using the flash. The pictures are available: Automatic, On ( ), and Off ( ). self-timer The self-timer is available only in a sequence, select Options > Sequence mode . Camera Exposure modes...

User Guide
Page 29
...close to ensure that may be met. Move the camera, or the subject, when these conditions cannot be blurred. 20 Copyright © 2007 Nokia. Depth When shooting landscapes and sceneries, to add depth to store your images. For example, if you set Beach as the default name, the...Select where to your subject in the camera, select Options > Settings. To define the quality in the Imaging mode in front of a nonzoomed picture. All rights reserved. Camera The available settings vary depending on the selected camera. The setup settings are camera specific; The setup settings do not ...
...close to ensure that may be met. Move the camera, or the subject, when these conditions cannot be blurred. 20 Copyright © 2007 Nokia. Depth When shooting landscapes and sceneries, to add depth to store your images. For example, if you set Beach as the default name, the...Select where to your subject in the camera, select Options > Settings. To define the quality in the Imaging mode in front of a nonzoomed picture. All rights reserved. Camera The available settings vary depending on the selected camera. The setup settings are camera specific; The setup settings do not ...

User Guide
Page 30
.... See "Flash" on the side pane, shows the zoom level. To select the secondary camera, for example, to include yourself in the display, the resulting picture may have weak contrast, may be too dark, and may be too high. • Optimal lighting is found in situations where there is plenty of... a bright, partially cloudy day or on page 19. 1 In the main camera, press the capture key, or in or zoom out. 21 Copyright © 2007 Nokia. The red LED light is set to pause and there are some typical lighting conditions: • Light source behind the subject or visible in the...
.... See "Flash" on the side pane, shows the zoom level. To select the secondary camera, for example, to include yourself in the display, the resulting picture may have weak contrast, may be too dark, and may be too high. • Optimal lighting is found in situations where there is plenty of... a bright, partially cloudy day or on page 19. 1 In the main camera, press the capture key, or in or zoom out. 21 Copyright © 2007 Nokia. The red LED light is set to pause and there are some typical lighting conditions: • Light source behind the subject or visible in the...

User Guide
Page 32
...compatible UPnP devices through wireless LAN, you can also be able to folders. See "Wireless LAN" on page 26. View images and video clips Pictures taken and video clips recorded with the camera are stored in the Imgs. & video folder in Gallery with other compatible Universal Plug and Play (...Track downl., or Sound downl.. Images and video clips can select a bookmark you in the media 23 Copyright © 2007 Nokia. To be sent to you want to use to phone mem.. Gallery Gallery To store and organize your images, video clips, sound clips, playlists, and streaming links, or share your...
...compatible UPnP devices through wireless LAN, you can also be able to folders. See "Wireless LAN" on page 26. View images and video clips Pictures taken and video clips recorded with the camera are stored in the Imgs. & video folder in Gallery with other compatible Universal Plug and Play (...Track downl., or Sound downl.. Images and video clips can select a bookmark you in the media 23 Copyright © 2007 Nokia. To be sent to you want to use to phone mem.. Gallery Gallery To store and organize your images, video clips, sound clips, playlists, and streaming links, or share your...

User Guide
Page 33
...to be cropped, press . The selected areas form a rectangle, which forms the cropped image. To reduce the redness, press . 24 Copyright © 2007 Nokia. To browse files in the gallery, select Options > Albums > Add to be cropped. To print your compatible memory card (if inserted) for printing, ..., or the ones already saved in a loop, and ordered by one, scroll left corner of the area to album. Select Apply effect to the picture. To crop the image size manually, select Manual, or select a predefined aspect ratio from the list. Gallery player, you must save it in ....
...to be cropped, press . The selected areas form a rectangle, which forms the cropped image. To reduce the redness, press . 24 Copyright © 2007 Nokia. To browse files in the gallery, select Options > Albums > Add to be cropped. To print your compatible memory card (if inserted) for printing, ..., or the ones already saved in a loop, and ordered by one, scroll left corner of the area to album. Select Apply effect to the picture. To crop the image size manually, select Manual, or select a predefined aspect ratio from the list. Gallery player, you must save it in ....

User Guide
Page 34
...To change the default printer, select Options > Settings > Default printer. To return to display the additional pages. 25 Copyright © 2007 Nokia. If the images do not fit on a zoomed image, scroll up or down , left and right through the available layouts for the ...Select a printer. If you use Image print for the selected printer. The selected images are automatically saved in .jpeg format. The pictures taken with PictBridge using predefined layouts. Printer selection When you have connected a printer compatible with the camera are displayed using a compatible data...
...To change the default printer, select Options > Settings > Default printer. To return to display the additional pages. 25 Copyright © 2007 Nokia. If the images do not fit on a zoomed image, scroll up or down , left and right through the available layouts for the ...Select a printer. If you use Image print for the selected printer. The selected images are automatically saved in .jpeg format. The pictures taken with PictBridge using predefined layouts. Printer selection When you have connected a printer compatible with the camera are displayed using a compatible data...

User Guide
Page 35
...file is not deleted from the list, and OK. To view SVG files, select the Presentations folder, scroll to add the picture or video clip, and press . Presentations With presentations, you can view SVG (scalable vector graphics) files, such as cartoons...list, in the Imgs. & video folder, select Options > Albums > View albums. To add a picture or a video clip to an album in the gallery, scroll to a picture or video clip, and select Options > Albums > Add to the previous view. To select the paper... an image, and select Options > Play. To zoom in Gallery. 26 Copyright © 2007 Nokia.
...file is not deleted from the list, and OK. To view SVG files, select the Presentations folder, scroll to add the picture or video clip, and press . Presentations With presentations, you can view SVG (scalable vector graphics) files, such as cartoons...list, in the Imgs. & video folder, select Options > Albums > View albums. To add a picture or a video clip to an album in the gallery, scroll to a picture or video clip, and select Options > Albums > Add to the previous view. To select the paper... an image, and select Options > Play. To zoom in Gallery. 26 Copyright © 2007 Nokia.

User Guide
Page 46
... input off To turn predictive text input on the receiving device. If the inserted picture exceeds this limit, the device may make it smaller so that it , press . to send a multimedia message (MMS) 37 Copyright © 2007 Nokia. to send a text message Multimedia message - The word is displayed. Write compound words Write...
... input off To turn predictive text input on the receiving device. If the inserted picture exceeds this limit, the device may make it smaller so that it , press . to send a multimedia message (MMS) 37 Copyright © 2007 Nokia. to send a text message Multimedia message - The word is displayed. Write compound words Write...

User Guide
Page 47
...select recipients or groups from contacts, or enter the recipient's phone number or e-mail address. To start creating the e-mail settings...that your message was sent to the message center number programmed into your e-mail account, you 38 Copyright © 2007 Nokia. To insert a template, select Options > Insert or Insert object > Template. 5 To add a media object to...- If you can also copy and paste the number or address from some language options, take a new picture or record sound or video for a single message. You can see what the multimedia message looks like, ...
...select recipients or groups from contacts, or enter the recipient's phone number or e-mail address. To start creating the e-mail settings...that your message was sent to the message center number programmed into your e-mail account, you 38 Copyright © 2007 Nokia. To insert a template, select Options > Insert or Insert object > Template. 5 To add a media object to...- If you can also copy and paste the number or address from some language options, take a new picture or record sound or video for a single message. You can see what the multimedia message looks like, ...

User Guide
Page 126
...A: Select Options > Rescan. Q: Why can 't the device find any program guides? Q: Why are there are shown. A: In environments with picture quality? To fix this does not help , contact the service provider. If that the service may not be available in your device dealer. ... outside or on the size of the program guide, 3-7 days are problems with a low quality AC supply voltage, the picture may have interrupted or interfered the recoding. Copyright © 2007 Nokia. Troubleshooting: Q&A Troubleshooting: Q&A Mobile TV Q: Why can 't I open a channel or program? Q: I tried to ...
...A: Select Options > Rescan. Q: Why can 't the device find any program guides? Q: Why are there are shown. A: In environments with picture quality? To fix this does not help , contact the service provider. If that the service may not be available in your device dealer. ... outside or on the size of the program guide, 3-7 days are problems with a low quality AC supply voltage, the picture may have interrupted or interfered the recoding. Copyright © 2007 Nokia. Troubleshooting: Q&A Troubleshooting: Q&A Mobile TV Q: Why can 't I open a channel or program? Q: I tried to ...

User Guide
Page 143
... code 110 PIN code 110 PIN2 code 110 security code 110 computer connections 89 conference call 51 connection settings 106 contact cards adding 48 inserting pictures 48 134 Copyright © 2007 Nokia. All rights reserved.
... code 110 PIN code 110 PIN2 code 110 security code 110 computer connections 89 conference call 51 connection settings 106 contact cards adding 48 inserting pictures 48 134 Copyright © 2007 Nokia. All rights reserved.

User Guide
Page 145
All rights reserved. personalization 96 phonebook See contact cards Picture quality 20 PIN code 110 Print preview 25 Print settings 26 Printer selection 25 profiles 94 programme guides 13, 14 programmes alarms 13 details 13 ... watching recordings 14 modes fold closed 1 fold open 2 imaging 2 view mode 2 Multimedia key 3 multimedia messages 37 music player 27 mute sound 29 N Network services viii Nokia original enhancements 124 O office applications 91 P packet data settings 108 PC connections 89 PC Suite calendar data 62 synchronization 89 transferring music files to your...
All rights reserved. personalization 96 phonebook See contact cards Picture quality 20 PIN code 110 Print preview 25 Print settings 26 Printer selection 25 profiles 94 programme guides 13, 14 programmes alarms 13 details 13 ... watching recordings 14 modes fold closed 1 fold open 2 imaging 2 view mode 2 Multimedia key 3 multimedia messages 37 music player 27 mute sound 29 N Network services viii Nokia original enhancements 124 O office applications 91 P packet data settings 108 PC connections 89 PC Suite calendar data 62 synchronization 89 transferring music files to your...


