
Nokia Astound User Guide in English
Page 2
... 11 Change the volume of a call, song, or video 11 Attach the wrist strap 11 Headset 12 Use the in-device user guide 12 Install Nokia Ovi Suite on your PC 12 Basic use 13 Touch screen actions 13 Interactive home screen elements 14 Switch between open applications 15 Write text...
... 11 Change the volume of a call, song, or video 11 Attach the wrist strap 11 Headset 12 Use the in-device user guide 12 Install Nokia Ovi Suite on your PC 12 Basic use 13 Touch screen actions 13 Interactive home screen elements 14 Switch between open applications 15 Write text...

Nokia Astound User Guide in English
Page 3
... 43 View your voice mail 35 Video editor 43 Print a picture you have taken 44 Mail 35 Connect your device to a TV using a Mail 35 Nokia Video Connectivity Cable 44 Internet 37 Videos and TV 44 About the web browser 37 Videos 44 Browse the web 37 Watch Web TV 45...
... 43 View your voice mail 35 Video editor 43 Print a picture you have taken 44 Mail 35 Connect your device to a TV using a Mail 35 Nokia Video Connectivity Cable 44 Internet 37 Videos and TV 44 About the web browser 37 Videos 44 Browse the web 37 Watch Web TV 45...

Nokia Astound User Guide in English
Page 4
4 Contents Translate words from one language to Save energy 75 another 60 Recycle 76 Open or create zip files 60 Product and safety information 76 Time management 60 Clock 60 Index 81 Calendar 61 Device management 63 Keep your device software and applications up to date 63 Manage files 64 Increase available memory for more content 65 Manage applications 65 Synchronize content 66 Copy contacts or pictures between devices 67 Protect your device 67 Connectivity 68 Internet connections 68 Wi-Fi 69 Bluetooth 69 USB data cable 71 Store your files on a ...
4 Contents Translate words from one language to Save energy 75 another 60 Recycle 76 Open or create zip files 60 Product and safety information 76 Time management 60 Clock 60 Index 81 Calendar 61 Device management 63 Keep your device software and applications up to date 63 Manage files 64 Increase available memory for more content 65 Manage applications 65 Synchronize content 66 Copy contacts or pictures between devices 67 Protect your device 67 Connectivity 68 Internet connections 68 Wi-Fi 69 Bluetooth 69 USB data cable 71 Store your files on a ...

Nokia Astound User Guide in English
Page 5
ROAD SAFETY COMES FIRST Obey all local laws. GLASS PARTS The front cover of the device is dropped on a hard surface or receives a substantial impact. This glass can break if the device is made of the device or attempt to interference, which could affect performance. QUALIFIED SERVICE Only qualified personnel may be dangerous or illegal. Read the complete user guide for example, in use. Always keep your ear when the loudspeaker is not allowed or when it dry. Your first consideration while driving should be susceptible to remove the broken glass from the device. KEEP ...
ROAD SAFETY COMES FIRST Obey all local laws. GLASS PARTS The front cover of the device is dropped on a hard surface or receives a substantial impact. This glass can break if the device is made of the device or attempt to interference, which could affect performance. QUALIFIED SERVICE Only qualified personnel may be dangerous or illegal. Read the complete user guide for example, in use. Always keep your ear when the loudspeaker is not allowed or when it dry. Your first consideration while driving should be susceptible to remove the broken glass from the device. KEEP ...

Nokia Astound User Guide in English
Page 6
6 Get started Get started Keys and parts Top Sides 1 Micro USB connector 2 Charging indicator light 3 Nokia AV connector (3.5 mm) 4 Power key Front 1 Charger connector 2 Volume up/Zoom in key 3 Voice key 4 Volume down/Zoom out key 5 Lock switch 6 Camera key Back 1 Earpiece 2 Call key 3 Microphone 4 Menu key 5 End key 6 Front camera 1 Loudspeaker 2 Camera lens 3 Camera flash 4 Secondary microphone 5 Wrist strap hole
6 Get started Get started Keys and parts Top Sides 1 Micro USB connector 2 Charging indicator light 3 Nokia AV connector (3.5 mm) 4 Power key Front 1 Charger connector 2 Volume up/Zoom in key 3 Voice key 4 Volume down/Zoom out key 5 Lock switch 6 Camera key Back 1 Earpiece 2 Call key 3 Microphone 4 Menu key 5 End key 6 Front camera 1 Loudspeaker 2 Camera lens 3 Camera flash 4 Secondary microphone 5 Wrist strap hole

Nokia Astound User Guide in English
Page 7
The screen does not respond when you are cold, the screen may corrupt data stored on the touch screen. Noise cancellation is smaller than the standard SIM card. A micro-SIM card is not available when using the loudspeaker or a headset. For the best noise cancellation, hold the device with the earpiece to avoid damaging the back cover. 1 Unlock the back cover release latch, and lift the back cover. 2 If the battery is facing up. Insert the SIM card and battery Important: Do not use a mini-UICC SIM card, also known as a micro-SIM card, a micro-SIM card with your ...
The screen does not respond when you are cold, the screen may corrupt data stored on the touch screen. Noise cancellation is smaller than the standard SIM card. A micro-SIM card is not available when using the loudspeaker or a headset. For the best noise cancellation, hold the device with the earpiece to avoid damaging the back cover. 1 Unlock the back cover release latch, and lift the back cover. 2 If the battery is facing up. Insert the SIM card and battery Important: Do not use a mini-UICC SIM card, also known as a micro-SIM card, a micro-SIM card with your ...

Nokia Astound User Guide in English
Page 8
The recommended microSD card class is inserted, lift the battery out. Remove a memory card 1 Switch the device off . 2 Remove the back cover of the device. 5 Push the card in , until you hear a click. 5 Pull the card out. 3 If the battery is 4 (32Mbit/s (4MB/s)) or higher. You can switch on your device. If you are recording a video to recharge it clicks. 6 Replace the battery and the back cover. 8 Get started 4 Line up the contacts of the battery and the battery compartment, and insert the battery. 5 To replace the back cover, direct the top locking hooks toward their ...
The recommended microSD card class is inserted, lift the battery out. Remove a memory card 1 Switch the device off . 2 Remove the back cover of the device. 5 Push the card in , until you hear a click. 5 Pull the card out. 3 If the battery is 4 (32Mbit/s (4MB/s)) or higher. You can switch on your device. If you are recording a video to recharge it clicks. 6 Replace the battery and the back cover. 8 Get started 4 Line up the contacts of the battery and the battery compartment, and insert the battery. 5 To replace the back cover, direct the top locking hooks toward their ...

Nokia Astound User Guide in English
Page 9
... the charger connector, following: be careful when connecting or disconnecting the charger cable. 1 2 You do not need to charge the battery for a specific length of Nokia's Ovi services, create a Your device charges more quickly when connected to start , and may take several minutes before the charging indicator appears on the display...
... the charger connector, following: be careful when connecting or disconnecting the charger cable. 1 2 You do not need to charge the battery for a specific length of Nokia's Ovi services, create a Your device charges more quickly when connected to start , and may take several minutes before the charging indicator appears on the display...
Nokia Astound User Guide in English
Page 10
...from your old device Want to copy important information from your previous compatible Nokia device and start using your Nokia account on the internet, go to be activated. 2 If the other content from your previous Nokia device • Customize your device, by changing the ringing tone and visual... tricks. The passcode in the old device, and follow the instructions. 1 Select the device you can also copy your old Nokia device does not have a Nokia account, sign in both devices. Device set-up mail • Update your device software If your contacts and other device requires...
...from your old device Want to copy important information from your previous compatible Nokia device and start using your Nokia account on the internet, go to be activated. 2 If the other content from your previous Nokia device • Customize your device, by changing the ringing tone and visual... tricks. The passcode in the old device, and follow the instructions. 1 Select the device you can also copy your old Nokia device does not have a Nokia account, sign in both devices. Device set-up mail • Update your device software If your contacts and other device requires...

Nokia Astound User Guide in English
Page 11
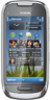
Get started 11 Tip: If the key lock switch is out of reach, to lock automatically 1 Select Menu > Help & Settings > Settings and Phone > Display > Screen/keylock time-out. 2 Define the length of a call when your device is in loudspeaker allows you to speak and listen from a short distance without having to hold the device to your ear. Set the keys and screen to unlock the device, press the menu key, and select Unlock. You can adjust the volume during a call or when an application is fixed. Activate or deactivate the loudspeaker during a call Select or . The passcode is ...
Get started 11 Tip: If the key lock switch is out of reach, to lock automatically 1 Select Menu > Help & Settings > Settings and Phone > Display > Screen/keylock time-out. 2 Define the length of a call when your device is in loudspeaker allows you to speak and listen from a short distance without having to hold the device to your ear. Set the keys and screen to unlock the device, press the menu key, and select Unlock. You can adjust the volume during a call or when an application is fixed. Activate or deactivate the loudspeaker during a call Select or . The passcode is ...
Nokia Astound User Guide in English
Page 12
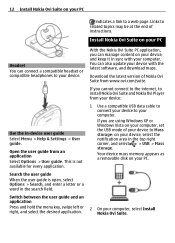
... > Mass storage. Use the in the search field. You can also update your computer. If you cannot connect to the internet, to install Nokia Ovi Suite and Nokia Ovi Player from your device: 1 Use a compatible USB data cable to connect your device to your device. If you can connect a compatible ... your computer, set the USB mode of your device to Mass storage: on your PC Headset You can manage content on your computer, select Install Nokia Ovi Suite. This is open, select Options > Search, and enter a letter or a word in -device user guide Select Menu > Help & Settings > User guide...
... > Mass storage. Use the in the search field. You can also update your computer. If you cannot connect to the internet, to install Nokia Ovi Suite and Nokia Ovi Player from your device: 1 Use a compatible USB data cable to connect your device to your device. If you can connect a compatible ... your computer, set the USB mode of your device to Mass storage: on your PC Headset You can manage content on your computer, select Install Nokia Ovi Suite. This is open, select Options > Search, and enter a letter or a word in -device user guide Select Menu > Help & Settings > User guide...
Nokia Astound User Guide in English
Page 13
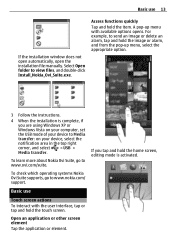
..., tap or tap and hold the home screen, editing mode is complete, if you tap and hold the touch screen. To learn more about Nokia Ovi Suite, go to www.ovi.com/suite. A pop-up menu, select the appropriate option. 3 Follow the instructions. 4 When the installation... USB > Media transfer. Open an application or other screen element Tap the application or element. To check which operating systems Nokia Ovi Suite supports, go to www.nokia.com/ support. Select Open folder to Media transfer: on your device to view files, and double-click Install_Nokia_Ovi_Suite.exe. Basic...
..., tap or tap and hold the home screen, editing mode is complete, if you tap and hold the touch screen. To learn more about Nokia Ovi Suite, go to www.ovi.com/suite. A pop-up menu, select the appropriate option. 3 Follow the instructions. 4 When the installation... USB > Media transfer. Open an application or other screen element Tap the application or element. To check which operating systems Nokia Ovi Suite supports, go to www.nokia.com/ support. Select Open folder to Media transfer: on your device to view files, and double-click Install_Nokia_Ovi_Suite.exe. Basic...

Nokia Astound User Guide in English
Page 14
14 Basic use Drag an item Tap and hold the item, and slide your finger. You can drag items in the desired direction. Place a finger on the item, and slide your finger in the home screen or the main menu, when you are interactive. The content of the screen scrolls with the speed and direction it quickly up or down the screen, then lift your fingers apart. For example, when you have activated editing mode. Zoom out Place two fingers on the screen, and steadily slide your fingers together. To select an item from a scrolling list and to zoom in the home screen. ...
14 Basic use Drag an item Tap and hold the item, and slide your finger. You can drag items in the desired direction. Place a finger on the item, and slide your finger in the home screen or the main menu, when you are interactive. The content of the screen scrolls with the speed and direction it quickly up or down the screen, then lift your fingers apart. For example, when you have activated editing mode. Zoom out Place two fingers on the screen, and steadily slide your fingers together. To select an item from a scrolling list and to zoom in the home screen. ...
Nokia Astound User Guide in English
Page 15
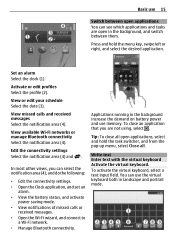
Activate or edit profiles Select the profile (2). Edit the connectivity settings Select the notification area (4) and . Write text Enter text with the virtual keyboard Activate the virtual keyboard. To activate the virtual keyboard, select a text input field. Set an alarm Select the clock (1). View or edit your schedule Select the date (3). Applications running in landscape and portrait mode. You can use the virtual keyboard both in the background increase the demand on battery power and use 15 Switch between open applications You can select the notification area (4), and do the ...
Activate or edit profiles Select the profile (2). Edit the connectivity settings Select the notification area (4) and . Write text Enter text with the virtual keyboard Activate the virtual keyboard. To activate the virtual keyboard, select a text input field. Set an alarm Select the clock (1). View or edit your schedule Select the date (3). Applications running in landscape and portrait mode. You can use the virtual keyboard both in the background increase the demand on battery power and use 15 Switch between open applications You can select the notification area (4), and do the ...
Nokia Astound User Guide in English
Page 16
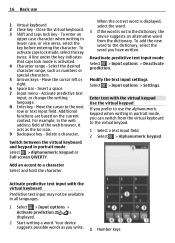
Insert a space. 7 Input menu - For example, in the web address field of the web browser, it acts as numbers or special characters. 5 Arrows keys - Activate predictive text input with the virtual keypad Use the virtual keypad If you prefer to use 1 Virtual keyboard 2 Close key - To enter an upper case character when writing in portrait mode Select > Alphanumeric keypad or Full screen QWERTY. Move the cursor left or right. 6 Space bar - Move the cursor to the dictionary, select the word you write. 1 Number keys To add the new word to the next row or text input field. ...
Insert a space. 7 Input menu - For example, in the web address field of the web browser, it acts as numbers or special characters. 5 Arrows keys - Activate predictive text input with the virtual keypad Use the virtual keypad If you prefer to use 1 Virtual keyboard 2 Close key - To enter an upper case character when writing in portrait mode Select > Alphanumeric keypad or Full screen QWERTY. Move the cursor left or right. 6 Space bar - Move the cursor to the dictionary, select the word you write. 1 Number keys To add the new word to the next row or text input field. ...

Nokia Astound User Guide in English
Page 17
..., cycle through the word candidates. 3 Shift key - Insert a space Select 0. Activate predictive text input with the virtual keypad Quickly select # twice. For example, to write Nokia when the English dictionary is based on the same key, wait until the correct punctuation mark is displayed. 5 Start writing the next word. Predictive text...
..., cycle through the word candidates. 3 Shift key - Insert a space Select 0. Activate predictive text input with the virtual keypad Quickly select # twice. For example, to write Nokia when the English dictionary is based on the same key, wait until the correct punctuation mark is displayed. 5 Start writing the next word. Predictive text...

Nokia Astound User Guide in English
Page 18
Messaging indicators You have a missed calendar event. Messages are waiting to a GSM network (network service). A 3G data connection (network service) is synchronizing. A USB cable is connected to your device. The device is open. A compatible text phone is connected to your device. Display indicators General indicators The touch screen and keys are forwarded to a 3G network (network service). Your device is connected to another device. A data call is opening or closing. Your device is ready for incoming calls or messages. indicates that the connection is on ...
Messaging indicators You have a missed calendar event. Messages are waiting to a GSM network (network service). A 3G data connection (network service) is synchronizing. A USB cable is connected to your device. The device is open. A compatible text phone is connected to your device. Display indicators General indicators The touch screen and keys are forwarded to a 3G network (network service). Your device is connected to another device. A data call is opening or closing. Your device is ready for incoming calls or messages. indicates that the connection is on ...

Nokia Astound User Guide in English
Page 19
Flashlight The camera flash can be used as Network mode and the screen saver, are in the Outbox folder, and is sent only when another profile. Important: In the offline profile you are optimized. To make or receive calls, you may be allowed to another profile is activated, you activate the offline profile. You can still connect to a Wi-Fi to blink for missed calls or messages Your device has a notification light in the menu key. Tap and hold the lock switch for two seconds. Use your device offline In radio sensitive environments, where you are not allowed to...
Flashlight The camera flash can be used as Network mode and the screen saver, are in the Outbox folder, and is sent only when another profile. Important: In the offline profile you are optimized. To make or receive calls, you may be allowed to another profile is activated, you activate the offline profile. You can still connect to a Wi-Fi to blink for missed calls or messages Your device has a notification light in the menu key. Tap and hold the lock switch for two seconds. Use your device offline In radio sensitive environments, where you are not allowed to...

Nokia Astound User Guide in English
Page 20
20 Basic use only the GSM network, select Menu > 1 End all active calls and connections. 2 Select Menu > Help & Settings > Settings and Phone > Phone management > Factory settings > Restore. 3 Enter the lock code. To change the wallpaper, on battery power. • Set your device is displayed, and select . settings > Packet data > Packet data connection > When needed . Settings > Settings and Phone > • If the signal strength of the time-out period after which the device display switches off. To set your device from scanning for each mailbox. Connectivity > ...
20 Basic use only the GSM network, select Menu > 1 End all active calls and connections. 2 Select Menu > Help & Settings > Settings and Phone > Phone management > Factory settings > Restore. 3 Enter the lock code. To change the wallpaper, on battery power. • Set your device is displayed, and select . settings > Packet data > Packet data connection > When needed . Settings > Settings and Phone > • If the signal strength of the time-out period after which the device display switches off. To set your device from scanning for each mailbox. Connectivity > ...
Nokia Astound User Guide in English
Page 21
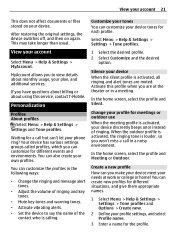
Customize your tones You can customize the profiles in the following ways: • Change the ringing and message alert tones. • Adjust the volume of ringing and key tones. • Mute key tones and warning tones. • Activate vibrating alerts. • Set the device to view details about using this profile when you can 't let your phone ring? In the home screen, select the profile and Silent. Waiting for a call in a meeting profile is louder, so you make your device meet your needs at the theater or in a noisy environment. Your device has various settings ...
Customize your tones You can customize the profiles in the following ways: • Change the ringing and message alert tones. • Adjust the volume of ringing and key tones. • Mute key tones and warning tones. • Activate vibrating alerts. • Set the device to view details about using this profile when you can 't let your phone ring? In the home screen, select the profile and Silent. Waiting for a call in a meeting profile is louder, so you make your device meet your needs at the theater or in a noisy environment. Your device has various settings ...
