User Guide
Page 4
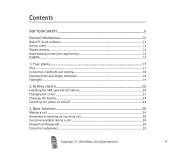
... General information 13 Nokia PC Suite software...13 Access codes ...13 Shared memory ...14 Downloading content and applications 14 (E)GPRS ...15 1. Getting started 20 Installing the SIM card and the battery 20 Changing the covers ...22 Charging the battery ...24 Switching the phone on and off ......24 3. All rights reserved. 4 Your phone...17 Keys ...17 Connectors, flashlight and camera...18 Standby mode and display indicators 18 ...
... General information 13 Nokia PC Suite software...13 Access codes ...13 Shared memory ...14 Downloading content and applications 14 (E)GPRS ...15 1. Getting started 20 Installing the SIM card and the battery 20 Changing the covers ...22 Charging the battery ...24 Switching the phone on and off ......24 3. All rights reserved. 4 Your phone...17 Keys ...17 Connectors, flashlight and camera...18 Standby mode and display indicators 18 ...
User Guide
Page 13
... against unauthorised use . Copyright © 2004 Nokia. Change the code and set the phone to request it using the Access codes and Security level functions in the PUK code and press OK. Nokia PC Suite is available on Nokia's Web site at www.nokia.com. ■ Access codes • Security...the new code secret and in a safe place separate from your photos. General information ■ Nokia PC Suite software With the Nokia PC Suite software you can also create new cut-out covers from your phone. • PIN code: The PIN (Personal Identification Number) code may be supplied with the SIM...
... against unauthorised use . Copyright © 2004 Nokia. Change the code and set the phone to request it using the Access codes and Security level functions in the PUK code and press OK. Nokia PC Suite is available on Nokia's Web site at www.nokia.com. ■ Access codes • Security...the new code secret and in a safe place separate from your photos. General information ■ Nokia PC Suite software With the Nokia PC Suite software you can also create new cut-out covers from your phone. • PIN code: The PIN (Personal Identification Number) code may be supplied with the SIM...
User Guide
Page 20
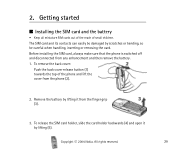
...; 2004 Nokia. Before installing the SIM card, always make sure that the phone is switched off and disconnected from any enhancement and then remove the battery. 1. Getting started ■ Installing the SIM card and the battery • Keep all miniature SIM cards out of the reach of the phone and lift the cover from...
...; 2004 Nokia. Before installing the SIM card, always make sure that the phone is switched off and disconnected from any enhancement and then remove the battery. 1. Getting started ■ Installing the SIM card and the battery • Keep all miniature SIM cards out of the reach of the phone and lift the cover from...
User Guide
Page 22
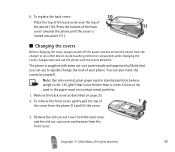
... weight is 60-135 g/m2) that you can also make the covers by Nokia that is locked into place (11). ■ Changing the covers Before changing the cover, always switch off the power and disconnect the phone from the front cover. Copyright © 2004 Nokia. Colors or ink used in the paper must not contain metal particles...
... weight is 60-135 g/m2) that you can also make the covers by Nokia that is locked into place (11). ■ Changing the covers Before changing the cover, always switch off the power and disconnect the phone from the front cover. Copyright © 2004 Nokia. Colors or ink used in the paper must not contain metal particles...

User Guide
Page 23
Place the keymat on the front cover (2). 5. Copyright © 2004 Nokia. Place the new cut-out cover on the cut-out cover (3). Place the cut -out cover under the two guides in place. 6. 4. To replace the front cover, align the bottom of the phone with the bottom of the cover (4) and press the top of the back cover (6). Make sure that the keymat is properly in the middle and at the bottom of the phone towards the cover until it locks into the back cover by sliding the cut -out cover into place (5). 7. All rights reserved. 23
Place the keymat on the front cover (2). 5. Copyright © 2004 Nokia. Place the new cut-out cover on the cut-out cover (3). Place the cut -out cover under the two guides in place. 6. 4. To replace the front cover, align the bottom of the phone with the bottom of the cover (4) and press the top of the back cover (6). Make sure that the keymat is properly in the middle and at the bottom of the phone towards the cover until it locks into the back cover by sliding the cut -out cover into place (5). 7. All rights reserved. 23
User Guide
Page 24
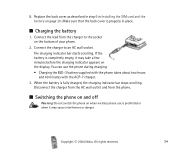
...sure that the back cover is fully charged, the charging indicator bar stops scrolling. Copyright © 2004 Nokia. Connect the charger to the socket on page 20. Connect the lead from the phone. ■ Switching the phone on and off Warning: Do not switch the phone on the display. Replace... the back cover as described in step 6 in place. ■...
...sure that the back cover is fully charged, the charging indicator bar stops scrolling. Copyright © 2004 Nokia. Connect the charger to the socket on page 20. Connect the lead from the phone. ■ Switching the phone on and off Warning: Do not switch the phone on the display. Replace... the back cover as described in step 6 in place. ■...


