User Guide
Page 4
Getting started 20 Installing the SIM card and the battery 20 Changing the covers ...22 Charging the battery ...24 Switching the phone on and off ...24 3. Basic functions 26 Making a call ...26 Answering or rejecting an incoming call 28 Functions available during... a call ...28 Keypad lock (Keyguard) ...29 Using the loudspeaker...29 Copyright © 2004 Nokia. All rights reserved. 4 Your phone...17 Keys ...17 Connectors, flashlight and camera...18 Standby mode and display indicators 18 Flashlight ...19 2. Contents FOR YOUR SAFETY 9 General information 13...
Getting started 20 Installing the SIM card and the battery 20 Changing the covers ...22 Charging the battery ...24 Switching the phone on and off ...24 3. Basic functions 26 Making a call ...26 Answering or rejecting an incoming call 28 Functions available during... a call ...28 Keypad lock (Keyguard) ...29 Using the loudspeaker...29 Copyright © 2004 Nokia. All rights reserved. 4 Your phone...17 Keys ...17 Connectors, flashlight and camera...18 Standby mode and display indicators 18 Flashlight ...19 2. Contents FOR YOUR SAFETY 9 General information 13...
User Guide
Page 7
...camera settings...82 Radio...82 Tuning and saving a radio channel 83 Other options related to the radio 84 Voice recorder ...84 Organiser (Menu 7) ...85 Alarm clock ...85 When the alarm time expires...86 Calendar...86 Using the different calendar views 86 Making a calendar note...87 When the phone... sounds an alarm for a note 88 Calculator ...88 Making a currency conversion...89 Applications (Menu 8)...89 Games ...90 Collection ...91 Other options available for an application or application set 91 Downloading a Java application ...92 Copyright © 2004 Nokia.
...camera settings...82 Radio...82 Tuning and saving a radio channel 83 Other options related to the radio 84 Voice recorder ...84 Organiser (Menu 7) ...85 Alarm clock ...85 When the alarm time expires...86 Calendar...86 Using the different calendar views 86 Making a calendar note...87 When the phone... sounds an alarm for a note 88 Calculator ...88 Making a currency conversion...89 Applications (Menu 8)...89 Games ...90 Collection ...91 Other options available for an application or application set 91 Downloading a Java application ...92 Copyright © 2004 Nokia.
User Guide
Page 13
The preset code is supplied with the phone's camera and create new ringing tones and wallpapers. Change the code and set the phone to request it using the Access codes and Security level functions in a new PIN code and press OK. Keep the new code secret and in a ... on . If you enter an incorrect PIN code three times in the Security settings menu, the code is requested each time the phone is switched on Nokia's Web site at www.nokia.com. ■ Access codes • Security code: This code is 12345. You can , for example, manage the photos captured with your...
The preset code is supplied with the phone's camera and create new ringing tones and wallpapers. Change the code and set the phone to request it using the Access codes and Security level functions in a new PIN code and press OK. Keep the new code secret and in a ... on . If you enter an incorrect PIN code three times in the Security settings menu, the code is requested each time the phone is switched on Nokia's Web site at www.nokia.com. ■ Access codes • Security code: This code is 12345. You can , for example, manage the photos captured with your...
User Guide
Page 18
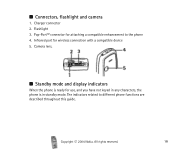
Flashlight 3. Infrared port for use, and you have not keyed in any characters, the phone is ready for wireless connection with a compatible device 5. The indicators related to the phone 4. All rights reserved. 18 ■ Connectors, flashlight and camera 1. Camera lens. ■ Standby mode and display indicators When the phone is in standby mode. Charger connector 2. Copyright © 2004 Nokia. Pop-PortTM connector for attaching a compatible enhancement to different phone functions are described throughout this guide.
Flashlight 3. Infrared port for use, and you have not keyed in any characters, the phone is ready for wireless connection with a compatible device 5. The indicators related to the phone 4. All rights reserved. 18 ■ Connectors, flashlight and camera 1. Camera lens. ■ Standby mode and display indicators When the phone is in standby mode. Charger connector 2. Copyright © 2004 Nokia. Pop-PortTM connector for attaching a compatible enhancement to different phone functions are described throughout this guide.
User Guide
Page 21
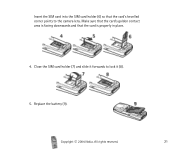
All rights reserved. 21 Close the SIM card holder (7) and slide it forwards to the camera lens. Make sure that the card's golden contact area is facing downwards and that the card's bevelled corner points to lock it (8). 5. Insert the SIM card into the SIM card holder (6) so that the card is properly in place. 4. Replace the battery (9). Copyright © 2004 Nokia.
All rights reserved. 21 Close the SIM card holder (7) and slide it forwards to the camera lens. Make sure that the card's golden contact area is facing downwards and that the card's bevelled corner points to lock it (8). 5. Insert the SIM card into the SIM card holder (6) so that the card is properly in place. 4. Replace the battery (9). Copyright © 2004 Nokia.

User Guide
Page 41
Gallery 1. Usage rights list 6. Settings 2. Radio 3. Rename folder 5. Gallery downloads 6. Night mode 4. Voice recorder Copyright © 2004 Nokia. PIN code request 2. Call barring service 3. View folders 2. Delete folder 4. Media 1. Closed user group 5. Add folder 3. Camera 1. Self-timer 5. All rights reserved. 41 Security level 6. Standard photo 2. Portrait photo 3. Restore factory settings 5. Fixed dialling 4. Access codes 11. 1.
Gallery 1. Usage rights list 6. Settings 2. Radio 3. Rename folder 5. Gallery downloads 6. Night mode 4. Voice recorder Copyright © 2004 Nokia. PIN code request 2. Call barring service 3. View folders 2. Delete folder 4. Media 1. Closed user group 5. Add folder 3. Camera 1. Self-timer 5. All rights reserved. 41 Security level 6. Standard photo 2. Portrait photo 3. Restore factory settings 5. Fixed dialling 4. Access codes 11. 1.

User Guide
Page 67
... and select Set as wallpaper. Copyright © 2004 Nokia. • Alert for to set an image as the wallpaper: • To select the wallpaper image for example, from phone numbers that belong to a certain caller group. To set the phone to ring only upon calls from multimedia messages. See also... are saved in the Contacts menu. Display settings To access this menu: Press Menu in the Gallery menu. Also photos taken with the phone's camera can save new images, for the first time or to change the image, select Select wallpaper. Scroll to the caller group you want or...
... and select Set as wallpaper. Copyright © 2004 Nokia. • Alert for to set an image as the wallpaper: • To select the wallpaper image for example, from phone numbers that belong to a certain caller group. To set the phone to ring only upon calls from multimedia messages. See also... are saved in the Contacts menu. Display settings To access this menu: Press Menu in the Gallery menu. Also photos taken with the phone's camera can save new images, for the first time or to change the image, select Select wallpaper. Scroll to the caller group you want or...

User Guide
Page 80
...the style, size and colour of the selected file. To access this menu you can be updated. Copyright © 2004 Nokia. If you press Options, you can use the phone's built-in standby mode and select Media. Press Options and select the desired function. If you want, press OK and ... some images, ringing tones and other content from being copied, modified, transferred or forwarded. ■ Media (Menu 6) In this menu: Press Menu in camera, FM radio and voice recorder. To save the modified image in the text you selected Insert frame or Insert clip-art, scroll to crop the...
...the style, size and colour of the selected file. To access this menu you can be updated. Copyright © 2004 Nokia. If you press Options, you can use the phone's built-in standby mode and select Media. Press Options and select the desired function. If you want, press OK and ... some images, ringing tones and other content from being copied, modified, transferred or forwarded. ■ Media (Menu 6) In this menu: Press Menu in camera, FM radio and voice recorder. To save the modified image in the text you selected Insert frame or Insert clip-art, scroll to crop the...
User Guide
Page 81
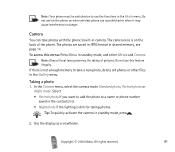
...want to add the photo to a name or phone number saved in shared memory, see page 14. If there is prohibited or when it may cause interference or danger. Copyright © 2004 Nokia. Do not switch the phone on the back of pictures. Camera You can take a new photo, delete old ...photos or other files in camera. Use the display as a viewfinder. Tip: To quickly activate the camera in the Media menu. To access this feature illegally...
...want to add the photo to a name or phone number saved in shared memory, see page 14. If there is prohibited or when it may cause interference or danger. Copyright © 2004 Nokia. Do not switch the phone on the back of pictures. Camera You can take a new photo, delete old ...photos or other files in camera. Use the display as a viewfinder. Tip: To quickly activate the camera in the Media menu. To access this feature illegally...

User Guide
Page 82
... beeping sound is saved in the contacts list. To take a photo after 10 seconds. If you want to the phone's FM radio via the built-in a multimedia message, or attach it . Tip: You can listen to use the...memory. • Camera sounds to set the camera to a name or phone number in the Images folder of the Gallery menu. 4. In the Camera menu, select Self-timer and the desired camera mode. Adjusting the camera settings In the Camera menu, select Settings...All rights reserved. 82 When using the loudspeaker, keep the Copyright © 2004 Nokia. The photo is heard.
... beeping sound is saved in the contacts list. To take a photo after 10 seconds. If you want to the phone's FM radio via the built-in a multimedia message, or attach it . Tip: You can listen to use the...memory. • Camera sounds to set the camera to a name or phone number in the Images folder of the Gallery menu. 4. In the Camera menu, select Self-timer and the desired camera mode. Adjusting the camera settings In the Camera menu, select Settings...All rights reserved. 82 When using the loudspeaker, keep the Copyright © 2004 Nokia. The photo is heard.


