User Guide
Page 2
... accuracy, reliability or contents of this document without prior notice. All rights reserved. Tegic Communications, Inc. Nokia operates a policy of continuous development. The contents of this document or withdraw it at http://www.nokia.com/phones/declaration_of_conformity/. Except as is prohibited. The availability of particular products may be responsible for a particular purpose, are...
... accuracy, reliability or contents of this document without prior notice. All rights reserved. Tegic Communications, Inc. Nokia operates a policy of continuous development. The contents of this document or withdraw it at http://www.nokia.com/phones/declaration_of_conformity/. Except as is prohibited. The availability of particular products may be responsible for a particular purpose, are...
User Guide
Page 3
... connectors...15 Display and standby mode ...16 Changing the covers ...17 Putting on or off 24 Copyright © 2003 Nokia. All rights reserved. 3 Call functions 20 Making a call ...20 Making a call using the phone book 20 Making a conference call ...20 Redialling...21 Speed dialling...21 Answering a call ...22 In-call operations ...22...
... connectors...15 Display and standby mode ...16 Changing the covers ...17 Putting on or off 24 Copyright © 2003 Nokia. All rights reserved. 3 Call functions 20 Making a call ...20 Making a call using the phone book 20 Making a conference call ...20 Redialling...21 Speed dialling...21 Answering a call ...22 In-call operations ...22...

User Guide
Page 4
......38 Voice mailbox number...38 Service command editor ...38 Contacts (Menu 2 ) ...38 Searching for a name and phone number 39 Settings for Contacts ...40 Call register (Menu 3) ...40 Recent call lists...41 Copyright © 2003 Nokia. All rights reserved. 4 Using predictive text input ...24 Writing compound words ...25 Using traditional text input...26...
......38 Voice mailbox number...38 Service command editor ...38 Contacts (Menu 2 ) ...38 Searching for a name and phone number 39 Settings for Contacts ...40 Call register (Menu 3) ...40 Recent call lists...41 Copyright © 2003 Nokia. All rights reserved. 4 Using predictive text input ...24 Writing compound words ...25 Using traditional text input...26...

User Guide
Page 5
All rights reserved. 5 Battery information 55 Copyright © 2003 Nokia. Call counters and call timers...41 Tones (Menu 4)...42 Profiles (Menu 5) ...43 Settings (Menu 6)...44 Time settings ...44 Clock ...44 Date setting ...44 Auto update of date & time ...44 Call settings...44 Phone settings ...46 Enhancement settings ...46 Keyguard settings ...47 Security settings...
All rights reserved. 5 Battery information 55 Copyright © 2003 Nokia. Call counters and call timers...41 Tones (Menu 4)...42 Profiles (Menu 5) ...43 Settings (Menu 6)...44 Time settings ...44 Clock ...44 Date setting ...44 Auto update of date & time ...44 Call settings...44 Phone settings ...46 Enhancement settings ...46 Keyguard settings ...47 Security settings...

User Guide
Page 7
... blasting is given in this manual. Do not use a hand-held phone while driving. INTERFERENCE All wireless phones may be dangerous or illegal. Observe restrictions, and follow any regulations or rules. Switch the phone off near fuel or chemicals. Copyright © 2003 Nokia. SWITCH OFF IN HOSPITALS Follow any regulations or rules. All rights...
... blasting is given in this manual. Do not use a hand-held phone while driving. INTERFERENCE All wireless phones may be dangerous or illegal. Observe restrictions, and follow any regulations or rules. Switch the phone off near fuel or chemicals. Copyright © 2003 Nokia. SWITCH OFF IN HOSPITALS Follow any regulations or rules. All rights...
User Guide
Page 8
...the normal position. Give your location. WATER-RESISTANCE Your phone is not water-resistant. To end a call , press Answer. All rights reserved. 8 To answer a call , press End. Copyright © 2003 Nokia. USE SENSIBLY Use only in service. Do not touch ...the antenna unnecessarily. QUALIFIED SERVICE Only qualified personnel may install or repair phone equipment. Do not connect incompatible products. Keep it dry. BACKUP COPIES ...
...the normal position. Give your location. WATER-RESISTANCE Your phone is not water-resistant. To end a call , press Answer. All rights reserved. 8 To answer a call , press End. Copyright © 2003 Nokia. USE SENSIBLY Use only in service. Do not touch ...the antenna unnecessarily. QUALIFIED SERVICE Only qualified personnel may install or repair phone equipment. Do not connect incompatible products. Keep it dry. BACKUP COPIES ...
User Guide
Page 9
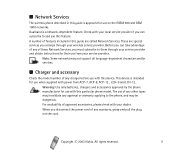
...use from ACP-7, ACP-8, ACP-12 , LCH-9 and LCH-12.. Before you must subscribe to the phone, and may invalidate any charger before use when supplied with your service provider. Note: Some networks may ...you arrange through your service provider and obtain instructions for use with this particular phone model. ■ Network Services The wireless phone described in this guide are special services you can take advantage of any of... Use only batteries, chargers and accessories approved by the phone manufacturer for use with this guide is approved for use on the EGSM 900 and...
...use from ACP-7, ACP-8, ACP-12 , LCH-9 and LCH-12.. Before you must subscribe to the phone, and may invalidate any charger before use when supplied with your service provider. Note: Some networks may ...you arrange through your service provider and obtain instructions for use with this particular phone model. ■ Network Services The wireless phone described in this guide are special services you can take advantage of any of... Use only batteries, chargers and accessories approved by the phone manufacturer for use with this guide is approved for use on the EGSM 900 and...
User Guide
Page 10
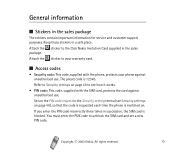
Refer to Security settings on . Copyright © 2003 Nokia. All rights reserved. 10 Attach the sticker to see Security settings on page 48), so that the code is requested each time the phone is switched on page 48 to your warranty card. ■ Access codes • Security code: ... in a safe place. You must enter the PUK code to the Club Nokia Invitation Card supplied in the Security settings menu (see how it works. • PIN code: This code, supplied with the phone, protects your phone against unauthorised use . Attach the sticker to unblock the SIM card and set...
Refer to Security settings on . Copyright © 2003 Nokia. All rights reserved. 10 Attach the sticker to see Security settings on page 48), so that the code is requested each time the phone is switched on page 48 to your warranty card. ■ Access codes • Security code: ... in a safe place. You must enter the PUK code to the Club Nokia Invitation Card supplied in the Security settings menu (see how it works. • PIN code: This code, supplied with the phone, protects your phone against unauthorised use . Attach the sticker to unblock the SIM card and set...
User Guide
Page 11
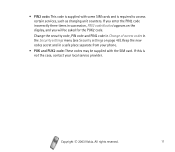
... supplied with some SIM cards and is not the case, contact your phone. • PUK and PUK2 code: These codes may be asked for the PUK2 code. If you will be supplied with the SIM card. Copyright © 2003 Nokia. If this is required to access certain services, such as charging unit...
... supplied with some SIM cards and is not the case, contact your phone. • PUK and PUK2 code: These codes may be asked for the PUK2 code. If you will be supplied with the SIM card. Copyright © 2003 Nokia. If this is required to access certain services, such as charging unit...

User Guide
Page 12
... SIM card and its contacts can be careful when handling, inserting or removing the card. • Before installing the SIM card, make sure that the phone is switched off the phone. 2. 1. Copyright © 2003 Nokia.
... SIM card and its contacts can be careful when handling, inserting or removing the card. • Before installing the SIM card, make sure that the phone is switched off the phone. 2. 1. Copyright © 2003 Nokia.

User Guide
Page 13
... sure that the goldcoloured connectors on the card are facing downwards and that the bevelled corner is on the battery with the bottom of the phone (7), press the top of the battery until it into the SIM card slot (5). All rights reserved. 13 Press the SIM card carefully into... place (8). Align the bottom of the back cover with the corresponding connectors on the phone, and push the opposite end of the back cover to lock. 4. Copyright © 2003 Nokia. 3. Align the gold-coloured connectors on the right. Lift the SIM card holder using the finger grip...
... sure that the goldcoloured connectors on the card are facing downwards and that the bevelled corner is on the battery with the bottom of the phone (7), press the top of the battery until it into the SIM card slot (5). All rights reserved. 13 Press the SIM card carefully into... place (8). Align the bottom of the back cover with the corresponding connectors on the phone, and push the opposite end of the back cover to lock. 4. Copyright © 2003 Nokia. 3. Align the gold-coloured connectors on the right. Lift the SIM card holder using the finger grip...

User Guide
Page 14
...of the phone covers has been removed. 1. Not touching the antenna area during a phone call quality and may cause the phone to the base of the phone. 2. ...Connect the charger to 3 hours 30 minutes. • If Not charging is displayed, wait for a while, disconnect the charger, plug it in antenna. If charging still fails, contact your phone.... All rights reserved. 14 TIPS ON EFFICIENT OPERATION: Your phone has a built-in again, and retry. Connect the lead from the phone and the...
...of the phone covers has been removed. 1. Not touching the antenna area during a phone call quality and may cause the phone to the base of the phone. 2. ...Connect the charger to 3 hours 30 minutes. • If Not charging is displayed, wait for a while, disconnect the charger, plug it in antenna. If charging still fails, contact your phone.... All rights reserved. 14 TIPS ON EFFICIENT OPERATION: Your phone has a built-in again, and retry. Connect the lead from the phone and the...

User Guide
Page 15
... different functions. All rights reserved. 15 Copyright © 2003 Nokia. In this guide, the symbol is locked, pressing briefly turns the phone's display lights on or off. Scroll keys Enable scrolling through names, phone numbers, menus or settings. ■ Keys and connectors 1. Flashlight Your phone has a built-in Contacts. 5. When the keypad is followed...
... different functions. All rights reserved. 15 Copyright © 2003 Nokia. In this guide, the symbol is locked, pressing briefly turns the phone's display lights on or off. Scroll keys Enable scrolling through names, phone numbers, menus or settings. ■ Keys and connectors 1. Flashlight Your phone has a built-in Contacts. 5. When the keypad is followed...

User Guide
Page 16
... the cellular network at your current location. 3. All rights reserved. 16 6. - enter numbers and characters. Copyright © 2003 Nokia. and are shown when the phone is ready for various purposes in which the phone is called 'standby mode'. 1. Shows the name of the cellular network in different functions. 1. Shows the battery charge level...
... the cellular network at your current location. 3. All rights reserved. 16 6. - enter numbers and characters. Copyright © 2003 Nokia. and are shown when the phone is ready for various purposes in which the phone is called 'standby mode'. 1. Shows the name of the cellular network in different functions. 1. Shows the battery charge level...

User Guide
Page 17
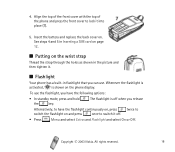
... sure that the new keymat is properly positioned (6). Copyright © 2003 Nokia. All rights reserved. 17 Press the new keymat into the new front cover starting from the bottom of the phone and battery. See steps 1 and 2 in Inserting a SIM card on page 12. 2. Remove the front cover carefully...charger or any other device. Avoid touching electronic components while changing the covers. Remove the keymat carefully (4). Always store and use the phone with the covers attached. 1. ■ Changing the covers Before changing the cover, always switch off the power and disconnect the...
... sure that the new keymat is properly positioned (6). Copyright © 2003 Nokia. All rights reserved. 17 Press the new keymat into the new front cover starting from the bottom of the phone and battery. See steps 1 and 2 in Inserting a SIM card on page 12. 2. Remove the front cover carefully...charger or any other device. Avoid touching electronic components while changing the covers. Remove the keymat carefully (4). Always store and use the phone with the covers attached. 1. ■ Changing the covers Before changing the cover, always switch off the power and disconnect the...
User Guide
Page 18
..., to have the following options: • In standby mode, press and hold the key. . Copyright © 2003 Nokia. Align the top of the front cover with the top of the phone and press the front cover to switch the flashlight on . Whenever the flashlight is activated, is off . • Press...Flashlight and select On or Off. Insert the battery and replace the back cover on and press once to switch it . ■ Flashlight Your phone has a built-in the picture and then tighten it off when you can use the flashlight, you have the flashlight continuously on, press twice ...
..., to have the following options: • In standby mode, press and hold the key. . Copyright © 2003 Nokia. Align the top of the front cover with the top of the phone and press the front cover to switch the flashlight on . Whenever the flashlight is activated, is off . • Press...Flashlight and select On or Off. Insert the battery and replace the back cover on and press once to switch it . ■ Flashlight Your phone has a built-in the picture and then tighten it off when you can use the flashlight, you have the flashlight continuously on, press twice ...

User Guide
Page 20
... to decrease the volume of the area code (delete the leading 0 if necessary). Making a call 1. Copyright © 2003 Nokia. All rights reserved. 20 2. To make international phone calls: Add a "+" by pressing twice, and add the country (or region) code in the phone number including the area code. Press Call to participate in the...
... to decrease the volume of the area code (delete the leading 0 if necessary). Making a call 1. Copyright © 2003 Nokia. All rights reserved. 20 2. To make international phone calls: Add a "+" by pressing twice, and add the country (or region) code in the phone number including the area code. Press Call to participate in the...

User Guide
Page 21
...select Contacts and Speed dials. Copyright © 2003 Nokia. To add another new participant to ) and press Assign. After the phone number has been assigned to a number key, you can speed dial the number in standby mode, scroll with or to the phone number or name you want , ( to the call... or to 3. 5. To end the conference call by pressing and Options and selecting Conference. 4. Redialling To redial one of the last 10 phone numbers you want and press Select. 2. Select the key you have called or attempted to call, press once in the following ways: •...
...select Contacts and Speed dials. Copyright © 2003 Nokia. To add another new participant to ) and press Assign. After the phone number has been assigned to a number key, you can speed dial the number in standby mode, scroll with or to the phone number or name you want , ( to the call... or to 3. 5. To end the conference call by pressing and Options and selecting Conference. 4. Redialling To redial one of the last 10 phone numbers you want and press Select. 2. Select the key you have called or attempted to call, press once in the following ways: •...

User Guide
Page 23
The number is shown on page 47. You can also set the phone to the emergency number programmed into your phone (e.g. 112 or other official emergency number). Note: When keypad is locked, calls may be possible to automatically turn on the keylock after you have keyed in the emergency number and press Call . Key in its last digit. All rights reserved. 23 Refer to Keyguard settings on the display. When the keypad is locked, the indicator is displayed only after a certain period of time. Copyright © 2003 Nokia.
The number is shown on page 47. You can also set the phone to the emergency number programmed into your phone (e.g. 112 or other official emergency number). Note: When keypad is locked, calls may be possible to automatically turn on the keylock after you have keyed in the emergency number and press Call . Key in its last digit. All rights reserved. 23 Refer to Keyguard settings on the display. When the keypad is locked, the indicator is displayed only after a certain period of time. Copyright © 2003 Nokia.

User Guide
Page 29
Copy 7. Send phone no. 9. Call register 1. Ringing volume 3. Dialled numbers 4. Call duration 6. Prepaid credit 4. Incoming call lists 5. Call cost settings 8. Keypad tones 6. Received calls 3. All rights reserved. 29 Assign tone 8. Missed calls 2. Delete recent call alert 4. Vibrating alert Copyright © 2003 Nokia. Tones 1. Message alert tone 5. Call costs 7. Edit 6. Ringing tone 2. Warning tones 7. Settings 10.Speed dials 3. 5.
Copy 7. Send phone no. 9. Call register 1. Ringing volume 3. Dialled numbers 4. Call duration 6. Prepaid credit 4. Incoming call lists 5. Call cost settings 8. Keypad tones 6. Received calls 3. All rights reserved. 29 Assign tone 8. Missed calls 2. Delete recent call alert 4. Vibrating alert Copyright © 2003 Nokia. Tones 1. Message alert tone 5. Call costs 7. Edit 6. Ringing tone 2. Warning tones 7. Settings 10.Speed dials 3. 5.


