Instruction Booklet
Page 2
... shock when you continue to have "For use only in (1) personal injury or (2) damage to the Nintendo GameCube, components, game discs or accessories. CAUTION - Motion Sickness Playing video games can not play , stop playing and see sections beginning with WARNING, CAUTION, and NOTE. If you...an outlet. Stop playing and consult a doctor if you about incorrect use the Nintendo GameCube during or after a few hours. Make sure the Nintendo GameCube power switch is turned OFF before playing a video game. • Parents should consult a doctor before removing the AC Adapter cord ...
... shock when you continue to have "For use only in (1) personal injury or (2) damage to the Nintendo GameCube, components, game discs or accessories. CAUTION - Motion Sickness Playing video games can not play , stop playing and see sections beginning with WARNING, CAUTION, and NOTE. If you...an outlet. Stop playing and consult a doctor if you about incorrect use the Nintendo GameCube during or after a few hours. Make sure the Nintendo GameCube power switch is turned OFF before playing a video game. • Parents should consult a doctor before removing the AC Adapter cord ...

Instruction Booklet
Page 3
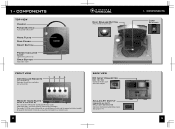
...to the consumer assistance information on the bottom of this seal when buying video game systems, accessories, games and related products. Please record the serial number, located on the back cover of the Nintendo GameCube, in the space below. You may need to refer to connect or use... AV Cable 8 Connecting to a Stereo TV/VCR using a S-Video AV Cable 8 Connecting to a Stereo TV(digital ready) using the Nintendo GameCube system or components. Nintendo does not license the sale or use your assurance that this product is licensed or manufactured by ATI. Always look for purchasing the...
...to the consumer assistance information on the bottom of this seal when buying video game systems, accessories, games and related products. Please record the serial number, located on the back cover of the Nintendo GameCube, in the space below. You may need to refer to connect or use... AV Cable 8 Connecting to a Stereo TV/VCR using a S-Video AV Cable 8 Connecting to a Stereo TV(digital ready) using the Nintendo GameCube system or components. Nintendo does not license the sale or use your assurance that this product is licensed or manufactured by ATI. Always look for purchasing the...
Instruction Booklet
Page 4
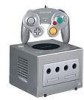
...Lights when power is on Open Button Opens disc cover FRONT VIEW Controller Sockets For connection of Nintendo GameCube controllers and accessories 12 34 Disc Release Button Press to release Game Disc BACK VIEW DC Input Connector (DC 12V IN) Connects the DC Jack of the AC... SLOT B) SLOT A SLOT B For connection of Nintendo GameCube Memory Cards (Sold separately, see back cover for purchasing information.) See pages 18-20 for more information on using Memory Cards and the game instruction booklet for specific information on how to save game information to a memory card. 2 Analog AV Output...
...Lights when power is on Open Button Opens disc cover FRONT VIEW Controller Sockets For connection of Nintendo GameCube controllers and accessories 12 34 Disc Release Button Press to release Game Disc BACK VIEW DC Input Connector (DC 12V IN) Connects the DC Jack of the AC... SLOT B) SLOT A SLOT B For connection of Nintendo GameCube Memory Cards (Sold separately, see back cover for purchasing information.) See pages 18-20 for more information on using Memory Cards and the game instruction booklet for specific information on how to save game information to a memory card. 2 Analog AV Output...

Instruction Booklet
Page 5
1• COMPONENTS BOTTOM VIEW High Speed Port Nintendo GameCube AC Adapter 1• COMPONENTS Serial Port 1 For connection of the Nintendo GameCube 5 SIDE VIEWS DC Jack Connects to DC Input Connector on back of the Nintendo GameCube Nintendo Stereo AV Cable Connects to A/V input connectors on TV or VCR Video (Yellow) Audio Left (White) Audio Right (Red) AC Plug...
1• COMPONENTS BOTTOM VIEW High Speed Port Nintendo GameCube AC Adapter 1• COMPONENTS Serial Port 1 For connection of the Nintendo GameCube 5 SIDE VIEWS DC Jack Connects to DC Input Connector on back of the Nintendo GameCube Nintendo Stereo AV Cable Connects to A/V input connectors on TV or VCR Video (Yellow) Audio Left (White) Audio Right (Red) AC Plug...
Instruction Booklet
Page 6
... power is turned ON, those positions will be connected directly to the Nintendo GameCube for the game you need to plug the controller(s) into a 4 120V AC wall outlet. (Illustration 3) CAUTION: To prevent electric shock, match wide blade of the console. 1• COMPONENTS Nintendo GameCube Controller L Button Start/ Pause Control Stick +Control Pad Controller Plug R Button Z Button...
... power is turned ON, those positions will be connected directly to the Nintendo GameCube for the game you need to plug the controller(s) into a 4 120V AC wall outlet. (Illustration 3) CAUTION: To prevent electric shock, match wide blade of the console. 1• COMPONENTS Nintendo GameCube Controller L Button Start/ Pause Control Stick +Control Pad Controller Plug R Button Z Button...
Instruction Booklet
Page 7
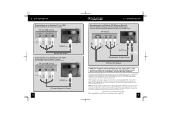
...VIDEO IN AUDIO IN LEFT RIGHT S-Video Audio Left (White) Audio Right (Red) To console ANALOG AV OUT S-Video Stereo AV Cable 8 2 • SYSTEM SETUP Connecting to display specially designed games in Progressive Scan Mode if your TV has Progressive Scan capability (see your TV operation ...connectors on your TV or VCR (Do not use Audio Left (White) Audio Right (Red) Red Blue Green To console DIGITAL AV OUT To console ANALOG AV OUT Component Video Cable Stereo AV Cable NOTE: The Component Video Cable/Progressive Scan feature is not available on Nintendo GameCube Model No.
...VIDEO IN AUDIO IN LEFT RIGHT S-Video Audio Left (White) Audio Right (Red) To console ANALOG AV OUT S-Video Stereo AV Cable 8 2 • SYSTEM SETUP Connecting to display specially designed games in Progressive Scan Mode if your TV has Progressive Scan capability (see your TV operation ...connectors on your TV or VCR (Do not use Audio Left (White) Audio Right (Red) Red Blue Green To console DIGITAL AV OUT To console ANALOG AV OUT Component Video Cable Stereo AV Cable NOTE: The Component Video Cable/Progressive Scan feature is not available on Nintendo GameCube Model No.
Instruction Booklet
Page 8
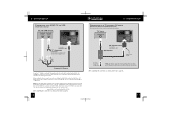
...Left (White) Audio Right (Red) Stereo AV Cable Using the "Y" Adapter is different for purchasing information.) TV Input ANTENNA IN To console ANALOG AV OUT "Y" Adapter (optional) (Not included - 2 • SYSTEM SETUP Connecting to a MONO TV or VCR (No ... 12. 10 RF Modulator To console ANALOG AV OUT RF Switch Channel 3/4 Switch Existing Cable TV Connection NOTE: All Nintendo brand RF Switches (NES, SNES and N64) and RF Modulators (N64) will be absent during game play. You can also find more...connector on your TV or VCR, although some sound will work with the Nintendo GameCube.
...Left (White) Audio Right (Red) Stereo AV Cable Using the "Y" Adapter is different for purchasing information.) TV Input ANTENNA IN To console ANALOG AV OUT "Y" Adapter (optional) (Not included - 2 • SYSTEM SETUP Connecting to a MONO TV or VCR (No ... 12. 10 RF Modulator To console ANALOG AV OUT RF Switch Channel 3/4 Switch Existing Cable TV Connection NOTE: All Nintendo brand RF Switches (NES, SNES and N64) and RF Modulators (N64) will be absent during game play. You can also find more...connector on your TV or VCR, although some sound will work with the Nintendo GameCube.
Instruction Booklet
Page 9
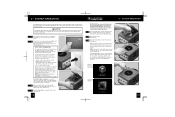
...the different inputs on . The Main Menu allows you to switch between the Antenna input and the Audio/Video input(s). Do not operate the console in any location where these vents may become covered or obstructed. 1 Turn your TV channel to 3 and the switch on -screen menu ...or go to the Troubleshooting section on your TV or VCR instruction manual for your TV or VCR. 1 Usually this product before using Nintendo GameCube Discs. 5 Place the Game Disc, printed side up, into the disc compartment and onto the center hub (Illustration 4). NOTE: If you don't see information about...
...the different inputs on . The Main Menu allows you to switch between the Antenna input and the Audio/Video input(s). Do not operate the console in any location where these vents may become covered or obstructed. 1 Turn your TV channel to 3 and the switch on -screen menu ...or go to the Troubleshooting section on your TV or VCR instruction manual for your TV or VCR. 1 Usually this product before using Nintendo GameCube Discs. 5 Place the Game Disc, printed side up, into the disc compartment and onto the center hub (Illustration 4). NOTE: If you don't see information about...
Instruction Booklet
Page 10
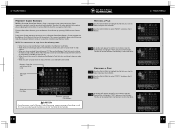
...prevent your Nintendo GameCube, disconnect the AC Adapter from the wall outlet. (Illustration 4) 3 4 14 4 • MAIN MENU Accessing the Main Menu The Main Menu allows you to the Main Menu Screen, use water only). Clean the disc from the console (Illustration 2). 3 • SYSTEM OPERATION Removing a Game Disc 1 ...to the different menus as shown below. To go to set the date and time, see information about the Game Disc currently loaded into the Nintendo GameCube, set various options, and access Memory Card information and options. NOTE: If the Disc Cover is opened ...
...prevent your Nintendo GameCube, disconnect the AC Adapter from the wall outlet. (Illustration 4) 3 4 14 4 • MAIN MENU Accessing the Main Menu The Main Menu allows you to the Main Menu Screen, use water only). Clean the disc from the console (Illustration 2). 3 • SYSTEM OPERATION Removing a Game Disc 1 ...to the different menus as shown below. To go to set the date and time, see information about the Game Disc currently loaded into the Nintendo GameCube, set various options, and access Memory Card information and options. NOTE: If the Disc Cover is opened ...

Instruction Booklet
Page 11
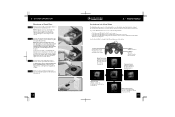
... Screen From the Main Menu Screen, go to the Game Play Screen by pushing UP on the Control Stick. Press the A Button to begin the game. Press START to display information about the Game Disc that is currently loaded into the Nintendo GameCube. Press the B Button to return to the Calendar Menu or the Main...
... Screen From the Main Menu Screen, go to the Game Play Screen by pushing UP on the Control Stick. Press the A Button to begin the game. Press START to display information about the Game Disc that is currently loaded into the Nintendo GameCube. Press the B Button to return to the Calendar Menu or the Main...
Instruction Booklet
Page 12
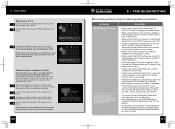
...go to the Memory Card Screen by pushing DOWN on the front of the console. Press the A Button to display the status of 127 files on the ... This limitation is only for instructions on your Memory Cards. Use the 3 Control Stick to the Memory Card or the Nintendo GameCube. This may cause damage to highlight "YES" and press the A Button. Use the 3 Control Stick to select "... the A 2 Button. 4• MAIN MENU Memory Card Screen NOTE: A Nintendo GameCube Memory Card is required to save game information (Sold separately, see below) allows you want to 1 copy and press the A Button.
...go to the Memory Card Screen by pushing DOWN on the front of the console. Press the A Button to display the status of 127 files on the ... This limitation is only for instructions on your Memory Cards. Use the 3 Control Stick to the Memory Card or the Nintendo GameCube. This may cause damage to highlight "YES" and press the A Button. Use the 3 Control Stick to select "... the A 2 Button. 4• MAIN MENU Memory Card Screen NOTE: A Nintendo GameCube Memory Card is required to save game information (Sold separately, see below) allows you want to 1 copy and press the A Button.
Instruction Booklet
Page 13
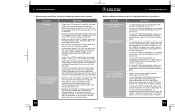
... are turned ON. • Check the connections between the console and the TV or VCR (if used if a corrupted Memory Card is inserted into the console. • Check to be sure that the Game Disc is not available on Nintendo Gamecube Model No. After selecting "Memory Card Screen" from a ...useable Memory Card. Use the 3 Control Stick to the outside. • Remove the Game Disc, close the Disc Cover and...
... are turned ON. • Check the connections between the console and the TV or VCR (if used if a corrupted Memory Card is inserted into the console. • Check to be sure that the Game Disc is not available on Nintendo Gamecube Model No. After selecting "Memory Card Screen" from a ...useable Memory Card. Use the 3 Control Stick to the outside. • Remove the Game Disc, close the Disc Cover and...
Instruction Booklet
Page 14
... The Power Indicator Light on the console does not come on. Sound is plugged into the "Input" connectors on the TV or VCR, not the "Output" connectors. • Make sure that can only be used on Nintendo GameCube Model No. When not playing games, the normal TV picture won't come... using a Stereo AV Cable, make sure it back into the outlet. If the Power Indicator Light now comes on Nintendo GameCube Model No. Turn the console power ON. • Remove all game sounds. DOL-001[USA]), change the Input switch on your particular setup. (Review page 12 on Input Select information.)...
... The Power Indicator Light on the console does not come on. Sound is plugged into the "Input" connectors on the TV or VCR, not the "Output" connectors. • Make sure that can only be used on Nintendo GameCube Model No. When not playing games, the normal TV picture won't come... using a Stereo AV Cable, make sure it back into the outlet. If the Power Indicator Light now comes on Nintendo GameCube Model No. Turn the console power ON. • Remove all game sounds. DOL-001[USA]), change the Input switch on your particular setup. (Review page 12 on Input Select information.)...
Instruction Booklet
Page 15
... the Control Stick, C Stick, and the L and R Buttons are using a RF Switch connection, make sure to the outside edge. PROCEDURE The Game Disc may be dirty or damaged. If you turn the power ON. (See page 6.) • If the Rumble feature won't shut off excess ... • If using the correct Controller Socket. • Make sure that all connections between the RF Switch, RF Modulator, console and your Nintendo GameCube system still does not operate correctly after trying the troubleshooting remedies, please visit the customer service area of buttons and into the ...
... the Control Stick, C Stick, and the L and R Buttons are using a RF Switch connection, make sure to the outside edge. PROCEDURE The Game Disc may be dirty or damaged. If you turn the power ON. (See page 6.) • If the Rumble feature won't shut off excess ... • If using the correct Controller Socket. • Make sure that all connections between the RF Switch, RF Modulator, console and your Nintendo GameCube system still does not operate correctly after trying the troubleshooting remedies, please visit the customer service area of buttons and into the ...
Instruction Booklet
Page 16
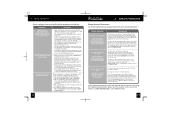
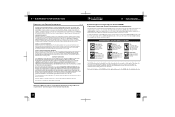
...and/or referral to the original purchaser that the hardware product shall be solved with the troubleshooting information available on the Nintendo GameCube package, IBM is not responsible for choosing a product. Although an IBM logo appears on -line or over the telephone..., you will repair the defective hardware product or component, free of the Nintendo GameCube. 8 • ESRB VIDEO GAME RATING INFORMATION Entertainment software Rating board (ESRB) Video and Computer Game Software rating Information The Entertainment Software Rating Board (ESRB) ratings are 6 a.m. Not ...
...and/or referral to the original purchaser that the hardware product shall be solved with the troubleshooting information available on the Nintendo GameCube package, IBM is not responsible for choosing a product. Although an IBM logo appears on -line or over the telephone..., you will repair the defective hardware product or component, free of the Nintendo GameCube. 8 • ESRB VIDEO GAME RATING INFORMATION Entertainment software Rating board (ESRB) Video and Computer Game Software rating Information The Entertainment Software Rating Board (ESRB) ratings are 6 a.m. Not ...
