S600 User's Manual
Page 4
... out of reach of flammable gas, as the result of the camera or AC adapter could result from the camera or AC adapter, unplug the AC adapter and remove the battery immediately, taking care to a Nikon-authorized service representative for inspection, after unplugging the product and/or ...removing the battery. Do not disassemble Touching the internal parts of a fall ...
... out of reach of flammable gas, as the result of the camera or AC adapter could result from the camera or AC adapter, unplug the AC adapter and remove the battery immediately, taking care to a Nikon-authorized service representative for inspection, after unplugging the product and/or ...removing the battery. Do not disassemble Touching the internal parts of a fall ...
S600 User's Manual
Page 5
...leak or explode if improperly handled. Do not transport or store with metal objects such as discoloration or deformation. • If liquid from the damaged battery comes in this precaution could result in electric shock. • Do not damage, modify, forcibly tug or bend the power cable, place it ... in fire. • Do not handle the power cable or go near the metal parts of water. Charge the battery by inserting it in a Battery Charger MH-63 (supplied). • When inserting the battery, do not attempt to insert it upside down or backwards. • Do not short or disassemble the...
...leak or explode if improperly handled. Do not transport or store with metal objects such as discoloration or deformation. • If liquid from the damaged battery comes in this precaution could result in electric shock. • Do not damage, modify, forcibly tug or bend the power cable, place it ... in fire. • Do not handle the power cable or go near the metal parts of water. Charge the battery by inserting it in a Battery Charger MH-63 (supplied). • When inserting the battery, do not attempt to insert it upside down or backwards. • Do not short or disassemble the...
S600 User's Manual
Page 9
...) Button...8 The e Button...8 The Rotary Multi Selector...9 The d Button...10 Help Displays ...11 Attaching the Camera Strap ...11 First Steps ...12 Charging the Battery ...12 Inserting the Battery ...14 Removing the Battery ...15 Turning On and Off the Camera...15 Setting Display Language, Date and Time 16 Inserting Memory Cards ...18 Removing Memory Cards...19...
...) Button...8 The e Button...8 The Rotary Multi Selector...9 The d Button...10 Help Displays ...11 Attaching the Camera Strap ...11 First Steps ...12 Charging the Battery ...12 Inserting the Battery ...14 Removing the Battery ...15 Turning On and Off the Camera...15 Setting Display Language, Date and Time 16 Inserting Memory Cards ...18 Removing Memory Cards...19...
S600 User's Manual
Page 14
... of this electronic circuitry. Rechargeable Li-ion Battery EN-EL10 Before Taking Important Pictures Before taking pictures on digital imaging and photography. Only Nikon brand electronic accessories (including battery chargers, batteries and AC adapters) certified by Nikon specifically for contact information: http://nikonimaging.com/ Use Only Nikon Brand Electronic Accessories Nikon COOLPIX cameras are engineered and proven to operate within...
... of this electronic circuitry. Rechargeable Li-ion Battery EN-EL10 Before Taking Important Pictures Before taking pictures on digital imaging and photography. Only Nikon brand electronic accessories (including battery chargers, batteries and AC adapters) certified by Nikon specifically for contact information: http://nikonimaging.com/ Use Only Nikon Brand Electronic Accessories Nikon COOLPIX cameras are engineered and proven to operate within...
S600 User's Manual
Page 17
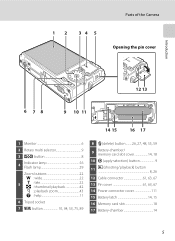
1 2 34 5 Parts of the Camera Opening the pin cover Introduction 12 13 6 78 9 10 11 14 15 16 17 1 Monitor 6 2 Rotary multi selector 9 3 e button 8 4 Indicator lamp 56 Flash lamp 29 ... 5 g : tele 22 h : thumbnail playback 42 i : playback zoom 43 j : help 11 6 Tripod socket 7 d button 10, 34, 53, 75, 89 8 l (delete) button......... 26, 27, 48, 55, 59 9 Battery-chamber/ memory card slot cover 14, 18 10 k (apply selection) button 9 11 c (shooting/playback) button 8, 26 12 Cable connector 61, 63, 67 13 Pin cover...
1 2 34 5 Parts of the Camera Opening the pin cover Introduction 12 13 6 78 9 10 11 14 15 16 17 1 Monitor 6 2 Rotary multi selector 9 3 e button 8 4 Indicator lamp 56 Flash lamp 29 ... 5 g : tele 22 h : thumbnail playback 42 i : playback zoom 43 j : help 11 6 Tripod socket 7 d button 10, 34, 53, 75, 89 8 l (delete) button......... 26, 27, 48, 55, 59 9 Battery-chamber/ memory card slot cover 14, 18 10 k (apply selection) button 9 11 c (shooting/playback) button 8, 26 12 Cable connector 61, 63, 67 13 Pin cover...
S600 User's Manual
Page 18
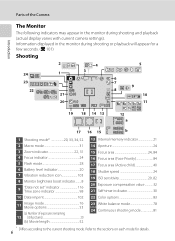
... 9m59s b 1 Shooting mode 20, 33, 34, 52 2 Macro mode 31 3 Zoom indicator 22, 31 4 Focus indicator 24 5 Flash mode 28 6 Battery level indicator 20 7 Vibration reduction icon 103 8 Monitor brightness boost indicator.........8 9 "Date not set" indicator 116 Time zone indicator 98 10 Date imprint 102 11... Image mode 76 Movie options 53 (a) Number of the Camera Introduction The Monitor The following indicators may appear in the monitor during shooting and playback (actual display varies with current...
... 9m59s b 1 Shooting mode 20, 33, 34, 52 2 Macro mode 31 3 Zoom indicator 22, 31 4 Focus indicator 24 5 Flash mode 28 6 Battery level indicator 20 7 Vibration reduction icon 103 8 Monitor brightness boost indicator.........8 9 "Date not set" indicator 116 Time zone indicator 98 10 Date imprint 102 11... Image mode 76 Movie options 53 (a) Number of the Camera Introduction The Monitor The following indicators may appear in the monitor during shooting and playback (actual display varies with current...

S600 User's Manual
Page 19
Parts of the Camera Introduction Playback 1 23 4 15/05/2008 12:00 5 18 9999.JPG 16 17 6 15 14 11 12 13 7 10 9 8 999 999 9999 9999 a 9m59s 9m59s b 1 Date of recording 16 2 Protect icon 92 3 Time of recording 16 4 Volume indicator 48, 55, 58 5 Battery level indicator 20 6 Monitor brightness boost indicator...
Parts of the Camera Introduction Playback 1 23 4 15/05/2008 12:00 5 18 9999.JPG 16 17 6 15 14 11 12 13 7 10 9 8 999 999 9999 9999 a 9m59s 9m59s b 1 Date of recording 16 2 Protect icon 92 3 Time of recording 16 4 Volume indicator 48, 55, 58 5 Battery level indicator 20 6 Monitor brightness boost indicator...
S600 User's Manual
Page 24
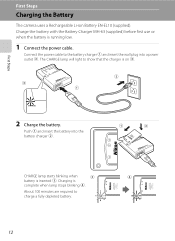
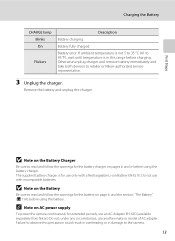
... blinking 4. Connect the power cable to charge a fully depleted battery. 12 First Steps First Steps Charging the Battery The camera uses a Rechargeable Li-ion Battery EN-EL10 (supplied). Charging is on 3. 2 3 1 2 Charge the battery. Push 1 and insert the battery into a power outlet 2. Charge the battery with the Battery Charger MH-63 (supplied) before first use or when the...
... blinking 4. Connect the power cable to charge a fully depleted battery. 12 First Steps First Steps Charging the Battery The camera uses a Rechargeable Li-ion Battery EN-EL10 (supplied). Charging is on 3. 2 3 1 2 Charge the battery. Push 1 and insert the battery into a power outlet 2. Charge the battery with the Battery Charger MH-63 (supplied) before first use or when the...
S600 User's Manual
Page 25
... iii and the section, "The Battery" (A 114), before using the battery charger. Charging the Battery CHARGE lamp Blinks On Flickers Description Battery charging. Battery error. Otherwise unplug charger and remove battery immediately and take both devices to read and follow the warnings for the battery on AC power supply To power the camera continuously for use only with...
... iii and the section, "The Battery" (A 114), before using the battery charger. Charging the Battery CHARGE lamp Blinks On Flickers Description Battery charging. Battery error. Otherwise unplug charger and remove battery immediately and take both devices to read and follow the warnings for the battery on AC power supply To power the camera continuously for use only with...
S600 User's Manual
Page 26
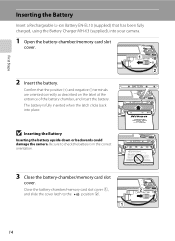
.../memory card slot cover 1, and slide the cover latch to check the battery is fully inserted when the latch clicks back into your camera. 1 Open the battery-chamber/memory card slot cover. 2 Insert the battery. First Steps Inserting the Battery Insert a Rechargeable Li-ion Battery EN-EL10 (supplied) that the positive (+) and negative (-) terminals are oriented...
.../memory card slot cover 1, and slide the cover latch to check the battery is fully inserted when the latch clicks back into your camera. 1 Open the battery-chamber/memory card slot cover. 2 Insert the battery. First Steps Inserting the Battery Insert a Rechargeable Li-ion Battery EN-EL10 (supplied) that the positive (+) and negative (-) terminals are oriented...
S600 User's Manual
Page 27
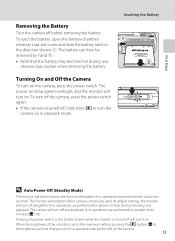
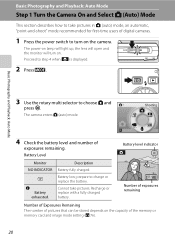
... are performed for another three minutes (A 105). When the brightness of the monitor is turned off before removing the battery. Turning On and Off the Camera To turn on . Inserting the Battery D Auto Power-Off (Standby Mode) The monitor will turn on in the direction shown 1. To eject the... will light, and the monitor will dim to reduce the drain on the battery if no operations are performed for about five seconds. First Steps Removing the Battery Turn the camera off , hold down c to turn the camera on . The monitor will not change even if no operations are performed on...
... are performed for another three minutes (A 105). When the brightness of the monitor is turned off before removing the battery. Turning On and Off the Camera To turn on . Inserting the Battery D Auto Power-Off (Standby Mode) The monitor will turn on in the direction shown 1. To eject the... will light, and the monitor will dim to reduce the drain on the battery if no operations are performed for about five seconds. First Steps Removing the Battery Turn the camera off , hold down c to turn the camera on . The monitor will not change even if no operations are performed on...
S600 User's Manual
Page 30
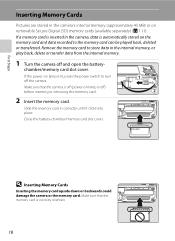
...that the camera is off and open the battery- chamber/memory card slot cover. Slide the memory card in the internal memory, or play back, delete or transfer data from the internal memory. 1 Turn the camera off (power-on lamp is automatically stored on removable Secure Digital (SD)... memory cards (available separately) (A 111). First Steps Inserting Memory Cards Pictures are stored in the camera's internal memory (approximately 45 MB) or on the memory...
...that the camera is off and open the battery- chamber/memory card slot cover. Slide the memory card in the internal memory, or play back, delete or transfer data from the internal memory. 1 Turn the camera off (power-on lamp is automatically stored on removable Secure Digital (SD)... memory cards (available separately) (A 111). First Steps Inserting Memory Cards Pictures are stored in the camera's internal memory (approximately 45 MB) or on the memory...
S600 User's Manual
Page 31
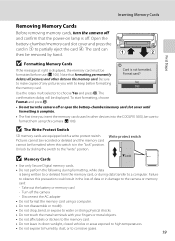
...press k. No Yes • Do not turn the camera off and confirm that formatting permanently deletes all pictures and other devices into the COOLPIX S600, be sure to keep before use (A 106). ...adapter • Do not format the memory card using this switch is off the camera - Open the battery-chamber/memory card slot cover and press the card in direct sunlight, closed vehicles ...when this camera (A 106). The confirmation dialog will be removed by sliding the switch to the camera or memory card: - Write protect switch B Memory Cards • Use only Secure Digital memory cards....
...press k. No Yes • Do not turn the camera off and confirm that formatting permanently deletes all pictures and other devices into the COOLPIX S600, be sure to keep before use (A 106). ...adapter • Do not format the memory card using this switch is off the camera - Open the battery-chamber/memory card slot cover and press the card in direct sunlight, closed vehicles ...when this camera (A 106). The confirmation dialog will be removed by sliding the switch to the camera or memory card: - Write protect switch B Memory Cards • Use only Secure Digital memory cards....
S600 User's Manual
Page 32
... capacity of pictures that can be stored depends on . Battery Level Battery level indicator Monitor NO INDICATOR B N Battery exhausted. Shooting 4 Check the battery level and number of digital cameras. 1 Press the power switch to step 4 when A is displayed. 2 Press e. Battery low; Recharge or replace with a fully charged battery. 16 Number of exposures remaining Number of Exposures Remaining The...
... capacity of pictures that can be stored depends on . Battery Level Battery level indicator Monitor NO INDICATOR B N Battery exhausted. Shooting 4 Check the battery level and number of digital cameras. 1 Press the power switch to step 4 when A is displayed. 2 Press e. Battery low; Recharge or replace with a fully charged battery. 16 Number of exposures remaining Number of Exposures Remaining The...
S600 User's Manual
Page 37
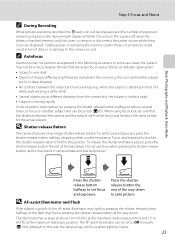
...the shutterrelease button halfway to set focus and exposure, press the shutter-release button halfway, stopping when you feel resistance. D Shutter-release Button The camera features a two-stage shutter-release button. Do not use focus lock (A 85). when the subject is very dark • Objects of the...on another subject and use force when pressing the shutter-release button, as expected in this position. Do not turn the camera off, open the battery-chamber/memory card slot cover, or remove or disconnect the power source while these circumstances could result in damage to take a...
...the shutterrelease button halfway to set focus and exposure, press the shutter-release button halfway, stopping when you feel resistance. D Shutter-release Button The camera features a two-stage shutter-release button. Do not use focus lock (A 85). when the subject is very dark • Objects of the...on another subject and use force when pressing the shutter-release button, as expected in this position. Do not turn the camera off, open the battery-chamber/memory card slot cover, or remove or disconnect the power source while these circumstances could result in damage to take a...
S600 User's Manual
Page 41
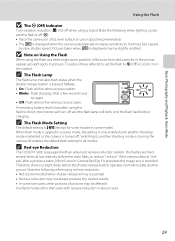
...low intensity before the shutter-release button operates normally to take another shooting mode or turning the camera off (W): • Place the camera on the subject. C The Flash Lamp The flash lamp indicates flash status when the shutter-... main flash, to minimize blur caused by slow shutter speed. If the camera detects "redeye" after using a tripod. C Red-eye Reduction The COOLPIX S600 is taken, Nikon's own In-Camera Red Eye Fix processes the image as bright spots in the air may ... equipped with red-eye reduction in scene mode). If remaining battery level is recorded.
...low intensity before the shutter-release button operates normally to take another shooting mode or turning the camera off (W): • Place the camera on the subject. C The Flash Lamp The flash lamp indicates flash status when the shutter-... main flash, to minimize blur caused by slow shutter speed. If the camera detects "redeye" after using a tripod. C Red-eye Reduction The COOLPIX S600 is taken, Nikon's own In-Camera Red Eye Fix processes the image as bright spots in the air may ... equipped with red-eye reduction in scene mode). If remaining battery level is recorded.
S600 User's Manual
Page 74
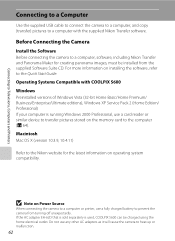
... a computer or printer, use any other AC adapters as it will cause the camera to heat up or malfunction. 62 Do not use a fully charged battery to the Nikon website for creating panorama images, must be charged using the home electrical outlet. For more ...editions), Windows XP Service Pack 2 (Home Edition/ Professional) If your computer is used, COOLPIX S600 can be installed from turning off unexpectedly. Operating Systems Compatible with the supplied Nikon Transfer software. Connecting to Televisions, Computers and Printers Connecting to a Computer Use the supplied USB...
... a computer or printer, use any other AC adapters as it will cause the camera to heat up or malfunction. 62 Do not use a fully charged battery to the Nikon website for creating panorama images, must be charged using the home electrical outlet. For more ...editions), Windows XP Service Pack 2 (Home Edition/ Professional) If your computer is used, COOLPIX S600 can be installed from turning off unexpectedly. Operating Systems Compatible with the supplied Nikon Transfer software. Connecting to Televisions, Computers and Printers Connecting to a Computer Use the supplied USB...
S600 User's Manual
Page 78
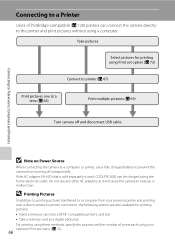
...a memory card to a digital photo lab For printing using these methods, specify the pictures and the number of PictBridge-compatible (A 128) printers can be charged using the home electrical outlet. Do not use a fully charged battery to prevent the camera from your camera's Print set option (A ...72) Connect to printer (A 67) Print pictures one at a time (A 68) Print multiple pictures (A 69) Turn camera off unexpectedly. If the AC adapter EH-62D that is sold separately is used, COOLPIX S600 can connect the camera...
...a memory card to a digital photo lab For printing using these methods, specify the pictures and the number of PictBridge-compatible (A 128) printers can be charged using the home electrical outlet. Do not use a fully charged battery to prevent the camera from your camera's Print set option (A ...72) Connect to printer (A 67) Print pictures one at a time (A 68) Print multiple pictures (A 69) Turn camera off unexpectedly. If the AC adapter EH-62D that is sold separately is used, COOLPIX S600 can connect the camera...
S600 User's Manual
Page 111
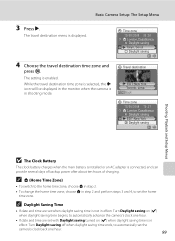
...15/05/2008 10:31 London,Casablanca Daylight saving EDT:New York Daylight saving Shooting, Playback and Setup Menus B The Clock Battery The clock battery charges when the main battery is installed or an AC adapter is displayed. C Daylight Saving Time • If date and time are set with ...Daylight saving turned on (w) when daylight saving time is not in effect: Turn Daylight saving off when daylight saving time ends, to automatically advance the camera's clock...
...15/05/2008 10:31 London,Casablanca Daylight saving EDT:New York Daylight saving Shooting, Playback and Setup Menus B The Clock Battery The clock battery charges when the main battery is installed or an AC adapter is displayed. C Daylight Saving Time • If date and time are set with ...Daylight saving turned on (w) when daylight saving time is not in effect: Turn Daylight saving off when daylight saving time ends, to automatically advance the camera's clock...

S600 User's Manual
Page 118
... pictures to a computer before formatting. • Do not turn the camera off, disconnect the AC adapter, or open the battery-chamber/memory card slot cover during formatting. • The first time you insert the memory cards used in other devices into the COOLPIX S600, be deleted! Format memory All images will be sure to...
... pictures to a computer before formatting. • Do not turn the camera off, disconnect the AC adapter, or open the battery-chamber/memory card slot cover during formatting. • The first time you insert the memory cards used in other devices into the COOLPIX S600, be deleted! Format memory All images will be sure to...


