
S220/225 User's Manual
Page 4
...a fall or other small parts into their entirety before using this section are indicated by qualified technicians. Should the camera or AC adapter break open as this Nikon product, to avoid burns. Keep out of reach of an infant or child. The consequences that should be read... them. Handle the camera strap with care Never place the strap around the neck of children Particular care should be taken to a Nikon-authorized service representative for inspection. WARNINGS Turn off in the event of flammable ...
...a fall or other small parts into their entirety before using this section are indicated by qualified technicians. Should the camera or AC adapter break open as this Nikon product, to avoid burns. Keep out of reach of an infant or child. The consequences that should be read... them. Handle the camera strap with care Never place the strap around the neck of children Particular care should be taken to a Nikon-authorized service representative for inspection. WARNINGS Turn off in the event of flammable ...
S220/225 User's Manual
Page 9
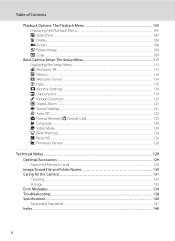
Table of Contents For Your Safety...ii WARNINGS ...ii Notices ...v Introduction ...1 About This Manual ...1 Information and Precautions...2 Parts of the Camera...4 The Camera Body ...4 The Monitor...6 Basic Operations...8 The A (Shooting Mode) Button...8 The c (Playback) Button...8 The Multi Selector...9 The d Button...... Language, Date and Time 16 Inserting Memory Cards ...18 Removing Memory Cards...18 A Basic Photography and Playback: Auto Mode 20 Step 1 Turn the Camera On and Select A (Auto) Mode 20 Indicators Displayed in A (Auto) Mode 21 Step 2 Frame a Picture ...22 Using the Zoom...23 ...
Table of Contents For Your Safety...ii WARNINGS ...ii Notices ...v Introduction ...1 About This Manual ...1 Information and Precautions...2 Parts of the Camera...4 The Camera Body ...4 The Monitor...6 Basic Operations...8 The A (Shooting Mode) Button...8 The c (Playback) Button...8 The Multi Selector...9 The d Button...... Language, Date and Time 16 Inserting Memory Cards ...18 Removing Memory Cards...18 A Basic Photography and Playback: Auto Mode 20 Step 1 Turn the Camera On and Select A (Auto) Mode 20 Indicators Displayed in A (Auto) Mode 21 Step 2 Frame a Picture ...22 Using the Zoom...23 ...
S220/225 User's Manual
Page 10
... Suited for the Scene 33 Shooting in Scene Mode ...33 Setting the Scene Mode...33 Features ...34 Shooting in the Scene Mode Selected by the Camera (Scene Auto Selector 40 Taking Pictures in Food Mode...41 Taking Pictures for a Panorama ...43 a Automatic Shooting of a Smiling Face 45 Shooting in Smile Mode...
... Suited for the Scene 33 Shooting in Scene Mode ...33 Setting the Scene Mode...33 Features ...34 Shooting in the Scene Mode Selected by the Camera (Scene Auto Selector 40 Taking Pictures in Food Mode...41 Taking Pictures for a Panorama ...43 a Automatic Shooting of a Smiling Face 45 Shooting in Smile Mode...
S220/225 User's Manual
Page 11
......78 Connecting to Televisions, Computers and Printers 79 Connecting to a TV ...79 Connecting to a Computer...80 Before Connecting the Camera...80 Transferring Pictures from a Camera to a Computer 81 Connecting to a Printer...84 Connecting the Camera and Printer...85 Printing Pictures One at a Time ...86 Printing Multiple Pictures ...87 Creating a DPOF Print Order: Print...
......78 Connecting to Televisions, Computers and Printers 79 Connecting to a TV ...79 Connecting to a Computer...80 Before Connecting the Camera...80 Transferring Pictures from a Camera to a Computer 81 Connecting to a Printer...84 Connecting the Camera and Printer...85 Printing Pictures One at a Time ...86 Printing Multiple Pictures ...87 Creating a DPOF Print Order: Print...
S220/225 User's Manual
Page 12
...Playback Menu 105 Displaying the Playback Menu...105 b Slide Show...107 c Delete...108 d Protect ...108 f Rotate Image...109 h Copy ...109 Basic Camera Setup: The Setup Menu 111 Displaying the Setup Menu...112 w Electronic VR ...113 a Menus...114 c Welcome Screen ...114 d Date ...115 e... Monitor Settings...118 f Date Imprint ...119 U Motion Detection ...120 u Digital Zoom ...121 i Sound Settings ...121 k Auto Off...122 l Format Memory/m Format Card 123 n Language ...124 o Video Mode ...124 d Blink Warning ...124 p...
...Playback Menu 105 Displaying the Playback Menu...105 b Slide Show...107 c Delete...108 d Protect ...108 f Rotate Image...109 h Copy ...109 Basic Camera Setup: The Setup Menu 111 Displaying the Setup Menu...112 w Electronic VR ...113 a Menus...114 c Welcome Screen ...114 d Date ...115 e... Monitor Settings...118 f Date Imprint ...119 U Motion Detection ...120 u Digital Zoom ...121 i Sound Settings ...121 k Auto Off...122 l Format Memory/m Format Card 123 n Language ...124 o Video Mode ...124 d Blink Warning ...124 p...
S220/225 User's Manual
Page 13
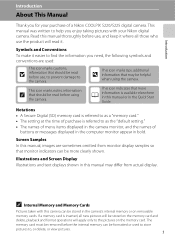
... be read it where all new pictures will be helpful when using the camera. C Internal Memory and Memory Cards Pictures taken with your purchase of a Nikon COOLPIX S220/S225 digital camera. Read this manual or in bold. Notations • A Secure Digital (SD) memory card is referred to as a "memory card." • The setting at the time of...
... be read it where all new pictures will be helpful when using the camera. C Internal Memory and Memory Cards Pictures taken with your purchase of a Nikon COOLPIX S220/S225 digital camera. Read this manual or in bold. Notations • A Secure Digital (SD) memory card is referred to as a "memory card." • The setting at the time of...
S220/225 User's Manual
Page 14
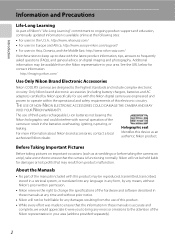
... this Nikon digital camera are designed to operate within the operational and safety requirements of this device as at the following sites: • For users in the U.S.A.: http://www.nikonusa.com/ • For users in Europe and Africa: http://www.europe-nikon.com/...stored in a retrieval system, or translated into any language in any form, by Nikon specifically for contact information: http://imaging.nikon.com/ Use Only Nikon Brand Electronic Accessories Nikon COOLPIX cameras are engineered and proven to the highest standards and include complex electronic circuitry. Holographic...
... this Nikon digital camera are designed to operate within the operational and safety requirements of this device as at the following sites: • For users in the U.S.A.: http://www.nikonusa.com/ • For users in Europe and Africa: http://www.europe-nikon.com/...stored in a retrieval system, or translated into any language in any form, by Nikon specifically for contact information: http://imaging.nikon.com/ Use Only Nikon Brand Electronic Accessories Nikon COOLPIX cameras are engineered and proven to the highest standards and include complex electronic circuitry. Holographic...

S220/225 User's Manual
Page 15
...unused postage stamps or post cards issued by public agencies and private groups, ID cards and tickets, such as memory cards or builtin camera memory does not completely erase the original image data. Be sure to also replace any pictures selected for example, pictures of empty sky...). Unless the prior permission of the government was digitally copied or reproduced by means of a scanner, digital camera or other device may be punishable by law. • Items prohibited by a company. Ensuring the privacy of such ...
...unused postage stamps or post cards issued by public agencies and private groups, ID cards and tickets, such as memory cards or builtin camera memory does not completely erase the original image data. Be sure to also replace any pictures selected for example, pictures of empty sky...). Unless the prior permission of the government was digitally copied or reproduced by means of a scanner, digital camera or other device may be punishable by law. • Items prohibited by a company. Ensuring the privacy of such ...

S220/225 User's Manual
Page 16
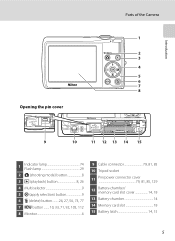
Parts of the Camera The Camera Body 1 2 34 5 6 Introduction 89 7 Lens cover closed 10 1 Shutter-release button 24 Zoom control 23 f : wide 23 2 g : tele 23 h : thumbnail playback 47 i : playback zoom 49 j : help 11 3 Power switch/Power-on lamp 20, 122 4 Built-in flash 28 5 Self-timer lamp 30 6 Lens 133, 144 7 Eyelet for camera strap 11 8 Built-in microphone 55, 70, 74 9 Speaker 56, 73, 76 10 Lens cover 131 4
Parts of the Camera The Camera Body 1 2 34 5 6 Introduction 89 7 Lens cover closed 10 1 Shutter-release button 24 Zoom control 23 f : wide 23 2 g : tele 23 h : thumbnail playback 47 i : playback zoom 49 j : help 11 3 Power switch/Power-on lamp 20, 122 4 Built-in flash 28 5 Self-timer lamp 30 6 Lens 133, 144 7 Eyelet for camera strap 11 8 Built-in microphone 55, 70, 74 9 Speaker 56, 73, 76 10 Lens cover 131 4
S220/225 User's Manual
Page 17
Introduction Opening the pin cover Parts of the Camera 1 2 3 4 5 6 7 8 9 10 11 12 13 14 15 1 Indicator lamp 74 Flash lamp 29 2 A (shooting mode) button 8 3 c (playback) button 8, 26 4 Multi selector 9 5 k (apply selection) button 9 6 l (delete) button.........26, 27, 56, 73, 77 7 d button ........ 10, 33, 71, 92, 105, 112 8 Monitor 6 9 Cable connector 79, 81, 85 10 Tripod socket 11 Pin/power connector cover 79, 81, 85, 129 12 Battery-chamber/ memory card slot cover 14, 18 13 Battery-chamber 14 14 Memory card slot 18 15 Battery latch 14, 15 5
Introduction Opening the pin cover Parts of the Camera 1 2 3 4 5 6 7 8 9 10 11 12 13 14 15 1 Indicator lamp 74 Flash lamp 29 2 A (shooting mode) button 8 3 c (playback) button 8, 26 4 Multi selector 9 5 k (apply selection) button 9 6 l (delete) button.........26, 27, 56, 73, 77 7 d button ........ 10, 33, 71, 92, 105, 112 8 Monitor 6 9 Cable connector 79, 81, 85 10 Tripod socket 11 Pin/power connector cover 79, 81, 85, 129 12 Battery-chamber/ memory card slot cover 14, 18 13 Battery-chamber 14 14 Memory card slot 18 15 Battery latch 14, 15 5
S220/225 User's Manual
Page 18
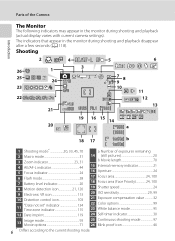
... 9 10 11 22 12 13 21 1600 1/125 F3.1 19 16 15 14 20 a 18 17 b 1 Shooting mode 20, 33, 45, 70 a Number of the Camera Introduction The Monitor The following indicators may appear in the monitor during shooting and playback (actual display varies with current... camera settings). Parts of exposures remaining 2 Macro mode 31 3 Zoom indicator 23, 31 4 AE/AF-L indicator 44 5 Focus indicator 24 6 Flash mode 28 7 Battery level indicator ...
... 9 10 11 22 12 13 21 1600 1/125 F3.1 19 16 15 14 20 a 18 17 b 1 Shooting mode 20, 33, 45, 70 a Number of the Camera Introduction The Monitor The following indicators may appear in the monitor during shooting and playback (actual display varies with current... camera settings). Parts of exposures remaining 2 Macro mode 31 3 Zoom indicator 23, 31 4 AE/AF-L indicator 44 5 Focus indicator 24 6 Flash mode 28 7 Battery level indicator ...

S220/225 User's Manual
Page 19
Parts of the Camera Introduction Playback 15 14 4 1 23 15 05 2009 12:00 5 17 9999.JPG 6 16 13 7 12 999 999 10 9 8 11 a b 1 Date of recording 16 2 Time ...
Parts of the Camera Introduction Playback 15 14 4 1 23 15 05 2009 12:00 5 17 9999.JPG 6 16 13 7 12 999 999 10 9 8 11 a b 1 Date of recording 16 2 Time ...

S220/225 User's Manual
Page 20
... shooting mode while the shooting-mode selection menu is turned off, hold down the c button to display the playback-mode selection menu. • If the camera is displayed, press the A button again. h Favorite pictures mode (A 63) 3 3. a Smile mode (A 45) 4 4. The c (Playback) Button &#...8226; Press the c button in shooting mode to enter playback mode. • Press the c button in playback mode to turn the camera on in shooting mode to the playback mode while the playback-mode selection menu is displayed, press the c button again. 8 Introduction Basic Operations The ...
... shooting mode while the shooting-mode selection menu is turned off, hold down the c button to display the playback-mode selection menu. • If the camera is displayed, press the A button again. h Favorite pictures mode (A 63) 3 3. a Smile mode (A 45) 4 4. The c (Playback) Button &#...8226; Press the c button in shooting mode to enter playback mode. • Press the c button in playback mode to turn the camera on in shooting mode to the playback mode while the playback-mode selection menu is displayed, press the c button again. 8 Introduction Basic Operations The ...
S220/225 User's Manual
Page 23
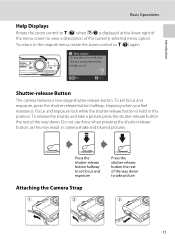
...To release the shutter and take picture 11 To set focus and exposure Attaching the Camera Strap Press the shutter-release button the rest of the way down . Exit Back Shutter-release Button The camera features a two-stage shutter-release button. Introduction Basic Operations Help Displays Rotate the ...zoom control to g (j) when M/L is held in camera shake and blurred pictures. Focus and exposure lock while the shutter-release button is displayed at the lower right of the menu screen...
...To release the shutter and take picture 11 To set focus and exposure Attaching the Camera Strap Press the shutter-release button the rest of the way down . Exit Back Shutter-release Button The camera features a two-stage shutter-release button. Introduction Basic Operations Help Displays Rotate the ...zoom control to g (j) when M/L is held in camera shake and blurred pictures. Focus and exposure lock while the shutter-release button is displayed at the lower right of the menu screen...

S220/225 User's Manual
Page 24
First Steps First Steps Charging the Battery The camera uses a Rechargeable Li-ion Battery EN-EL10 (supplied). The CHARGE lamp will light to charge a fully depleted battery. 12 About 100 minutes are required to ...
First Steps First Steps Charging the Battery The camera uses a Rechargeable Li-ion Battery EN-EL10 (supplied). The CHARGE lamp will light to charge a fully depleted battery. 12 About 100 minutes are required to ...
S220/225 User's Manual
Page 25
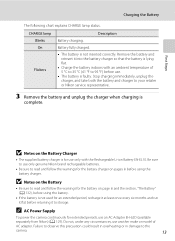
...and run it flat before use an AC Adapter EH-62D (available separately from Nikon) (A 129). Stop charging immediately, unplug the charger, and take both the battery and charger to the camera. 13 First Steps Charging the Battery The following chart explains CHARGE lamp status. ...Failure to observe this precaution could result in overheating or in damage to your retailer or Nikon service representative. 3 Remove the battery and unplug...
...and run it flat before use an AC Adapter EH-62D (available separately from Nikon) (A 129). Stop charging immediately, unplug the charger, and take both the battery and charger to the camera. 13 First Steps Charging the Battery The following chart explains CHARGE lamp status. ...Failure to observe this precaution could result in overheating or in damage to your retailer or Nikon service representative. 3 Remove the battery and unplug...

S220/225 User's Manual
Page 26
...direction indicated by the arrow 1 and fully insert the battery 2. B Inserting the Battery Inserting the battery upside down or backwards could damage the camera. Be sure to push the orange battery latch in the correct orientation. 3 Close the battery-chamber/memory card slot cover. 14 When the .../memory card slot cover. 2 Insert the battery. First Steps Inserting the Battery Insert a Rechargeable Li-ion Battery EN-EL10 (supplied) into your camera. • Charge the battery before the first use or when the battery is fully inserted, the battery latch will lock it in place. Confirm...
...direction indicated by the arrow 1 and fully insert the battery 2. B Inserting the Battery Inserting the battery upside down or backwards could damage the camera. Be sure to push the orange battery latch in the correct orientation. 3 Close the battery-chamber/memory card slot cover. 14 When the .../memory card slot cover. 2 Insert the battery. First Steps Inserting the Battery Insert a Rechargeable Li-ion Battery EN-EL10 (supplied) into your camera. • Charge the battery before the first use or when the battery is fully inserted, the battery latch will lock it in place. Confirm...

S220/225 User's Manual
Page 27
...turned off, both the power-on lamp and monitor will turn on. If no operations are performed for another three minutes, the camera will turn off. • If the camera is off in the setup menu (A 111). 15 Pressing the power switch, or the shutter-release button, while the monitor is... turned off, hold down the c button to elapse from the Auto off function). The power-on the camera, press the power switch. The time allowed to turn off automatically (the auto off option (A 122) in standby mode will reactivate the monitor. First...
...turned off, both the power-on lamp and monitor will turn on. If no operations are performed for another three minutes, the camera will turn off. • If the camera is off in the setup menu (A 111). 15 Pressing the power switch, or the shutter-release button, while the monitor is... turned off, hold down the c button to elapse from the Auto off function). The power-on the camera, press the power switch. The time allowed to turn off automatically (the auto off option (A 122) in standby mode will reactivate the monitor. First...

S220/225 User's Manual
Page 28
Date Set time and date? 4 Press the multi selector J or K to choose the desired language and press the k button. To turn on the camera. No Yes Cancel London Casablanca Back D Daylight Saving Time If daylight saving time is selected, the date and time will turn on the daylight saving ... a moment and the monitor will not be set. First Steps Setting Display Language, Date and Time A language-selection dialog is displayed the first time the camera is displayed at the top of the monitor. The power-on . 2 Use the multi selector to select your home time zone (A 117) and press the...
Date Set time and date? 4 Press the multi selector J or K to choose the desired language and press the k button. To turn on the camera. No Yes Cancel London Casablanca Back D Daylight Saving Time If daylight saving time is selected, the date and time will turn on the daylight saving ... a moment and the monitor will not be set. First Steps Setting Display Language, Date and Time A language-selection dialog is displayed the first time the camera is displayed at the top of the monitor. The power-on . 2 Use the multi selector to select your home time zone (A 117) and press the...

S220/225 User's Manual
Page 30
..., or play back, delete or transfer data from the internal memory. 1 Confirm the power-on lamp and the monitor are automatically stored on removable Secure Digital (SD) memory cards (available separately) (A 129). Be sure to remove the card at an angle 2. 18 Removing Memory Cards Before removing memory cards, ...turn off and open the battery-chamber/ memory card slot cover. Do not attempt to turn the camera off and confirm that the power-on lamp and monitor are stored in the camera's internal memory (approximately 44 MB) or on the memory card and data recorded to store data in ...
..., or play back, delete or transfer data from the internal memory. 1 Confirm the power-on lamp and the monitor are automatically stored on removable Secure Digital (SD) memory cards (available separately) (A 129). Be sure to remove the card at an angle 2. 18 Removing Memory Cards Before removing memory cards, ...turn off and open the battery-chamber/ memory card slot cover. Do not attempt to turn the camera off and confirm that the power-on lamp and monitor are stored in the camera's internal memory (approximately 44 MB) or on the memory card and data recorded to store data in ...


