
S1000pj User's Manual
Page 4
...marks warnings, information that should be read before using this Nikon product, to a Nikon-authorized service representative for inspection, after unplugging the product and/or removing the battery. After removing or disconnecting the power source, take the ...product to others, read them. Keep these safety instructions where all those who use electronic equipment in explosion or fire. Should the camera...
...marks warnings, information that should be read before using this Nikon product, to a Nikon-authorized service representative for inspection, after unplugging the product and/or removing the battery. After removing or disconnecting the power source, take the ...product to others, read them. Keep these safety instructions where all those who use electronic equipment in explosion or fire. Should the camera...

S1000pj User's Manual
Page 5
... observe these precautions could result in fire or electric shock. • Do not handle the plug or battery charger with plenty of the plug should be sure to remove the battery when no charge remains. • Discontinue use with travel converters or adapters designed to convert from one ... under heavy objects, or expose it to observe this precaution could result in fire or electric shock. • Dust on or near the battery charger during lightning storms. Failure to observe this precaution could result in this precaution could result in electric shock. • Do not use ...
... observe these precautions could result in fire or electric shock. • Do not handle the plug or battery charger with plenty of the plug should be sure to remove the battery when no charge remains. • Discontinue use with travel converters or adapters designed to convert from one ... under heavy objects, or expose it to observe this precaution could result in fire or electric shock. • Dust on or near the battery charger during lightning storms. Failure to observe this precaution could result in this precaution could result in electric shock. • Do not use ...

S1000pj User's Manual
Page 8
... for separate collection at an appropriate collection point. Notice for customers in Europe This symbol indicates that the battery is to be collected separately. Notices Notice for customers in Canada CAUTION This Class B digital apparatus complies with this product is to be collected separately. The following apply only to users in European...
... for separate collection at an appropriate collection point. Notice for customers in Europe This symbol indicates that the battery is to be collected separately. Notices Notice for customers in Canada CAUTION This Class B digital apparatus complies with this product is to be collected separately. The following apply only to users in European...

S1000pj User's Manual
Page 9
... d Button...12 Switching Between Tabs...12 Help Displays...13 The P (Projector) Button...13 First Steps ...14 Charging the Battery ...14 Inserting the Battery into the Camera 16 Removing the Battery ...17 Turning On and Off the Camera...17 Setting Display Language, Date and Time 18 Inserting Memory Cards ...20 Removing Memory Cards...20 A Basic Photography...
... d Button...12 Switching Between Tabs...12 Help Displays...13 The P (Projector) Button...13 First Steps ...14 Charging the Battery ...14 Inserting the Battery into the Camera 16 Removing the Battery ...17 Turning On and Off the Camera...17 Setting Display Language, Date and Time 18 Inserting Memory Cards ...20 Removing Memory Cards...20 A Basic Photography...
S1000pj User's Manual
Page 14
... included with this Nikon digital camera are designed to frequently asked questions (FAQs), and general advice on digital imaging and photography. http://imaging.nikon.com/ Use Only Nikon Brand Electronic Accessories Nikon COOLPIX cameras are engineered and proven to operate within the operational and safety requirements of this electronic circuitry. Only Nikon brand electronic accessories (including battery chargers, batteries and AC adapters...
... included with this Nikon digital camera are designed to frequently asked questions (FAQs), and general advice on digital imaging and photography. http://imaging.nikon.com/ Use Only Nikon Brand Electronic Accessories Nikon COOLPIX cameras are engineered and proven to operate within the operational and safety requirements of this electronic circuitry. Only Nikon brand electronic accessories (including battery chargers, batteries and AC adapters...

S1000pj User's Manual
Page 17
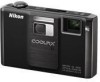
Introduction Parts of the Camera 1 2 3 4 5 6 7 8 9 10 11 12 13 17 16 15 14 1 Flash lamp 31 2 Infrared receiver (rear 35, 138 3 Speaker 72, 83 4 A (shooting mode) button 10 5 c (playback) button ... 7 k (apply selection) button 11 8 l (delete) button 28, 29, 72, 83 9 d button....12, 98, 111, 118, 142, 144 10 Monitor 8 11 Cover latch 16, 20 12 Battery-chamber/ memory card slot cover 16, 20 13 Power connector cover (for AC adapter; available separately 147 14...
Introduction Parts of the Camera 1 2 3 4 5 6 7 8 9 10 11 12 13 17 16 15 14 1 Flash lamp 31 2 Infrared receiver (rear 35, 138 3 Speaker 72, 83 4 A (shooting mode) button 10 5 c (playback) button ... 7 k (apply selection) button 11 8 l (delete) button 28, 29, 72, 83 9 d button....12, 98, 111, 118, 142, 144 10 Monitor 8 11 Cover latch 16, 20 12 Battery-chamber/ memory card slot cover 16, 20 13 Power connector cover (for AC adapter; available separately 147 14...

S1000pj User's Manual
Page 18
... volume 3 Multi selector 4 Q (apply selection) button See the following pages for the battery on page iii and the section, "The Battery" 6 (A 150). In projector mode (A 137), the remote control can be sure that the battery's positive (+) and negative (-) terminals are oriented correctly. • Be sure to read ...and follow the warnings for details of the operation of the Camera Remote Control ML-L4 The supplied remote control can be used...
... volume 3 Multi selector 4 Q (apply selection) button See the following pages for the battery on page iii and the section, "The Battery" 6 (A 150). In projector mode (A 137), the remote control can be sure that the battery's positive (+) and negative (-) terminals are oriented correctly. • Be sure to read ...and follow the warnings for details of the operation of the Camera Remote Control ML-L4 The supplied remote control can be used...

S1000pj User's Manual
Page 19
.... B Note on the Projector Stand Do not carry the camera by the projector stand attached to the camera strap. Introduction Replacing the Remote Control Battery 1 2 Parts of the Camera 3 Push the tab in the battery holder. Be sure that the "+" mark is facing up. Attaching the Camera Strap 1 2 3 The projector stand can be attached to the...
.... B Note on the Projector Stand Do not carry the camera by the projector stand attached to the camera strap. Introduction Replacing the Remote Control Battery 1 2 Parts of the Camera 3 Push the tab in the battery holder. Be sure that the "+" mark is facing up. Attaching the Camera Strap 1 2 3 The projector stand can be attached to the...

S1000pj User's Manual
Page 20
...4 AE/AF-L indicator 48 18 Focus area 26, 106 5 Focus indicator 26 19 Focus area (face priority)....... 26, 49, 106 6 Flash mode 30 7 Battery level indicator 22 8 Motion detection icon 23, 127 9 Vibration reduction icon 23, 126 10 "Date not set" indicator 152 11 Travel destination 121 12 Date... 104 24 Exposure compensation value 34 25 Color options 105 26 White balance mode 101 27 Self-timer indicator 32 a Number of the Camera Introduction The Monitor The following indicators may appear in the monitor during shooting and playback (actual display varies with current...
...4 AE/AF-L indicator 48 18 Focus area 26, 106 5 Focus indicator 26 19 Focus area (face priority)....... 26, 49, 106 6 Flash mode 30 7 Battery level indicator 22 8 Motion detection icon 23, 127 9 Vibration reduction icon 23, 126 10 "Date not set" indicator 152 11 Travel destination 121 12 Date... 104 24 Exposure compensation value 34 25 Color options 105 26 White balance mode 101 27 Self-timer indicator 32 a Number of the Camera Introduction The Monitor The following indicators may appear in the monitor during shooting and playback (actual display varies with current...

S1000pj User's Manual
Page 21
Parts of the Camera Introduction Playback 16 14 1 23 4 15/11/2009 12:00 5 19 9999.JPG 6 18 17 15 13 7 12 999 999 8 10 9 11 999 999 9999 ... recording 18 2 Time of recording 18 3 Volume indicator 72, 83, 142 Category icon in 4 auto sort mode1 61 Album icon in favorite pictures mode1 67 5 Battery level indicator 22 6 Protect icon 114 7 Image mode2 99 Movie options2 82 a Current frame number/ 8 total number of frames 28 b Movie length 83 9 Internal memory...
Parts of the Camera Introduction Playback 16 14 1 23 4 15/11/2009 12:00 5 19 9999.JPG 6 18 17 15 13 7 12 999 999 8 10 9 11 999 999 9999 ... recording 18 2 Time of recording 18 3 Volume indicator 72, 83, 142 Category icon in 4 auto sort mode1 61 Album icon in favorite pictures mode1 67 5 Battery level indicator 22 6 Protect icon 114 7 Image mode2 99 Movie options2 82 a Current frame number/ 8 total number of frames 28 b Movie length 83 9 Internal memory...

S1000pj User's Manual
Page 26
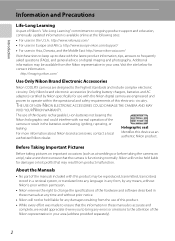
First Steps First Steps Charging the Battery Charge the Rechargeable Li-ion Battery EN-EL12 (supplied) using the Battery Charger MH-65 (supplied). 1 Connect the power cable in the order indicated below. 2 Insert the battery into the battery charger by sliding the battery forward 1, and press down until it locks into place 2. • CHARGE lamp starts blinking when charging begins. • About 2 hours 30 minutes are required to charge a fully exhausted battery. 14
First Steps First Steps Charging the Battery Charge the Rechargeable Li-ion Battery EN-EL12 (supplied) using the Battery Charger MH-65 (supplied). 1 Connect the power cable in the order indicated below. 2 Insert the battery into the battery charger by sliding the battery forward 1, and press down until it locks into place 2. • CHARGE lamp starts blinking when charging begins. • About 2 hours 30 minutes are required to charge a fully exhausted battery. 14
S1000pj User's Manual
Page 27
... before using the battery. • If the battery is not used for the battery on page iii before use an AC Adapter EH-62F (available separately from Nikon; A 147). Battery fully charged. • The battery is complete. B Notes on the Battery Charger • The supplied battery charger is faulty....35 °C (41 °F to storage. C AC Power Supply To power the camera continuously for the battery charger on page iii and the section, "The Battery" (A 150), before using the battery charger. Failure to observe this precaution could result in overheating or in damage to your ...
... before using the battery. • If the battery is not used for the battery on page iii before use an AC Adapter EH-62F (available separately from Nikon; A 147). Battery fully charged. • The battery is complete. B Notes on the Battery Charger • The supplied battery charger is faulty....35 °C (41 °F to storage. C AC Power Supply To power the camera continuously for the battery charger on page iii and the section, "The Battery" (A 150), before using the battery charger. Failure to observe this precaution could result in overheating or in damage to your ...

S1000pj User's Manual
Page 28
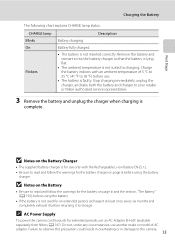
... (+) and negative (-) terminals are oriented correctly as shown on the label at the battery chamber opening, and insert the battery. B Inserting the Battery Inserting the battery upside down or backwards could damage the camera. Slide the cover latch to Z side. 16 Close the cover (1 ), and slide the cover latch (2) to the Y side (1) and open (2). 2 Insert...
... (+) and negative (-) terminals are oriented correctly as shown on the label at the battery chamber opening, and insert the battery. B Inserting the Battery Inserting the battery upside down or backwards could damage the camera. Slide the cover latch to Z side. 16 Close the cover (1 ), and slide the cover latch (2) to the Y side (1) and open (2). 2 Insert...

S1000pj User's Manual
Page 29
...observe due caution when removing the battery. To turn off function). The battery can be changed from the Auto off automatically and the camera will turn off automatically (the auto off the camera, press the power switch again. Turning On and Off the Camera To turn on. If no...the camera, press the power switch. To eject the battery, open the battery-chamber/ memory card slot cover and slide the orange battery latch in the setup menu (A 117). 17 First Steps Inserting the Battery into the Camera Removing the Battery Turn the camera off and be sure that the camera and battery ...
...observe due caution when removing the battery. To turn off function). The battery can be changed from the Auto off automatically and the camera will turn off automatically (the auto off the camera, press the power switch again. Turning On and Off the Camera To turn on. If no...the camera, press the power switch. To eject the battery, open the battery-chamber/ memory card slot cover and slide the orange battery latch in the setup menu (A 117). 17 First Steps Inserting the Battery into the Camera Removing the Battery Turn the camera off and be sure that the camera and battery ...

S1000pj User's Manual
Page 32
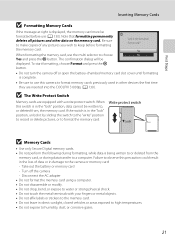
... memory (approximately 36 MB) or on removable Secure Digital (SD) memory cards (available separately; Do not attempt to remove the card at an angle (2). • Note that the power-on lamp and monitor are off and confirm that the camera and battery may become hot during use; observe due caution when ...removing the 20 battery. Remove the memory card to store data in the correct orientation. Be sure to turn the...
... memory (approximately 36 MB) or on removable Secure Digital (SD) memory cards (available separately; Do not attempt to remove the card at an angle (2). • Note that the power-on lamp and monitor are off and confirm that the camera and battery may become hot during use; observe due caution when ...removing the 20 battery. Remove the memory card to store data in the correct orientation. Be sure to turn the...
S1000pj User's Manual
Page 33
...the memory card. When formatting the memory card, use (A 130). Format card? B The Write Protect Switch Memory cards are inserted into the COOLPIX S1000pj (A 130). Take out the battery or memory card - Disconnect the AC adapter • Do not format the memory card using a computer. • Do not disassemble or... to make copies of data or in the "lock" position, data cannot be written to the camera or memory card: - Write protect switch B Memory Cards • Use only Secure Digital memory cards. • Do not perform the following during data transfer to keep before use the ...
...the memory card. When formatting the memory card, use (A 130). Format card? B The Write Protect Switch Memory cards are inserted into the COOLPIX S1000pj (A 130). Take out the battery or memory card - Disconnect the AC adapter • Do not format the memory card using a computer. • Do not disassemble or... to make copies of data or in the "lock" position, data cannot be written to the camera or memory card: - Write protect switch B Memory Cards • Use only Secure Digital memory cards. • Do not perform the following during data transfer to keep before use the ...
S1000pj User's Manual
Page 34
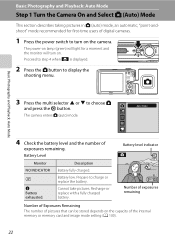
...-andshoot" mode recommended for a moment and the monitor will light for first-time users of digital cameras. 1 Press the power switch to charge or replace the battery. Prepare to turn on. Recharge or replace with a fully charged battery. 12 Number of exposures remaining Number of Exposures Remaining The number of pictures that can be...
...-andshoot" mode recommended for a moment and the monitor will light for first-time users of digital cameras. 1 Press the power switch to charge or replace the battery. Prepare to turn on. Recharge or replace with a fully charged battery. 12 Number of exposures remaining Number of Exposures Remaining The number of pictures that can be...

S1000pj User's Manual
Page 39
... Focus and Shoot Shutter-release Button The camera features a two-stage shutter-release button. Focus and exposure lock while the shutter-release button is standing in front of data or in camera shake and blurred pictures. Do not open the battery-chamber/memory card slot cover while pictures are... at different distances from the camera (e.g. the subject is inside a cage) • Subject is poorly lit...
... Focus and Shoot Shutter-release Button The camera features a two-stage shutter-release button. Focus and exposure lock while the shutter-release button is standing in front of data or in camera shake and blurred pictures. Do not open the battery-chamber/memory card slot cover while pictures are... at different distances from the camera (e.g. the subject is inside a cage) • Subject is poorly lit...

S1000pj User's Manual
Page 43
... for Blink proof (A 51) • s (subject tracking): U (auto) The flash mode setting applied in A (auto) mode is stored in the camera's memory even after the camera is turned off, and reapplied the next time A (auto) mode is detected, the affected area will turn off, and remain off, until the...main flash, reducing "red eye." Wait a few seconds and try again. 31 If the battery is low, the monitor display will be processed to stabilize the camera during shooting and avoid the effects of camera shake. This mode is not recommended when a quick shutter response is required. • ...
... for Blink proof (A 51) • s (subject tracking): U (auto) The flash mode setting applied in A (auto) mode is stored in the camera's memory even after the camera is turned off, and reapplied the next time A (auto) mode is detected, the affected area will turn off, and remain off, until the...main flash, reducing "red eye." Wait a few seconds and try again. 31 If the battery is low, the monitor display will be processed to stabilize the camera during shooting and avoid the effects of camera shake. This mode is not recommended when a quick shutter response is required. • ...
S1000pj User's Manual
Page 93
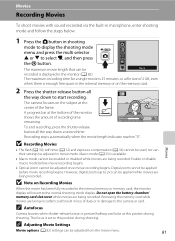
... 82) settings can be adjusted from the movie menu. 81 Movies Do not open the battery-chamber/ memory card slot cover while movies are being recorded. Movies Recording Movies To shoot ...the monitor (A 82). A progress bar at the center of recording time 25s remaining. Digital zoom cannot be applied before movie recording begins. • Optical zoom cannot be enabled...movie length indicator reaches "0". Enable or disable macro mode before movie recording begins. The camera focuses on Recording Movies When the movie has been fully recorded to the internal memory...
... 82) settings can be adjusted from the movie menu. 81 Movies Do not open the battery-chamber/ memory card slot cover while movies are being recorded. Movies Recording Movies To shoot ...the monitor (A 82). A progress bar at the center of recording time 25s remaining. Digital zoom cannot be applied before movie recording begins. • Optical zoom cannot be enabled...movie length indicator reaches "0". Enable or disable macro mode before movie recording begins. The camera focuses on Recording Movies When the movie has been fully recorded to the internal memory...


