
S1000pj User's Manual
Page 9
... ...1 About This Manual ...1 Information and Precautions...2 Parts of the Camera...4 The Camera Body ...4 Remote Control ML-L4...6 Attaching the Camera Strap ...7 The Monitor...8 Basic Operations...10 The A (Shooting Mode) Button...10 The c (Playback) Button...10 The Multi Selector...11 The d Button...12 Switching Between Tabs...12 Help Displays...13 The P (Projector) Button...13 First Steps...
... ...1 About This Manual ...1 Information and Precautions...2 Parts of the Camera...4 The Camera Body ...4 Remote Control ML-L4...6 Attaching the Camera Strap ...7 The Monitor...8 Basic Operations...10 The A (Shooting Mode) Button...10 The c (Playback) Button...10 The Multi Selector...11 The d Button...12 Switching Between Tabs...12 Help Displays...13 The P (Projector) Button...13 First Steps...

S1000pj User's Manual
Page 16
Parts of the Camera The Camera Body Opening the connector cover 1 2 3 4 5 6 7 8 9 10 Introduction 15 14 13 12 Lens cover closed 11 1 Shutter-release button 26 Zoom control 25 f: wide 25 2 g: tele 25 h: thumbnail playback 54 i: playback zoom 57 j: help 13 3 Power switch/... 137 7 P (projector) button 137 8 Lens 151, 162 9 Infrared receiver (front 35, 138 10 Self-timer lamp 32 AF-assist illuminator 128 11 Lens cover 149 12 Built-in microphone 71, 81 13 Eyelet for camera strap 7 14 Connector cover 84, 86, 90 15 Cable connector 84, 86, 90 4
Parts of the Camera The Camera Body Opening the connector cover 1 2 3 4 5 6 7 8 9 10 Introduction 15 14 13 12 Lens cover closed 11 1 Shutter-release button 26 Zoom control 25 f: wide 25 2 g: tele 25 h: thumbnail playback 54 i: playback zoom 57 j: help 13 3 Power switch/... 137 7 P (projector) button 137 8 Lens 151, 162 9 Infrared receiver (front 35, 138 10 Self-timer lamp 32 AF-assist illuminator 128 11 Lens cover 149 12 Built-in microphone 71, 81 13 Eyelet for camera strap 7 14 Connector cover 84, 86, 90 15 Cable connector 84, 86, 90 4

S1000pj User's Manual
Page 17
... of the Camera 1 2 3 4 5 6 7 8 9 10 11 12 13 17 16 15 14 1 Flash lamp 31 2 Infrared receiver (rear 35, 138 3 Speaker 72, 83 4 A (shooting mode) button 10 5 c (playback) button 10, 28 6 Multi selector 11 7 k (apply selection) button 11 8 l (delete) button 28, 29, 72, 83 9 d button....12, 98, ...111, 118, 142, 144 10 Monitor 8 11 Cover latch 16, 20 12 Battery-chamber/ memory card slot cover 16, 20 13 Power connector cover (for AC adapter; available separately 147 14...
... of the Camera 1 2 3 4 5 6 7 8 9 10 11 12 13 17 16 15 14 1 Flash lamp 31 2 Infrared receiver (rear 35, 138 3 Speaker 72, 83 4 A (shooting mode) button 10 5 c (playback) button 10, 28 6 Multi selector 11 7 k (apply selection) button 11 8 l (delete) button 28, 29, 72, 83 9 d button....12, 98, ...111, 118, 142, 144 10 Monitor 8 11 Cover latch 16, 20 12 Battery-chamber/ memory card slot cover 16, 20 13 Power connector cover (for AC adapter; available separately 147 14...

S1000pj User's Manual
Page 20
... Battery level indicator 22 8 Motion detection icon 23, 127 9 Vibration reduction icon 23, 126 10 "Date not set" indicator 152 11 Travel destination 121 12 Date imprint 125 13 Image mode 99 Movie options 82 20 Focus area (subject tracking mode 52 21 Shutter speed 26 22 Skin softening 49..., 104 24 Exposure compensation value 34 25 Color options 105 26 White balance mode 101 27 Self-timer indicator 32 a Number of the Camera Introduction The Monitor The following indicators may appear in the monitor during shooting and playback (actual display varies with current...
... Battery level indicator 22 8 Motion detection icon 23, 127 9 Vibration reduction icon 23, 126 10 "Date not set" indicator 152 11 Travel destination 121 12 Date imprint 125 13 Image mode 99 Movie options 82 20 Focus area (subject tracking mode 52 21 Shutter speed 26 22 Skin softening 49..., 104 24 Exposure compensation value 34 25 Color options 105 26 White balance mode 101 27 Self-timer indicator 32 a Number of the Camera Introduction The Monitor The following indicators may appear in the monitor during shooting and playback (actual display varies with current...

S1000pj User's Manual
Page 21
Parts of the Camera Introduction Playback 16 14 1 23 4 15/11/2009 12:00 5 19 9999.JPG 6 18 17 15 13 7 12 999 999 8 10 9 11 999 999 9999 9999 1m00s 1m00s a b 1 Date of recording 18 2 Time of recording 18 3 Volume indicator 72, 83, 142 Category icon ... frame number/ 8 total number of frames 28 b Movie length 83 9 Internal memory indicator 28 10 Add to favorites guide 66 11 Movie playback guide 83 12 List by date guide 58 13 Print set icon 95 14 Small picture icon 79 15 D-Lighting icon 76 16 Quick retouch icon 75 17...
Parts of the Camera Introduction Playback 16 14 1 23 4 15/11/2009 12:00 5 19 9999.JPG 6 18 17 15 13 7 12 999 999 8 10 9 11 999 999 9999 9999 1m00s 1m00s a b 1 Date of recording 18 2 Time of recording 18 3 Volume indicator 72, 83, 142 Category icon ... frame number/ 8 total number of frames 28 b Movie length 83 9 Internal memory indicator 28 10 Add to favorites guide 66 11 Movie playback guide 83 12 List by date guide 58 13 Print set icon 95 14 Small picture icon 79 15 D-Lighting icon 76 16 Quick retouch icon 75 17...

S1000pj User's Manual
Page 24
... apply selection Switching Between Tabs Shooting menu Image mode White balance Continuous ISO sensitivity Color options Exit Press the multi selector J to highlight the tab 12 Shooting menu Image mode White balance Continuous ISO sensitivity Color options Exit Press the multi selector H or I to exit the menu.
... apply selection Switching Between Tabs Shooting menu Image mode White balance Continuous ISO sensitivity Color options Exit Press the multi selector J to highlight the tab 12 Shooting menu Image mode White balance Continuous ISO sensitivity Color options Exit Press the multi selector H or I to exit the menu.
S1000pj User's Manual
Page 34
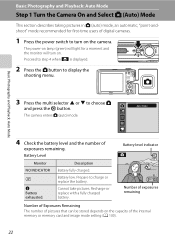
...in A (auto) mode, an automatic, "point-andshoot" mode recommended for a moment and the monitor will light for first-time users of digital cameras. 1 Press the power switch to turn on the capacity of the internal memory or memory card and image mode setting (A 100). 22 Basic... step 4 when A is displayed. 2 Press the A button to choose A and press the k button. The camera enters A (auto) mode. Recharge or replace with a fully charged battery. 12 Number of exposures remaining Number of Exposures Remaining The number of exposures remaining. Auto mode 4 Check the battery level and...
...in A (auto) mode, an automatic, "point-andshoot" mode recommended for a moment and the monitor will light for first-time users of digital cameras. 1 Press the power switch to turn on the capacity of the internal memory or memory card and image mode setting (A 100). 22 Basic... step 4 when A is displayed. 2 Press the A button to choose A and press the k button. The camera enters A (auto) mode. Recharge or replace with a fully charged battery. 12 Number of exposures remaining Number of Exposures Remaining The number of exposures remaining. Auto mode 4 Check the battery level and...

S1000pj User's Manual
Page 35
...default setting is displayed. Basic Photography and Playback: Auto Mode Step 1 Turn the Camera On and Select A (Auto) Mode Indicators Displayed in A (Auto) Mode Shooting mode A displayed in A (auto) mode. 12 Internal memory indicator Indicates that images will be stored in the memory card. When ...a memory card is inserted in the camera, C does not appear and images will be stored on the camera's internal memory (approximately 36 MB).
...default setting is displayed. Basic Photography and Playback: Auto Mode Step 1 Turn the Camera On and Select A (Auto) Mode Indicators Displayed in A (Auto) Mode Shooting mode A displayed in A (auto) mode. 12 Internal memory indicator Indicates that images will be stored in the memory card. When ...a memory card is inserted in the camera, C does not appear and images will be stored on the camera's internal memory (approximately 36 MB).
S1000pj User's Manual
Page 36
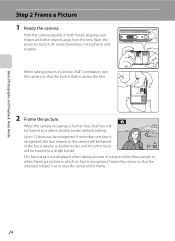
Up to the camera will be framed in which no face is recognized, the face nearest to 12 faces can be framed by a single border. If more than people, or when framing a picture in the focus area by a double border, and the other faces 12 will be recognized. Frame the picture so that the...
Up to the camera will be framed in which no face is recognized, the face nearest to 12 faces can be framed by a single border. If more than people, or when framing a picture in the focus area by a double border, and the other faces 12 will be recognized. Frame the picture so that the...

S1000pj User's Manual
Page 46
... k button within a few seconds, the selection will be cancelled. When the picture is displayed with the H indicator in the camera's memory even after the camera is turned off, and reapplied the next time A (auto) mode is too bright, adjust the exposure compensation to "+" direction....adjust the exposure compensation to "-" direction. To exit without altering exposure, return to step 1, change the value to 0.0 and press the k button. 12 C Exposure Compensation Value The exposure compensation value applied in A (auto) mode is stored in the monitor. 3 Press the shutter-release button to ...
... k button within a few seconds, the selection will be cancelled. When the picture is displayed with the H indicator in the camera's memory even after the camera is turned off, and reapplied the next time A (auto) mode is too bright, adjust the exposure compensation to "+" direction....adjust the exposure compensation to "-" direction. To exit without altering exposure, return to step 1, change the value to 0.0 and press the k button. 12 C Exposure Compensation Value The exposure compensation value applied in A (auto) mode is stored in the monitor. 3 Press the shutter-release button to ...

S1000pj User's Manual
Page 55
... shooting. B Note on that for the scene mode currently enabled. See "Face Priority" (A 108) for AF area mode (A 106). 43 The camera enters scene auto selector mode. d: Auto g: Night landscape e: Portrait i: Close-up (A 40) 1 Press the A button in shooting mode to ...Portrait (A 37) • Night portrait (A 38) • Night landscape (A 40) • Backlight (A 42) • Landscape (A 37) • Close-up 12 f: Landscape j: Backlight h: Night portrait Press the shutter-release button halfway to set focus and exposure. C Focusing in Scene Auto Selector Mode • When the...
... shooting. B Note on that for the scene mode currently enabled. See "Face Priority" (A 108) for AF area mode (A 106). 43 The camera enters scene auto selector mode. d: Auto g: Night landscape e: Portrait i: Close-up (A 40) 1 Press the A button in shooting mode to ...Portrait (A 37) • Night portrait (A 38) • Night landscape (A 40) • Backlight (A 42) • Landscape (A 37) • Close-up 12 f: Landscape j: Backlight h: Night portrait Press the shutter-release button halfway to set focus and exposure. C Focusing in Scene Auto Selector Mode • When the...

S1000pj User's Manual
Page 57
.... 2 Press the multi selector H or I , J, or K to select a focus area and press the k button again to move the focus area. When the camera is pressed the rest of blue. 12 3 Frame the picture. Focus is locked when the shutter-release button is pressed halfway, and a picture is taken when the shutterrelease button...
.... 2 Press the multi selector H or I , J, or K to select a focus area and press the k button again to move the focus area. When the camera is pressed the rest of blue. 12 3 Frame the picture. Focus is locked when the shutter-release button is pressed halfway, and a picture is taken when the shutterrelease button...

S1000pj User's Manual
Page 59
... reduction (A 126) to Off in setup menu (A 117) when using a tripod to stabilize the camera. 1 Press the A button in Scene Mode Shooting Suited to Scenes Shooting for a Panorama The camera focuses on the subject at the center of the frame. Panorama assist 2 Use the multi selector to... macro mode (A 33) and exposure compensation (A 34) settings with this process until the necessary number of the picture will be displayed as translucent. 12 4 Take the next picture. Repeat this step. right (I ) is displayed for the best results. One third of pictures has been taken to choose...
... reduction (A 126) to Off in setup menu (A 117) when using a tripod to stabilize the camera. 1 Press the A button in Scene Mode Shooting Suited to Scenes Shooting for a Panorama The camera focuses on the subject at the center of the frame. Panorama assist 2 Use the multi selector to... macro mode (A 33) and exposure compensation (A 34) settings with this process until the necessary number of the picture will be displayed as translucent. 12 4 Take the next picture. Repeat this step. right (I ) is displayed for the best results. One third of pictures has been taken to choose...

S1000pj User's Manual
Page 89
...the d button. 4 Check the enhancement performance. If more than one softened face is displayed. 2 Use the multi selector to 12 faces can be performed is displayed and the camera returns to playback mode. 3 Press the multi selector H or I to step 3. Press the k button to display other ...faces. Editing Pictures Softening Skin Tones: Skin Softening The camera detects faces in pictures and creates a copy with the skin softening function are recognized in the picture, an alert is shown. Up to choose ...
...the d button. 4 Check the enhancement performance. If more than one softened face is displayed. 2 Use the multi selector to 12 faces can be performed is displayed and the camera returns to playback mode. 3 Press the multi selector H or I to step 3. Press the k button to display other ...faces. Editing Pictures Softening Skin Tones: Skin Softening The camera detects faces in pictures and creates a copy with the skin softening function are recognized in the picture, an alert is shown. Up to choose ...

S1000pj User's Manual
Page 105
Print menu Print selection Print all images 004 prints return to the print menu. Rotate the zoom control to g (i) to switch to 12-thumbnail display. Rotate the zoom control to f (h) to switch back to full-frame playback. When the menu shown at right is displayed, choose Start print ...
Print menu Print selection Print all images 004 prints return to the print menu. Rotate the zoom control to g (i) to switch to 12-thumbnail display. Rotate the zoom control to f (h) to switch back to full-frame playback. When the menu shown at right is displayed, choose Start print ...

S1000pj User's Manual
Page 107
... connected to a PictBridge-compatible printer, pictures can be printed from the camera, a DPOF print order can be recognized by date mode, auto sort mode, or favorite pictures mode. 3 Choose Select ...to full-frame playback. Creating a DPOF Print Order: Print Set The Print set option in the playback menu is used to create digital "print orders" for which no copies have created for printing can be created for pictures stored in the internal memory. 1 Press ...numeral indicating the number of copies to be printed. Rotate the zoom control to f (h) to switch back to 12-thumbnail display.
... connected to a PictBridge-compatible printer, pictures can be printed from the camera, a DPOF print order can be recognized by date mode, auto sort mode, or favorite pictures mode. 3 Choose Select ...to full-frame playback. Creating a DPOF Print Order: Print Set The Print set option in the playback menu is used to create digital "print orders" for which no copies have created for printing can be created for pictures stored in the internal memory. 1 Press ...numeral indicating the number of copies to be printed. Rotate the zoom control to f (h) to switch back to 12-thumbnail display.

S1000pj User's Manual
Page 110
... The following options can also be modified from other shooting menus (except the movie menu). Shooting, Playback and Setup Menus B Camera Settings that Cannot Be Applied Simultaneously 98 Some functions cannot be set when shooting in conjunction with others (A 110). E ISO sensitivity ...BSS (best shot selector). F Color options A 105 Apply color effects to light. Shooting menu Image mode White balance Continuous ISO sensitivity Color options 12 Exit • Use the multi selector to choose and apply settings (A 11). • To exit the shooting menu, press the d button...
... The following options can also be modified from other shooting menus (except the movie menu). Shooting, Playback and Setup Menus B Camera Settings that Cannot Be Applied Simultaneously 98 Some functions cannot be set when shooting in conjunction with others (A 110). E ISO sensitivity ...BSS (best shot selector). F Color options A 105 Apply color effects to light. Shooting menu Image mode White balance Continuous ISO sensitivity Color options 12 Exit • Use the multi selector to choose and apply settings (A 11). • To exit the shooting menu, press the d button...

S1000pj User's Manual
Page 112
... composition of exposures remaining display shows "9999". 2 All figures are calculated by 2.54 cm (1 in .) H High (4000P) 6 85 34 × 25/13.4 × 9.8 I Normal (4000) 12 165 34 × 25/13.4 × 9.8 R Normal (3264) 18 250 28 × 21/11 × 8.3 L Normal (2592) 28 390 22 × 16.5/8.7 × 6.5 M Normal (2048...
... composition of exposures remaining display shows "9999". 2 All figures are calculated by 2.54 cm (1 in .) H High (4000P) 6 85 34 × 25/13.4 × 9.8 I Normal (4000) 12 165 34 × 25/13.4 × 9.8 R Normal (3264) 18 250 28 × 21/11 × 8.3 L Normal (2592) 28 390 22 × 16.5/8.7 × 6.5 M Normal (2048...

S1000pj User's Manual
Page 118
...a subject with which the intended subject is recognized, the camera focuses on that face. To end focus-area selection and adjust the flash, macro, self-timer and exposure compensation settings, press the k button. When digital zoom is 12 recognized, the AF area mode setting switches to Auto, ...and the camera will be displayed in the monitor. 12 Focus areas x Manual This option is suited to situations in which no face ...
...a subject with which the intended subject is recognized, the camera focuses on that face. To end focus-area selection and adjust the flash, macro, self-timer and exposure compensation settings, press the k button. When digital zoom is 12 recognized, the AF area mode setting switches to Auto, ...and the camera will be displayed in the monitor. 12 Focus areas x Manual This option is suited to situations in which no face ...

S1000pj User's Manual
Page 119
...are locked. 3 Continue holding down the shutter-release button halfway and recompose the picture. • Be sure that the focus area is always displayed. 12 Focus area Shooting, Playback and Setup Menus D Focus Lock To focus on the subject at the center of the way down to take the picture.... 12 1/125 F3.9 1/125 F3.9 D More Information See "Autofocus" (A 27) for more information. 107 Shooting Options: The Shooting Menu y Center The camera focuses on off-center subjects when Center is selected for AF area mode, use ...
...are locked. 3 Continue holding down the shutter-release button halfway and recompose the picture. • Be sure that the focus area is always displayed. 12 Focus area Shooting, Playback and Setup Menus D Focus Lock To focus on the subject at the center of the way down to take the picture.... 12 1/125 F3.9 1/125 F3.9 D More Information See "Autofocus" (A 27) for more information. 107 Shooting Options: The Shooting Menu y Center The camera focuses on off-center subjects when Center is selected for AF area mode, use ...


