
Instruction Manual
Page 3
... is imprinted. 7. MODE button : Push to select one of five available displays. 4. M : Month indicator 6. - : Data imprint indicator: Blinks approx. 2 sec. Dio Finder lever P. 56 P. 56 Film cartridge confirmation window P. 19 AE -
... is imprinted. 7. MODE button : Push to select one of five available displays. 4. M : Month indicator 6. - : Data imprint indicator: Blinks approx. 2 sec. Dio Finder lever P. 56 P. 56 Film cartridge confirmation window P. 19 AE -

Instruction Manual
Page 4
... read . It returns to normal when the temperature drops to normal. 4 LCDNiewfinder Dis la s 1 2 3 4 (a-, a-, oI .~, o.~,Io.~,o." Self-timer (page 55) 6. Film (page 19) About LCD • At high temperatures of 60°C (140°F) or above, the display tums black, making it returns to 20°C (68 °F) . • At temperatures below...
... read . It returns to normal when the temperature drops to normal. 4 LCDNiewfinder Dis la s 1 2 3 4 (a-, a-, oI .~, o.~,Io.~,o." Self-timer (page 55) 6. Film (page 19) About LCD • At high temperatures of 60°C (140°F) or above, the display tums black, making it returns to 20°C (68 °F) . • At temperatures below...
Instruction Manual
Page 8
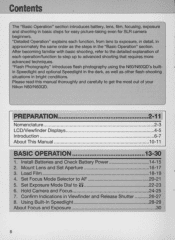
... in the "Basic Operation" section. Confirm Indications in basic steps for easy picture-taking even for SLR camera beginners. "Flash Photography" introduces flash photography using the N60/N60QD's builtin Speedlight and optional Speedlight in the dark, as well as the steps in bright conditions...function to step up to the detailed explanation of your Nikon N60/N60QD. Load Film 18-19 4. Using Built-In Speedlight 28-29 About Focus and Exposure 30 8 Install Batteries and Check Battery Power 14-15 2. Hold Camera and Focus 24-25 7. After becoming familiar with ...
... in the "Basic Operation" section. Confirm Indications in basic steps for easy picture-taking even for SLR camera beginners. "Flash Photography" introduces flash photography using the N60/N60QD's builtin Speedlight and optional Speedlight in the dark, as well as the steps in bright conditions...function to step up to the detailed explanation of your Nikon N60/N60QD. Load Film 18-19 4. Using Built-In Speedlight 28-29 About Focus and Exposure 30 8 Install Batteries and Check Battery Power 14-15 2. Hold Camera and Focus 24-25 7. After becoming familiar with ...

Instruction Manual
Page 9
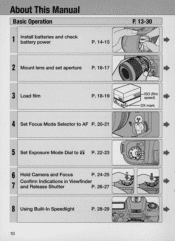
---=...c:- _. DETAILED OPERATION 31-64 Lens Compatibility 32-33 Film 34-35 Focus Mode 36-37 Focus Lock 38 Shooting in Each Exposure Mode 39-44 Vari-Program 45-47 Exposure Metering System 48 Auto ...-63 Built-in Speed light and Matrix Balanced Fill-Flash 58 Flash shooting distance range 58 Flash sync mode features 59 USing built-in Speedlight 60-61 Usable lenses with built-in Speedlight 61 Usable Optional Speedlights 62-63 Available Mode Combinations 64 MISCELLANEOUS 65-77 Optional Accessories 66...
---=...c:- _. DETAILED OPERATION 31-64 Lens Compatibility 32-33 Film 34-35 Focus Mode 36-37 Focus Lock 38 Shooting in Each Exposure Mode 39-44 Vari-Program 45-47 Exposure Metering System 48 Auto ...-63 Built-in Speed light and Matrix Balanced Fill-Flash 58 Flash shooting distance range 58 Flash sync mode features 59 USing built-in Speedlight 60-61 Usable lenses with built-in Speedlight 61 Usable Optional Speedlights 62-63 Available Mode Combinations 64 MISCELLANEOUS 65-77 Optional Accessories 66...
Instruction Manual
Page 10
About This Manual [ Basic Operation 1 Install batteries and check battery power P. 14-15 P. 13-30 • 2 Mount lens and set aperture P.16-17 • 3 Load film P.18-19 • 4 Set Focus Mode Selector to AF P.20-21 • 5 Set Exposure Mode Dial to 8 P. 22-23 • 6 Hold Camera and Focus ~ ~ P. 24-25 7 Confirm Indications in Viewfinder and Release Shutter P.26-27 • 8 Using Built-In Speedlight P.28-29 • 10
About This Manual [ Basic Operation 1 Install batteries and check battery power P. 14-15 P. 13-30 • 2 Mount lens and set aperture P.16-17 • 3 Load film P.18-19 • 4 Set Focus Mode Selector to AF P.20-21 • 5 Set Exposure Mode Dial to 8 P. 22-23 • 6 Hold Camera and Focus ~ ~ P. 24-25 7 Confirm Indications in Viewfinder and Release Shutter P.26-27 • 8 Using Built-In Speedlight P.28-29 • 10
Instruction Manual
Page 11
...Built-in Speedlight and Matrix Balanced Fill-Flash (P. 58)/ Flash shooting distance range (P. 58)/Flash sync mode features (P. 59)/ Using built-in Speedlight (P. 60-61)/Usable lenses with built-in Each Exposure Mode (P. 39-44)-8: General Purpose (P. 39)/ P: Auto-Multi (P. 40)/S: Shutter-Priority Auto (P. 41 ...)-CPU Nikkor lens (P. 32-33)/ Non-CPU lens (P. 32-33) Film (P. 34)-Confirming an automatically set film speed (P. 34)/ Mid-roll rewind (P. 34)/ ln case film does not start rewind or film rewind stops at midroll (P. 35)/Film advance mode (P. 35) Focus Mode (P. 36-37)-Autofocus (P. 36)/AF...
...Built-in Speedlight and Matrix Balanced Fill-Flash (P. 58)/ Flash shooting distance range (P. 58)/Flash sync mode features (P. 59)/ Using built-in Speedlight (P. 60-61)/Usable lenses with built-in Each Exposure Mode (P. 39-44)-8: General Purpose (P. 39)/ P: Auto-Multi (P. 40)/S: Shutter-Priority Auto (P. 41 ...)-CPU Nikkor lens (P. 32-33)/ Non-CPU lens (P. 32-33) Film (P. 34)-Confirming an automatically set film speed (P. 34)/ Mid-roll rewind (P. 34)/ ln case film does not start rewind or film rewind stops at midroll (P. 35)/Film advance mode (P. 35) Focus Mode (P. 36-37)-Autofocus (P. 36)/AF...

Instruction Manual
Page 18
3 Load Film Use a DX-coded film. Film speed r is properly positioned with no slack . 18 When the camera is turned on, film is loaded and the camera back is closed , the film automat- ___"'7llLUL_ ISO (film speed) ~I DX mark ically advances to the first frame 3.1 Turn on the main switch, then open the camera back and insert film . • Insert from the bottom of the film cartridge. 3.2 Pull film leader out to red index mark. • Do not insert the film leader beyond the red index mark. • Hold the film cartridge and ensure film is set automatically (18025- 5000).
3 Load Film Use a DX-coded film. Film speed r is properly positioned with no slack . 18 When the camera is turned on, film is loaded and the camera back is closed , the film automat- ___"'7llLUL_ ISO (film speed) ~I DX mark ically advances to the first frame 3.1 Turn on the main switch, then open the camera back and insert film . • Insert from the bottom of the film cartridge. 3.2 Pull film leader out to red index mark. • Do not insert the film leader beyond the red index mark. • Hold the film cartridge and ensure film is set automatically (18025- 5000).

Instruction Manual
Page 19
When film other than ffi OX-coded film is inserted , 1ZI Check points o z ~ D Only OX-coded film can be used with this camera.
When film other than ffi OX-coded film is inserted , 1ZI Check points o z ~ D Only OX-coded film can be used with this camera.

Instruction Manual
Page 24
...focus, causes. Therefore, the actual exposed frame is crucial when taking photographs. Camera shake and shutter speed Preventing camera shake is somewhat larger than 1/50 sec.) Use of a tripod is approximately 90% of a negative film are partially cropped by most labs. 24 Note that the edges of the ...actual exposed frame on the subject and when the subject is in the viewfinder. 6.1 Hold the camera properly. • Keep your elbow propped against your body...
...focus, causes. Therefore, the actual exposed frame is crucial when taking photographs. Camera shake and shutter speed Preventing camera shake is somewhat larger than 1/50 sec.) Use of a tripod is approximately 90% of a negative film are partially cropped by most labs. 24 Note that the edges of the ...actual exposed frame on the subject and when the subject is in the viewfinder. 6.1 Hold the camera properly. • Keep your elbow propped against your body...

Instruction Manual
Page 26
appears without blinking and slowly depre~s the shutter release button . • After shutter is released , the film automatically advances to the next frame and the next shot can be taken. 26 7 Confirm Indications in Viewfinder and Release Shutter Confirm that. (focus indicator) ...
appears without blinking and slowly depre~s the shutter release button . • After shutter is released , the film automatically advances to the next frame and the next shot can be taken. 26 7 Confirm Indications in Viewfinder and Release Shutter Confirm that. (focus indicator) ...

Instruction Manual
Page 27
... For mid-roll rewind, see page 34. ~ o For self-timer operation , see page 70. o When you reach the end of the film roll , the film starts to rewind oQ. o automatically . IZl Check points o z ~ o Focus, shutter speed and aperture can be discarded due to development procedures. 7.4 ...Confirm film is complete. W If any other indications appear, see page 55. 7.3 Film starts to rewind automatically when film reaches the end of the exposures for the film roll may be confirmed in the LCD panel during film rewind and the frame counter counts...
... For mid-roll rewind, see page 34. ~ o For self-timer operation , see page 70. o When you reach the end of the film roll , the film starts to rewind oQ. o automatically . IZl Check points o z ~ o Focus, shutter speed and aperture can be discarded due to development procedures. 7.4 ...Confirm film is complete. W If any other indications appear, see page 55. 7.3 Film starts to rewind automatically when film reaches the end of the exposures for the film roll may be confirmed in the LCD panel during film rewind and the frame counter counts...
Instruction Manual
Page 30
.... Metering System As the proper combination of shutter speed and aperture for subject brightness and film sensitivity results in the correct exposure. In general , brightness inside the viewfinder is controlled by the film. larger apertures (smaller fnumbers) will produce a deeper depth of and behind the subject... Metering, data on which the lens is the zone of sharpest focus in the viewfinder. (With D-type AF Nikkor lenses, the N60/N60QD camera performs 3D Matrix Metering. Depth of field is focused. Exposure Light from the subject passes through the lens and is concentrated on the...
.... Metering System As the proper combination of shutter speed and aperture for subject brightness and film sensitivity results in the correct exposure. In general , brightness inside the viewfinder is controlled by the film. larger apertures (smaller fnumbers) will produce a deeper depth of and behind the subject... Metering, data on which the lens is the zone of sharpest focus in the viewfinder. (With D-type AF Nikkor lenses, the N60/N60QD camera performs 3D Matrix Metering. Depth of field is focused. Exposure Light from the subject passes through the lens and is concentrated on the...

Instruction Manual
Page 31
DETAILED OPERATION This section features detailed descriptions of all camera functions - including lens, film, focus, exposure and others. 31
DETAILED OPERATION This section features detailed descriptions of all camera functions - including lens, film, focus, exposure and others. 31

Instruction Manual
Page 34
Film Confirming an automatically set film speed • To confirm the automatically set film speed of the functions. (For "Two-Button Reset", see page 57 .) Mid-roll rewind = • To rewind film at mid-roll , press the (mid -roll rewind) button with a pointed object. resets some of your loaded OX-coded film , press the II! Open the camera back and remove the film cartridge. 34 When film is completely rewound, E appears and (;) blinks in the LCD panel. and @ buttons for more than 2 sec. Note that pressing the II! and @ buttons simultaneously.
Film Confirming an automatically set film speed • To confirm the automatically set film speed of the functions. (For "Two-Button Reset", see page 57 .) Mid-roll rewind = • To rewind film at mid-roll , press the (mid -roll rewind) button with a pointed object. resets some of your loaded OX-coded film , press the II! Open the camera back and remove the film cartridge. 34 When film is completely rewound, E appears and (;) blinks in the LCD panel. and @ buttons for more than 2 sec. Note that pressing the II! and @ buttons simultaneously.

Instruction Manual
Page 35
In case film does not start to rewi nd or film rewind stops at mid-roll ./ -j r r- @) ~ -[' 3 6 1 ~ • When battery power is very low, or in low temperatures, film may not start rewinding or film rewind may stop at mid-roll, and --
In case film does not start to rewi nd or film rewind stops at mid-roll ./ -j r r- @) ~ -[' 3 6 1 ~ • When battery power is very low, or in low temperatures, film may not start rewinding or film rewind may stop at mid-roll, and --

Instruction Manual
Page 50
... the ~ button until the desired compensation value appears. ., ,- This can be useful when the subject has pronounced contrast or when bracketing exposure with color slide film (where the latitude of the proper exposure is minimal). I ( :. ~) I -0.5EV compensation I Ie) F:•.
... the ~ button until the desired compensation value appears. ., ,- This can be useful when the subject has pronounced contrast or when bracketing exposure with color slide film (where the latitude of the proper exposure is minimal). I ( :. ~) I -0.5EV compensation I Ie) F:•.

Instruction Manual
Page 54
Compati ble film speeds for approx. 2 sec. C.Iil.liID. Select no imprint) to select available imprinting displays. DatelTime-continued Taking pictures with the imprinted date/time. • To ...
Compati ble film speeds for approx. 2 sec. C.Iil.liID. Select no imprint) to select available imprinting displays. DatelTime-continued Taking pictures with the imprinted date/time. • To ...

Instruction Manual
Page 57
... Program: Canceled .~.... ~ Exposure Compensation: Canceled Flash sync mode: Slow Sync with other exposure modes 2o z ~ Self-timer: Canceled o ~ • See page 64 for the camera's default setting and available mode combinations. ~ • When the II! Press the ~ and @ buttons simultaneously for less than 2 sec. Two-Button Reset • Two-Button... Reset lets you instantly reset specified settings to I:!!I or normal sync with exposure mode set film speed of loaded OX-coded film appears in the LCD panel. (Page 34.) ~ -
... Program: Canceled .~.... ~ Exposure Compensation: Canceled Flash sync mode: Slow Sync with other exposure modes 2o z ~ Self-timer: Canceled o ~ • See page 64 for the camera's default setting and available mode combinations. ~ • When the II! Press the ~ and @ buttons simultaneously for less than 2 sec. Two-Button Reset • Two-Button... Reset lets you instantly reset specified settings to I:!!I or normal sync with exposure mode set film speed of loaded OX-coded film appears in the LCD panel. (Page 34.) ~ -

Instruction Manual
Page 58
...standard TTL flash is the only flash mode available. Flash shooting distance range Flash shooting distance changes according to the film speed in Speedlight that of print film with the same ISO film speed rating. • The flash shooting distance range can be used in daylight to reduce shadows on the main ...(IS01 00, ft.). Four flash sync modes-Normal Sync, Red-Eye Reduction, Slow Sync and RedEye Reduction with Slow Sync-are available with this camera. • When using this camera's built-in your subject's eyes. Flash Photo Built-in Speedlight and Matrix Balanced Fill-Flash This...
...standard TTL flash is the only flash mode available. Flash shooting distance range Flash shooting distance changes according to the film speed in Speedlight that of print film with the same ISO film speed rating. • The flash shooting distance range can be used in daylight to reduce shadows on the main ...(IS01 00, ft.). Four flash sync modes-Normal Sync, Red-Eye Reduction, Slow Sync and RedEye Reduction with Slow Sync-are available with this camera. • When using this camera's built-in your subject's eyes. Flash Photo Built-in Speedlight and Matrix Balanced Fill-Flash This...

Instruction Manual
Page 60
when the shutter speed is set to the flash shooting distance range table on page 58. 60 In Aperture-Priority Auto or Manual exposure mode, set the aperture according to 11125 sec. -continued 1Using built-in Speedlight Release the built-in Speedlight ... 11125 sec. or faster and the flash is fired (or attached optional Speedlight is turned on). *2 Flash shooting distance range depends on the ISO film speed of film in each exposure mode Exposure mode General-Purpose Program Auto-Multi Program Vari-Program Shutter-Priority Auto Available shutter speed Automatically set 1/125-30...
when the shutter speed is set to the flash shooting distance range table on page 58. 60 In Aperture-Priority Auto or Manual exposure mode, set the aperture according to 11125 sec. -continued 1Using built-in Speedlight Release the built-in Speedlight ... 11125 sec. or faster and the flash is fired (or attached optional Speedlight is turned on). *2 Flash shooting distance range depends on the ISO film speed of film in each exposure mode Exposure mode General-Purpose Program Auto-Multi Program Vari-Program Shutter-Priority Auto Available shutter speed Automatically set 1/125-30...


