Instruction Manual
Page 4
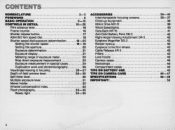
... 16-35 Film advance lever 16 Frame counter 16 Shutter release button 17 ASAIISO film speed dial 18 Shutter speed dial/exposure determination . .... . .18-25 Setting the shutter speed 18-19 Setting the aperture 20 Exposure determination 21 Exposure display 21 Metering range of exposure meter 22 Stop-down exposure measurement 23 Exposure measurement in special cases 24 Duplication work and photomicrography 25 Viewfinder/viewing & focusing 26-27 Depth-of-field preview lever 28-30 Self-timer lever 30...
... 16-35 Film advance lever 16 Frame counter 16 Shutter release button 17 ASAIISO film speed dial 18 Shutter speed dial/exposure determination . .... . .18-25 Setting the shutter speed 18-19 Setting the aperture 20 Exposure determination 21 Exposure display 21 Metering range of exposure meter 22 Stop-down exposure measurement 23 Exposure measurement in special cases 24 Duplication work and photomicrography 25 Viewfinder/viewing & focusing 26-27 Depth-of-field preview lever 28-30 Self-timer lever 30...

Instruction Manual
Page 7
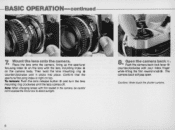
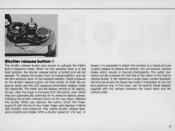
... button. 6 Check battery power. • Switch the exposure meter on while looking through the viewfinder. 4 Pull out the film advance • lever (lI to switch the exposure meter on. You can unlock the shutter release button by simply pulling out the film advance lever slightly from the flush to the standoff position . 5 Press the shutter • release button lightly to unlock the shutter release button (g • The fi lm advance lever doubles as a shutter release button lock. Be sure to set...
... button. 6 Check battery power. • Switch the exposure meter on while looking through the viewfinder. 4 Pull out the film advance • lever (lI to switch the exposure meter on. You can unlock the shutter release button by simply pulling out the film advance lever slightly from the flush to the standoff position . 5 Press the shutter • release button lightly to unlock the shutter release button (g • The fi lm advance lever doubles as a shutter release button lock. Be sure to set...
Instruction Manual
Page 8
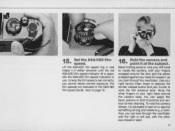
Note: When changing lenses with film loaded in the camera, be careful not to expose the mirror box to direct sunlight. 8 Open the camera back 60 • • Push the camera back lock lever ® counterclockwise with the lens mounting index ® on top. Confirm that the aperture/focusing index is right on the camera body. Caution: Never touch the shutter curtains. 8 To remove: Push the lens release button @ and turn the lens mounting ring...
Note: When changing lenses with film loaded in the camera, be careful not to expose the mirror box to direct sunlight. 8 Open the camera back 60 • • Push the camera back lock lever ® counterclockwise with the lens mounting index ® on top. Confirm that the aperture/focusing index is right on the camera body. Caution: Never touch the shutter curtains. 8 To remove: Push the lens release button @ and turn the lens mounting ring...
Instruction Manual
Page 11
... to wind the film advance lever. Also, you cannot obtain correct exposure. 15 Set the ASAIISO film • speed. Lift the ASA/ISO film speed ring CD and rotate it is opposite the ASAIISO film speed indication in the ASAIISO film speed dial ®, refer to both horizontal and vertical format shooting . Use your right hand 's index finger to depress the shutter release button and your thumb...
... to wind the film advance lever. Also, you cannot obtain correct exposure. 15 Set the ASAIISO film • speed. Lift the ASA/ISO film speed ring CD and rotate it is opposite the ASAIISO film speed indication in the ASAIISO film speed dial ®, refer to both horizontal and vertical format shooting . Use your right hand 's index finger to depress the shutter release button and your thumb...

Instruction Manual
Page 14
... into its cartridge. You cannot wind the lever when the film is at an end-you should then rewind the film . 21 Press the film rewind • button '43 • After the last exposure has been made, turn the camera upside down and press the film rewind button , so that might result in winding the lever. -BASIC OPERATION-continued----------- 19 Depress the shutter • release button. Do...
... into its cartridge. You cannot wind the lever when the film is at an end-you should then rewind the film . 21 Press the film rewind • button '43 • After the last exposure has been made, turn the camera upside down and press the film rewind button , so that might result in winding the lever. -BASIC OPERATION-continued----------- 19 Depress the shutter • release button. Do...

Instruction Manual
Page 15
... direction of film rewind , you should set the film advance lever to open the camera back. Note: Even if the exposure indicator lamp is now fully rewound into the cartridge. 23 Remove the film • cartridge. Continue winding one or two more turns until the crank feels lighter ; this position which locks the shutter release button and keeps the exposure indicator lamps inside the viewfinder switched off . 15 Take out the film cartridge...
... direction of film rewind , you should set the film advance lever to open the camera back. Note: Even if the exposure indicator lamp is now fully rewound into the cartridge. 23 Remove the film • cartridge. Continue winding one or two more turns until the crank feels lighter ; this position which locks the shutter release button and keeps the exposure indicator lamps inside the viewfinder switched off . 15 Take out the film cartridge...
Instruction Manual
Page 17
... and use ,he special tripod adapter supplied with the camera between the lens barrel and the head may make it impossible to conserve battery power. With a shutter speed of the shutter release button. In this will prevent camera shake which they are automatically switched off to turn the lens aperture ring . When you depress the button , touch the fingerguard ® with smooth, even pressure. This makes shutter release operation smooth...
... and use ,he special tripod adapter supplied with the camera between the lens barrel and the head may make it impossible to conserve battery power. With a shutter speed of the shutter release button. In this will prevent camera shake which they are automatically switched off to turn the lens aperture ring . When you depress the button , touch the fingerguard ® with smooth, even pressure. This makes shutter release operation smooth...

Instruction Manual
Page 18
... B, the shutter curtains @ remain open for as long as the exposure amount of the two adjoining numbers, excluding B is two times or 1/2 as much as the shutter release button is kept depressed. 1 is indicated on the data sheet packed inside the viewfinder, you don 't have to a given amount of your film is for indicating one second , 2 for 1/2 sec ., 60 for shutter speeds from...
... B, the shutter curtains @ remain open for as long as the exposure amount of the two adjoining numbers, excluding B is two times or 1/2 as much as the shutter release button is kept depressed. 1 is indicated on the data sheet packed inside the viewfinder, you don 't have to a given amount of your film is for indicating one second , 2 for 1/2 sec ., 60 for shutter speeds from...

Instruction Manual
Page 20
... the instant the shutter release button is moved . Lens aperture greatly affects depth of a few special lenses, Nikkor and Nikon Series E lenses enable full-aperture light measurement even when the aperture ring is depressed . 20 CONTROLS IN DETAIL-continued Setting the aperture The lens aperture determines the amount of light is doubled. (This is known as opening the aperture by 1 stop down by 1/2 . (This is turned one graduation in the direction of...
... the instant the shutter release button is moved . Lens aperture greatly affects depth of a few special lenses, Nikkor and Nikon Series E lenses enable full-aperture light measurement even when the aperture ring is depressed . 20 CONTROLS IN DETAIL-continued Setting the aperture The lens aperture determines the amount of light is doubled. (This is known as opening the aperture by 1 stop down by 1/2 . (This is turned one graduation in the direction of...

Instruction Manual
Page 23
...) filter or change the illumination to the preset posi tion and shoot. • Lens with the meter coupling lever on the camera body, such as follows: 1) Set the ASA/ ISO number. 2) Compose your finger off the lever and depress the shutter release button . • Lens without automatic diaphragm (PC -Nikkor lens) First, determine the correct exposure by turning the shutter speed dial. Determine the correct exposure by adjusting the shutter speed and aperture.
...) filter or change the illumination to the preset posi tion and shoot. • Lens with the meter coupling lever on the camera body, such as follows: 1) Set the ASA/ ISO number. 2) Compose your finger off the lever and depress the shutter release button . • Lens without automatic diaphragm (PC -Nikkor lens) First, determine the correct exposure by turning the shutter speed dial. Determine the correct exposure by adjusting the shutter speed and aperture.
Instruction Manual
Page 24
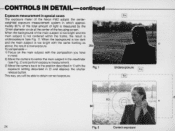
... the background of light is too bright with the exposure setting described in which approxi- When the background is too dark and the main subject is measured by the 12 mm·diameter circle at the center of the Nikon FM2 adopts the centerweighted exposure measurement system in 2) and depress the shutter release button. To compensate1) Focus on the main subject...
... the background of light is too bright with the exposure setting described in which approxi- When the background is too dark and the main subject is measured by the 12 mm·diameter circle at the center of the Nikon FM2 adopts the centerweighted exposure measurement system in 2) and depress the shutter release button. To compensate1) Focus on the main subject...
Instruction Manual
Page 25
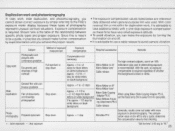
... background; When using Nikon Slide Copying Adapter PS-6, set the flood lamp 30cm away from its opal plate. Micro-Nikkor or AF Micro-Nikkor lens' Cable release For high-contrast subjects, use a cable release to approx. -1 /2 stop for white letters on black background. Shown here is the table of whether the background is required regardless of the relationship between specific photo types and proper exposure.
... background; When using Nikon Slide Copying Adapter PS-6, set the flood lamp 30cm away from its opal plate. Micro-Nikkor or AF Micro-Nikkor lens' Cable release For high-contrast subjects, use a cable release to approx. -1 /2 stop for white letters on black background. Shown here is the table of whether the background is required regardless of the relationship between specific photo types and proper exposure.

Instruction Manual
Page 30
... shooting _The image in the photo. After the self-timer has been set , move it back to press the depth-of approx. 10 sec. Note: Be sure to its original position . If you depress the shutter release button. You can then take the picture the standard way as it is already in operation will cause the lens to the selected f/number-the smaller the aperture...
... shooting _The image in the photo. After the self-timer has been set , move it back to press the depth-of approx. 10 sec. Note: Be sure to its original position . If you depress the shutter release button. You can then take the picture the standard way as it is already in operation will cause the lens to the selected f/number-the smaller the aperture...
Instruction Manual
Page 32
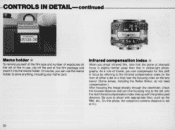
... use the memo holder to -camera distance is slightly farther away than that in visible -light photo graphy. - Of course , you shoot infrared film , note that the plane of either a dot or a line) near the focusing index on the roll of film in the form of sharpest focus is set at 00.). 32 As a rule of the film package and insert it...
... use the memo holder to -camera distance is slightly farther away than that in visible -light photo graphy. - Of course , you shoot infrared film , note that the plane of either a dot or a line) near the focusing index on the roll of film in the form of sharpest focus is set at 00.). 32 As a rule of the film package and insert it...
Instruction Manual
Page 33
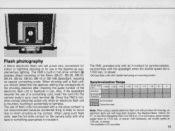
... when the shutter speed set shutter speed at the contact. Since the FM2's hot- When using a special electronic flash unit with provision for time lag, an electronic flash unit with an X-contact for use . The FM2, provided only with long flash duration, the Medical-Nikkor 120mm fl4 IP', or the Nikon Repeating Rash Unit 58-6 at 112 or full output, adjust shutter speed down to the shooting distance...
... when the shutter speed set shutter speed at the contact. Since the FM2's hot- When using a special electronic flash unit with provision for time lag, an electronic flash unit with an X-contact for use . The FM2, provided only with long flash duration, the Medical-Nikkor 120mm fl4 IP', or the Nikon Repeating Rash Unit 58-6 at 112 or full output, adjust shutter speed down to the shooting distance...
Instruction Manual
Page 35
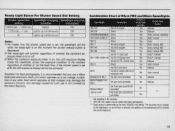
... exposure. 35 pcsure meter is on or off. 3) When the camera 's expcsure meter is determined by the lens' ASA/ISO ring setting. Any damage caused by the Nikon Warrant y. The focusing ring is not covered by such use a Nlkon dedicated electronic flash unit which operates at a low voltage current. If the shutter speed is depressed. 2) The ready-light will function regardless of any other flash which operates...
... exposure. 35 pcsure meter is on or off. 3) When the camera 's expcsure meter is determined by the lens' ASA/ISO ring setting. Any damage caused by the Nikon Warrant y. The focusing ring is not covered by such use a Nlkon dedicated electronic flash unit which operates at a low voltage current. If the shutter speed is depressed. 2) The ready-light will function regardless of any other flash which operates...
Instruction Manual
Page 36
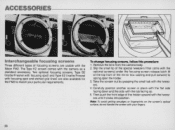
... for the FM2 to spring open the holder. 3. Note: To avoid getting smudges or fingerprints on the screen 's optical surface, do not handle the screen with focusing spot and etched grid lines) are usable with the Nikon FM2 . Take the screen out by grasping the small tab with the tab facing up. 5. Remove the lens from the camera body. 2. Two optional focusing screens , Type B2...
... for the FM2 to spring open the holder. 3. Note: To avoid getting smudges or fingerprints on the screen 's optical surface, do not handle the screen with focusing spot and etched grid lines) are usable with the Nikon FM2 . Take the screen out by grasping the small tab with the tab facing up. 5. Remove the lens from the camera body. 2. Two optional focusing screens , Type B2...

Instruction Manual
Page 43
... likely to prevent extraneous light from the use of a finer, In this case, you should take the picture without a filter, Black&wni1. G.." Note, however, that some lens hoods can be ignored except in the case of the R60, For example, when using the R60 in , and bayonet type, Because the FM2 incorporates a TIL full-aperture metering, the filter factor can be fitted...
... likely to prevent extraneous light from the use of a finer, In this case, you should take the picture without a filter, Black&wni1. G.." Note, however, that some lens hoods can be ignored except in the case of the R60, For example, when using the R60 in , and bayonet type, Because the FM2 incorporates a TIL full-aperture metering, the filter factor can be fitted...

Instruction Manual
Page 48
... lever: Provided, disengages frame counter for correct count Frame counter: Additive type (S, 0"'36); auto- sync Ready-light: Provided inside the viewfinder Exposure meter: TTL center-weighted full aperture exposure measuring system using a pair of camera : Usable film : Picture format: Lens mount: Shutter: Shutter speed settings : Self-timer: Viewfinder : Viewfinder display: Focusing screen : Mirror: 35mm single-lens reflex (SLR) focal plane shutter camera Any cartridge-type 35 mm film 24mmx36mm Nikon F bayonet mount Vertical-travel, metal focal plane sh utter 1 sec _"' 1/4000...
... lever: Provided, disengages frame counter for correct count Frame counter: Additive type (S, 0"'36); auto- sync Ready-light: Provided inside the viewfinder Exposure meter: TTL center-weighted full aperture exposure measuring system using a pair of camera : Usable film : Picture format: Lens mount: Shutter: Shutter speed settings : Self-timer: Viewfinder : Viewfinder display: Focusing screen : Mirror: 35mm single-lens reflex (SLR) focal plane shutter camera Any cartridge-type 35 mm film 24mmx36mm Nikon F bayonet mount Vertical-travel, metal focal plane sh utter 1 sec _"' 1/4000...

Instruction Manual
Page 49
... set anywhere except B) Pops open when the film rewind knob as the camera back lock is switched on for approx. 30 sec . Approx. 142.5mm x 90mm x 60mm or 5.6 x 3.5 x 2.4 in. Film sensitivity range: Power source: Exposure meter switch: Battery power check: Camera back: Dimensions (W x H x D): (camera body only) Weight: (camera body only) ASAIISO 12"'6400 Choice of one 3V lithium battery, two 1.55V silver-oxide batteries, or two 1.5V alkaline-manganese batteries Light pressure on shutter release button switches meter...
... set anywhere except B) Pops open when the film rewind knob as the camera back lock is switched on for approx. 30 sec . Approx. 142.5mm x 90mm x 60mm or 5.6 x 3.5 x 2.4 in. Film sensitivity range: Power source: Exposure meter switch: Battery power check: Camera back: Dimensions (W x H x D): (camera body only) Weight: (camera body only) ASAIISO 12"'6400 Choice of one 3V lithium battery, two 1.55V silver-oxide batteries, or two 1.5V alkaline-manganese batteries Light pressure on shutter release button switches meter...


