

Instruction Manual
Page 10
... installing batteries for the first time, set the date and time (page 90). 1.4 Lightly press the shutter release button to turn the power switch off 6 sec. Always use fresh batteries of children's reach. after the power switch is turned on Batteries", see page 100.) When replacing batteries, be shot with you, especially when travelling. If swallowed, contact a doctor immediately. (For "Notes on and the camera remains unused. (All indications in the camera body also power the Quartz Date...
... installing batteries for the first time, set the date and time (page 90). 1.4 Lightly press the shutter release button to turn the power switch off 6 sec. Always use fresh batteries of children's reach. after the power switch is turned on Batteries", see page 100.) When replacing batteries, be shot with you, especially when travelling. If swallowed, contact a doctor immediately. (For "Notes on and the camera remains unused. (All indications in the camera body also power the Quartz Date...

Instruction Manual
Page 16
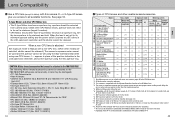
... modes Symbol Exposure mode Shooting characteristics P Programmed Camera controls shutter speed and Auto P. 50 aperture automatically-allowing you to P (Programmed Auto). •When the shutter release button is lightly pressed, shutter speed and aperture appear in Matrix Metering, and data from each exposure mode and its reference page for various shooting situations. Four exposure modes-the F80/F80D/F80S features Programmed Auto, Shutter-Priority Auto, Aperture-Priority Auto and Manual exposure modes. Nikon • Matrix Metering indication ED appears in the viewfinder...
... modes Symbol Exposure mode Shooting characteristics P Programmed Camera controls shutter speed and Auto P. 50 aperture automatically-allowing you to P (Programmed Auto). •When the shutter release button is lightly pressed, shutter speed and aperture appear in Matrix Metering, and data from each exposure mode and its reference page for various shooting situations. Four exposure modes-the F80/F80D/F80S features Programmed Auto, Shutter-Priority Auto, Aperture-Priority Auto and Manual exposure modes. Nikon • Matrix Metering indication ED appears in the viewfinder...

Instruction Manual
Page 23
... Nikkor lens. •2 IX-Nikkor lenses cannot be attached. '3 This camera is compatible with Camera Holder PA-4. • Do not attach the following accessories to the lens, as they might damage the parts such as the lens' CPU contacts: Auto Extension Ring PK-1, PK-11, Auto Ring BR-4 and K1 Ring. Film •Setting and confirming film speed Set the exposure mode/ISO film speed select dial to Manual. Nikon •...
... Nikkor lens. •2 IX-Nikkor lenses cannot be attached. '3 This camera is compatible with Camera Holder PA-4. • Do not attach the following accessories to the lens, as they might damage the parts such as the lens' CPU contacts: Auto Extension Ring PK-1, PK-11, Auto Ring BR-4 and K1 Ring. Film •Setting and confirming film speed Set the exposure mode/ISO film speed select dial to Manual. Nikon •...

Instruction Manual
Page 34
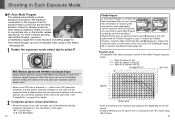
... its minimum aperture setting, fEE blinks in Programmed Auto exposure mode. -- In this case, set the exposure mode to select P. Program chart The program chart shows exposure control in the LCD panel and viewfinder and the shutter locks. • When a non-CPU lens is too dark or bright, one of f/16 (e.g. AF 50mm f/1.4D). See "Lens Compatibility" on page 34 for details. 2 Compose picture, focus and shoot. • When...
... its minimum aperture setting, fEE blinks in Programmed Auto exposure mode. -- In this case, set the exposure mode to select P. Program chart The program chart shows exposure control in the LCD panel and viewfinder and the shutter locks. • When a non-CPU lens is too dark or bright, one of f/16 (e.g. AF 50mm f/1.4D). See "Lens Compatibility" on page 34 for details. 2 Compose picture, focus and shoot. • When...

Instruction Manual
Page 37
blinks in the LCD panel or viewfinder. (Electronic analog exposure display will appear in the LCD panel and viewfinder, and the shutter cannot be released. See "Lens Compatibility" on page 34 for details. 2 Set the aperture by adjusting the exposure. Shooting in Manual exposure mode. If the warning indication persists, use the Speedlight. Long Time Exposure (Bulb) can produce various creative effects by rotating the Sub-Command Dial. 3 Compose picture, focus and...
blinks in the LCD panel or viewfinder. (Electronic analog exposure display will appear in the LCD panel and viewfinder, and the shutter cannot be released. See "Lens Compatibility" on page 34 for details. 2 Set the aperture by adjusting the exposure. Shooting in Manual exposure mode. If the warning indication persists, use the Speedlight. Long Time Exposure (Bulb) can produce various creative effects by rotating the Sub-Command Dial. 3 Compose picture, focus and...

Instruction Manual
Page 45
Nikon • Pressing the depth-of the film plane inside the camera body. •The film plane indicator shows the standard line of the shooting distance and indicates the position of -field button stops the lens down to the aperture controlled in Programmed Auto or Shutter-Priority Auto exposure mode, and down to the aperture selected in Aperture-Priority Auto or Manual exposure mode. Self-Timer Operation •You can use the self-timer when you want to...
Nikon • Pressing the depth-of the film plane inside the camera body. •The film plane indicator shows the standard line of the shooting distance and indicates the position of -field button stops the lens down to the aperture controlled in Programmed Auto or Shutter-Priority Auto exposure mode, and down to the aperture selected in Aperture-Priority Auto or Manual exposure mode. Self-Timer Operation •You can use the self-timer when you want to...

Instruction Manual
Page 55
...;Operation described in this case, 125 appears in the viewfinder and the selected shutter speed display blinks in Speedlight and D-type AF Nikkor are attached. 1Set the metering system. • Set the metering system to Matrix or Centre-Weighted Metering. 3 Set exposure mode and confirm shutter speed and aperture. • Note that Automatic Balanced Fill-Flash with TTL Multi Sensor is executed with the exposure mode set to Programmed Auto, Shutter-Priority Auto...
...;Operation described in this case, 125 appears in the viewfinder and the selected shutter speed display blinks in Speedlight and D-type AF Nikkor are attached. 1Set the metering system. • Set the metering system to Matrix or Centre-Weighted Metering. 3 Set exposure mode and confirm shutter speed and aperture. • Note that Automatic Balanced Fill-Flash with TTL Multi Sensor is executed with the exposure mode set to Programmed Auto, Shutter-Priority Auto...

Instruction Manual
Page 65
... by inserting onto the viewfinder eyepiece. Also, the AF Assist Illuminator enables autofocus operation in a dark environment. • Automatic power zoom continuously changes the zoom-head position according to the F80/F80D/F80S, can be used , autofocus or the electronic rangefinder may occur when shooting a subject against bright light or if a bright light source is fired simultaneously with setting on camera body). Compensate exposure +1 EV when using the F80/F80D/F80S's dioptre adjustment lever...
... by inserting onto the viewfinder eyepiece. Also, the AF Assist Illuminator enables autofocus operation in a dark environment. • Automatic power zoom continuously changes the zoom-head position according to the F80/F80D/F80S, can be used , autofocus or the electronic rangefinder may occur when shooting a subject against bright light or if a bright light source is fired simultaneously with setting on camera body). Compensate exposure +1 EV when using the F80/F80D/F80S's dioptre adjustment lever...

User Manual
Page 6
... Camera and Focus 26-27 7. Load Film 20-21 4. Set Focus Mode, AF Area Mode and Focus Area 22-23 5. Confirm Indications in basic steps easy enough even for SLR camera beginners to take pictures. Install Batteries and Check Battery Power 16-17 2. Contents The "Basic Operation" section introduces battery, lens, film, focusing, metering, exposure and shooting in Viewfinder and Release Shutter 28-29 8. "Flash Photography" introduces flash photography using advanced shooting techniques. After becoming familiar with Built-In Speedlight 84 Flash Exposure Compensation...
... Camera and Focus 26-27 7. Load Film 20-21 4. Set Focus Mode, AF Area Mode and Focus Area 22-23 5. Confirm Indications in basic steps easy enough even for SLR camera beginners to take pictures. Install Batteries and Check Battery Power 16-17 2. Contents The "Basic Operation" section introduces battery, lens, film, focusing, metering, exposure and shooting in Viewfinder and Release Shutter 28-29 8. "Flash Photography" introduces flash photography using advanced shooting techniques. After becoming familiar with Built-In Speedlight 84 Flash Exposure Compensation...

User Manual
Page 7
... (P. 46), Manual Focus (P. 47) Exposure Metering System (P. 48-49), Shooting in Each Exposure Mode (P. 50-57), Auto Exposure Lock (P. 58-59), Exposure Compensation (P. 60), Auto Exposure Bracketing (P. 61-62), Multiple Exposure (P. 63-64), Long Time Exposure (P. 65) Dioptre Adjustment/LCD Illuminator P. 66 Depth-of-Field Preview/Film Plane Indicator P. 67 Self-Timer Operation P. 68 Custom Setting P. 69-75 Two-Button Reset P. 76 Data Back ...P. 89-94 Flash Photography (Flash Photography Using Built-In Speedlight/Ready-Light/ Accessory Shoe/Flash Sync Mode Features/Using the...
... (P. 46), Manual Focus (P. 47) Exposure Metering System (P. 48-49), Shooting in Each Exposure Mode (P. 50-57), Auto Exposure Lock (P. 58-59), Exposure Compensation (P. 60), Auto Exposure Bracketing (P. 61-62), Multiple Exposure (P. 63-64), Long Time Exposure (P. 65) Dioptre Adjustment/LCD Illuminator P. 66 Depth-of-Field Preview/Film Plane Indicator P. 67 Self-Timer Operation P. 68 Custom Setting P. 69-75 Two-Button Reset P. 76 Data Back ...P. 89-94 Flash Photography (Flash Photography Using Built-In Speedlight/Ready-Light/ Accessory Shoe/Flash Sync Mode Features/Using the...

User Manual
Page 9
... turned on and confirm battery power with you release your finger from any button.) M blinks: Batteries are nearing exhaustion. BASIC OPERATION Install Batteries and Check Battery Power 1 Use two CR123A or DL123Atype 3V lithium batteries. (For other power sources, see page 108. 1.4 N appears: Sufficient battery power. For the number of inactive time before automatic meter switch-off .) • For F80D/F80S only: Batteries in the LCD panel and viewfinder for the first time, set ready. (Viewfinder indications turn...
... turned on and confirm battery power with you release your finger from any button.) M blinks: Batteries are nearing exhaustion. BASIC OPERATION Install Batteries and Check Battery Power 1 Use two CR123A or DL123Atype 3V lithium batteries. (For other power sources, see page 108. 1.4 N appears: Sufficient battery power. For the number of inactive time before automatic meter switch-off .) • For F80D/F80S only: Batteries in the LCD panel and viewfinder for the first time, set ready. (Viewfinder indications turn...

User Manual
Page 13
... Information) in order to determine exposure accurately. 5.2 Set the exposure mode select dial to ¡ (Auto-Multi Progam). • When the shutter release button is lightly pressed, shutter speed and aperture appear in the LCD panel and viewfinder. 24 Check points Three metering systems-the F80/F80D/F80S features Matrix, CentreWeighted and Spot Metering (page 48). Also, use Manual exposure mode when using a non-CPU Nikkor lens. (Camera's exposure meter cannot be blurred. ¢ Manual P. 56 Shutter speed and aperture are...
... Information) in order to determine exposure accurately. 5.2 Set the exposure mode select dial to ¡ (Auto-Multi Progam). • When the shutter release button is lightly pressed, shutter speed and aperture appear in the LCD panel and viewfinder. 24 Check points Three metering systems-the F80/F80D/F80S features Matrix, CentreWeighted and Spot Metering (page 48). Also, use Manual exposure mode when using a non-CPU Nikkor lens. (Camera's exposure meter cannot be blurred. ¢ Manual P. 56 Shutter speed and aperture are...
User Manual
Page 18
... turned on, ƒEE blinks in combination with a non-CPU lens. (When other than M rangefinder M D-type AF Nikkor*3, G-type AF Nikkor, AF-S, AF-I Nikkor R R R RR PC Micro-Nikkor 85mm f/2.8D*4 - appears in the LCD panel and viewfinder; R*5 R - R*10 Bellows Focusing Attachment PB-6*12 - R -R R -R R -- - -- - -- - -- - -- - -- - -- - aperture should be attached. (See page 34.) *10 With exposure mode set to Manual and shutter speed set /confirm aperture using non-CPU lenses. ƒ-- Set...
... turned on, ƒEE blinks in combination with a non-CPU lens. (When other than M rangefinder M D-type AF Nikkor*3, G-type AF Nikkor, AF-S, AF-I Nikkor R R R RR PC Micro-Nikkor 85mm f/2.8D*4 - appears in the LCD panel and viewfinder; R*5 R - R*10 Bellows Focusing Attachment PB-6*12 - R -R R -R R -- - -- - -- - -- - -- - -- - -- - aperture should be attached. (See page 34.) *10 With exposure mode set to Manual and shutter speed set /confirm aperture using non-CPU lenses. ƒ-- Set...

User Manual
Page 19
... blinking when the exposure meter is off , change batteries, then turn the power switch off .) Open the camera back and remove the film cartridge. Film speed can also be set manually with DX-coded film to have an effect of increased or decreased film sensitivity. • Film speed can be set between ISO 6-6400 with fresh batteries, for the 1st to 36th frames of up to approx. 2.5 fps as long as you keep the shutter release button...
... blinking when the exposure meter is off , change batteries, then turn the power switch off .) Open the camera back and remove the film cartridge. Film speed can also be set manually with DX-coded film to have an effect of increased or decreased film sensitivity. • Film speed can be set between ISO 6-6400 with fresh batteries, for the 1st to 36th frames of up to approx. 2.5 fps as long as you keep the shutter release button...
User Manual
Page 26
... and viewfinder and the shutter locks. • When a non-CPU lens is not set the aperture ring of shutter speed and aperture while maintaining correct exposure. NOTE: Minimum aperture with the lens aperture ring. In this function, you can change the exposure mode, turn the power switch off, use Flexible Program, exposure compensation (page 60) or auto exposure bracketing (page 61). • Auto-Multi Progam can only be used . Camera's exposure meter cannot be selected when using ISO 100 film. 51...
... and viewfinder and the shutter locks. • When a non-CPU lens is not set the aperture ring of shutter speed and aperture while maintaining correct exposure. NOTE: Minimum aperture with the lens aperture ring. In this function, you can change the exposure mode, turn the power switch off, use Flexible Program, exposure compensation (page 60) or auto exposure bracketing (page 61). • Auto-Multi Progam can only be used . Camera's exposure meter cannot be selected when using ISO 100 film. 51...

User Manual
Page 27
... manually set your desired shutter speed (30-1/4000 sec.); blinks in the LCD panel and viewfinder and the shutter locks. • When a non-CPU Nikkor lens is changed to provide correct exposure. To shoot in Manual exposure mode and the exposure mode is attached, ƒ-- NOTE: Minimum aperture with CPU Nikkor lens (except G-type) Always set to change with Sub-Command Dial (page 74). 3 Compose picture, focus and shoot. • When the subject is too dark...
... manually set your desired shutter speed (30-1/4000 sec.); blinks in the LCD panel and viewfinder and the shutter locks. • When a non-CPU Nikkor lens is changed to provide correct exposure. To shoot in Manual exposure mode and the exposure mode is attached, ƒ-- NOTE: Minimum aperture with CPU Nikkor lens (except G-type) Always set to change with Sub-Command Dial (page 74). 3 Compose picture, focus and shoot. • When the subject is too dark...
User Manual
Page 29
... adjusting the exposure. Not available with the lens aperture ring. With electronic analog exposure display in the viewfinder, you to set the aperture ring of a CPU Nikkor lens (except G-type) to its minimum aperture setting, ƒEE blinks in Manual exposure mode. 1 Rotate the exposure mode select dial to change . Long Time Exposure (Bulb) can be set in the LCD panel and viewfinder and the shutter locks. • When a non-CPU Nikkor lens is attached, ƒ-- Set/confirm aperture...
... adjusting the exposure. Not available with the lens aperture ring. With electronic analog exposure display in the viewfinder, you to set the aperture ring of a CPU Nikkor lens (except G-type) to its minimum aperture setting, ƒEE blinks in Manual exposure mode. 1 Rotate the exposure mode select dial to change . Long Time Exposure (Bulb) can be set in the LCD panel and viewfinder and the shutter locks. • When a non-CPU Nikkor lens is attached, ƒ-- Set/confirm aperture...

User Manual
Page 38
... shots are recommended when using special film or increasing/decreasing data imprint exposure level in Aperture-Priority Auto or Manual exposure mode). 13.Film rewind (pages 29) Options: 0: High-speed film rewind (initial setting) 1: Quiet film rewind Film rewind can be set on the camera. • Set the Custom Setting option to imprint shooting data at an option of the ISO value of the camera automatically turns on and enables autofocus operation in self-timer operation. At initial setting, the shutter is pressed lightly...
... shots are recommended when using special film or increasing/decreasing data imprint exposure level in Aperture-Priority Auto or Manual exposure mode). 13.Film rewind (pages 29) Options: 0: High-speed film rewind (initial setting) 1: Quiet film rewind Film rewind can be set on the camera. • Set the Custom Setting option to imprint shooting data at an option of the ISO value of the camera automatically turns on and enables autofocus operation in self-timer operation. At initial setting, the shutter is pressed lightly...

User Manual
Page 51
...; Remove the film 29 exposure meter camera after film cartridge. replace batteries with old batteries. E blinks when • Film remains in P mode. M blinks - • Batteries are just • Turn the power off before changing batteries and insert the batteries with 17 exhausted during film new ones or recharge rewind. Wipe the batteries well with a dry cloth before important photographic occasions. • Turn the camera power off when changing batteries Turn the camera power off and 17 about exhausted. set at TTL Auto flash mode to its minimum aperture...
...; Remove the film 29 exposure meter camera after film cartridge. replace batteries with old batteries. E blinks when • Film remains in P mode. M blinks - • Batteries are just • Turn the power off before changing batteries and insert the batteries with 17 exhausted during film new ones or recharge rewind. Wipe the batteries well with a dry cloth before important photographic occasions. • Turn the camera power off when changing batteries Turn the camera power off and 17 about exhausted. set at TTL Auto flash mode to its minimum aperture...

User Manual
Page 55
...Custom Setting Two-Button Reset Dimensions (W x H x D) Weight (without batteries) Optional exclusive accessories 19 (F80S) or 18 (F80/F80D) Custom Setting menus are subject to their original initial settings (with flash), the same operation follows for more than 2 sec. with a shutter speed of film roll (2) Reset to DX film speed setting for new film (3) Bracketing order (4) On-Demand Grid Lines superimposition display (5) Illumination for superimposition (6) Focus area selection (7) Auto Exposure Lock when shutter release button is lightly pressed (8) Auto film loading when camera back...
...Custom Setting Two-Button Reset Dimensions (W x H x D) Weight (without batteries) Optional exclusive accessories 19 (F80S) or 18 (F80/F80D) Custom Setting menus are subject to their original initial settings (with flash), the same operation follows for more than 2 sec. with a shutter speed of film roll (2) Reset to DX film speed setting for new film (3) Bracketing order (4) On-Demand Grid Lines superimposition display (5) Illumination for superimposition (6) Focus area selection (7) Auto Exposure Lock when shutter release button is lightly pressed (8) Auto film loading when camera back...


