Reference Manual
Page 2
... explanations in "For Your Safety" (0 x-xv). Thank you need, the following symbols and conventions are used : D This icon marks cautions; Digitutor "Digitutor", a series of a Nikon single-lens reflex (SLR) digital camera. To get the most from the following website: http://www.nikondigitutor.com/index_eng.html A For Your Safety Before using the camera...
... explanations in "For Your Safety" (0 x-xv). Thank you need, the following symbols and conventions are used : D This icon marks cautions; Digitutor "Digitutor", a series of a Nikon single-lens reflex (SLR) digital camera. To get the most from the following website: http://www.nikondigitutor.com/index_eng.html A For Your Safety Before using the camera...

Reference Manual
Page 6
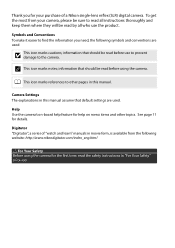
......5 The Command Dial ...7 The Viewfinder...10 Camera Menus...11 Using Camera Menus ...12 First Steps ...14 Charge the Battery ...14 Insert the Battery ...15 Attach a Lens...17 Basic Setup...19 Insert a Memory Card...21 Format the Memory Card ...22 Adjust Viewfinder Focus ...23 Basic Photography 25 Battery Level and Card Capacity...
......5 The Command Dial ...7 The Viewfinder...10 Camera Menus...11 Using Camera Menus ...12 First Steps ...14 Charge the Battery ...14 Insert the Battery ...15 Attach a Lens...17 Basic Setup...19 Insert a Memory Card...21 Format the Memory Card ...22 Adjust Viewfinder Focus ...23 Basic Photography 25 Battery Level and Card Capacity...
Reference Manual
Page 19
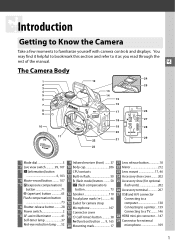
... strap 17 Microphone 107 18 Connector cover 19 E (self-timer) button 38 Fn (function) button ...... 9, 165 20 Mounting mark 17 21 Lens release button 18 22 Mirror 212 23 Lens mount 17, 46 24 Accessory shoe cover......... 202 25 Accessory shoe (for external microphone 109 1 You may find it helpful to bookmark...
... strap 17 Microphone 107 18 Connector cover 19 E (self-timer) button 38 Fn (function) button ...... 9, 165 20 Mounting mark 17 21 Lens release button 18 22 Mirror 212 23 Lens mount 17, 46 24 Accessory shoe cover......... 202 25 Accessory shoe (for external microphone 109 1 You may find it helpful to bookmark...

Reference Manual
Page 35
...(0 197). 17 Slide the A-M mode switch to press the lens-release button, rotate the lens counterclockwise until it clicks into place (w). Autofocus is removed. Focal length mark Focal length scale Mounting mark Lens cap CPU contacts (0 198) X Rear lens cap Focus ring (0 45, 106) Zoom ring (0 29...) 1 Turn the camera off. 2 Remove the rear lens cap and the camera body cap. The lens generally used in the camera's bayonet mount (q). ...
...(0 197). 17 Slide the A-M mode switch to press the lens-release button, rotate the lens counterclockwise until it clicks into place (w). Autofocus is removed. Focal length mark Focal length scale Mounting mark Lens cap CPU contacts (0 198) X Rear lens cap Focus ring (0 45, 106) Zoom ring (0 29...) 1 Turn the camera off. 2 Remove the rear lens cap and the camera body cap. The lens generally used in the camera's bayonet mount (q). ...

Reference Manual
Page 36
...power to stabilize before shooting. 18 wait for example, vibration reduction will be turned off or remove the lens while vibration reduction is not part of 55 mm (Nikon measurements; When the camera is panned, vibration reduction applies only to motion that is in the viewfinder ...Turn vibration reduction off when removing or exchanging lenses. Vibration reduction is pressed halfway, reducing the effects of camera shake on , the lens may be corrected by sliding the VR switch to ON. This does not indicate a malfunction; Vibration reduction is activated when the shutter-...
...power to stabilize before shooting. 18 wait for example, vibration reduction will be turned off or remove the lens while vibration reduction is not part of 55 mm (Nikon measurements; When the camera is panned, vibration reduction applies only to motion that is in the viewfinder ...Turn vibration reduction off when removing or exchanging lenses. Vibration reduction is pressed halfway, reducing the effects of camera shake on , the lens may be corrected by sliding the VR switch to ON. This does not indicate a malfunction; Vibration reduction is activated when the shutter-...
Reference Manual
Page 41
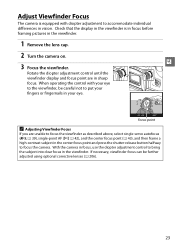
... careful not to focus the camera. With the camera in focus, use the diopter adjustment control to accommodate individual differences in the viewfinder. 1 Remove the lens cap. 2 Turn the camera on. When operating the control with diopter adjustment to bring the subject into clear focus in the viewfinder. X 3 Focus the viewfinder...
... careful not to focus the camera. With the camera in focus, use the diopter adjustment control to accommodate individual differences in the viewfinder. 1 Remove the lens cap. 2 Turn the camera on. When operating the control with diopter adjustment to bring the subject into clear focus in the viewfinder. X 3 Focus the viewfinder...

Reference Manual
Page 44
...your left. Focus point 26 Mode dial To shoot where use of a tripod is poor; When framing photographs in your upper body stable. Remove the lens cap and turn the camera on . When framing photographs in portrait (tall) orientation, hold the handgrip in the viewfinder, hold the camera as shown ... for support and place one of settings are controlled by rotating the mode dial to keep your right hand and cradle the camera body or lens with the main subject in at right. use of the other to j. The information display will appear in response to i (auto). 3 Ready ...
...your left. Focus point 26 Mode dial To shoot where use of a tripod is poor; When framing photographs in your upper body stable. Remove the lens cap and turn the camera on . When framing photographs in portrait (tall) orientation, hold the handgrip in the viewfinder, hold the camera as shown ... for support and place one of settings are controlled by rotating the mode dial to keep your right hand and cradle the camera body or lens with the main subject in at right. use of the other to j. The information display will appear in response to i (auto). 3 Ready ...

Reference Manual
Page 47
... Sensor Cleaning s The camera vibrates the low-pass filter covering the image sensor to zoom. Zoom in , shorter focal lengths to zoom out). A Using a Zoom Lens Use the zoom ring to zoom in on the subject so that in the case of the frame, or zoom out to increase the area... visible in the final photograph (select longer focal lengths on the lens focal length scale to zoom in Zoom ring Note that it fills a larger area of the AF-S DX NIKKOR 18-55mm f/3.5-5.6G VR, changes to...
... Sensor Cleaning s The camera vibrates the low-pass filter covering the image sensor to zoom. Zoom in , shorter focal lengths to zoom out). A Using a Zoom Lens Use the zoom ring to zoom in on the subject so that in the case of the frame, or zoom out to increase the area... visible in the final photograph (select longer focal lengths on the lens focal length scale to zoom in Zoom ring Note that it fills a larger area of the AF-S DX NIKKOR 18-55mm f/3.5-5.6G VR, changes to...

Reference Manual
Page 48
... AF-assist illuminator turn off; use of a tripod is poor. 30 The built-in daylight. If the subject is far from the background or a telephoto lens is used, background details will be selected with soft, natural-looking skin tones. Creative Photography (Scene Modes) The camera offers a choice of depth. Choosing a scene...
... AF-assist illuminator turn off; use of a tripod is poor. 30 The built-in daylight. If the subject is far from the background or a telephoto lens is used, background details will be selected with soft, natural-looking skin tones. Creative Photography (Scene Modes) The camera offers a choice of depth. Choosing a scene...

Reference Manual
Page 49
Use of a tripod is recommended to focus at very close -up Use for dynamic sports shots in flash and AF-assist illuminator turn off. Use for close ranges). p Child m Sports n Close up shots of flowers, insects, and other small objects (a macro lens can be used to prevent blur. 31 The built-in which the main subject stands out clearly. s Fast shutter speeds freeze motion for snapshots of children. Clothing and background details are vividly rendered, while skin tones remain soft and natural.
Use of a tripod is recommended to focus at very close -up Use for dynamic sports shots in flash and AF-assist illuminator turn off. Use for close ranges). p Child m Sports n Close up shots of flowers, insects, and other small objects (a macro lens can be used to prevent blur. 31 The built-in which the main subject stands out clearly. s Fast shutter speeds freeze motion for snapshots of children. Clothing and background details are vividly rendered, while skin tones remain soft and natural.
Reference Manual
Page 59
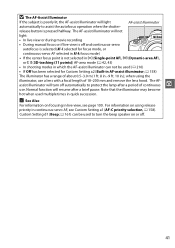
... selected for Custom Setting a2 (Built-in AF-assist illuminator; 0 158) The illuminator has a range of 18-200 mm and remove the lens hood. D The AF-Assist Illuminator If the subject is pressed halfway. The AF- Normal function will not light: • In live view...used to turn off automatically to assist the autofocus operation when the shutter- The AF-assist illuminator will resume after a period of continuous use a lens with a focal length of about 0.5-3.0 m (1 ft. 8 in.-9 ft. 10 in quick succession. assist illuminator will light AF-assist illuminator ...
... selected for Custom Setting a2 (Built-in AF-assist illuminator; 0 158) The illuminator has a range of 18-200 mm and remove the lens hood. D The AF-Assist Illuminator If the subject is pressed halfway. The AF- Normal function will not light: • In live view...used to turn off automatically to assist the autofocus operation when the shutter- The AF-assist illuminator will resume after a period of continuous use a lens with a focal length of about 0.5-3.0 m (1 ft. 8 in.-9 ft. 10 in quick succession. assist illuminator will light AF-assist illuminator ...
Reference Manual
Page 63
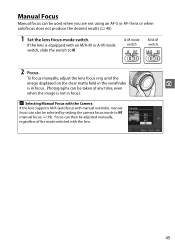
A-M mode switch M/A-M switch 2 Focus. A Selecting Manual Focus with the Camera If the lens supports M/A (autofocus with manual override), manual focus can then be adjusted manually, regardless of the mode selected with an M/A-M or A-M mode switch, slide the switch ... focus mode to M. Manual Focus Manual focus can be taken at any time, even when the image is in focus. To focus manually, adjust the lens focus ring until the image displayed on the clear matte field in the viewfinder z is not in focus. Photographs can be used when you are...
A-M mode switch M/A-M switch 2 Focus. A Selecting Manual Focus with the Camera If the lens supports M/A (autofocus with manual override), manual focus can then be adjusted manually, regardless of the mode selected with an M/A-M or A-M mode switch, slide the switch ... focus mode to M. Manual Focus Manual focus can be taken at any time, even when the image is in focus. To focus manually, adjust the lens focus ring until the image displayed on the clear matte field in the viewfinder z is not in focus. Photographs can be used when you are...

Reference Manual
Page 64
... between your subject and the camera, measure from any of the 11 focus points). A Focal Plane Position To determine the distance between the lens mounting flange and the focal plane is 46.5 mm (1.83 in.). 46.5 mm Focal plane mark 46 After positioning the subject in the selected...indicator may sometimes be displayed when the subject is in front of or behind the subject (0 159). ❚❚ The Electronic Rangefinder If the lens has a maximum aperture of f/5.6 or faster, the viewfinder focus indicator can be used to confirm whether the subject in the selected focus point ...
... between your subject and the camera, measure from any of the 11 focus points). A Focal Plane Position To determine the distance between the lens mounting flange and the focal plane is 46.5 mm (1.83 in.). 46.5 mm Focal plane mark 46 After positioning the subject in the selected...indicator may sometimes be displayed when the subject is in front of or behind the subject (0 159). ❚❚ The Electronic Rangefinder If the lens has a maximum aperture of f/5.6 or faster, the viewfinder focus indicator can be used to confirm whether the subject in the selected focus point ...

Reference Manual
Page 70
... does not fire even when lighting is poor or subject is back-lit. • SLOW (slow sync): Shutter speed slows automatically to prevent shadows. Remove lens hoods to capture background lighting at night or under low light. The flash has a minimum range of 0.6 m (2 ft.) and can be used with a macro function...
... does not fire even when lighting is poor or subject is back-lit. • SLOW (slow sync): Shutter speed slows automatically to prevent shadows. Remove lens hoods to capture background lighting at night or under low light. The flash has a minimum range of 0.6 m (2 ft.) and can be used with a macro function...

Reference Manual
Page 79
... slow shutter speeds and small apertures blur moving objects and bring both shutter speed and aperture. Use to blur background or bring out background details. D Lens Aperture Rings When using a CPU lens equipped with an aperture ring.
... slow shutter speeds and small apertures blur moving objects and bring both shutter speed and aperture. Use to blur background or bring out background details. D Lens Aperture Rings When using a CPU lens equipped with an aperture ring.

Reference Manual
Page 82
... and in front of field, bringing out details in landscape photographs to choose the desired aperture from values between the minimum and maximum for the lens.
... and in front of field, bringing out details in landscape photographs to choose the desired aperture from values between the minimum and maximum for the lens.
Reference Manual
Page 83
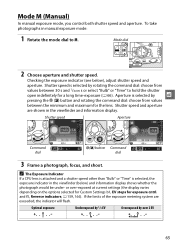
... is selected by t pressing the N (E) button and rotating the command dial: choose from values between the minimum and maximum for the lens. and f5, Reverse indicators; 0 159, 166). Checking the exposure indicator (see below ) and information display shows whether the photograph would... in the viewfinder (below ), adjust shutter speed and aperture. Mode dial 2 Choose aperture and shutter speed. A The Exposure Indicator If a CPU lens is attached and a shutter speed other than "Bulb" or "Time" is selected by over -exposed at current settings (the display varies depending on...
... is selected by t pressing the N (E) button and rotating the command dial: choose from values between the minimum and maximum for the lens. and f5, Reverse indicators; 0 159, 166). Checking the exposure indicator (see below ) and information display shows whether the photograph would... in the viewfinder (below ), adjust shutter speed and aperture. Mode dial 2 Choose aperture and shutter speed. A The Exposure Indicator If a CPU lens is attached and a shutter speed other than "Bulb" or "Time" is selected by over -exposed at current settings (the display varies depending on...

Reference Manual
Page 117
The mirror will be raised and the view through the lens will be displayed in green; Live view switch 2 Position the focus point. Position the focus point over your subject as x described on page 102. If ...
The mirror will be raised and the view through the lens will be displayed in green; Live view switch 2 Position the focus point. Position the focus point over your subject as x described on page 102. If ...

Reference Manual
Page 122
... shown at right. A Automatic Scene Selection (Scene Auto Selector) If live view is selected in i or j mode, the camera will display the view through the lens as fluorescent or mercury-vapor lamps. A HDMI When the camera is attached to suit the live view. 104
... shown at right. A Automatic Scene Selection (Scene Auto Selector) If live view is selected in i or j mode, the camera will display the view through the lens as fluorescent or mercury-vapor lamps. A HDMI When the camera is attached to suit the live view. 104

Reference Manual
Page 123
... view ends automatically (0 103; Note that although the count down will still end automatically when the timer expires. 105 Live view ends automatically if the lens is removed or when the monitor is displayed when you attempt to cool and then try again. Failure to observe this does not indicate a malfunction...
... view ends automatically (0 103; Note that although the count down will still end automatically when the timer expires. 105 Live view ends automatically if the lens is removed or when the monitor is displayed when you attempt to cool and then try again. Failure to observe this does not indicate a malfunction...


