L10 / L11 User's Manual
Page 4
... transport or store with care Never place the strap around the neck of them . Do not combine batteries from the camera or AC adapter, unplug the AC adapter and remove the batteries immediately, taking care to a Nikon-authorized service representative for use the product will read the following pre- ii Introduction For Your Safety...
... transport or store with care Never place the strap around the neck of them . Do not combine batteries from the camera or AC adapter, unplug the AC adapter and remove the batteries immediately, taking care to a Nikon-authorized service representative for use the product will read the following pre- ii Introduction For Your Safety...

L10 / L11 User's Manual
Page 5
...prod- Handle moving parts. Failure to observe this precaution could result in fire or electric shock. • Dust on or near the battery charger during lightening storms. Failure to your fingers or other objects are not pinched by the lens cover or other moving parts with ...not be taken to avoid injury caused by Nikon for inspection. Particular care should be observed if photographing infants, when the flash should you notice any change in the batteries, such as discoloration or deformation. • If liquid from damaged batteries comes in contact with clothing or skin, rinse...
...prod- Handle moving parts. Failure to observe this precaution could result in fire or electric shock. • Dust on or near the battery charger during lightening storms. Failure to your fingers or other objects are not pinched by the lens cover or other moving parts with ...not be taken to avoid injury caused by Nikon for inspection. Particular care should be observed if photographing infants, when the flash should you notice any change in the batteries, such as discoloration or deformation. • If liquid from damaged batteries comes in contact with clothing or skin, rinse...
L10 / L11 User's Manual
Page 8
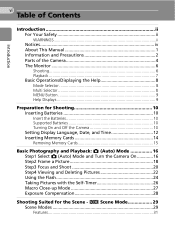
... 6 Playback 7 Basic Operations/Displaying the Help 8 Mode Selector 8 Multi Selector 8 MENU Button 9 Help Displays 9 Preparation for Shooting 10 Inserting Batteries 10 Insert the Batteries 10 Supported Batteries 10 Turning On and Off the Camera 10 Setting Display Language, Date, and Time 12 Inserting Memory Cards 14 Removing Memory Cards 15 Basic Photography and Playback...
... 6 Playback 7 Basic Operations/Displaying the Help 8 Mode Selector 8 Multi Selector 8 MENU Button 9 Help Displays 9 Preparation for Shooting 10 Inserting Batteries 10 Insert the Batteries 10 Supported Batteries 10 Turning On and Off the Camera 10 Setting Display Language, Date, and Time 12 Inserting Memory Cards 14 Removing Memory Cards 15 Basic Photography and Playback...
L10 / L11 User's Manual
Page 10
... 73 Z Image Mode 74 d White Balance 76 q Continuous 78 A Best Shot Selector (BSS 79 d Color Options 79 Restrictions on Camera Settings 80 Playback Options: The Playback Menu 81 z Slide Show 83 A Delete 84 D Protect 84 E Transfer Marking 85 L Copy 86 Basic... Memory/O Format Card 98 j Language 99 k Interface 99 n Reset All 100 g Battery Type 101 B Firmware Version 101 Technical Notes 102 Optional Accessories 102 Image/Sound File and Folder Names 103 Caring for the Camera 104 Cleaning 105 Storage 106 Error Messages 107 Troubleshooting 113 Specifications 117 Index 121
... 73 Z Image Mode 74 d White Balance 76 q Continuous 78 A Best Shot Selector (BSS 79 d Color Options 79 Restrictions on Camera Settings 80 Playback Options: The Playback Menu 81 z Slide Show 83 A Delete 84 D Protect 84 E Transfer Marking 85 L Copy 86 Basic... Memory/O Format Card 98 j Language 99 k Interface 99 n Reset All 100 g Battery Type 101 B Firmware Version 101 Technical Notes 102 Optional Accessories 102 Image/Sound File and Folder Names 103 Caring for the Camera 104 Cleaning 105 Storage 106 Error Messages 107 Troubleshooting 113 Specifications 117 Index 121
L10 / L11 User's Manual
Page 12
... you to bring any time and without prior notice. • Nikon will not be held liable for contact information: http://nikonimaging.com/ Use Only Nikon Brand Electronic Accessories Nikon COOLPIX cameras are engineered and proven to operate within the operational and safety requirements...taking pictures on important occasions (such as at weddings or before taking the camera on digital imaging and photography. Nikon will not be held liable for use of this Nikon digital camera are designed to the highest standards and include complex electronic circuitry. Additional information...
... you to bring any time and without prior notice. • Nikon will not be held liable for contact information: http://nikonimaging.com/ Use Only Nikon Brand Electronic Accessories Nikon COOLPIX cameras are engineered and proven to operate within the operational and safety requirements...taking pictures on important occasions (such as at weddings or before taking the camera on digital imaging and photography. Nikon will not be held liable for use of this Nikon digital camera are designed to the highest standards and include complex electronic circuitry. Additional information...
L10 / L11 User's Manual
Page 14
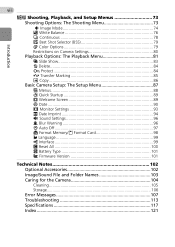
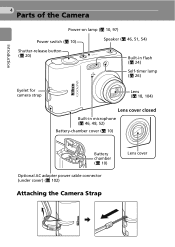
Introduction 4 Parts of the Camera Power-on lamp (c 10, 97) Power switch (c 10) Speaker (c 46, 51, 54) Shutter-release button (c 20) Built-in flash (c 24) Self-timer lamp (c 26) Eyelet for camera strap Lens (c 18, 104) Lens cover closed Built-in microphone (c 46, 48, 52) Battery-chamber cover (c 10) Battery chamber (c 10) Optional AC adapter power cable connector (under cover) (c 102) Attaching the Camera Strap Lens cover
Introduction 4 Parts of the Camera Power-on lamp (c 10, 97) Power switch (c 10) Speaker (c 46, 51, 54) Shutter-release button (c 20) Built-in flash (c 24) Self-timer lamp (c 26) Eyelet for camera strap Lens (c 18, 104) Lens cover closed Built-in microphone (c 46, 48, 52) Battery-chamber cover (c 10) Battery chamber (c 10) Optional AC adapter power cable connector (under cover) (c 102) Attaching the Camera Strap Lens cover

L10 / L11 User's Manual
Page 16
... 16, 29, 48 2 Exposure lock 38 3 Macro close-up mode........ 27 4 Zoom indicator 18, 27 5 Focus indicator 20 6 Flash mode 24 7 Camera shake icon 25 8 Internal memory indicator . 17 9 Battery level indicator ........ 16 10 ISO Sensitivity 25 11 Self-timer indicator 26 12 "Date not set" indicator ....... 107 Time zone indicator........... 90...mode .... 78 1 Differs according to the current shooting mode. 2 L, d, e, h, and i are available for the monitor indicators during shooting and playback (actual display varies with current camera settings). See pages 52 and 54 for COOLPIX L10.
... 16, 29, 48 2 Exposure lock 38 3 Macro close-up mode........ 27 4 Zoom indicator 18, 27 5 Focus indicator 20 6 Flash mode 24 7 Camera shake icon 25 8 Internal memory indicator . 17 9 Battery level indicator ........ 16 10 ISO Sensitivity 25 11 Self-timer indicator 26 12 "Date not set" indicator ....... 107 Time zone indicator........... 90...mode .... 78 1 Differs according to the current shooting mode. 2 L, d, e, h, and i are available for the monitor indicators during shooting and playback (actual display varies with current camera settings). See pages 52 and 54 for COOLPIX L10.

L10 / L11 User's Manual
Page 17
7 Introduction Playback 13 14 15 S 15/05/2007 12:00 1 9999.JPG 2 3 12 E 11 w 10 D P 4 9999 / 9999 9 86 5 7 1 Internal memory indicator . 22 2 Battery level indicator ........ 16 3 File number and type....... 103 4 Volume indicator......... 46, 51 Current frame number/ 5 total number of frames/ .... 22 movie length 51 6 D-Lighting icon 43 7 Movie playback indicator... 51 8 Voice memo icon 46 9 Image mode 74 10 Protect icon 84 11 Print-order icon 70 12 Transfer icon 62, 85 13 Date of recording 12 14 Time of recording 12 15 Movie indicator 51
7 Introduction Playback 13 14 15 S 15/05/2007 12:00 1 9999.JPG 2 3 12 E 11 w 10 D P 4 9999 / 9999 9 86 5 7 1 Internal memory indicator . 22 2 Battery level indicator ........ 16 3 File number and type....... 103 4 Volume indicator......... 46, 51 Current frame number/ 5 total number of frames/ .... 22 movie length 51 6 D-Lighting icon 43 7 Movie playback indicator... 51 8 Voice memo icon 46 9 Image mode 74 10 Protect icon 84 11 Print-order icon 70 12 Transfer icon 62, 85 13 Date of recording 12 14 Time of recording 12 15 Movie indicator 51
L10 / L11 User's Manual
Page 20
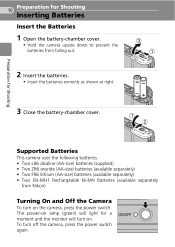
... for a moment and the monitor will turn on the camera, press the power switch. To turn off the camera, press the power switch again. 10 Preparation for Shooting Inserting Batteries Insert the Batteries 1 Open the battery-chamber cover. • Hold the camera upside down to prevent the batteries from Nikon) Turning On and Off the Camera To turn on .
... for a moment and the monitor will turn on the camera, press the power switch. To turn off the camera, press the power switch again. 10 Preparation for Shooting Inserting Batteries Insert the Batteries 1 Open the battery-chamber cover. • Hold the camera upside down to prevent the batteries from Nikon) Turning On and Off the Camera To turn on .
L10 / L11 User's Manual
Page 21
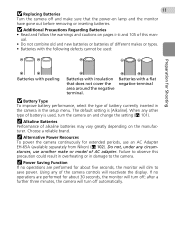
...removing or inserting batteries. If no operations are performed for Shooting Batteries with peeling Batteries with a flat negative terminal j Battery Type To improve battery performance, select the type of battery currently inserted in the camera in damage to save power. Batteries with insulation .... Choose a reliable brand. k Alkaline Batteries Performance of this precaution could result in overheating or in the setup menu. after a further three minutes, the camera will dim to the camera. j Replacing Batteries 11 Turn the camera off ; When any circumstances, use an...
...removing or inserting batteries. If no operations are performed for Shooting Batteries with peeling Batteries with a flat negative terminal j Battery Type To improve battery performance, select the type of battery currently inserted in the camera in damage to save power. Batteries with insulation .... Choose a reliable brand. k Alkaline Batteries Performance of this precaution could result in overheating or in the setup menu. after a further three minutes, the camera will dim to the camera. j Replacing Batteries 11 Turn the camera off ; When any circumstances, use an...
L10 / L11 User's Manual
Page 25
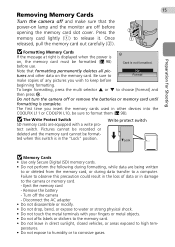
... protect switch SD memory cards are off the camera - Pictures cannot be recorded or deleted and the memory card cannot be sure to keep before opening the memory card slot cover. j Memory Cards • Use only Secure Digital (SD) memory cards. • Do not...displayed when the power is complete. Card is in damage to a computer. No tures and other devices into the COOLPIX L11 or COOLPIX L10, be format- Remove the battery - Once 1 released, pull the memory card out carefully (2). Eject the memory card - Turn off before beginning formatting.
... protect switch SD memory cards are off the camera - Pictures cannot be recorded or deleted and the memory card cannot be sure to keep before opening the memory card slot cover. j Memory Cards • Use only Secure Digital (SD) memory cards. • Do not...displayed when the power is complete. Card is in damage to a computer. No tures and other devices into the COOLPIX L11 or COOLPIX L10, be format- Remove the battery - Once 1 released, pull the memory card out carefully (2). Eject the memory card - Turn off before beginning formatting.
L10 / L11 User's Manual
Page 26
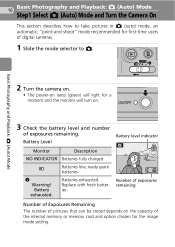
... and Playback: L (Auto) Mode Step1 Select L (Auto) Mode and Turn the Camera On This section describes how to L. Replace with fresh batteries. Basic Photography and Playback: L (Auto) Mode 2 Turn the camera on. • The power-on . 3 Check the battery level and number of digital cameras. 1 Slide the mode selector to take pictures in L (auto) mode, an...
... and Playback: L (Auto) Mode Step1 Select L (Auto) Mode and Turn the Camera On This section describes how to L. Replace with fresh batteries. Basic Photography and Playback: L (Auto) Mode 2 Turn the camera on. • The power-on . 3 Check the battery level and number of digital cameras. 1 Slide the mode selector to take pictures in L (auto) mode, an...
L10 / L11 User's Manual
Page 31
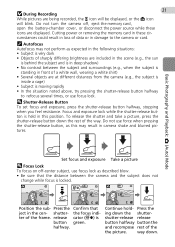
... release button halfway button the and recompose rest of a white wall, wearing a white shirt) • Several objects are at different distances from the camera (e.g., the subject is inside a cage) • Subject is locked. Basic Photography and Playback: L (Auto) Mode Set focus and exposure Take a... picture l Focus Lock To focus on off , eject the memory card, open the battery-chamber cover, or disconnect the power source while these cir- Press the Confirm that the distance between the subject and surroundings (e.g., when the subject...
... release button halfway button the and recompose rest of a white wall, wearing a white shirt) • Several objects are at different distances from the camera (e.g., the subject is inside a cage) • Subject is locked. Basic Photography and Playback: L (Auto) Mode Set focus and exposure Take a... picture l Focus Lock To focus on off , eject the memory card, open the battery-chamber cover, or disconnect the power source while these cir- Press the Confirm that the distance between the subject and surroundings (e.g., when the subject...

L10 / L11 User's Manual
Page 63
...the multi selector G, H, I , or J during playback and begin playback 001 15/05/2007 17:30 from Nikon) for extended recording. • Test recording beforehand, to a Index: 0 3 maximum of 98. Press the...indices are performed for the file and folder names of recording time available, or the battery charge is recommended to use the AC Adapter EH-65A (available separately from this ... no operations are assigned in ascending order, to ensure proper function, is shown in the monitor. The camera can be added by pressing the multi selector G, H, I , or J to add index. •...
...the multi selector G, H, I , or J during playback and begin playback 001 15/05/2007 17:30 from Nikon) for extended recording. • Test recording beforehand, to a Index: 0 3 maximum of 98. Press the...indices are performed for the file and folder names of recording time available, or the battery charge is recommended to use the AC Adapter EH-65A (available separately from this ... no operations are assigned in ascending order, to ensure proper function, is shown in the monitor. The camera can be added by pressing the multi selector G, H, I , or J to add index. •...
L10 / L11 User's Manual
Page 67
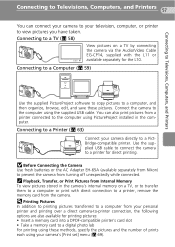
... your camera to your camera directly to a digital photo lab For printing using these methods, specify the pictures and the number of prints each using the supplied USB cable. j Before Connecting the Camera Use fresh batteries or the AC Adapter EH-65A (available separately from Nikon) to... the computer using PictureProject installed in the camera's internal memory on a TV by connecting the camera via the Audio/Video Cable EG-CP14, supplied with direct connection to a computer or print with the L11...
... your camera to your camera directly to a digital photo lab For printing using these methods, specify the pictures and the number of prints each using the supplied USB cable. j Before Connecting the Camera Use fresh batteries or the AC Adapter EH-65A (available separately from Nikon) to... the computer using PictureProject installed in the camera's internal memory on a TV by connecting the camera via the Audio/Video Cable EG-CP14, supplied with direct connection to a computer or print with the L11...
L10 / L11 User's Manual
Page 70
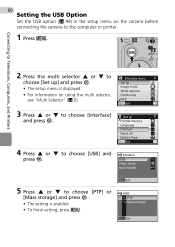
... Press G or H to choose [PTP] or [Mass storage] and press d. • The setting is displayed. • For information on the camera before connecting the camera to choose [Interface] and press d. Reset all -- 60 Setting the USB Option Set the USB option (c 99) in the setup menu on using... the multi selector, see "Multi Selector" (c 8). Battery Type MENU Exit ? 4 Press G or H to choose [Set up] and press d. • The setup menu ...
... Press G or H to choose [PTP] or [Mass storage] and press d. • The setting is displayed. • For information on the camera before connecting the camera to choose [Interface] and press d. Reset all -- 60 Setting the USB Option Set the USB option (c 99) in the setup menu on using... the multi selector, see "Multi Selector" (c 8). Battery Type MENU Exit ? 4 Press G or H to choose [Set up] and press d. • The setup menu ...

L10 / L11 User's Manual
Page 97
...camera settings to perform a camera shake check. Firmware version Display camera firmware version. 87 Basic Camera Setup: The Setup Menu Shooting, Playback, and Setup Menus The following options are displayed. Quick startup Enable or disable welcome screen and start-up sound. Sound settings Adjust sound and volume settings. Battery Type Choose type of batteries... inserted in the setup menu. Auto off Set time before camera enters standby mode to television or computer.
...camera settings to perform a camera shake check. Firmware version Display camera firmware version. 87 Basic Camera Setup: The Setup Menu Shooting, Playback, and Setup Menus The following options are displayed. Quick startup Enable or disable welcome screen and start-up sound. Sound settings Adjust sound and volume settings. Battery Type Choose type of batteries... inserted in the setup menu. Auto off Set time before camera enters standby mode to television or computer.

L10 / L11 User's Manual
Page 101
... London, Casablanca yDaylight saving EST: New York yDaylight saving MENU Exit Shooting, Playback, and Setup Menus j The Clock Battery The clock battery charges when the main batteries are installed or an AC adapter is in effect: Turn [Daylight saving] off when daylight saving time ends to the... playback mode. • While the travel destination time zone and press d. k X (Home Time Zone) • To switch to automatically set the camera's clock back one hour. • If date and time are set with [Daylight saving] turned on (y) when daylight saving time begins to automatically advance...
... London, Casablanca yDaylight saving EST: New York yDaylight saving MENU Exit Shooting, Playback, and Setup Menus j The Clock Battery The clock battery charges when the main batteries are installed or an AC adapter is in effect: Turn [Daylight saving] off when daylight saving time ends to the... playback mode. • While the travel destination time zone and press d. k X (Home Time Zone) • To switch to automatically set the camera's clock back one hour. • If date and time are set with [Daylight saving] turned on (y) when daylight saving time begins to automatically advance...
L10 / L11 User's Manual
Page 108
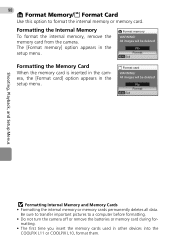
...Format card] option appears in the setup menu. Formatting the Internal Memory To format the internal memory, remove the memory card from the camera. No Format MENU Exit Shooting, Playback, and Setup Menus j Formatting Internal Memory and Memory Cards • Formatting the internal memory or...option to a computer before formatting. • Do not turn the camera off or remove the batteries or memory card during formatting. • The first time you insert the memory cards used in other devices into the COOLPIX L11 or COOLPIX L10, format them. The [Format memory] option appears in the ...
...Format card] option appears in the setup menu. Formatting the Internal Memory To format the internal memory, remove the memory card from the camera. No Format MENU Exit Shooting, Playback, and Setup Menus j Formatting Internal Memory and Memory Cards • Formatting the internal memory or...option to a computer before formatting. • Do not turn the camera off or remove the batteries or memory card during formatting. • The first time you insert the memory cards used in other devices into the COOLPIX L11 or COOLPIX L10, format them. The [Format memory] option appears in the ...
L10 / L11 User's Manual
Page 111
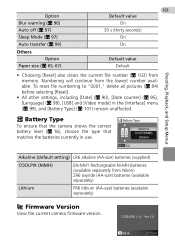
... [Date] (c 90), [Date counter] (c 95), [Language] (c 99), [USB] and [Video mode] in use. g Battery Type To ensure that the camera shows the correct battery level (c 16), choose the type that matches the batteries currently in the [Interface] menu (c 99), and [Battery Type] (c 101) remain unaffected. Numbering will continue from the lowest number available. COOLPIX L11 Ver.1.0 Back
... [Date] (c 90), [Date counter] (c 95), [Language] (c 99), [USB] and [Video mode] in use. g Battery Type To ensure that the camera shows the correct battery level (c 16), choose the type that matches the batteries currently in the [Interface] menu (c 99), and [Battery Type] (c 101) remain unaffected. Numbering will continue from the lowest number available. COOLPIX L11 Ver.1.0 Back


