L10 / L11 User's Manual
Page 4
... the strap around the neck of a fall or other small parts into their entirety before using this Nikon product to prevent possible injury. The consequences that could result in injury. Handle the camera strap with metal objects such as a set. Observe the following pre- vent infants from the... where all those who use in this product: • Before replacing the batteries, turn the product off in the event of chil- ii Introduction For Your Safety To prevent damage to your Nikon product or injury to yourself or to others, read the following safety precautions in their...
... the strap around the neck of a fall or other small parts into their entirety before using this Nikon product to prevent possible injury. The consequences that could result in injury. Handle the camera strap with metal objects such as a set. Observe the following pre- vent infants from the... where all those who use in this product: • Before replacing the batteries, turn the product off in the event of chil- ii Introduction For Your Safety To prevent damage to your Nikon product or injury to yourself or to others, read the following safety precautions in their...

L10 / L11 User's Manual
Page 6
...to be determined by turning the equipment off and on, the user is encouraged to try to correct the interference by Nikon for your equipment. Nikon Inc., 1300 Walt Whitman... Road Melville, New York 11747-3064 USA Tel: 631-547-4200 Notice for customers in accordance with the instructions, may exceed the limits of Class B Part 15 of the FCC rules. COOLPIX L11... if not installed and used in Canada CAUTION This Class B digital apparatus complies with the limits for a Class B digital device, pursuant to Part 15 of the FCC rules. ATTENTION ...
...to be determined by turning the equipment off and on, the user is encouraged to try to correct the interference by Nikon for your equipment. Nikon Inc., 1300 Walt Whitman... Road Melville, New York 11747-3064 USA Tel: 631-547-4200 Notice for customers in accordance with the instructions, may exceed the limits of Class B Part 15 of the FCC rules. COOLPIX L11... if not installed and used in Canada CAUTION This Class B digital apparatus complies with the limits for a Class B digital device, pursuant to Part 15 of the FCC rules. ATTENTION ...
L10 / L11 User's Manual
Page 8
... Multi Selector 8 MENU Button 9 Help Displays 9 Preparation for Shooting 10 Inserting Batteries 10 Insert the Batteries 10 Supported Batteries 10 Turning On and Off the Camera 10 Setting Display Language, Date, and Time 12 Inserting Memory Cards 14 Removing Memory Cards 15 Basic Photography and Playback: L (...Auto) Mode 16 Step1 Select L (Auto) Mode and Turn the Camera On 16 Step2 Frame a Picture 18 Step3 Focus and Shoot 20 Step4 Viewing and Deleting Pictures 22 Using the Flash 24 Taking Pictures...
... Multi Selector 8 MENU Button 9 Help Displays 9 Preparation for Shooting 10 Inserting Batteries 10 Insert the Batteries 10 Supported Batteries 10 Turning On and Off the Camera 10 Setting Display Language, Date, and Time 12 Inserting Memory Cards 14 Removing Memory Cards 15 Basic Photography and Playback: L (...Auto) Mode 16 Step1 Select L (Auto) Mode and Turn the Camera On 16 Step2 Frame a Picture 18 Step3 Focus and Shoot 20 Step4 Viewing and Deleting Pictures 22 Using the Flash 24 Taking Pictures...
L10 / L11 User's Manual
Page 20
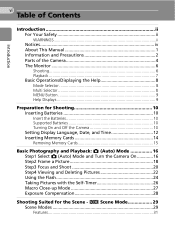
... (AA-size) batteries (available separately) • Two FR6 lithium (AA-size) batteries (available separately) • Two EN-MH1 Rechargeable Ni-MH Batteries (available separately from Nikon) Turning On and Off the Camera To turn on . 10 Preparation for Shooting Inserting Batteries Insert the Batteries 1 Open the battery-chamber cover. • Hold the...
... (AA-size) batteries (available separately) • Two FR6 lithium (AA-size) batteries (available separately) • Two EN-MH1 Rechargeable Ni-MH Batteries (available separately from Nikon) Turning On and Off the Camera To turn on . 10 Preparation for Shooting Inserting Batteries Insert the Batteries 1 Open the battery-chamber cover. • Hold the...
L10 / L11 User's Manual
Page 21
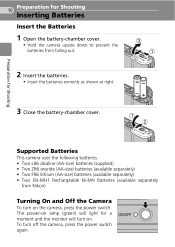
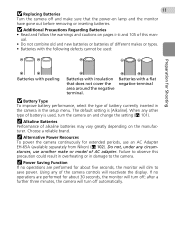
...for extended periods, use another make sure that does not cover the area around the negative terminal. j Replacing Batteries 11 Turn the camera off and make or model of battery is [Alkaline]. Batteries with insulation that the power-on the manufacturer. Using any ...circumstances, use an AC Adapter EH-65A (available separately from Nikon) (c 102). j Additional Precautions Regarding Batteries • Read and follow the warnings and...
...for extended periods, use another make sure that does not cover the area around the negative terminal. j Replacing Batteries 11 Turn the camera off and make or model of battery is [Alkaline]. Batteries with insulation that the power-on the manufacturer. Using any ...circumstances, use an AC Adapter EH-65A (available separately from Nikon) (c 102). j Additional Precautions Regarding Batteries • Read and follow the warnings and...

L10 / L11 User's Manual
Page 22
...set the date. 1 Before pressing d, press the multi selector H to choose [Daylight saving]. 2 Press d to step 5. The camera's clock is displayed. l Daylight Saving Time If daylight saving time is in effect, turn on using the multi selector, see "Multi Selector" (c 8). 3 Press G or H to choose [Yes] and press d. &#... for Shooting 12 Setting Display Language, Date, and Time A language-selection dialog is displayed the first time the camera is turned on. 1 Press the power switch to turn on the camera. • The power-on lamp will light for a moment and the monitor will not be set. When ...
...set the date. 1 Before pressing d, press the multi selector H to choose [Daylight saving]. 2 Press d to step 5. The camera's clock is displayed. l Daylight Saving Time If daylight saving time is in effect, turn on using the multi selector, see "Multi Selector" (c 8). 3 Press G or H to choose [Yes] and press d. &#... for Shooting 12 Setting Display Language, Date, and Time A language-selection dialog is displayed the first time the camera is turned on. 1 Press the power switch to turn on the camera. • The power-on lamp will light for a moment and the monitor will not be set. When ...
L10 / L11 User's Manual
Page 24
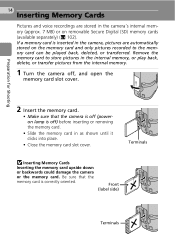
..., and open the memory card slot cover. 2 Insert the memory card. • Make sure that the memory card is inserted in the camera, pictures are stored in as shown until it clicks into place. • Close the memory card slot cover. Front (label side) Terminals Remove... in the internal memory, or play back, delete, or transfer pictures from the internal memory. 1 Turn the camera off ) before inserting or removing the memory card. • Slide the memory card in the camera's internal memory (approx. 7 MB) or on removable Secure Digital (SD) memory cards (available separately) (c 102).
..., and open the memory card slot cover. 2 Insert the memory card. • Make sure that the memory card is inserted in the camera, pictures are stored in as shown until it clicks into place. • Close the memory card slot cover. Front (label side) Terminals Remove... in the internal memory, or play back, delete, or transfer pictures from the internal memory. 1 Turn the camera off ) before inserting or removing the memory card. • Slide the memory card in the camera's internal memory (approx. 7 MB) or on removable Secure Digital (SD) memory cards (available separately) (c 102).
L10 / L11 User's Manual
Page 25
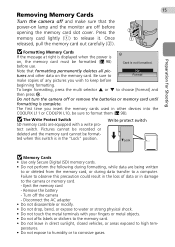
... the power-on , the memory card must be format- No tures and other devices into the COOLPIX L11 or COOLPIX L10, be sure to the camera or memory card. - Do not turn the camera off the camera - Pictures cannot be recorded or deleted and the memory card cannot be formatted (c 98) before ...j Memory Cards • Use only Secure Digital (SD) memory cards. • Do not perform the following during formatting, while data are being written to or deleted from the memory card, or during data transfer to choose [Format] and then press d. Turn off or remove the batteries or memory card ...
... the power-on , the memory card must be format- No tures and other devices into the COOLPIX L11 or COOLPIX L10, be sure to the camera or memory card. - Do not turn the camera off the camera - Pictures cannot be recorded or deleted and the memory card cannot be formatted (c 98) before ...j Memory Cards • Use only Secure Digital (SD) memory cards. • Do not perform the following during formatting, while data are being written to or deleted from the memory card, or during data transfer to choose [Format] and then press d. Turn off or remove the batteries or memory card ...
L10 / L11 User's Manual
Page 26
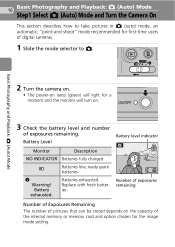
... exposures remaining Number of Exposures Remaining The number of pictures that can be stored depends on . 3 Check the battery level and number of digital cameras. 1 Slide the mode selector to take pictures in L (auto) mode, an automatic, "point-and-shoot" mode recommended for the image...Basic Photography and Playback: L (Auto) Mode Step1 Select L (Auto) Mode and Turn the Camera On This section describes how to L. Battery exhausted. Replace with fresh batteries. Basic Photography and Playback: L (Auto) Mode 2 Turn the camera on. • The power-on lamp (green) will light for a moment and...
... exposures remaining Number of Exposures Remaining The number of pictures that can be stored depends on . 3 Check the battery level and number of digital cameras. 1 Slide the mode selector to take pictures in L (auto) mode, an automatic, "point-and-shoot" mode recommended for the image...Basic Photography and Playback: L (Auto) Mode Step1 Select L (Auto) Mode and Turn the Camera On This section describes how to L. Battery exhausted. Replace with fresh batteries. Basic Photography and Playback: L (Auto) Mode 2 Turn the camera on. • The power-on lamp (green) will light for a moment and...
L10 / L11 User's Manual
Page 28
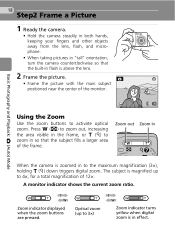
... the built-in flash is magnified up to 3×) Zoom indicator turns yellow when digital zoom is zoomed in to the maximum magnification (3×), holding v (k) down triggers digital zoom. Zoom out Zoom in When the camera is in effect. Zoom indicator displayed when the zoom buttons are pressed... hands, keeping your fingers and other objects away from the lens, flash, and microphone. • When taking pictures in "tall" orientation, turn the camera counterclockwise so that the subject fills a larger area of the frame. The subject is above the lens. 2 Frame the picture. L •...
... the built-in flash is magnified up to 3×) Zoom indicator turns yellow when digital zoom is zoomed in to the maximum magnification (3×), holding v (k) down triggers digital zoom. Zoom out Zoom in When the camera is in effect. Zoom indicator displayed when the zoom buttons are pressed... hands, keeping your fingers and other objects away from the lens, flash, and microphone. • When taking pictures in "tall" orientation, turn the camera counterclockwise so that the subject fills a larger area of the frame. The subject is above the lens. 2 Frame the picture. L •...
L10 / L11 User's Manual
Page 31
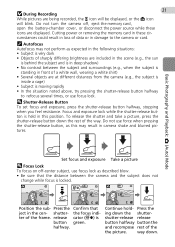
... does not change while focus is moving rapidly • In the situation noted above, try pressing the shutter-release button halfway to the camera or card. k Autofocus Autofocus may result in the cen- l Shutter-Release Button To set focus and exposure, press the shutter-release button..., the y icon will be displayed, or the M icon will blink. Focus and exposure lock while the shutter-release but- Do not turn the camera off -center subject, use focus lock as this position. Press the Confirm that the distance between the subject and surroundings (e.g., when the subject...
... does not change while focus is moving rapidly • In the situation noted above, try pressing the shutter-release button halfway to the camera or card. k Autofocus Autofocus may result in the cen- l Shutter-Release Button To set focus and exposure, press the shutter-release button..., the y icon will be displayed, or the M icon will blink. Focus and exposure lock while the shutter-release but- Do not turn the camera off -center subject, use focus lock as this position. Press the Confirm that the distance between the subject and surroundings (e.g., when the subject...
L10 / L11 User's Manual
Page 33
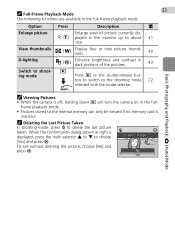
i ing mode Press i or the shutter-release but- Basic Photography and Playback: L (Auto) Mode k Viewing Pictures • When the camera is inserted. To exit without deleting the picture, choose [No] and press d. k Deleting the Last Picture Taken In shooting mode, press T to about 41 10&#... picture Enlarge view of the pictures. 43 Switch to the internal memory can only be viewed if no memory card is off, holding down i will turn the camera on in the full-frame playback mode.
i ing mode Press i or the shutter-release but- Basic Photography and Playback: L (Auto) Mode k Viewing Pictures • When the camera is inserted. To exit without deleting the picture, choose [No] and press d. k Deleting the Last Picture Taken In shooting mode, press T to about 41 10&#... picture Enlarge view of the pictures. 43 Switch to the internal memory can only be viewed if no memory card is off, holding down i will turn the camera on in the full-frame playback mode.

L10 / L11 User's Manual
Page 34
... or under dim light. 1 Press J (flash mode). • The flash menu is 0.4-2.5 m (15.7 in.-8 ft. 1.9 in .) when the camera is not applied by pressing d within five seconds, the selection will not fire even when lighting is only displayed for five sec- celled. • For... Selector" (c 8). D Slow sync Flash illuminates main subject; When z is applied, z is poor. z z 5 J Fill flash Flash fires whenever picture is turned off. era is taken. A Auto with red-eye reduction Reduces "red eye" in " (illuminate) shadows and back-lit subjects. The following flash modes are used...
... or under dim light. 1 Press J (flash mode). • The flash menu is 0.4-2.5 m (15.7 in.-8 ft. 1.9 in .) when the camera is not applied by pressing d within five seconds, the selection will not fire even when lighting is only displayed for five sec- celled. • For... Selector" (c 8). D Slow sync Flash illuminates main subject; When z is applied, z is poor. z z 5 J Fill flash Flash fires whenever picture is turned off. era is taken. A Auto with red-eye reduction Reduces "red eye" in " (illuminate) shadows and back-lit subjects. The following flash modes are used...

L10 / L11 User's Manual
Page 37
... pressed halfway to light the entire subject at distances of less than 40 cm (15.7 in the camera's memory even after the camera is turned off. k Macro Close-up Mode In macro close-up mode, the camera focuses continuously, even when the shutter-release button is not applied by pressing d within five seconds. &#... back and check the results. 1 Press L (macro close-up mode). • The macro close-up mode is only displayed for five seconds. L • The camera can focus at a distance of objects as close as 15 cm (5.9 in.). 27 Macro Close-up Mode Macro close-up mode is used for taking...
... pressed halfway to light the entire subject at distances of less than 40 cm (15.7 in the camera's memory even after the camera is turned off. k Macro Close-up Mode In macro close-up mode, the camera focuses continuously, even when the shutter-release button is not applied by pressing d within five seconds. &#... back and check the results. 1 Press L (macro close-up mode). • The macro close-up mode is only displayed for five seconds. L • The camera can focus at a distance of objects as close as 15 cm (5.9 in.). 27 Macro Close-up Mode Macro close-up mode is used for taking...

L10 / L11 User's Manual
Page 38
... "-" side. • The monitor will return to the normal display for the current mode if the setting is not applied by the camera to make pictures brighter or darker. 1 Press I icon and exposure compensation are shown in the monitor. • The exposure compensation applied... in L +1.0 mode is stored in the camera's memory even 5 after the camera is turned off. 28 Exposure Compensation Exposure compensation is used to alter exposure from the value suggested by pressing d within five seconds...
... "-" side. • The monitor will return to the normal display for the current mode if the setting is not applied by the camera to make pictures brighter or darker. 1 Press I icon and exposure compensation are shown in the monitor. • The exposure compensation applied... in L +1.0 mode is stored in the camera's memory even 5 after the camera is turned off. 28 Exposure Compensation Exposure compensation is used to alter exposure from the value suggested by pressing d within five seconds...

L10 / L11 User's Manual
Page 45
... B H Off F Off I 0 O Copy Provides clear pictures of text or drawings on automatically. • Hold the camera steadily to prevent camera shake. Q: For those scene modes with Q, use the flash. • [A] (c 79) turns on a white board or in print. • Use macro close-up mode (c 27) to focus at infinity. Focus ...Off1 I 01 1 Other settings can be selected. K Fireworks show Q Slow shutter speeds are used to capture the expanding burst of light from a firework. • Camera focuses at short ranges. • Colored text and drawings may not always be selected.
... B H Off F Off I 0 O Copy Provides clear pictures of text or drawings on automatically. • Hold the camera steadily to prevent camera shake. Q: For those scene modes with Q, use the flash. • [A] (c 79) turns on a white board or in print. • Use macro close-up mode (c 27) to focus at infinity. Focus ...Off1 I 01 1 Other settings can be selected. K Fireworks show Q Slow shutter speeds are used to capture the expanding burst of light from a firework. • Camera focuses at short ranges. • Colored text and drawings may not always be selected.

L10 / L11 User's Manual
Page 48
... the next picture so that is, the direction in yellow to select the desired pan direction and press d. • The arrow showing the selected direction turns white. • Before the first picture is taken, the flash mode (c 24), self-timer (c 26), macro 5 close-up (c 27), and exposure compensa...
... the next picture so that is, the direction in yellow to select the desired pan direction and press d. • The arrow showing the selected direction turns white. • Before the first picture is taken, the flash mode (c 24), self-timer (c 26), macro 5 close-up (c 27), and exposure compensa...

L10 / L11 User's Manual
Page 63
...voice recordings. The current index number is shown in ascending order, to end voice recording. Press the shutter-release button halfway to save power. The camera can be added by pressing the multi selector G, H, I , or J to add index. • Press d to pause or resume voice ...Image/Sound File and Folder Names" (c 103) for 30 seconds, the monitor will turn off . • Press the multi selector G, H, I , or J during playback and begin playback 001 15/05/2007 17:30 from Nikon) for extended recording. • Test recording beforehand, to ensure proper function, is ...
...voice recordings. The current index number is shown in ascending order, to end voice recording. Press the shutter-release button halfway to save power. The camera can be added by pressing the multi selector G, H, I , or J to add index. • Press d to pause or resume voice ...Image/Sound File and Folder Names" (c 103) for 30 seconds, the monitor will turn off . • Press the multi selector G, H, I , or J during playback and begin playback 001 15/05/2007 17:30 from Nikon) for extended recording. • Test recording beforehand, to ensure proper function, is ...
L10 / L11 User's Manual
Page 67
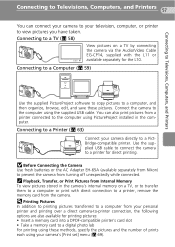
... the L11 or available separately for printing pictures: • Insert a memory card into a DPOF-compatible printer's card slot • Take a memory card to a digital photo ... the memory card from the camera. Connecting to a computer from turning off unexpectedly while connected. Use the supplied USB cable to connect the camera to a computer, and then...camera's [Print set] menu (c 69). j Before Connecting the Camera Use fresh batteries or the AC Adapter EH-65A (available separately from Nikon) to prevent the camera from your personal printer and printing over a direct camera...
... the L11 or available separately for printing pictures: • Insert a memory card into a DPOF-compatible printer's card slot • Take a memory card to a digital photo ... the memory card from the camera. Connecting to a computer from turning off unexpectedly while connected. Use the supplied USB cable to connect the camera to a computer, and then...camera's [Print set] menu (c 69). j Before Connecting the Camera Use fresh batteries or the AC Adapter EH-65A (available separately from Nikon) to prevent the camera from your personal printer and printing over a direct camera...

L10 / L11 User's Manual
Page 68
... the [Interface] (c 99) item in the setup menu (c 87). 58 Connecting to a TV Connect the camera to a television using the audio/video (A/V) cable to the camera. Yellow White 3 Tune the television to turn the camera on the television. 1 Turn the camera off and the image normally shown in the monitor will remain off . j Connecting the A/V Cable...
... the [Interface] (c 99) item in the setup menu (c 87). 58 Connecting to a TV Connect the camera to a television using the audio/video (A/V) cable to the camera. Yellow White 3 Tune the television to turn the camera on the television. 1 Turn the camera off and the image normally shown in the monitor will remain off . j Connecting the A/V Cable...


