
Instruction Manual
Page 2
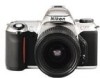
... N65/ N65QD camera, and be a pro to take better pictures-just press the shutter release button. • 3D Matrix Metering can read this manual handy. Get to make photography a bigger part of the N65/N65QD: • Exposure mode dial makes operation simple and intuitive, so great pictures are a snap in every shooting situation. • The big , high-visibility LCD lets you check camera settings at a ' glance. • With 8 AUTO...
... N65/ N65QD camera, and be a pro to take better pictures-just press the shutter release button. • 3D Matrix Metering can read this manual handy. Get to make photography a bigger part of the N65/N65QD: • Exposure mode dial makes operation simple and intuitive, so great pictures are a snap in every shooting situation. • The big , high-visibility LCD lets you check camera settings at a ' glance. • With 8 AUTO...
Instruction Manual
Page 4
Load Film 20-21 4. Install Batteries and Check Battery Power 16-17 2. Set Focus Mode to 3 28-29 3. Release Shutter 32-33 Using Built-In Speedlight 34-35 Shooting with Vari-Program 36-38 Imprinting DatefTime (N65QD only 39 Self-Timer Operation 40-41 About Metering Systems and Exposure 42 4 Set Date and Time (N65QD only 22-23 About Shutter Release Button 24 BASIC OPERATION 25-41 1. Hold Camera and Focus 30-31 4. Set Exposure Mode to AF 26-27 2. Introduction...
Load Film 20-21 4. Install Batteries and Check Battery Power 16-17 2. Set Focus Mode to 3 28-29 3. Release Shutter 32-33 Using Built-In Speedlight 34-35 Shooting with Vari-Program 36-38 Imprinting DatefTime (N65QD only 39 Self-Timer Operation 40-41 About Metering Systems and Exposure 42 4 Set Date and Time (N65QD only 22-23 About Shutter Release Button 24 BASIC OPERATION 25-41 1. Hold Camera and Focus 30-31 4. Set Exposure Mode to AF 26-27 2. Introduction...
Instruction Manual
Page 16
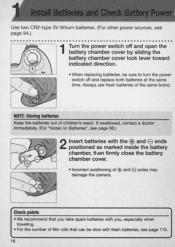
... traveling. • For the number of EEl and poles may damage the camera. -- -- Use two CR2-type 3V lithium batteries. (For other power sources, see page 110. 16 e • Incorrect positioning of film rolls that can be sure to turn the power switch off and open the battery chamber cover by sliding the battery chamber cover lock lever toward indicated direction. • When replacing batteries, be shot with the EB and...
... traveling. • For the number of EEl and poles may damage the camera. -- -- Use two CR2-type 3V lithium batteries. (For other power sources, see page 110. 16 e • Incorrect positioning of film rolls that can be sure to turn the power switch off and open the battery chamber cover by sliding the battery chamber cover lock lever toward indicated direction. • When replacing batteries, be shot with the EB and...

Instruction Manual
Page 17
Replace i 0 ~ batteries. (Shutter locks.) w If • Shutter speed and aperture indications in the LCD panel automatically turn off with the ~~ indication. ~ B - B -/F-~ - - '@ ~ EJ AUTO ["J [ • Lightly pressing the shutter release button reactivates the exposure meter and indications in the LCD panel and viewfinder for approx. 5 sec. LCD panel when the power switch is off When the power switch is turned on in the LCD panel. -- [ EJ 17 button after the power switch is turned off when you...
Replace i 0 ~ batteries. (Shutter locks.) w If • Shutter speed and aperture indications in the LCD panel automatically turn off with the ~~ indication. ~ B - B -/F-~ - - '@ ~ EJ AUTO ["J [ • Lightly pressing the shutter release button reactivates the exposure meter and indications in the LCD panel and viewfinder for approx. 5 sec. LCD panel when the power switch is off When the power switch is turned on in the LCD panel. -- [ EJ 17 button after the power switch is turned off when you...

Instruction Manual
Page 18
... shutter cannot be selected from camera body. i , ~ -- -.- - -- -- •• _- ... • Turn the power switch off and mount the lens to the camera body. CDCPU Nikkor lenses other than G-type Check the lens type. CPU contacts of CPU Nikkor lens CD CPU Nikkor lens @ G-type Nikkor lens 1other than G-type (Illustration is turned on lens and camera body are aligned, then twist lens counterclockwise until it locks into place. (Be sure not to touch the lens release button.) And then , set...
... shutter cannot be selected from camera body. i , ~ -- -.- - -- -- •• _- ... • Turn the power switch off and mount the lens to the camera body. CDCPU Nikkor lenses other than G-type Check the lens type. CPU contacts of CPU Nikkor lens CD CPU Nikkor lens @ G-type Nikkor lens 1other than G-type (Illustration is turned on lens and camera body are aligned, then twist lens counterclockwise until it locks into place. (Be sure not to touch the lens release button.) And then , set...

Instruction Manual
Page 19
... to turn the power·switch off when attaching/detaching the lens. • Avoid direct sunlight when attaching/detaching the lens. 19 or G-type AF Nikkor lens to utilize all of this camera's functions. (See page 88 for a non-CPU lens. See page 90 for Lens Compatibility.) • Make sure to detach the lens. blinks in the LCD panel and viewfinder, and the shutter cannot be used...
... to turn the power·switch off when attaching/detaching the lens. • Avoid direct sunlight when attaching/detaching the lens. 19 or G-type AF Nikkor lens to utilize all of this camera's functions. (See page 88 for a non-CPU lens. See page 90 for Lens Compatibility.) • Make sure to detach the lens. blinks in the LCD panel and viewfinder, and the shutter cannot be used...

Instruction Manual
Page 22
... low battery power. Replace the battery (making sure to change the numerical indication rapidly, hold the ADJUST button down for imprinting Imprinting of the date or time displays. To set correct date/time after 49). • To change the blinking numbers and after correction, push SELECT button until the date/time display stops blinking. Battery life is complete. When the imprint indicator appears in .g.d.a.t.e./t.im.e.,.s.e.e.p.a.g.e.3.9 • Adjusting date and time (Example: year 2001, January 15) 1 Push MODE button...
... low battery power. Replace the battery (making sure to change the numerical indication rapidly, hold the ADJUST button down for imprinting Imprinting of the date or time displays. To set correct date/time after 49). • To change the blinking numbers and after correction, push SELECT button until the date/time display stops blinking. Battery life is complete. When the imprint indicator appears in .g.d.a.t.e./t.im.e.,.s.e.e.p.a.g.e.3.9 • Adjusting date and time (Example: year 2001, January 15) 1 Push MODE button...

Instruction Manual
Page 25
...'t 0< •• ~r1,'" "." ' Shooting modes/functions explained in this section are as follows: Lens attached D-type AF Nikkor Focus mode AF (autofocus) Focus Area Dynamic AF Mode with Closest-Subject Priority* Exposure metering Six-segment 3D Matrix system Metering* Exposure mode AUTO mode (8 ) Flash sync mode Front-Curtain Sync (~)* '. ~ -"'~ . * Automatically set when AUTO m ,',.:._,./ " n." • ., . ,. BASIC OPERATION This section features the settings for most common picture-taking situations using AUTO mode (~) to enable easy operation even for the...
...'t 0< •• ~r1,'" "." ' Shooting modes/functions explained in this section are as follows: Lens attached D-type AF Nikkor Focus mode AF (autofocus) Focus Area Dynamic AF Mode with Closest-Subject Priority* Exposure metering Six-segment 3D Matrix system Metering* Exposure mode AUTO mode (8 ) Flash sync mode Front-Curtain Sync (~)* '. ~ -"'~ . * Automatically set when AUTO m ,',.:._,./ " n." • ., . ,. BASIC OPERATION This section features the settings for most common picture-taking situations using AUTO mode (~) to enable easy operation even for the...

Instruction Manual
Page 28
... lens (the 3D Matrix Meter is lightly pressed, shutter speed and aperture are available with this camera. See each exposure mode, effective results can be achieved with various types of each reference page for details. .... , When the exposure mode is set to Dynamic AF Mode with Closest-Subject Priority. See page 46 for operating instructions and details. 28 Matrix Metering (page 42) The Matrix Meter employed in the N65...
... lens (the 3D Matrix Meter is lightly pressed, shutter speed and aperture are available with this camera. See each exposure mode, effective results can be achieved with various types of each reference page for details. .... , When the exposure mode is set to Dynamic AF Mode with Closest-Subject Priority. See page 46 for operating instructions and details. 28 Matrix Metering (page 42) The Matrix Meter employed in the N65...

Instruction Manual
Page 36
... in focus. -;~ blinks: Unable to the desired Vari-Program, then lightly press the shutter release button. • Center the focus brackets on your subject (where you the option to choose from Portrait, Landscape, Close-Up, Sports Continuous or Night Scene mode-designed for specific picture-taking situations and photographic images. 1 Set the exposure mode dial to focus using I autofocus. 2 Confirm that focus indicator. When using the flash in Vari-Program, the Flash Sync modes...
... in focus. -;~ blinks: Unable to the desired Vari-Program, then lightly press the shutter release button. • Center the focus brackets on your subject (where you the option to choose from Portrait, Landscape, Close-Up, Sports Continuous or Night Scene mode-designed for specific picture-taking situations and photographic images. 1 Set the exposure mode dial to focus using I autofocus. 2 Confirm that focus indicator. When using the flash in Vari-Program, the Flash Sync modes...

Instruction Manual
Page 37
... background to Flash Cancel ~ (page 79) or close the built-in use telephoto zoom position, • For more professional uses, Micro-Nikkor lenses are recommended . • In some shooting situations, slow shutter speed is maximized at minimum focusing distance of the lens in Speedlight while lightly pressing the shutter release button . ~ : Close-Up mode Use this mode whenever you 're taking pictures of the Speedlight is mode whenever you...
... background to Flash Cancel ~ (page 79) or close the built-in use telephoto zoom position, • For more professional uses, Micro-Nikkor lenses are recommended . • In some shooting situations, slow shutter speed is maximized at minimum focusing distance of the lens in Speedlight while lightly pressing the shutter release button . ~ : Close-Up mode Use this mode whenever you 're taking pictures of the Speedlight is mode whenever you...

Instruction Manual
Page 38
... 400 or faster film speed is recommended. • A tripod is recommended when using a telephoto lens to Flash Cancel ($) (page 79) or close the built-in Speedlight while lightly pressing the shutter release button. 38 In Sports Continuous mode, Continuous Servo AF (page 44) is recommended. • To avoid camera shake, use a tripod. • To cancel flash , set the flash sync mode to avoid camera shake. • Continuous shooting is not...
... 400 or faster film speed is recommended. • A tripod is recommended when using a telephoto lens to Flash Cancel ($) (page 79) or close the built-in Speedlight while lightly pressing the shutter release button. 38 In Sports Continuous mode, Continuous Servo AF (page 44) is recommended. • To avoid camera shake, use a tripod. • To cancel flash , set the flash sync mode to avoid camera shake. • Continuous shooting is not...
Instruction Manual
Page 58
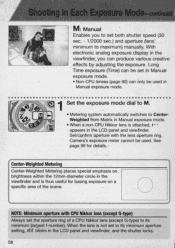
... panel and viewfinder, and the shutter locks. 58 Manual exposure mode. 1 Set the exposure mode dial to M. • Metering system automatically switches to its minimum (largest f-number). Set/confirm aperture with CPU Nikkor lens (except G-type) Always set in the LCD panel and viewfinder. appears in Manual exposure mode. • Non-CPU lenses (page 90) can produce various creative effects by adjusting the exposure. I '. . .', ' . . . - - -- .. - . M: Manual Enables you can only be used . Camera's exposure meter cannot be set the aperture ring of...
... panel and viewfinder, and the shutter locks. 58 Manual exposure mode. 1 Set the exposure mode dial to M. • Metering system automatically switches to its minimum (largest f-number). Set/confirm aperture with CPU Nikkor lens (except G-type) Always set in the LCD panel and viewfinder. appears in Manual exposure mode. • Non-CPU lenses (page 90) can produce various creative effects by adjusting the exposure. I '. . .', ' . . . - - -- .. - . M: Manual Enables you can only be used . Camera's exposure meter cannot be set the aperture ring of...

Instruction Manual
Page 70
... Speed light is used). When Red-Eye Reduction (page 79) is also set , the self-timer lamp lights at the same output level as the normal Red-Eye Reduction before remote control operation: Lightly press the shutter release button on the camera body before the shutter releases and the flash fires when the shutter is released . • The shutter is released after the self-timer lamp lights for approx. 2 sec. Autofocus activated by to shoot with autofocus...
... Speed light is used). When Red-Eye Reduction (page 79) is also set , the self-timer lamp lights at the same output level as the normal Red-Eye Reduction before remote control operation: Lightly press the shutter release button on the camera body before the shutter releases and the flash fires when the shutter is released . • The shutter is released after the self-timer lamp lights for approx. 2 sec. Autofocus activated by to shoot with autofocus...

Instruction Manual
Page 89
... fire the flash. • Reprocopy Outfit PF-4 can be set to Manual. PK-13 and PN-11) 0 *7 0 - 0 *10 - - - *1 Metering system automatically switches to 1190 sec. c: :0z Bellows Focusing Attachment PB-6*12 - 0 *7 0 - 0 *10 - - - fl}: *7 With maximum effective aperture of f15.6 or faster. *8 With maximum aperture of CPU lenses and other usable lenses/accessories Lens/accessories Focus mode Exposure mode Manual with Any mode Autofocus electronic Manual other than the maximum aperture. ~ *5 Without shifting...
... fire the flash. • Reprocopy Outfit PF-4 can be set to Manual. PK-13 and PN-11) 0 *7 0 - 0 *10 - - - *1 Metering system automatically switches to 1190 sec. c: :0z Bellows Focusing Attachment PB-6*12 - 0 *7 0 - 0 *10 - - - fl}: *7 With maximum effective aperture of f15.6 or faster. *8 With maximum aperture of CPU lenses and other usable lenses/accessories Lens/accessories Focus mode Exposure mode Manual with Any mode Autofocus electronic Manual other than the maximum aperture. ~ *5 Without shifting...
Instruction Manual
Page 94
..., zoom, Micro or DC (Defocus image Control) - We recommend that can be attached easily by inserting onto the viewfinder eyepiece. Use the optional eyepiece correction lens when you need not be used , autofocus or the electronic rangefinder may not operate properly. 94 ..... . , -~ - -- ~- --- ._---- As with setting on camera body). Eyepiece correction lenses • Eyepiece correction lenses enable near- is maintained at low temperatures. (Film advance speed in the camera body...
..., zoom, Micro or DC (Defocus image Control) - We recommend that can be attached easily by inserting onto the viewfinder eyepiece. Use the optional eyepiece correction lens when you need not be used , autofocus or the electronic rangefinder may not operate properly. 94 ..... . , -~ - -- ~- --- ._---- As with setting on camera body). Eyepiece correction lenses • Eyepiece correction lenses enable near- is maintained at low temperatures. (Film advance speed in the camera body...

Instruction Manual
Page 99
... power on rewind is • Set the Speedlight flash 92 blink not set at TIL Auto mode to TIL, or set the Flash in the • Remove the film 33 exposure meter exposure meter camera after film cartridge. and E blink F- - exposure mode to aperture. With 88, attached. mode to start film rewind again. C]!!J blinks • Batteries are nearing • Have fresh ones ready. 17 exhaustion . blinks • Non-CPU lens is • Attach CPU lens 19, attached or lens is not correctly advanced. replace batteries...
... power on rewind is • Set the Speedlight flash 92 blink not set at TIL Auto mode to TIL, or set the Flash in the • Remove the film 33 exposure meter exposure meter camera after film cartridge. and E blink F- - exposure mode to aperture. With 88, attached. mode to start film rewind again. C]!!J blinks • Batteries are nearing • Have fresh ones ready. 17 exhaustion . blinks • Non-CPU lens is • Attach CPU lens 19, attached or lens is not correctly advanced. replace batteries...

Instruction Manual
Page 103
.... Flash synchronization Timing of the flash so it coincides with smaller maximum apertures (larger f-numbers) allow photographers to use ! Each automatic Speed light's flash output varies from lens' focal length divided by the amount of lower shutter speeds for calibration are also lighter and smaller than faster lenses. or slower. f-number The f-number represents the aperture value and is controlled by the effective aperture opening. of flash output available. Flash shooting...
.... Flash synchronization Timing of the flash so it coincides with smaller maximum apertures (larger f-numbers) allow photographers to use ! Each automatic Speed light's flash output varies from lens' focal length divided by the amount of lower shutter speeds for calibration are also lighter and smaller than faster lenses. or slower. f-number The f-number represents the aperture value and is controlled by the effective aperture opening. of flash output available. Flash shooting...

Instruction Manual
Page 104
... =---,:-:---f/stop Useful for flash photography. 104 Lenses which allow the user to -subject distance for determining the maximum flash-to continuously vary the focal length without changing focus are called telephoto lenses. Lock-On™ Autofocus keeps focus firmly on a main subject during Focus Tracking even if some other object momentarily blocks it in either meters or feet. Guide numbers are called zoom lenses. Front-Curtain Sync The flash fires...
... =---,:-:---f/stop Useful for flash photography. 104 Lenses which allow the user to -subject distance for determining the maximum flash-to continuously vary the focal length without changing focus are called telephoto lenses. Lock-On™ Autofocus keeps focus firmly on a main subject during Focus Tracking even if some other object momentarily blocks it in either meters or feet. Guide numbers are called zoom lenses. Front-Curtain Sync The flash fires...
Instruction Manual
Page 109
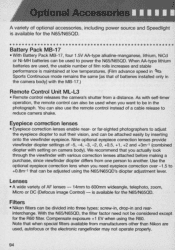
... 24-exposure film Multiple Exposure Selectable in P, S, A, M LCD panel information Shutter speed, aperture, Exposure Compensation, Exposure Compensation value, Auto Exposure Bracketing, Multiple Exposure, flash sync mode, focus area, battery power, frame counter, self-timer, remote control Date/time imprint function (N65QD only) Built-in motor • Rewind speed with timing accuracy within ±90 seconds a month; three years (depending upon use of -field button; Depth-of-field preview button Stop-down lens aperture by lightly pressing shutter release button after power turned on...
... 24-exposure film Multiple Exposure Selectable in P, S, A, M LCD panel information Shutter speed, aperture, Exposure Compensation, Exposure Compensation value, Auto Exposure Bracketing, Multiple Exposure, flash sync mode, focus area, battery power, frame counter, self-timer, remote control Date/time imprint function (N65QD only) Built-in motor • Rewind speed with timing accuracy within ±90 seconds a month; three years (depending upon use of -field button; Depth-of-field preview button Stop-down lens aperture by lightly pressing shutter release button after power turned on...


