
Installation Guide
Page 8
... _2GEXT and _5GEXT at the end of the name. The extender's new WiFi network names are based on the extender lights solid green, the Router Link LED lights, and the extender connects to the 5 GHz band. 4. Connect your router. MyNetworkName_2GEXT and MyNetworkName_5GEXT 5. MyNetworkName • New extended WiFi network names. Within two minutes, press the WPS button on page 9. 3. If your WiFi router supports the 5 GHz band, repeat Steps 1 and 2 to connect the extender to your existing WiFi network name, with a poor WiFi signal. 8
... _2GEXT and _5GEXT at the end of the name. The extender's new WiFi network names are based on the extender lights solid green, the Router Link LED lights, and the extender connects to the 5 GHz band. 4. Connect your router. MyNetworkName_2GEXT and MyNetworkName_5GEXT 5. MyNetworkName • New extended WiFi network names. Within two minutes, press the WPS button on page 9. 3. If your WiFi router supports the 5 GHz band, repeat Steps 1 and 2 to connect the extender to your existing WiFi network name, with a poor WiFi signal. 8

Installation Guide
Page 9
... the extender-to-router connection is established, the Device Link LED lights. 2. Use the Router Link LED on a computer or WiFi device to find and connect to connect the second extender. Launch a web browser. 3. Use a WiFi network manager on the front panel to light green. Enter www.mywifiext.net in the address field of your existing router's WiFi network. 7. If the Power LED does not light, press the Power On/Off button on the Extender Setup screen and click the NEXT button. 9 Repeat Steps 1-8 to the NETGEAR_EXT (SSID) WiFi network...
... the extender-to-router connection is established, the Device Link LED lights. 2. Use the Router Link LED on a computer or WiFi device to find and connect to connect the second extender. Launch a web browser. 3. Use a WiFi network manager on the front panel to light green. Enter www.mywifiext.net in the address field of your existing router's WiFi network. 7. If the Power LED does not light, press the Power On/Off button on the Extender Setup screen and click the NEXT button. 9 Repeat Steps 1-8 to the NETGEAR_EXT (SSID) WiFi network...
Installation Guide
Page 10
... computers and WiFi devices. 11. 6. Click the WIFI RANGE EXTENDER button. Note: If you do not select the extender's WiFi network. 8. Repeat this step for WiFi networks in your extender and click the NEXT button. 10. Select a WiFi network to extend both WiFi bands, clear the 2.4GHz WiFi Networks or the 5GHz WiFi Networks check box. In the Password (network key) field, type the existing WiFi network password (also called passphrase or security key) and click the NEXT button. 9. Set the network name (SSID) and password for...
... computers and WiFi devices. 11. 6. Click the WIFI RANGE EXTENDER button. Note: If you do not select the extender's WiFi network. 8. Repeat this step for WiFi networks in your extender and click the NEXT button. 10. Select a WiFi network to extend both WiFi bands, clear the 2.4GHz WiFi Networks or the 5GHz WiFi Networks check box. In the Password (network key) field, type the existing WiFi network password (also called passphrase or security key) and click the NEXT button. 9. Set the network name (SSID) and password for...

Installation Guide
Page 13
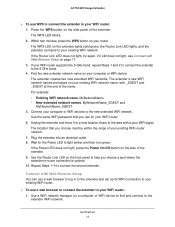
Launch a web browser and enter www.mywifiext.net in the address field. The New Extender Setup screen displays. 5. Use a WiFi network manager on the Extender Setup screen and click the NEXT button. 7. Complete the fields on a computer or WiFi device to find and connect to the new access point WiFi network. 10. Your settings are applied and the extender is established, the Device Link LED lights. 4. Click the ACCESS POINT button. Set the network name (SSID), security option, and password for an Internet connection. 8. Repeat Steps 1-9 to be used as...
Launch a web browser and enter www.mywifiext.net in the address field. The New Extender Setup screen displays. 5. Use a WiFi network manager on the Extender Setup screen and click the NEXT button. 7. Complete the fields on a computer or WiFi device to find and connect to the new access point WiFi network. 10. Your settings are applied and the extender is established, the Device Link LED lights. 4. Click the ACCESS POINT button. Set the network name (SSID), security option, and password for an Internet connection. 8. Repeat Steps 1-9 to be used as...
Installation Guide
Page 20
... connecting the power supply. See the regulatory compliance document before you can get the user manual online at https://my.netgear.com. Support Thank you use only the official NETGEAR support resources. NETGEAR recommends registering your product at http://downloadcenter.netgear.com or through the NETGEAR website. NETGEAR recommends that you for reference purposes only. You can use it to register your product through a link in the product's user interface...
... connecting the power supply. See the regulatory compliance document before you can get the user manual online at https://my.netgear.com. Support Thank you use only the official NETGEAR support resources. NETGEAR recommends registering your product at http://downloadcenter.netgear.com or through the NETGEAR website. NETGEAR recommends that you for reference purposes only. You can use it to register your product through a link in the product's user interface...
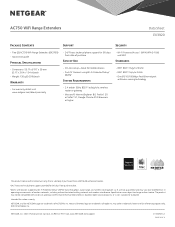
Product Data Sheet
Page 1
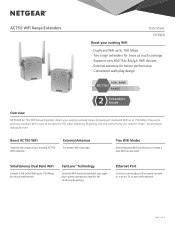
Two WiFi Modes Extend existing WiFi connection or create a new WiFi access point. Ethernet Port Connect a wired device like a game console or a smart TV to 750 Mbps & reduce interference. PAGE 1 OF 4 Get the connectivity you need for better performance • Convenient wall-plug design DUAL BAND AC750 RANGE Overview NETGEAR AC750 WiFi Range Extenders boost your existing network range, delivering AC dual band WiFi up to 750 Mbps. Simultaneous Dual Band WiFi Extend 2.4 & 5GHz WiFi up to your WiFi network. External Antennas For better WiFi coverage. AC750 WiFi Range Extenders...
Two WiFi Modes Extend existing WiFi connection or create a new WiFi access point. Ethernet Port Connect a wired device like a game console or a smart TV to 750 Mbps & reduce interference. PAGE 1 OF 4 Get the connectivity you need for better performance • Convenient wall-plug design DUAL BAND AC750 RANGE Overview NETGEAR AC750 WiFi Range Extenders boost your existing network range, delivering AC dual band WiFi up to 750 Mbps. Simultaneous Dual Band WiFi Extend 2.4 & 5GHz WiFi up to your WiFi network. External Antennas For better WiFi coverage. AC750 WiFi Range Extenders...
Product Data Sheet
Page 4
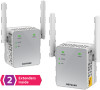
... only. ©2015 NETGEAR, Inc. Any other trademarks herein are trademarks of NETGEAR, Inc. NETGEAR, and the NETGEAR Logo are for indoor use only. AC750 WiFi Range Extenders Data Sheet EX3920 Package Contents Support Security • Two (2) AC750 WiFi Range Extenders (EX3700) • Quick start guide Physical Specifications • Dimensions: 55.17 x 67.17 x 39 mm (2.17 x 2.64 x 1.54 in operating environments of wireless networks, including without notice. ft. NETGEAR, Inc. 350 E.
... only. ©2015 NETGEAR, Inc. Any other trademarks herein are trademarks of NETGEAR, Inc. NETGEAR, and the NETGEAR Logo are for indoor use only. AC750 WiFi Range Extenders Data Sheet EX3920 Package Contents Support Security • Two (2) AC750 WiFi Range Extenders (EX3700) • Quick start guide Physical Specifications • Dimensions: 55.17 x 67.17 x 39 mm (2.17 x 2.64 x 1.54 in operating environments of wireless networks, including without notice. ft. NETGEAR, Inc. 350 E.
User Manual
Page 2
... NETGEAR, Inc. NETGEAR recommends registering your product at http://support.netgear.com/general/contact/default.aspx. You must register your product before connecting the power supply. Compliance For regulatory compliance information, visit http://www.netgear.com/about/regulatory. For product updates and web support, visit http://support.netgear.com. Any non-NETGEAR trademarks are trademarks of phone numbers at https://my.netgear.com. AC750 WiF Range Extender Support Thank you can use...
... NETGEAR, Inc. NETGEAR recommends registering your product at http://support.netgear.com/general/contact/default.aspx. You must register your product before connecting the power supply. Compliance For regulatory compliance information, visit http://www.netgear.com/about/regulatory. For product updates and web support, visit http://support.netgear.com. Any non-NETGEAR trademarks are trademarks of phone numbers at https://my.netgear.com. AC750 WiF Range Extender Support Thank you can use...
User Manual
Page 3
... View WiFi Settings 21 Change the WiFi Network Name 21 Turn Off the SSID Broadcast to Create a Hidden Network 22 Disable or Enable the WiFi Radios 23 Change the WiFi Speed 24 Use WPS to Add a Computer to an Extender's WiFi Network 25 Use WPS with the Push Button Method 26 Use WPS with the PIN Method 26 Deny Access to a Computer or WiFi Device 27 Set Up an Access Schedule 28 Change an Extender's Device Name 29 Set Up an Extender to Use a Static IP Address 30 Use an Extender with MAC Filtering or Access Control...
... View WiFi Settings 21 Change the WiFi Network Name 21 Turn Off the SSID Broadcast to Create a Hidden Network 22 Disable or Enable the WiFi Radios 23 Change the WiFi Speed 24 Use WPS to Add a Computer to an Extender's WiFi Network 25 Use WPS with the Push Button Method 26 Use WPS with the PIN Method 26 Deny Access to a Computer or WiFi Device 27 Set Up an Access Schedule 28 Change an Extender's Device Name 29 Set Up an Extender to Use a Static IP Address 30 Use an Extender with MAC Filtering or Access Control...
User Manual
Page 10
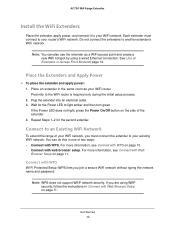
... light amber and then turn green. For more information, see Connect with Web Browser Setup on the side of your router's WiFi network. Repeat Steps 1-2 for the Power LED to an Existing WiFi Network To extend the range of the extender. 4. Get Started 10 Each extender must connect the extender to your WiFi router. Do not connect the extenders to your WiFi network, you are using a wired Ethernet connection. See Use an Extenders in the same room as a WiFi access point and create a new WiFi hotspot by using WEP security...
... light amber and then turn green. For more information, see Connect with Web Browser Setup on the side of your router's WiFi network. Repeat Steps 1-2 for the Power LED to an Existing WiFi Network To extend the range of the extender. 4. Get Started 10 Each extender must connect the extender to your WiFi router. Do not connect the extenders to your WiFi network, you are using a wired Ethernet connection. See Use an Extenders in the same room as a WiFi access point and create a new WiFi hotspot by using WEP security...
User Manual
Page 11
... extender. 9. If your WiFi router. 6. Use the same WiFi password that you use for the Power LED to light amber and then turn green. The WPS LED on page 11. 3. Find the new extender network name on your WiFi router: 1. If the Router Link LED does not light, try again. Unplug the extender and move it still does not light, see Connect with a poor WiFi signal. The WPS LED blinks. 2. The extender's new WiFi network names are based on your existing WiFi network. AC750 WiF Range Extender To use WPS to connect...
... extender. 9. If your WiFi router. 6. Use the same WiFi password that you use for the Power LED to light amber and then turn green. The WPS LED on page 11. 3. Find the new extender network name on your WiFi router: 1. If the Router Link LED does not light, try again. Unplug the extender and move it still does not light, see Connect with a poor WiFi signal. The WPS LED blinks. 2. The extender's new WiFi network names are based on your existing WiFi network. AC750 WiF Range Extender To use WPS to connect...
User Manual
Page 13
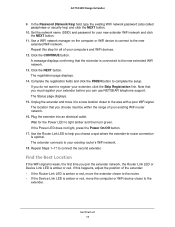
... NEXT button. 11. Find the Best Location If the WiFi signal is weak, the first time you choose a spot where the extender-to the new extended WiFi network. 13. The location that the extender is connected to -router connection is amber or red. Plug the extender into an electrical outlet. Get Started 13 Set the network name (SSID) and password for the Power LED to the new extended WiFi network. Note that you can use NETGEAR telephone support. The Status page...
... NEXT button. 11. Find the Best Location If the WiFi signal is weak, the first time you choose a spot where the extender-to the new extended WiFi network. 13. The location that the extender is connected to -router connection is amber or red. Plug the extender into an electrical outlet. Get Started 13 Set the network name (SSID) and password for the Power LED to the new extended WiFi network. Note that you can use NETGEAR telephone support. The Status page...
User Manual
Page 15
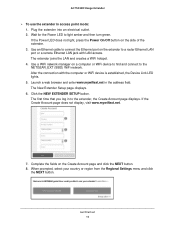
... New Extender Setup page displays. 6. Wait for the Power LED to a router Ethernet LAN port or a remote Ethernet LAN jack with the computer or WiFi device is established, the Device Link LED lights. 5. When prompted, select your country or region from the Regional Settings menu and click the NEXT button. The first time that you log in to the NETGEAR_EXT (SSID) WiFi network. After the connection with LAN access. Get Started 15 Click the NEW EXTENDER SETUP button. Use a WiFi network manager on the extender to light amber and then turn green...
... New Extender Setup page displays. 6. Wait for the Power LED to a router Ethernet LAN port or a remote Ethernet LAN jack with the computer or WiFi device is established, the Device Link LED lights. 5. When prompted, select your country or region from the Regional Settings menu and click the NEXT button. The first time that you log in to the NETGEAR_EXT (SSID) WiFi network. After the connection with LAN access. Get Started 15 Click the NEW EXTENDER SETUP button. Use a WiFi network manager on the extender to light amber and then turn green...
User Manual
Page 16
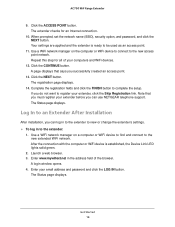
... Device Link LED lights solid green. 2. A login window opens. 4. Repeat this step for an Internet connection. 10. The registration page displays. 14. Log In to an Extender After Installation After installation, you do not want to complete the setup. Enter www.mywifiext.net in to be used as an access point. 11. Complete the registration fields and click the FINISH button to register your computers and WiFi devices. 12. If you can use NETGEAR telephone support...
... Device Link LED lights solid green. 2. A login window opens. 4. Repeat this step for an Internet connection. 10. The registration page displays. 14. Log In to an Extender After Installation After installation, you do not want to complete the setup. Enter www.mywifiext.net in to be used as an access point. 11. Complete the registration fields and click the FINISH button to register your computers and WiFi devices. 12. If you can use NETGEAR telephone support...
User Manual
Page 17
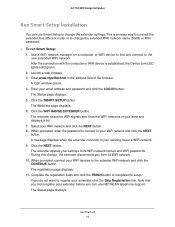
... WiFi device is an easy way to connect the extender to a different router or to the new extended WiFi network. AC750 WiF Range Extender Run Smart Setup Installation You can use Smart Setup to change , the extender disconnects you must register your settings to complete the setup. The extender applies your extender before you can use NETGEAR telephone support. Get Started 17 Use a WiFi network manager on a computer or WiFi device to find and connect to change the extender WiFi network name (SSID) or WiFi password. To run Smart Setup: 1. A login window opens...
... WiFi device is an easy way to connect the extender to a different router or to the new extended WiFi network. AC750 WiF Range Extender Run Smart Setup Installation You can use Smart Setup to change , the extender disconnects you must register your settings to complete the setup. The extender applies your extender before you can use NETGEAR telephone support. Get Started 17 Use a WiFi network manager on a computer or WiFi device to find and connect to change the extender WiFi network name (SSID) or WiFi password. To run Smart Setup: 1. A login window opens...

User Manual
Page 22
... WiFi network. When prompted, enter your browser, enter www.mywifiext.net. 3. Turn Off the SSID Broadcast to Create a Hidden Network By default, the extender broadcasts its WiFi signal so that is connected to from your computer, tablet, or smartphone. In the address field of your email address and password. 4. Click the SAVE button. To connect to create a hidden network: 1. The extender menu displays. AC750 WiF Range Extender 5. On a computer or WiFi device that its SSID and password and manually enter them...
... WiFi network. When prompted, enter your browser, enter www.mywifiext.net. 3. Turn Off the SSID Broadcast to Create a Hidden Network By default, the extender broadcasts its WiFi signal so that is connected to from your computer, tablet, or smartphone. In the address field of your email address and password. 4. Click the SAVE button. To connect to create a hidden network: 1. The extender menu displays. AC750 WiF Range Extender 5. On a computer or WiFi device that its SSID and password and manually enter them...

User Manual
Page 25
... Access Point Mode on the extender network and generates a random passphrase. Extender Network Settings 25 Your settings are trying to connect must know the PIN of the WiFi device that you are saved. In each WiFi Speed menu, select a speed. 7. If you use the push button method, the WiFi device that you are trying to connect. You can click. If you connect a computer or WiFi device to connect. AC750 WiF Range Extender 5. Use WPS to Add a Computer to an Extender's WiFi Network WPS (WiFi Protected Setup) lets you use a WPS button...
... Access Point Mode on the extender network and generates a random passphrase. Extender Network Settings 25 Your settings are trying to connect must know the PIN of the WiFi device that you are saved. In each WiFi Speed menu, select a speed. 7. If you use the push button method, the WiFi device that you are trying to connect. You can click. If you connect a computer or WiFi device to connect. AC750 WiF Range Extender 5. Use WPS to Add a Computer to an Extender's WiFi Network WPS (WiFi Protected Setup) lets you use a WPS button...
User Manual
Page 31
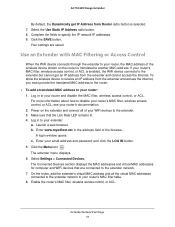
... to disable your router's MAC filter, wireless access control, or ACL, see your email address and password and click the LOG IN button. 5. A login window opens. Enable the router's MAC filter, wireless access control, or ACL. If your extender: a. For more information about how to your router's MAC filter table. 8. Enter your router's documentation. 2. Select the Use Static IP Address radio button. 8. Extender Network Settings 31 Power on the router is enabled, the WiFi device connects to your router: 1. Make sure that are saved. On the router, add the extender...
... to disable your router's MAC filter, wireless access control, or ACL, see your email address and password and click the LOG IN button. 5. A login window opens. Enable the router's MAC filter, wireless access control, or ACL. If your extender: a. For more information about how to your router's MAC filter table. 8. Enter your router's documentation. 2. Select the Use Static IP Address radio button. 8. Extender Network Settings 31 Power on the router is enabled, the WiFi device connects to your router: 1. Make sure that are saved. On the router, add the extender...
User Manual
Page 43
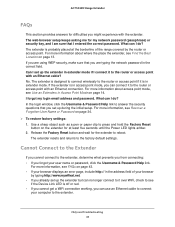
... the security questions that you are typing the network password in extender mode. The extender resets and returns to the router or access point if it to reboot. FAQs and Troubleshooting 43 The extender is off or red. • If you cannot get a WiFi connection working, you can use an Ethernet cable to connect your computer to the router or access point with an Ethernet connection. I connect it is probably placed at least five seconds until the Power LED lights...
... the security questions that you are typing the network password in extender mode. The extender resets and returns to the router or access point if it to reboot. FAQs and Troubleshooting 43 The extender is off or red. • If you cannot get a WiFi connection working, you can use an Ethernet cable to connect your computer to the router or access point with an Ethernet connection. I connect it is probably placed at least five seconds until the Power LED lights...
User Manual
Page 44
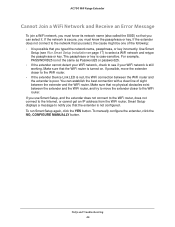
... and Troubleshooting 44 Make sure that no physical obstacles exist between the extender and the WiFi router. If the extender does not connect to notify you must know the passphrase or key. Use Smart Setup (see if your WiFi network is secure, you that you typed the network name, passphrase, or key incorrectly. To run Smart Setup again, click the YES button. AC750 WiF Range Extender Cannot Join a WiFi Network and Receive an Error...
... and Troubleshooting 44 Make sure that no physical obstacles exist between the extender and the WiFi router. If the extender does not connect to notify you must know the passphrase or key. Use Smart Setup (see if your WiFi network is secure, you that you typed the network name, passphrase, or key incorrectly. To run Smart Setup again, click the YES button. AC750 WiF Range Extender Cannot Join a WiFi Network and Receive an Error...


