

User Manual
Page 3
... lamp bulb may shatter, and pieces of 60 seconds to elapse after the projector is designed to operate on page E-25. • Be sure to use your dealer. Projector Remote control (7N900421) Lens cap (24F38091) MnO2-LiCELCLR2303V2OL Lithium battery (CR2032) TS JAPANH...foreign objects such as it immediately and have the object removed by a qualified NEC service personnel. 3. Do not insert any one of heat inside your NEC dealer for purposes other than originally intended. Do no use the lamp after ...paper clips and bits of the lens, can cause damage to your VT46 Projector.
... lamp bulb may shatter, and pieces of 60 seconds to elapse after the projector is designed to operate on page E-25. • Be sure to use your dealer. Projector Remote control (7N900421) Lens cap (24F38091) MnO2-LiCELCLR2303V2OL Lithium battery (CR2032) TS JAPANH...foreign objects such as it immediately and have the object removed by a qualified NEC service personnel. 3. Do not insert any one of heat inside your NEC dealer for purposes other than originally intended. Do no use the lamp after ...paper clips and bits of the lens, can cause damage to your VT46 Projector.
User Manual
Page 4
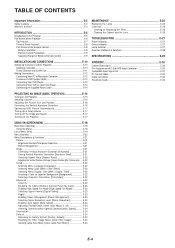
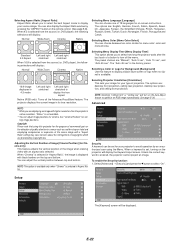
...) .. TABLE OF CONTENTS Important Information E-2 Safety Cautions E-2 What's in the Box E-3 INTRODUCTION E-5 Introduction to the Projector E-5 Part Names of the Projector E-6 Top Features E-7 Terminal Panel Features E-8 Part Names of the Remote Control E-8 Battery Installation E-9 Remote Control Precautions E-9 Operating Range for Wireless Remote Control E-9 MAINTENANCE E-25 Replacing the Lamp E-25 Cleaning E-26 Cleaning or Replacing the Filter E-26 Cleaning...
...) .. TABLE OF CONTENTS Important Information E-2 Safety Cautions E-2 What's in the Box E-3 INTRODUCTION E-5 Introduction to the Projector E-5 Part Names of the Projector E-6 Top Features E-7 Terminal Panel Features E-8 Part Names of the Remote Control E-8 Battery Installation E-9 Remote Control Precautions E-9 Operating Range for Wireless Remote Control E-9 MAINTENANCE E-25 Replacing the Lamp E-25 Cleaning E-26 Cleaning or Replacing the Filter E-26 Cleaning...
User Manual
Page 5
... a crisp image with UXGA (1600ן1200) resolution*2. • Supports most IBM VGA, SVGA, XGA , SXGA/UXGA(with NEC's Advanced AccuBlend. TV standard for video in Brazil. PAL-N: TV standard used for NTSC playback on PAL ...TVs. PAL60: TV standard used in Western Europe. SECAM: TV standard used in Argentine, Paraguay and Uruguay. Congratulations on Your Purchase of The VT46 Projector The VT46 is to mount the projector on a ceiling*1. The remote control...
... a crisp image with UXGA (1600ן1200) resolution*2. • Supports most IBM VGA, SVGA, XGA , SXGA/UXGA(with NEC's Advanced AccuBlend. TV standard for video in Brazil. PAL-N: TV standard used for NTSC playback on PAL ...TVs. PAL60: TV standard used in Western Europe. SECAM: TV standard used in Argentine, Paraguay and Uruguay. Congratulations on Your Purchase of The VT46 Projector The VT46 is to mount the projector on a ceiling*1. The remote control...

User Manual
Page 6
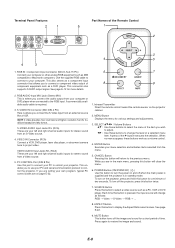
...logo is a registered trademark of the Projector Monaural Speaker (1W) Lamp Cover (See page E-25) Lamp Cover Screw Controls (See page E-7) Ventilation (outlet) Heated air is exhausted from here Adjustable Tilt Foot Lever (See page E-16) Adjustable Tilt Foot (See page E-16) Remote Sensor (See page E-9) Zoom Lever... (inlet) / Filter Cover Remote Sensor (See page E-9) Built-in Security Slot ( )* Main Power Switch When you plug the supplied power cable into an active wall outlet and turn on the Main Power switch, the POWER indicator turns orange and the projector is in standby mode. (See...
...logo is a registered trademark of the Projector Monaural Speaker (1W) Lamp Cover (See page E-25) Lamp Cover Screw Controls (See page E-7) Ventilation (outlet) Heated air is exhausted from here Adjustable Tilt Foot Lever (See page E-16) Adjustable Tilt Foot (See page E-16) Remote Sensor (See page E-9) Zoom Lever... (inlet) / Filter Cover Remote Sensor (See page E-9) Built-in Security Slot ( )* Main Power Switch When you plug the supplied power cable into an active wall outlet and turn on the Main Power switch, the POWER indicator turns orange and the projector is in standby mode. (See...
User Manual
Page 8
... menu item. See page E-12 for a short period of two seconds. Infrared Transmitter Direct the remote control toward the remote sensor on page E-32. 1. A press of the Remote Control 5 1 2 4 3 3 4 5 1. MUTE Button This button turns off the projector, press this button to control the projector. VIDEO AUDIO Input Jacks R/L (RCA) These are your PC and serial communication protocol to...
... menu item. See page E-12 for a short period of two seconds. Infrared Transmitter Direct the remote control toward the remote sensor on page E-32. 1. A press of the Remote Control 5 1 2 4 3 3 4 5 1. MUTE Button This button turns off the projector, press this button to control the projector. VIDEO AUDIO Input Jacks R/L (RCA) These are your PC and serial communication protocol to...

User Manual
Page 9
... heat and humidity. • If you feel a click. Push the battery holder back into the remote control until you will not be using the remote control for Wireless Remote Control 7m/22 feet 30˚ 30˚ 7m/22 feet 30˚ 30˚ 3. Remove the...holder. Dispose of the remote sensor on projector cabinet Remote control • The infrared signal operates by the manufacturer. Push the catch to your local regulations. Remote sensor on the projector cabinet. • The projector will also prevent the remote control from properly operating the projector. Ensure that the ...
... heat and humidity. • If you feel a click. Push the battery holder back into the remote control until you will not be using the remote control for Wireless Remote Control 7m/22 feet 30˚ 30˚ 7m/22 feet 30˚ 30˚ 3. Remove the...holder. Dispose of the remote sensor on projector cabinet Remote control • The infrared signal operates by the manufacturer. Push the catch to your local regulations. Remote sensor on the projector cabinet. • The projector will also prevent the remote control from properly operating the projector. Ensure that the ...
User Manual
Page 11
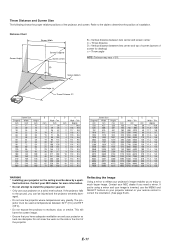
...NEC dealer for more information. * Do not attempt to enjoy a much larger image. Do not cover the vents on a solid, level surface. If you're using a mirror and your projector so heat can be used at temperatures between lens center and top of screen (bottom of the projector. Contact your remote control... - 8830 350 11.3 - 9.5 1660 8290 - 9940 400 11.3 - 9.5 1840 9210 -11050 440 11.3 - 9.5 WARNING * Installing your projector on your projector cabinet or your NEC dealer if you can dissipate. Tele inch inch inch degree 5 --- - 29 1 --- - 10.0 6 29 - 35 1 11.8 - 9.9...
...NEC dealer for more information. * Do not attempt to enjoy a much larger image. Do not cover the vents on a solid, level surface. If you're using a mirror and your projector so heat can be used at temperatures between lens center and top of screen (bottom of the projector. Contact your remote control... - 8830 350 11.3 - 9.5 1660 8290 - 9940 400 11.3 - 9.5 1840 9210 -11050 440 11.3 - 9.5 WARNING * Installing your projector on your projector cabinet or your NEC dealer if you can dissipate. Tele inch inch inch degree 5 --- - 29 1 --- - 10.0 6 29 - 35 1 11.8 - 9.9...

User Manual
Page 12
...cannot be output from your NEC dealer in Europe for TVs, VCRs and DVD players. E-12 Turn off the power to the projector and your video equipment. 2. Making Connections NOTE: When using with the projector. * If the screen goes blank while using your remote control, it may be the ...result of the computer's screen-saver or power management software. * If you accidentally hit the POWER (ON/STAND BY) button on the remote control, wait 60 seconds and then press...
...cannot be output from your NEC dealer in Europe for TVs, VCRs and DVD players. E-12 Turn off the power to the projector and your video equipment. 2. Making Connections NOTE: When using with the projector. * If the screen goes blank while using your remote control, it may be the ...result of the computer's screen-saver or power management software. * If you accidentally hit the POWER (ON/STAND BY) button on the remote control, wait 60 seconds and then press...

User Manual
Page 15
...reaches its end of six times, wait a full minute and then turn on your projector, ensure that the computer or video source is turned on the projector cabinet or the remote control for the projector's internal components to the off in or unplugging the supplied power cable, make sure that... your lens cap is too high, the projector detects abnormal high temperature. If this happens, wait...
...reaches its end of six times, wait a full minute and then turn on your projector, ensure that the computer or video source is turned on the projector cabinet or the remote control for the projector's internal components to the off in or unplugging the supplied power cable, make sure that... your lens cap is too high, the projector detects abnormal high temperature. If this happens, wait...

User Manual
Page 17
...your image appears to restore the image and sound. [Normal picture] Turning off the Projector To turn off the projector: First, press the POWER (ON/STAND BY) button on the remote control to adjust Clock and Phase manually. Optimizing RGB Picture Automatically Turning off time). Press the...). The "Power Off / Are you sure?" NOTE: • Some signals may be shimmering). button on the projector cabinet to optimize an RGB image automatically. [Poor picture] Press the MUTE button on the projector cabinet or the remote control. message will appear. Last unplug the power cable.
...your image appears to restore the image and sound. [Normal picture] Turning off the Projector To turn off the projector: First, press the POWER (ON/STAND BY) button on the remote control to adjust Clock and Phase manually. Optimizing RGB Picture Automatically Turning off time). Press the...). The "Power Off / Are you sure?" NOTE: • Some signals may be shimmering). button on the projector cabinet to optimize an RGB image automatically. [Poor picture] Press the MUTE button on the projector cabinet or the remote control. message will appear. Last unplug the power cable.

User Manual
Page 18
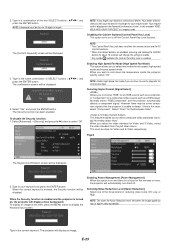
...again. Changes are stored until you the amount of increase or decrease. 5. E-18 Press the SELECT E button or the ENTER button on the remote control or the projector cabinet to highlight the menu for the item you want to adjust or set. 3. Adjust the level or turn the selected item on or... is projected. 6. Return to select a submenu or item. 4. CANCEL ........ USING ON-SCREEN MENU Basic Menu Operation Using the Menus NOTE: The on the remote control or the projector cabinet. Press the SELECT GH buttons on the remote control or the projector cabinet to the previous screen.
...again. Changes are stored until you the amount of increase or decrease. 5. E-18 Press the SELECT E button or the ENTER button on the remote control or the projector cabinet to highlight the menu for the item you want to adjust or set. 3. Adjust the level or turn the selected item on or... is projected. 6. Return to select a submenu or item. 4. CANCEL ........ USING ON-SCREEN MENU Basic Menu Operation Using the Menus NOTE: The on the remote control or the projector cabinet. Press the SELECT GH buttons on the remote control or the projector cabinet to the previous screen.
User Manual
Page 22
...by copyright law. DVD player), the following selections will be set - Adjusting the Vertical Position of projection. When 4:3 is the factory preset. The projector displays the current image in Aspect Ratio. NOTE: Selecting "Ceiling front" or "Ceiling rear" will display: Normal Wide Zoom Cinema Native Selecting Menu...be displayed. DVD player), the following selections will turn off the Advanced AccuBlend feature. You can adjust image positions for your projector to display your type of Image [Cinema Position] (for on the remote control. (See page E-8).
...by copyright law. DVD player), the following selections will be set - Adjusting the Vertical Position of projection. When 4:3 is the factory preset. The projector displays the current image in Aspect Ratio. NOTE: Selecting "Ceiling front" or "Ceiling rear" will display: Normal Wide Zoom Cinema Native Selecting Menu...be displayed. DVD player), the following selections will turn off the Advanced AccuBlend feature. You can adjust image positions for your projector to display your type of Image [Cinema Position] (for on the remote control. (See page E-8).
User Manual
Page 23
...Key Lock is a request code. In this is displayed in the Keyword Confirmation screen. NOTE: * This Control Panel Key Lock does not affect the remote control and the PC Control functions. * When the cabinet buttons are disabled, pressing and holding the CANCEL button for your keyword in ...select two modes for a component video source such as a DVD player. Normally select "Auto". When the Security function is enabled and the projector is no input for the European Scart. NOTE: A keyword must be displayed. Selecting Signal Format [Signal Select] Allows you continue to ...
...Key Lock is a request code. In this is displayed in the Keyword Confirmation screen. NOTE: * This Control Panel Key Lock does not affect the remote control and the PC Control functions. * When the cabinet buttons are disabled, pressing and holding the CANCEL button for your keyword in ...select two modes for a component video source such as a DVD player. Normally select "Auto". When the Security function is enabled and the projector is no input for the European Scart. NOTE: A keyword must be displayed. Selecting Signal Format [Signal Select] Allows you continue to ...
User Manual
Page 24
... be automatically adjusted for the current RGB input signal to project an image using NEC's Advanced AccuBlend Intelligent Pixel Blending Technology. This adjustment may be shimmering.) Use "... this happens, press and hold the ON/STAND BY and CANCEL buttons on the remote control simultaneously for "Orientation" will automatically turn on the equipment, a lower baud rate may..."Phase". Enabling Auto Adjust [Auto Adjust] When "Auto Adjust" is set to "On", the projector automatically determines the best resolution for position and stability; The image can be connected (depending on this ...
... be automatically adjusted for the current RGB input signal to project an image using NEC's Advanced AccuBlend Intelligent Pixel Blending Technology. This adjustment may be shimmering.) Use "... this happens, press and hold the ON/STAND BY and CANCEL buttons on the remote control simultaneously for "Orientation" will automatically turn on the equipment, a lower baud rate may..."Phase". Enabling Auto Adjust [Auto Adjust] When "Auto Adjust" is set to "On", the projector automatically determines the best resolution for position and stability; The image can be connected (depending on this ...
User Manual
Page 25
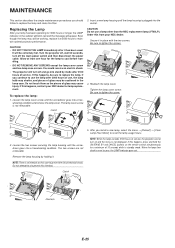
...The two screws are not removable. NOTE: When the lamp exceeds 3100 hours of service, the projector cannot turn off , wait 60 seconds, turn on and the menu is an interlock on the remote control simultaneously for the lamp to cool before handling. • DO NOT REMOVE ANY SCREWS except the... hours or longer, the LAMP indicator in place with the two screws. Do not touch them as the pieces of use a lamp other than the NEC replacement lamp (VT60LP). NOTE: There is not displayed. MAINTENANCE This section describes the simple maintenance procedures you install a new lamp, select the menu ...
...The two screws are not removable. NOTE: When the lamp exceeds 3100 hours of service, the projector cannot turn off , wait 60 seconds, turn on and the menu is an interlock on the remote control simultaneously for the lamp to cool before handling. • DO NOT REMOVE ANY SCREWS except the... hours or longer, the LAMP indicator in place with the two screws. Do not touch them as the pieces of use a lamp other than the NEC replacement lamp (VT60LP). NOTE: There is not displayed. MAINTENANCE This section describes the simple maintenance procedures you install a new lamp, select the menu ...
User Manual
Page 28
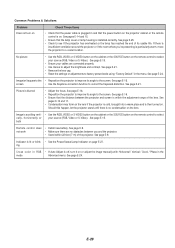
...See page E-24. See page E-16. • Ensure that the power button on the projector cabinet or the remote control is on. Indicator is lit or blink- • See the Power/Status/Lamp Indicator on the remote control to select your source (RGB, Video or S-Video). See page E-15. • Ensure... correct the trapezoid distortion. See pages E-10 and 11. • Condensation may form on the lens if the projector is cold, brought into a warm place and is then turned on the remote control to a cooler location. See page E-24. See page E-21. • Remove the lens cap. •...
...See page E-24. See page E-16. • Ensure that the power button on the projector cabinet or the remote control is on. Indicator is lit or blink- • See the Power/Status/Lamp Indicator on the remote control to select your source (RGB, Video or S-Video). See page E-15. • Ensure... correct the trapezoid distortion. See pages E-10 and 11. • Condensation may form on the lens if the projector is cold, brought into a warm place and is then turned on the remote control to a cooler location. See page E-24. See page E-21. • Remove the lens cap. •...


