
User Manual
Page 5
.../Clock E-30 Resolution E-30 Factory Default E-30 Menu E-31 Menu Mode E-31 Basic/Advanced E-31 Language E-31 Projector Pointer E-31 Source Display E-31 Volume Bar (Direct Button E-31 Menu Display Time E-31 Setup E-31 Orientation E-31...E-40 E-5 MAINTENANCE Replacing the Lamp E-33 Remote Control Battery Installation E-34 Cleaning or Replacing the Filters E-34 5. INTRODUCTION Introduction to the MultiSync VT440/VT540 Projector E-6 Getting Started E-6 What's in the Box E-7 Getting to Know Your MultiSync VT440/VT540 Projector E-8 Front / Side Features E-8 Rear ...
.../Clock E-30 Resolution E-30 Factory Default E-30 Menu E-31 Menu Mode E-31 Basic/Advanced E-31 Language E-31 Projector Pointer E-31 Source Display E-31 Volume Bar (Direct Button E-31 Menu Display Time E-31 Setup E-31 Orientation E-31...E-40 E-5 MAINTENANCE Replacing the Lamp E-33 Remote Control Battery Installation E-34 Cleaning or Replacing the Filters E-34 5. INTRODUCTION Introduction to the MultiSync VT440/VT540 Projector E-6 Getting Started E-6 What's in the Box E-7 Getting to Know Your MultiSync VT440/VT540 Projector E-8 Front / Side Features E-8 Rear ...
User Manual
Page 6
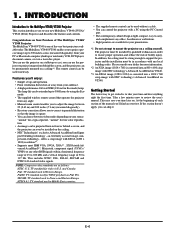
... player, document camera, or even a laser disc player. SECAM: TV standard used in accordance with NEC technology's Advanced AccuBlend on the ceiling. • NEC Technologies' exclusive Advanced AccuBlend intelligent pixel blending technology - In addition, the ceiling must be strong enough ...1280 x 1024) resolution*3. • Supports most IBM VGA, SVGA, XGA*2 , SXGA(with a PC using the Eco mode. • The supplied wireless remote control that the image is to your new MultiSync VT440 (SVGA)/ VT540 (XGA) Projector and describes the features and controls. This includes NTSC, PAL, ...
... player, document camera, or even a laser disc player. SECAM: TV standard used in accordance with NEC technology's Advanced AccuBlend on the ceiling. • NEC Technologies' exclusive Advanced AccuBlend intelligent pixel blending technology - In addition, the ceiling must be strong enough ...1280 x 1024) resolution*3. • Supports most IBM VGA, SVGA, XGA*2 , SXGA(with a PC using the Eco mode. • The supplied wireless remote control that the image is to your new MultiSync VT440 (SVGA)/ VT540 (XGA) Projector and describes the features and controls. This includes NTSC, PAL, ...

User Manual
Page 7
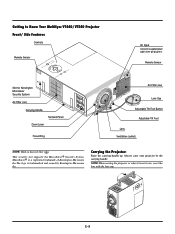
POINTER POWER MUTPEIC. CANCEL ADAJU. Make sure your MultiSync VT440/VT540 Projector. STATPUOSWER ENTER ON/OFF ENTER CANCEL Lens cap SELECT SOURCE MENU AUTO ADJUST INRPGUBT AUD OUTPUT IN PC-CONTROL S-VIDEO OUT VID Projector MAGNIFY HELP RD-366E SOURCE MENU Vol. TO Card remote control String and rivet Power cable GCuoidneQnuecictk MaUnusaelr's Signal cable ON...
POINTER POWER MUTPEIC. CANCEL ADAJU. Make sure your MultiSync VT440/VT540 Projector. STATPUOSWER ENTER ON/OFF ENTER CANCEL Lens cap SELECT SOURCE MENU AUTO ADJUST INRPGUBT AUD OUTPUT IN PC-CONTROL S-VIDEO OUT VID Projector MAGNIFY HELP RD-366E SOURCE MENU Vol. TO Card remote control String and rivet Power cable GCuoidneQnuecictk MaUnusaelr's Signal cable ON...
User Manual
Page 8
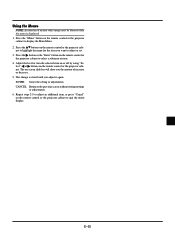
...CEL OUTPUT PC-CONTROL S-VIDEO VIDEO R IGNBPUT OUT SOURCE IN IN OUT AUD E-8 STATPUOSWER Getting to Know Your MultiSync VT440/VT540 Projector Front/ Side Features Controls Remote Sensor AC Input Connect the supplied power cable's three-pin plug here. MicroSaver® is a registered trademark ... slot supports the MicroSaver® Security System. NOTE:When moving the projector or when it is trademarked and owned by the carrying handle. Always carry your projector by Kensington Microware Inc. Remote Sensor ENTER ON/STAND BY SELECT CANCEL SOURCE MENU AUTO ADJUST Slot ...
...CEL OUTPUT PC-CONTROL S-VIDEO VIDEO R IGNBPUT OUT SOURCE IN IN OUT AUD E-8 STATPUOSWER Getting to Know Your MultiSync VT440/VT540 Projector Front/ Side Features Controls Remote Sensor AC Input Connect the supplied power cable's three-pin plug here. MicroSaver® is a registered trademark ... slot supports the MicroSaver® Security System. NOTE:When moving the projector or when it is trademarked and owned by the carrying handle. Always carry your projector by Kensington Microware Inc. Remote Sensor ENTER ON/STAND BY SELECT CANCEL SOURCE MENU AUTO ADJUST Slot ...

User Manual
Page 9
... Built-in Monaural Speaker (1W) Rear Foot Lamp Cover Card Remote Slot Slot for Card Remote Control The supplied card remote control can be stored in the string. Pull out the card remote control. 3. E-9 To store the card remote control: 1. Lens Cap AUTO ADJ. Thread the string through the hole ...INRPGUBT IN AUD NOTE: Do not push or pull the card remote control in a slanting direction. Unless you push the card remote control straight, you may not eject the card remote control. SOURCE HELP POWER Vol. Push the card remote control until it is into the slot. 2. Use the ...
... Built-in Monaural Speaker (1W) Rear Foot Lamp Cover Card Remote Slot Slot for Card Remote Control The supplied card remote control can be stored in the string. Pull out the card remote control. 3. E-9 To store the card remote control: 1. Lens Cap AUTO ADJ. Thread the string through the hole ...INRPGUBT IN AUD NOTE: Do not push or pull the card remote control in a slanting direction. Unless you push the card remote control straight, you may not eject the card remote control. SOURCE HELP POWER Vol. Push the card remote control until it is into the slot. 2. Use the ...

User Manual
Page 12
... Mute Button This button turns off the projector, press and hold the POWER button for an optimal picture. NOTE: Before you want on the projector cabinet. Remote Control Precautions • Handle the remote control carefully. • If the remote control gets wet, wipe it may not... be sure to remove the insulation tape from the card remote control. * Keep the coin cell battery...
... Mute Button This button turns off the projector, press and hold the POWER button for an optimal picture. NOTE: Before you want on the projector cabinet. Remote Control Precautions • Handle the remote control carefully. • If the remote control gets wet, wipe it may not... be sure to remove the insulation tape from the card remote control. * Keep the coin cell battery...

User Manual
Page 16
... Do not cover the vents on a solid, level surface. Contact your remote control to correct the orientation. (See page E-31.) E-16 Contact your projector on the ceiling must be used at temperatures between projector base and top of the projector. Ceiling Installation F B α PC-CONTROL S-VIDEO VIDEO RGB INPUT...581 1927 76 390 15 WARNING • Installing your NEC dealer if you 're using a mirror and your image is upside down, use the "Menu" and "Select" buttons on your projector cabinet or vw buttons on your NEC dealer for more information. * Do not attempt to install...
... Do not cover the vents on a solid, level surface. Contact your remote control to correct the orientation. (See page E-31.) E-16 Contact your projector on the ceiling must be used at temperatures between projector base and top of the projector. Ceiling Installation F B α PC-CONTROL S-VIDEO VIDEO RGB INPUT...581 1927 76 390 15 WARNING • Installing your NEC dealer if you 're using a mirror and your image is upside down, use the "Menu" and "Select" buttons on your projector cabinet or vw buttons on your NEC dealer for more information. * Do not attempt to install...

User Manual
Page 17
...connecting a signal cable longer than the supplied cable. DVD Player (with the projector. Optional Component V cable Document Camera NOTE: When using with a notebook PC, be 3 m (9.8 feet) or shorter. NOTE: If using your remote control, it may be output from RGB output unless the notebook PC is ...recommended that you accidentally hit the POWER button on the projector. It is turned on after connecting with component output) VCR, DVD Player or...
...connecting a signal cable longer than the supplied cable. DVD Player (with the projector. Optional Component V cable Document Camera NOTE: When using with a notebook PC, be 3 m (9.8 feet) or shorter. NOTE: If using your remote control, it may be output from RGB output unless the notebook PC is ...recommended that you accidentally hit the POWER button on the projector. It is turned on after connecting with component output) VCR, DVD Player or...

User Manual
Page 24
... blinks green and the lamp will go into its standby mode and the power indicator will glow orange. The projector needs to use. Or press the "Menu" button on the remote control or the projector cabinet to select "Video" (VCR, document camera, or laser disc player), S-Video" or "RGB" (computer or... want to display the image. SELECT Vol. 3) Adjust the image size up to 400 percent. If you press the "POWER" button on the projector cabinet or the remote control will not to be unplugged if it can enlarge the area you want up to 400%. 4. Use the "Magnify" button (+) or (-) ...
... blinks green and the lamp will go into its standby mode and the power indicator will glow orange. The projector needs to use. Or press the "Menu" button on the remote control or the projector cabinet to select "Video" (VCR, document camera, or laser disc player), S-Video" or "RGB" (computer or... want to display the image. SELECT Vol. 3) Adjust the image size up to 400 percent. If you press the "POWER" button on the projector cabinet or the remote control will not to be unplugged if it can enlarge the area you want up to 400%. 4. Use the "Magnify" button (+) or (-) ...
User Manual
Page 25
... you the amount of increase or decrease. 5. The change is displayed. 1. Repeat steps 2-5 to adjust an additional item, or press "Cancel" on the remote control or the projector cabinet to highlight the menu for the item you want to quit the menu display. Press the vw buttons on the...adjustments. Press the ᮣ button or the "Enter" button on -screen slide bar will show you adjust it again. The on the remote control or the projector cabinet to the previous screen without storing settings or adjustments. 6. Adjust the level or turn the selected item on or off by using "Select...
... you the amount of increase or decrease. 5. The change is displayed. 1. Repeat steps 2-5 to adjust an additional item, or press "Cancel" on the remote control or the projector cabinet to highlight the menu for the item you want to quit the menu display. Press the vw buttons on the...adjustments. Press the ᮣ button or the "Enter" button on -screen slide bar will show you adjust it again. The on the remote control or the projector cabinet to the previous screen without storing settings or adjustments. 6. Adjust the level or turn the selected item on or off by using "Select...
User Manual
Page 28
... details. Hue Varies the color level from +/- Use the ᮤ or ᮣ buttons on VT440. Move the slide bar to the right to controls for a brief period of the projector. Image Options Basic Mode Advanced Mode Provides optional controls such as a VCR, DVD player, laser ... Auto Adjust, Position/Clock, Resolution, and Factory Default. S-Video Selects what is connected to your remote control to adjust. Use the "Select" button on the projector cabinet or the remote control to highlight the menu for the item you to select a video source such as Keystone Correction,...
... details. Hue Varies the color level from +/- Use the ᮤ or ᮣ buttons on VT440. Move the slide bar to the right to controls for a brief period of the projector. Image Options Basic Mode Advanced Mode Provides optional controls such as a VCR, DVD player, laser ... Auto Adjust, Position/Clock, Resolution, and Factory Default. S-Video Selects what is connected to your remote control to adjust. Use the "Select" button on the projector cabinet or the remote control to highlight the menu for the item you to select a video source such as Keystone Correction,...
User Manual
Page 31
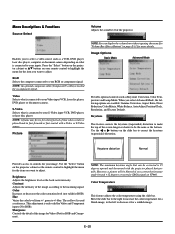
...seconds if no signal is used for more advanced functionality. The menu will automatically be turned off the information for the on the projector. E-31 Menu Allows you to set operating options. The options are pressed within 10 seconds. Auto 10 sec ..... The menu will...RGB. The preset choices are pressed within 3 seconds. Background: Use this mode you want on the screen, press the Magnify button on the remote control to enlarge the selected area on screen. Auto 30 sec ..... Advanced Mode ... Language: You can change the following settings: Gamma Correction...
...seconds if no signal is used for more advanced functionality. The menu will automatically be turned off the information for the on the projector. E-31 Menu Allows you to set operating options. The options are pressed within 10 seconds. Auto 10 sec ..... The menu will...RGB. The preset choices are pressed within 3 seconds. Background: Use this mode you want on the screen, press the Magnify button on the remote control to enlarge the selected area on screen. Auto 30 sec ..... Advanced Mode ... Language: You can change the following settings: Gamma Correction...

User Manual
Page 32
...". Information Displays the status of lamp and projector usage respectively. This feature enables you select the video standard for Video and S-Video respectively. [Page 3] (Advanced mode) Auto Start: Turns the projector on the remote control or projector cabinet. This must be some component signals ...Confirmation: This option determines whether a confirmation dialog for five minutes or more, the projector will appear or not. If this happens, press the "Help" button on and there is on the remote control for a component video source such as a computer, or "Component" for...
...". Information Displays the status of lamp and projector usage respectively. This feature enables you select the video standard for Video and S-Video respectively. [Page 3] (Advanced mode) Auto Start: Turns the projector on the remote control or projector cabinet. This must be some component signals ...Confirmation: This option determines whether a confirmation dialog for five minutes or more, the projector will appear or not. If this happens, press the "Help" button on and there is on the remote control for a component video source such as a computer, or "Component" for...

User Manual
Page 33
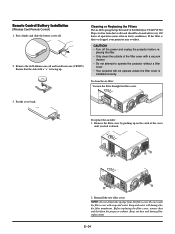
... still be scattered in place with the two screws. CAUTION: Do not use , the lamp bulb may cause injury. Order this happens, contact your NEC dealer. CAUTION • DO NOT TOUCH THE LAMP immediately after 2100 (up to prevent the risk of glass may shatter, and pieces of 10 seconds...clean the filter, and replace the batteries in Eco mode) hours of service, the projector cannot turn off , wait a full minute, and then disconnect the power cable. Allow at 2000 (up to 3150 hours in the remote control. Do not touch them as the pieces of electrical shock. Loosen the lamp cover...
... still be scattered in place with the two screws. CAUTION: Do not use , the lamp bulb may cause injury. Order this happens, contact your NEC dealer. CAUTION • DO NOT TOUCH THE LAMP immediately after 2100 (up to prevent the risk of glass may shatter, and pieces of 10 seconds...clean the filter, and replace the batteries in Eco mode) hours of service, the projector cannot turn off , wait a full minute, and then disconnect the power cable. Allow at 2000 (up to 3150 hours in the remote control. Do not touch them as the pieces of electrical shock. Loosen the lamp cover...
User Manual
Page 34
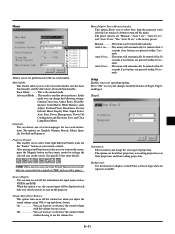
...not wash the filter cover with a "+" is dirty or clogged, your projector may overheat. MnO2-LiCELCLR2302VO5L Cleaning or Replacing the Filters The air-filter sponge keeps the inside of the MultiSync VT440/VT540 Projector free from dust or dirt and should be cleaned after every 100 hours ...back. Remove the filter cover by pushing up . Keep out dust and during filter replacement. TS JAPAN H TS JAPAN H Remote Control Battery Installation [Wireless Card Remote Control] 1. Ensure that the side with soap and water. MnO2-LiCELCLR2302VO5L TS JAPAN H INRPGUBT AUD OUTPUT IN PC-CONTROL S-...
...not wash the filter cover with a "+" is dirty or clogged, your projector may overheat. MnO2-LiCELCLR2302VO5L Cleaning or Replacing the Filters The air-filter sponge keeps the inside of the MultiSync VT440/VT540 Projector free from dust or dirt and should be cleaned after every 100 hours ...back. Remove the filter cover by pushing up . Keep out dust and during filter replacement. TS JAPAN H TS JAPAN H Remote Control Battery Installation [Wireless Card Remote Control] 1. Ensure that the side with soap and water. MnO2-LiCELCLR2302VO5L TS JAPAN H INRPGUBT AUD OUTPUT IN PC-CONTROL S-...

User Manual
Page 35
...replace the lamp as soon as possible Steady orange Steady red The projector is insufficient ventilation around the projector or if the room where you want to a cooler location. Steady orange Blinking red (8 sec interval) The projector is turned on . Remote control does not work • Install a new battery. Cross...up or using the Factory Default on the Image Options Menu in and that the power button on the projector cabinet or the remote control is on screen during 20002100 hours of the projector. If Auto Adjust is on, turn on . See page E-14. • Ensure that the power...
...replace the lamp as soon as possible Steady orange Steady red The projector is insufficient ventilation around the projector or if the room where you want to a cooler location. Steady orange Blinking red (8 sec interval) The projector is turned on . Remote control does not work • Install a new battery. Cross...up or using the Factory Default on the Image Options Menu in and that the power button on the projector cabinet or the remote control is on screen during 20002100 hours of the projector. If Auto Adjust is on, turn on . See page E-14. • Ensure that the power...


