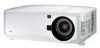

NP4000/NP4001 spec sheet
Page 2
IN THE BOX Remote control, batteries, power cord, 6-segment color wheel, user's manual on until the lamp is properly cooled. DLP by Texas Instruments NP4000: XGA 1024 x 768 NP4001: WXGA 1280 x 768 NP4000/NP4001: UXGA 1600 x 1200 NP4000: 5200 normal NP4001: 4500 normal 2100:1 260W AC / 230W eco 2000 hours normal ...noise and reduces total cost of InstaCare. The lamp is switched off. Kensington lock slot enables security cable to be attached to projector. 64-step image magnification with location control Quick Power Off protects the lamp during this period to prevent unit power on CD-...
IN THE BOX Remote control, batteries, power cord, 6-segment color wheel, user's manual on until the lamp is properly cooled. DLP by Texas Instruments NP4000: XGA 1024 x 768 NP4001: WXGA 1280 x 768 NP4000/NP4001: UXGA 1600 x 1200 NP4000: 5200 normal NP4001: 4500 normal 2100:1 260W AC / 230W eco 2000 hours normal ...noise and reduces total cost of InstaCare. The lamp is switched off. Kensington lock slot enables security cable to be attached to projector. 64-step image magnification with location control Quick Power Off protects the lamp during this period to prevent unit power on CD-...
NP4000/4001 UM
Page 1
Projector NP4001/NP4000 User's Manual
Projector NP4001/NP4000 User's Manual

NP4000/4001 UM
Page 2
however, should you notice any questionable points, errors or omissions, please contact us. (4) Notwithstanding article (3), NEC will not be responsible for trademark rights in this user's manual may not be the trade- and other countries. • Windows, Windows 98, Windows Me, Windows XP or Windows...user's manual may be reprinted in part or whole without notice. (3) Great care has been taken in the U.S. tion. • Macintosh, Mac OS X and PowerBook are subject to result from using the Projector. © NEC Display Solutions, Ltd. 2007 Second edition July 2007 • DLP, ...
however, should you notice any questionable points, errors or omissions, please contact us. (4) Notwithstanding article (3), NEC will not be responsible for trademark rights in this user's manual may not be the trade- and other countries. • Windows, Windows 98, Windows Me, Windows XP or Windows...user's manual may be reprinted in part or whole without notice. (3) Great care has been taken in the U.S. tion. • Macintosh, Mac OS X and PowerBook are subject to result from using the Projector. © NEC Display Solutions, Ltd. 2007 Second edition July 2007 • DLP, ...

NP4000/4001 UM
Page 3
...the unit. The power outlet socket should be installed as near to the equipment as possible, and should be read this manual carefully before using your projector. Machine Noise Information Regulation - 3. This symbol alerts the user that un-insulated voltage within the unit may be sufficient ... QUALIFIED SERVICE PERSONNEL. Do NOT use this unit's plug with an extension cord or in accordance with any kind of your NEC NP4001/NP4000 projector and keep the manual handy for Canada only) This Class B digital apparatus meets all the prongs can be fully inserted. GPSGV (for Germany only...
...the unit. The power outlet socket should be installed as near to the equipment as possible, and should be read this manual carefully before using your projector. Machine Noise Information Regulation - 3. This symbol alerts the user that un-insulated voltage within the unit may be sufficient ... QUALIFIED SERVICE PERSONNEL. Do NOT use this unit's plug with an extension cord or in accordance with any kind of your NEC NP4001/NP4000 projector and keep the manual handy for Canada only) This Class B digital apparatus meets all the prongs can be fully inserted. GPSGV (for Germany only...
NP4000/4001 UM
Page 5
... this equipment. Please read them carefully and heed all warnings. Failure to comply with this manual. For UK only: In UK, a BS approved power cable with molded plug has ..., which the receiver is encouraged to try to the unit EXCEPT those specified by NEC Display Solutions of America, Inc. Important Safeguards These safety instructions are designed to Part... regulation could void your right to radio communications. iii Installation • Do not place the projector in the following measures: z Reorient or relocate the receiving antenna. This equipment generates, uses,...
... this equipment. Please read them carefully and heed all warnings. Failure to comply with this manual. For UK only: In UK, a BS approved power cable with molded plug has ..., which the receiver is encouraged to try to the unit EXCEPT those specified by NEC Display Solutions of America, Inc. Important Safeguards These safety instructions are designed to Part... regulation could void your right to radio communications. iii Installation • Do not place the projector in the following measures: z Reorient or relocate the receiving antenna. This equipment generates, uses,...
NP4000/4001 UM
Page 8
...been exposed to rain or water. ƒ If the projector does not operate normally when you follow the instructions described in this user's manual. ƒ If the projector has been dropped or the cabinet has been damaged. ƒ If the projector exhibits a distinct change in the Fan Mode window to... reduce heat stress on the projector (see Fan Mode). 1 • Do not unplug...
...been exposed to rain or water. ƒ If the projector does not operate normally when you follow the instructions described in this user's manual. ƒ If the projector has been dropped or the cabinet has been damaged. ƒ If the projector exhibits a distinct change in the Fan Mode window to... reduce heat stress on the projector (see Fan Mode). 1 • Do not unplug...

NP4000/4001 UM
Page 10
......1 o INTRODUCTION TO THE PROJECTOR 2 Features you'll enjoy:...2 p PART NAMES OF THE PROJECTOR 3 Front-right view ...3 Top View...4 Carrying the Projector...5 Bottom view...6 q TOP... PROJECTOR 17 o SELECTING A LOCATION...18 p INSTALLING OR REMOVING THE OPTIONAL LENS 19 Removing the Existing Lens From the Projector 19... Installing the New Lens ...21 Installing the New Lens Using the anti-theft screw 21 q THROW DISTANCE AND SCREEN SIZE 22 NP4000...PROJECTING AN IMAGE (BASIC OPERATION 37 n TURNING ON THE PROJECTOR ...37 Note on Startup Screen (Menu Language Select screen 38 ...
......1 o INTRODUCTION TO THE PROJECTOR 2 Features you'll enjoy:...2 p PART NAMES OF THE PROJECTOR 3 Front-right view ...3 Top View...4 Carrying the Projector...5 Bottom view...6 q TOP... PROJECTOR 17 o SELECTING A LOCATION...18 p INSTALLING OR REMOVING THE OPTIONAL LENS 19 Removing the Existing Lens From the Projector 19... Installing the New Lens ...21 Installing the New Lens Using the anti-theft screw 21 q THROW DISTANCE AND SCREEN SIZE 22 NP4000...PROJECTING AN IMAGE (BASIC OPERATION 37 n TURNING ON THE PROJECTOR ...37 Note on Startup Screen (Menu Language Select screen 38 ...

NP4000/4001 UM
Page 11
... ADJUSTING VOLUME UP AND DOWN 46 s TURNING OFF THE PROJECTOR ...47 About Direct Power Off...48 After Use...48 4. CONVENIENT FEATURES ...49 n TURNING OFF THE IMAGE AND SOUND 49 o FREEZING A PICTURE ...49 p ADJUSTING THE FOCUS/ZOOM MANUALLY 50 Adjusting by Using the OSD Control Panel 50 q CHANGING... LAMP MODE ...51 Changing Lamp Mode by Using the Projector's OSD Control Panel 51 Changing Lamp Mode by Using the Remote Control 52 r GETTING ...
... ADJUSTING VOLUME UP AND DOWN 46 s TURNING OFF THE PROJECTOR ...47 About Direct Power Off...48 After Use...48 4. CONVENIENT FEATURES ...49 n TURNING OFF THE IMAGE AND SOUND 49 o FREEZING A PICTURE ...49 p ADJUSTING THE FOCUS/ZOOM MANUALLY 50 Adjusting by Using the OSD Control Panel 50 q CHANGING... LAMP MODE ...51 Changing Lamp Mode by Using the Projector's OSD Control Panel 51 Changing Lamp Mode by Using the Remote Control 52 r GETTING ...

NP4000/4001 UM
Page 13
... the Box? Introduction n What's in dusty environments. 1 Carefully unpack the projector and check that the following items are included: NP4001/NP4000 Projector Power cable 3.6m/11.8 ft. (North America: 79TD5701) (Europe: 79TD5711) (Japan: 79TD 5691) Remote Cable 10m/33ft (79TD5481)... ƒ For North America Only: Registration Card Limited Warranty ƒ For Europe only: Guarantee Policy ƒ For Japan Only: User's manual Warranty card CD-ROM (This User's manual) (79TD5501) 6 Segment Color Wheel (79TD5371) Lens Hole Cap (Installed) ƒ Anti-Theft Screw for lens x 1 (79TD5811) &#...
... the Box? Introduction n What's in dusty environments. 1 Carefully unpack the projector and check that the following items are included: NP4001/NP4000 Projector Power cable 3.6m/11.8 ft. (North America: 79TD5701) (Europe: 79TD5711) (Japan: 79TD 5691) Remote Cable 10m/33ft (79TD5481)... ƒ For North America Only: Registration Card Limited Warranty ƒ For Europe only: Guarantee Policy ƒ For Japan Only: User's manual Warranty card CD-ROM (This User's manual) (79TD5501) 6 Segment Color Wheel (79TD5371) Lens Hole Cap (Installed) ƒ Anti-Theft Screw for lens x 1 (79TD5811) &#...

NP4000/4001 UM
Page 25
... between remote and projector is obstructed, you can disrupt remote control operation. 2. Certain high- If the path between the remote control and the projec- This user's manual describes the functions based on . Introduction Important: 1. Avoid using the projector with bright fluorescent ...lighting turned on the remote control. Note: *To turn on the projector have the same functions as...
... between remote and projector is obstructed, you can disrupt remote control operation. 2. Certain high- If the path between the remote control and the projec- This user's manual describes the functions based on . Introduction Important: 1. Avoid using the projector with bright fluorescent ...lighting turned on the remote control. Note: *To turn on the projector have the same functions as...
NP4000/4001 UM
Page 46
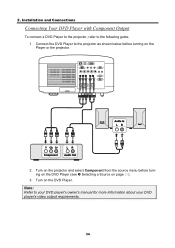
Connect the DVD Player to the projector as shown below before turning on the DVD Player (see o Selecting a Source on the Player or the projector. 2. Turn on the projector and select Component from the source menu before turning on page 39). 3. Note: Refer to the following guide. 1. 2. Turn on the DVD Player. Installation and Connections Connecting Your DVD Player with Component Output To connect a DVD Player to the projector, refer to your DVD player's owner's manual for more information about your DVD player's video output requirements. 34
Connect the DVD Player to the projector as shown below before turning on the DVD Player (see o Selecting a Source on the Player or the projector. 2. Turn on the projector and select Component from the source menu before turning on page 39). 3. Note: Refer to the following guide. 1. 2. Turn on the DVD Player. Installation and Connections Connecting Your DVD Player with Component Output To connect a DVD Player to the projector, refer to your DVD player's owner's manual for more information about your DVD player's video output requirements. 34
NP4000/4001 UM
Page 47
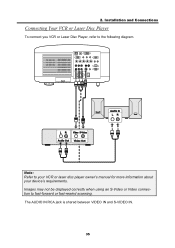
2. Installation and Connections Connecting Your VCR or Laser Disc Player To connect you VCR or Laser Disc Player, refer to your VCR or laser disc player owner's manual for more information about your device's requirements. The AUDIO IN RCA jack is shared between VIDEO IN and S-VIDEO IN. 35 Note: Refer to the following diagram. Images may not be displayed correctly when using an S-Video or Video connection to fast-forward or fast-rewind scanning.
2. Installation and Connections Connecting Your VCR or Laser Disc Player To connect you VCR or Laser Disc Player, refer to your VCR or laser disc player owner's manual for more information about your device's requirements. The AUDIO IN RCA jack is shared between VIDEO IN and S-VIDEO IN. 35 Note: Refer to the following diagram. Images may not be displayed correctly when using an S-Video or Video connection to fast-forward or fast-rewind scanning.
NP4000/4001 UM
Page 52
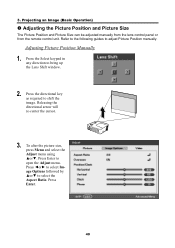
...) p Adjusting the Picture Position and Picture Size The Picture Position and Picture Size can be adjusted manually from the lens control panel or from the remote control unit. Press Enter to adjust Picture Position manually. Refer to the following guides to open the Adjust menu. Press the directional key as required to...
...) p Adjusting the Picture Position and Picture Size The Picture Position and Picture Size can be adjusted manually from the lens control panel or from the remote control unit. Press Enter to adjust Picture Position manually. Refer to the following guides to open the Adjust menu. Press the directional key as required to...
NP4000/4001 UM
Page 62
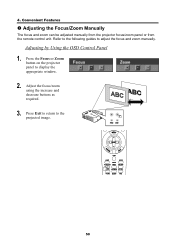
4. Adjust the focus/zoom using the increase and decrease buttons as required. 3. Refer to the following guides to the projected image. 50 Convenient Features p Adjusting the Focus/Zoom Manually The focus and zoom can be adjusted manually from the projector focus/zoom panel or from the remote control unit. Press Exit to return to adjust the focus and zoom manually. Press the Focus or Zoom button on the projector panel to display the appropriate window. 2. Adjusting by Using the OSD Control Panel 1.
4. Adjust the focus/zoom using the increase and decrease buttons as required. 3. Refer to the following guides to the projected image. 50 Convenient Features p Adjusting the Focus/Zoom Manually The focus and zoom can be adjusted manually from the projector focus/zoom panel or from the remote control unit. Press Exit to return to adjust the focus and zoom manually. Press the Focus or Zoom button on the projector panel to display the appropriate window. 2. Adjusting by Using the OSD Control Panel 1.
NP4000/4001 UM
Page 66
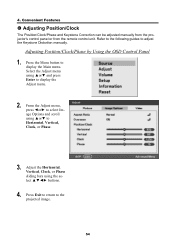
... the following guides to the projected image. 54 Press Exit to return to adjust the Keystone Distortion manually. Convenient Features s Adjusting Position/Clock The Position/Clock/Phase and Keystone Correction can be adjusted manually from the projector's control panel or from the remote control unit. Select the Adjust menu using the select buttons...
... the following guides to the projected image. 54 Press Exit to return to adjust the Keystone Distortion manually. Convenient Features s Adjusting Position/Clock The Position/Clock/Phase and Keystone Correction can be adjusted manually from the projector's control panel or from the remote control unit. Select the Adjust menu using the select buttons...

NP4000/4001 UM
Page 76
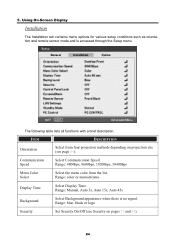
... Fan Mode Default Source Select Color System Video S-Video Filter Message Desktop Front/Ceiling Rear/Desktop Rear/Ceiling Front 4800bps/9600bps/19200bps/38400bps Color/Monochrome Manual/Auto 5s/Auto 15s/Auto 45s Blue/Black/Logo Off/On Off/On Off/On Front/Back, Front, Back DHCP Enable/Disable IP address Subnet...
... Fan Mode Default Source Select Color System Video S-Video Filter Message Desktop Front/Ceiling Rear/Desktop Rear/Ceiling Front 4800bps/9600bps/19200bps/38400bps Color/Monochrome Manual/Auto 5s/Auto 15s/Auto 45s Blue/Black/Logo Off/On Off/On Off/On Front/Back, Front, Back DHCP Enable/Disable IP address Subnet...
NP4000/4001 UM
Page 96
... list. Range: 4800bps, 9600bps, 19200bps, 38400bps Menu Color Select Select the menu color from four projection methods depending on pages 57 and 88). 84 Range: Manual, Auto 5s, Auto 15s, Auto 45s Background Select Background appearance when there is accessed through the Setup menu. The following table lists all functions with...
... list. Range: 4800bps, 9600bps, 19200bps, 38400bps Menu Color Select Select the menu color from four projection methods depending on pages 57 and 88). 84 Range: Manual, Auto 5s, Auto 15s, Auto 45s Background Select Background appearance when there is accessed through the Setup menu. The following table lists all functions with...
NP4000/4001 UM
Page 99
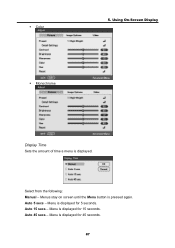
Auto 5 secs - Using On-Screen Display ƒ Monochrome Display Time Sets the amount of time a menu is pressed again. Menu is displayed for 5 seconds. Select from the following: Manual - Menu is displayed for 45 seconds. 87 Menus stay on screen until the Menu button is displayed. Menu is displayed for 15 seconds. Auto 45 secs - Auto 15 secs - ƒ Color 5.
Auto 5 secs - Using On-Screen Display ƒ Monochrome Display Time Sets the amount of time a menu is pressed again. Menu is displayed for 5 seconds. Select from the following: Manual - Menu is displayed for 45 seconds. 87 Menus stay on screen until the Menu button is displayed. Menu is displayed for 15 seconds. Auto 45 secs - Auto 15 secs - ƒ Color 5.
NP4000/4001 UM
Page 107
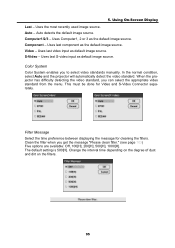
... default image source. In the normal condition, select Auto and the projector will automatically detect the video standard. The default setting is 500[H]. Component - Clean the filter when you to select video standards manually. Video - Auto - S-Video - Change the interval time depending... the message "Please clean filter." (see page 103) Five options are available: Off, 100[H], 200[H], 500[H], 1000[H]. When the projector has difficulty detecting the video standard, you can select the appropriate video standard from the menu. 5. Computer1/2/3 - This must be done...
... default image source. In the normal condition, select Auto and the projector will automatically detect the video standard. The default setting is 500[H]. Component - Clean the filter when you to select video standards manually. Video - Auto - S-Video - Change the interval time depending... the message "Please clean filter." (see page 103) Five options are available: Off, 100[H], 200[H], 500[H], 1000[H]. When the projector has difficulty detecting the video standard, you can select the appropriate video standard from the menu. 5. Computer1/2/3 - This must be done...

NP4000/4001 UM
Page 149
... inserted into the input connector A message appears on PC and changed it to the projector. • A combination of the projector. Power cable's plug is shifted in the projector's menu. Still no image even though you checked the signal's resolution on the screen.... Input source's resolution and frequency are lost . Horizontal and vertical positions are lost . Troubleshooting Check List Before contacting your dealer or service personnel, check the following list to your user's manual...
... inserted into the input connector A message appears on PC and changed it to the projector. • A combination of the projector. Power cable's plug is shifted in the projector's menu. Still no image even though you checked the signal's resolution on the screen.... Input source's resolution and frequency are lost . Horizontal and vertical positions are lost . Troubleshooting Check List Before contacting your dealer or service personnel, check the following list to your user's manual...


