
NP115 : RS232 codes- Projectors
Page 27
... (NULL termination character string) DATA50 .. 82 : Reserved DATA83 .. 86 : Lamp Hour Meter (second) (!) DATA87 .. 90 : Filter Usage (second) DATA91 .. 94 : Panel Usage (second) DATA95 .. 98 : Projector Usage (second) Response: At the time of a failure A3H 8AH 01H xxH 02H DATA01 DATA02 CKS (*1) (*2) (*4) (*3) Supplement: (!) Lamp Hour Meter This is also displayed.... LAMP INFORMATION REQUEST Function: This command acquires the lamp information (in DATA86 DATA85 DATA84 DATA83 (005265C0) 3) Change from HEX to 5400000 seconds * The projector's hours of use is displayed in terms of...
... (NULL termination character string) DATA50 .. 82 : Reserved DATA83 .. 86 : Lamp Hour Meter (second) (!) DATA87 .. 90 : Filter Usage (second) DATA91 .. 94 : Panel Usage (second) DATA95 .. 98 : Projector Usage (second) Response: At the time of a failure A3H 8AH 01H xxH 02H DATA01 DATA02 CKS (*1) (*2) (*4) (*3) Supplement: (!) Lamp Hour Meter This is also displayed.... LAMP INFORMATION REQUEST Function: This command acquires the lamp information (in DATA86 DATA85 DATA84 DATA83 (005265C0) 3) Change from HEX to 5400000 seconds * The projector's hours of use is displayed in terms of...
NP115 : RS232 codes- Projectors
Page 39
... / On/Off 00H Image / Auto Adjust 00H Image / Position H 01H Image / Position V 00H Image / Pixel Adjust Clock 01H Image / Pixel Adjust Phase 00H Image / Video Filter 00H Image / Resolution 00H Image / Amplitude H 01H Image / Amplitude V 00H Image / Input Signal Size H 01H Image / Input Signal Size V 00H Image / Output Signal Size H 01H...
... / On/Off 00H Image / Auto Adjust 00H Image / Position H 01H Image / Position V 00H Image / Pixel Adjust Clock 01H Image / Pixel Adjust Phase 00H Image / Video Filter 00H Image / Resolution 00H Image / Amplitude H 01H Image / Amplitude V 00H Image / Input Signal Size H 01H Image / Input Signal Size V 00H Image / Output Signal Size H 01H...

NP4000/4001 UM
Page 6
...you wish to have the projector installed on the ceiling: ƒ Do not attempt to install the projector yourself. ƒ The projector must be installed by qualified...ensure proper operation and reduce the risk of the projector up to the projector. Doing so may encounter damage caused by up...must be strong enough to support the projector and the installation must be in a horizontal position Do not put the projector on its side when the lamp ... and the lens shift mechanism may cause damage to 20%. Place the projector in accordance with any local building codes. ƒ Please consult your...
...you wish to have the projector installed on the ceiling: ƒ Do not attempt to install the projector yourself. ƒ The projector must be installed by qualified...ensure proper operation and reduce the risk of the projector up to the projector. Doing so may encounter damage caused by up...must be strong enough to support the projector and the installation must be in a horizontal position Do not put the projector on its side when the lamp ... and the lens shift mechanism may cause damage to 20%. Place the projector in accordance with any local building codes. ƒ Please consult your...

NP4000/4001 UM
Page 12
......131 Handling of Contents Version ...99 v RESET MENU DESCRIPTIONS AND FUNCTIONS 101 6. MAINTENANCE...102 n CLEANING THE PROJECTOR ...102 Cleaning the Cabinet ...102 Cleaning the Lens ...102 Cleaning the Filters ...103 o REPLACING CONSUMABLE PARTS 105 Replacing the Filters ...105 Replacing the Lamps ...107 Resetting the Lamp Hours Counter 109 7. Table of the Address for...
......131 Handling of Contents Version ...99 v RESET MENU DESCRIPTIONS AND FUNCTIONS 101 6. MAINTENANCE...102 n CLEANING THE PROJECTOR ...102 Cleaning the Cabinet ...102 Cleaning the Lens ...102 Cleaning the Filters ...103 o REPLACING CONSUMABLE PARTS 105 Replacing the Filters ...105 Replacing the Lamps ...107 Resetting the Lamp Hours Counter 109 7. Table of the Address for...

NP4000/4001 UM
Page 15
...obstruct 8 10 - - 6, 44 - - - 103 Important: Grill openings on the projector allow for good air circulation, which keeps the projector lamp cool. Intake vent and front filter Keeps the front fan free of the lens 12. clean regularly for IR signal from remote...input devices 6. Height adjuster Adjusts level of the grill openings. 3 Introduction ITEM 1. 2. 3. Do not obstruct any of projector 9. p Part Names of the Projector Front-right view 1. LABEL IR receiver Lamp cover Lens control panel DESCRIPTION Receiver for optimum performance - Lens release button Press ...
...obstruct 8 10 - - 6, 44 - - - 103 Important: Grill openings on the projector allow for good air circulation, which keeps the projector lamp cool. Intake vent and front filter Keeps the front fan free of the lens 12. clean regularly for IR signal from remote...input devices 6. Height adjuster Adjusts level of the grill openings. 3 Introduction ITEM 1. 2. 3. Do not obstruct any of projector 9. p Part Names of the Projector Front-right view 1. LABEL IR receiver Lamp cover Lens control panel DESCRIPTION Receiver for optimum performance - Lens release button Press ...

NP4000/4001 UM
Page 18
...: 50/50 cm, 20/20 inch for optimum performance 103 4. For permanent installations, follow local codes. 6 clean regularly for proper ventilation; Rear filter 7. Introduction Bottom view ITEM LABEL 1. do not obstruct - 3. distance from fluorescent lamps: at least 50 cm front and back of screw: 12... installation, use approved mounting hardware & M4 screws; Security chain opening Attach anti-theft device - maximum depth of then projector. clean regularly for information on mounting the projector on a ceiling - 5. 1. see u Using the Physical Lock 60 6.
...: 50/50 cm, 20/20 inch for optimum performance 103 4. For permanent installations, follow local codes. 6 clean regularly for proper ventilation; Rear filter 7. Introduction Bottom view ITEM LABEL 1. do not obstruct - 3. distance from fluorescent lamps: at least 50 cm front and back of screw: 12... installation, use approved mounting hardware & M4 screws; Security chain opening Attach anti-theft device - maximum depth of then projector. clean regularly for information on mounting the projector on a ceiling - 5. 1. see u Using the Physical Lock 60 6.

NP4000/4001 UM
Page 76
...Sensor LAN Settings Standby Mode PC Control Auto Start Power Management Screen Trigger Fan Mode Default Source Select Color System Video S-Video Filter Message Desktop Front/Ceiling Rear/Desktop Rear/Ceiling Front 4800bps/9600bps/19200bps/38400bps Color/Monochrome Manual/Auto 5s/Auto 15s/Auto 45s...NTSC/PAL/SECAM Off/100[H]/200[H]/500[H]/1000[H] Lamp 1 Life Remaining, Lamp 2 Life Remaining Lamp 1 Hours Used, Lamp 2 Hours Used Filter Hours Used Input Terminal Source Name Horizontal Frequency Vertical Frequency Video Type Sync Type Sync Polarity Scan Type IP Address, Subnet Mask, Gateway, MAC...
...Sensor LAN Settings Standby Mode PC Control Auto Start Power Management Screen Trigger Fan Mode Default Source Select Color System Video S-Video Filter Message Desktop Front/Ceiling Rear/Desktop Rear/Ceiling Front 4800bps/9600bps/19200bps/38400bps Color/Monochrome Manual/Auto 5s/Auto 15s/Auto 45s...NTSC/PAL/SECAM Off/100[H]/200[H]/500[H]/1000[H] Lamp 1 Life Remaining, Lamp 2 Life Remaining Lamp 1 Hours Used, Lamp 2 Hours Used Filter Hours Used Input Terminal Source Name Horizontal Frequency Vertical Frequency Video Type Sync Type Sync Polarity Scan Type IP Address, Subnet Mask, Gateway, MAC...

NP4000/4001 UM
Page 105
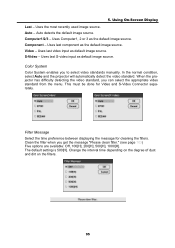
... there is no signal received by using a power strip equipped with a switch and a breaker. Power Management Power Management enables the projector to have the projector display a message when the air Filter Message filter needs servicing. Set this item to on to automatically turn off by using the Direct Power Off function or after the...
... there is no signal received by using a power strip equipped with a switch and a breaker. Power Management Power Management enables the projector to have the projector display a message when the air Filter Message filter needs servicing. Set this item to on to automatically turn off by using the Direct Power Off function or after the...
NP4000/4001 UM
Page 107
... image source. In the normal condition, select Auto and the projector will automatically detect the video standard. Using On-Screen Display Last - Uses last S-video input as the default image source. Auto - Filter Message Select the time preference between displaying the message for Video ... 1000[H]. This must be done for cleaning the filters. Clean the filter when you to select video standards manually. Uses the most recently used image source. Uses last component as default image source. When the projector has difficulty detecting the video standard, you can select...
... image source. In the normal condition, select Auto and the projector will automatically detect the video standard. Using On-Screen Display Last - Uses last S-video input as the default image source. Auto - Filter Message Select the time preference between displaying the message for Video ... 1000[H]. This must be done for cleaning the filters. Clean the filter when you to select video standards manually. Uses the most recently used image source. Uses last component as default image source. When the projector has difficulty detecting the video standard, you can select...

NP4000/4001 UM
Page 108
... Descriptions and Functions The information menu provides only screens to access details quickly. Lamp2 Life Remaining Lamp1 Hours Used Lamp2 Hours Used Filter Hours Used Displays the Lamp2 life remaining as a percentage. Usage Time The Usage Time tab displays information about lamp usage and ...remaining lamp life. Displays the Lamp1 total usage in hours. 96 Displays the filter total usage in hours. Displays the Lamp2 total usage in hours. ITEM DESCRIPTION Lamp1 Life Remaining Displays the Lamp1 life remaining as...
... Descriptions and Functions The information menu provides only screens to access details quickly. Lamp2 Life Remaining Lamp1 Hours Used Lamp2 Hours Used Filter Hours Used Displays the Lamp2 life remaining as a percentage. Usage Time The Usage Time tab displays information about lamp usage and ...remaining lamp life. Displays the Lamp1 total usage in hours. 96 Displays the filter total usage in hours. Displays the Lamp2 total usage in hours. ITEM DESCRIPTION Lamp1 Life Remaining Displays the Lamp1 life remaining as...

NP4000/4001 UM
Page 113
..., Background, Control Panel Lock, Security, LAN Mode, Communication Speed, Lamp Life Remaining, Lamp Hours Used, and Filter Hours Used. Clear Lamp1 Hours Reset lamp1 hours Clear Lamp2 Hours Reset lamp2 hours Clear Filter Hours Reset filter hours These options should only be reset. Using On-Screen Display v Reset Menu Descriptions and Functions Occasionally...
..., Background, Control Panel Lock, Security, LAN Mode, Communication Speed, Lamp Life Remaining, Lamp Hours Used, and Filter Hours Used. Clear Lamp1 Hours Reset lamp1 hours Clear Lamp2 Hours Reset lamp2 hours Clear Filter Hours Reset filter hours These options should only be reset. Using On-Screen Display v Reset Menu Descriptions and Functions Occasionally...

NP4000/4001 UM
Page 115
..., please clean or replace all three filters at the same time to clean the filters. 1. If the filter is displayed the filters must be accessed as shown. 103 When the message below is dirty or clogged, your projector may overheat. Refer to clean the filters more frequently. Lift the projector to expose the underside to keep the...
..., please clean or replace all three filters at the same time to clean the filters. 1. If the filter is displayed the filters must be accessed as shown. 103 When the message below is dirty or clogged, your projector may overheat. Refer to clean the filters more frequently. Lift the projector to expose the underside to keep the...

NP4000/4001 UM
Page 116
Once the filters are sucked into the projector, causing failure. 104 6. Maintenance 3. The rear filter can be accessed as shown. Note: Using the projector without the air filter fitted inside, dirt and dust are cleaned, please reset the filter hours via the Clear Filter Hours option in the v Reset Menu Descriptions and Functions on page 101.
Once the filters are sucked into the projector, causing failure. 104 6. Maintenance 3. The rear filter can be accessed as shown. Note: Using the projector without the air filter fitted inside, dirt and dust are cleaned, please reset the filter hours via the Clear Filter Hours option in the v Reset Menu Descriptions and Functions on page 101.

NP4000/4001 UM
Page 117
... injure your hand or fingers while lifting the projector to replace the various consumable parts within the projector quickly and safely. Gently slide the filter covers in the direction shown. CAUTION: Do not drop the projector on the bottom. 1. See pages 27 and 106 for the projector to replace any of the parts, please take...
... injure your hand or fingers while lifting the projector to replace the various consumable parts within the projector quickly and safely. Gently slide the filter covers in the direction shown. CAUTION: Do not drop the projector on the bottom. 1. See pages 27 and 106 for the projector to replace any of the parts, please take...

NP4000/4001 UM
Page 118
Once the filters are replaced, please reset the filter hours via the Clear Filter Hours option in the direction shown. Maintenance 3. Insert replacement foam and press down firmly. 4. Replace the filter covers by pushing gently in the v Reset Menu Descriptions and Functions on page 101. 106 6.
Once the filters are replaced, please reset the filter hours via the Clear Filter Hours option in the direction shown. Maintenance 3. Insert replacement foam and press down firmly. 4. Replace the filter covers by pushing gently in the v Reset Menu Descriptions and Functions on page 101. 106 6.

NP4000/4001 UM
Page 120
6. Lift the module handle up (B) in the direction shown to remove the lamp. 4. Pull firmly on the module handle in the direction shown. Loosen the two captive screws (A) on the lamp cover (A), and remove the lamp cover as shown (B). 2. Maintenance To replace the lamp, refer to install the new lamp module and replace the lamp cover. Note: The filters should be replaced when replacing the lamp modules. 108 Reverse steps 1 to 3 to the following. 1. A B A B 3. Loosen the screw on the lamp module.
6. Lift the module handle up (B) in the direction shown to remove the lamp. 4. Pull firmly on the module handle in the direction shown. Loosen the two captive screws (A) on the lamp cover (A), and remove the lamp cover as shown (B). 2. Maintenance To replace the lamp, refer to install the new lamp module and replace the lamp cover. Note: The filters should be replaced when replacing the lamp modules. 108 Reverse steps 1 to 3 to the following. 1. A B A B 3. Loosen the screw on the lamp module.

NP4000/4001 UM
Page 147
Specifications FUNCTION SETTING Source Select Panel Computer1 - Switches to the projector (see o Selecting a Source on page 39 for more information). 135 Displays the status of errors occurring within the projector DESCRIPTION This switches the input connector of the projector This displays the status of hours Filter has been used Lamp 2 Life Remaining - Switches to the...
Specifications FUNCTION SETTING Source Select Panel Computer1 - Switches to the projector (see o Selecting a Source on page 39 for more information). 135 Displays the status of errors occurring within the projector DESCRIPTION This switches the input connector of the projector This displays the status of hours Filter has been used Lamp 2 Life Remaining - Switches to the...

NP 4000 IG
Page 5
Dimensions are in inches. v 1.4 Lamp & Color Wheel Cover 15.16 8.23 7.76 0.47 19.88 5.37 4.60 Speaker 3.89 5.74 2.11 4.92 4.90 Filter Air Intake For Mount M4*12mm max 5.93 9.45 Speaker Filter Air Intake Filter Air Intake Air Exhaust 3.35 2.14 11.78 www.necdisplay.com NP4000 Page 5 of America, Inc. NP4000 Installation Guide Desktop and Ceiling Mount Cabinet Dimensions The following diagrams show the cabinet dimensions for the NP4000. For millimeters multiply by 25.4. NEC Display Solutions of 8
Dimensions are in inches. v 1.4 Lamp & Color Wheel Cover 15.16 8.23 7.76 0.47 19.88 5.37 4.60 Speaker 3.89 5.74 2.11 4.92 4.90 Filter Air Intake For Mount M4*12mm max 5.93 9.45 Speaker Filter Air Intake Filter Air Intake Air Exhaust 3.35 2.14 11.78 www.necdisplay.com NP4000 Page 5 of America, Inc. NP4000 Installation Guide Desktop and Ceiling Mount Cabinet Dimensions The following diagrams show the cabinet dimensions for the NP4000. For millimeters multiply by 25.4. NEC Display Solutions of 8


