

NP216 : NP01UCM (ceiling mount) instructions
Page 6
...Never tighten in excess of 80 in • lb (9 N.M.). • Make sure that mounting screws are recommended. INCORRECT CORRECT metal bracket concrete metal bracket concrete plaster/ dry wall plaster/ dry wall Visit the NEC Web Site at www.necsam.com 6 of 50 lb (22.7 kg). IMPORTANT: It is...and all fasteners. Drill two 1/4" (6 mm) dia. Concrete expansion anchors are not intended for the concrete anchors. WARNING • When installing wall mounts on concrete, verify that you have a minimum of 1 5/8" of actual concrete surface in the 1/ 4" diameter hole to be 2000 psi ...
...Never tighten in excess of 80 in • lb (9 N.M.). • Make sure that mounting screws are recommended. INCORRECT CORRECT metal bracket concrete metal bracket concrete plaster/ dry wall plaster/ dry wall Visit the NEC Web Site at www.necsam.com 6 of 50 lb (22.7 kg). IMPORTANT: It is...and all fasteners. Drill two 1/4" (6 mm) dia. Concrete expansion anchors are not intended for the concrete anchors. WARNING • When installing wall mounts on concrete, verify that you have a minimum of 1 5/8" of actual concrete surface in the 1/ 4" diameter hole to be 2000 psi ...

NP04WK1 Installation Manual
Page 1
Wall Mount Unit NP04WK/NP04WK1 Installation and Adjustment Manual NP04WK-IAM-01
Wall Mount Unit NP04WK/NP04WK1 Installation and Adjustment Manual NP04WK-IAM-01

NP04WK1 Installation Manual
Page 2
.... Special skills are mainly for Distortion of the mounting location to install the wall mount unit. Wall Mount Unit NP04WK/NP04WK1 Installation and Adjustment Manual Thank you for your purchase of the supported projectors, please see the NEC website or NEC catalogs. To the Dealer and Installer To ensure customer safety, we ask that the installation work... the Projected Image ENG-14 Specifications ENG-20 ENG-1 For a list of this installation and adjustment manual carefully to ensure proper use. Please read this NEC wall mount unit.
.... Special skills are mainly for Distortion of the mounting location to install the wall mount unit. Wall Mount Unit NP04WK/NP04WK1 Installation and Adjustment Manual Thank you for your purchase of the supported projectors, please see the NEC website or NEC catalogs. To the Dealer and Installer To ensure customer safety, we ask that the installation work... the Projected Image ENG-14 Specifications ENG-20 ENG-1 For a list of this installation and adjustment manual carefully to ensure proper use. Please read this NEC wall mount unit.

NP04WK1 Installation Manual
Page 3
... material, furring strip and so on . The symbols and meanings are well understood. Examples of the projector, the wall mount unit and so on a wooden wall Ensure the load is insufficient, please reinforce it so as to ensure sufficient strength to support the combined weight of symbols:...earthquakes. Do not directly connect to the lamp line because this is dangerous.Also, use of the constructional material and so on is mounted on a concrete wall Use a commercial anchor bolt M6 (1/4 inch), anchor nuts and similar, which will bear the load of the projector. Improper handling ...
... material, furring strip and so on . The symbols and meanings are well understood. Examples of the projector, the wall mount unit and so on a wooden wall Ensure the load is insufficient, please reinforce it so as to ensure sufficient strength to support the combined weight of symbols:...earthquakes. Do not directly connect to the lamp line because this is dangerous.Also, use of the constructional material and so on is mounted on a concrete wall Use a commercial anchor bolt M6 (1/4 inch), anchor nuts and similar, which will bear the load of the projector. Improper handling ...

NP04WK1 Installation Manual
Page 4
... deteriorate and result in the projector falling and causing injury. Extended vibration may cause loosening of heat and may result in the projector and the Wall Mount Unit falling and causing injury. Doing so may result in fire. If a part should break, consult your eyesight. • Do not hang ...the projector is difficult to view. • Avoid locations exposed to do so will prevent the dissipation of the screws and result in the Wall Mount Unit and projector falling and causing injury. Doing so may cause the material of heat and may result in fires. Caution • Do not...
... deteriorate and result in the projector falling and causing injury. Extended vibration may cause loosening of heat and may result in the projector and the Wall Mount Unit falling and causing injury. Doing so may result in fire. If a part should break, consult your eyesight. • Do not hang ...the projector is difficult to view. • Avoid locations exposed to do so will prevent the dissipation of the screws and result in the Wall Mount Unit and projector falling and causing injury. Doing so may cause the material of heat and may result in fires. Caution • Do not...

NP04WK1 Installation Manual
Page 5
...wall surface. Wall plate: 1 This is a wrench for mounting the wall adapter to the wall, use bolts or screws that are adapted to the wall surface. Hexagonal wrench: 1 This is used to mount the wall adapter to mount the wall adapter in the package. Cautions on Installation: 1 These include safety precautions on installing the wall mount...lock screws. Washers: 4 Spacers: 4 These are used to the wall mount unit. The two covers are included in the North American region. * For the bolts or screws for the wall adapter. Introduction M Packaged Parts Check that the parts below are ...
...wall surface. Wall plate: 1 This is a wrench for mounting the wall adapter to the wall, use bolts or screws that are adapted to the wall surface. Hexagonal wrench: 1 This is used to mount the wall adapter to mount the wall adapter in the package. Cautions on Installation: 1 These include safety precautions on installing the wall mount...lock screws. Washers: 4 Spacers: 4 These are used to the wall mount unit. The two covers are included in the North American region. * For the bolts or screws for the wall adapter. Introduction M Packaged Parts Check that the parts below are ...

NP04WK1 Installation Manual
Page 6
M Names of Parts Elongated wall mount screw holes (Wall adapter) Cable hole Wall adapter cover Wall adapter cover Fixing screw (A) (Arm unit) Vertical position reference line Wall adapter (wall adapter unit + arm unit) View from above Slide arm Cap Left/right tilt adjustment knob Safety lock screws (2) Fixing screws (B) (2) Cable hole Horizontal title adjustment knob (Mount plate) Vertical title adjustment knob Cable hole Elongated wall mount screw holes View from below ENG-5
M Names of Parts Elongated wall mount screw holes (Wall adapter) Cable hole Wall adapter cover Wall adapter cover Fixing screw (A) (Arm unit) Vertical position reference line Wall adapter (wall adapter unit + arm unit) View from above Slide arm Cap Left/right tilt adjustment knob Safety lock screws (2) Fixing screws (B) (2) Cable hole Horizontal title adjustment knob (Mount plate) Vertical title adjustment knob Cable hole Elongated wall mount screw holes View from below ENG-5

NP04WK1 Installation Manual
Page 7
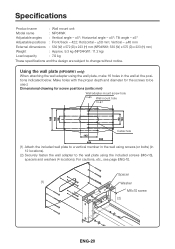
...) 100 Center of wall adapter Wall adapter mount screw positions 142 100 189 94.5 100 Center of movement when mounting the projector. M Dimensions of Parts The following shows an external view of the wall mount unit, the positions of the wall adapter's wall mount screws and the amount of wall adapter 100 142 Wall adapter mount screw positions Wall adapter mount screw positions ±...
...) 100 Center of wall adapter Wall adapter mount screw positions 142 100 189 94.5 100 Center of movement when mounting the projector. M Dimensions of Parts The following shows an external view of the wall mount unit, the positions of the wall adapter's wall mount screws and the amount of wall adapter 100 142 Wall adapter mount screw positions Wall adapter mount screw positions ±...

NP04WK1 Installation Manual
Page 10
... facing is projected at an angle. Consider the place where the screen is to be installed and determine the position in "Be sure to be mounted. (See page ENG-7) - Position in such a way that the image is projected directly to install in the projection distance will change the size... and position of these instructions. - Also, if the direction in which the wall mount unit is large, small shifts in such a way that the position of the image increases. Preparations: 1. Check that the image is off the ...
... facing is projected at an angle. Consider the place where the screen is to be installed and determine the position in "Be sure to be mounted. (See page ENG-7) - Position in such a way that the image is projected directly to install in the projection distance will change the size... and position of these instructions. - Also, if the direction in which the wall mount unit is large, small shifts in such a way that the position of the image increases. Preparations: 1. Check that the image is off the ...
NP04WK1 Installation Manual
Page 21
Spacer (1) Washer M6×10 screw (2) ENG-20 Specifications Product name : Wall mount unit Model name : NP04WK Adjustable angles : Vertical angle - ±5°; Dimensional drawing for the screws to the wall plate using the included screws (M6×10), spacers and washers (4 locations). ... for screw positions (units: mm) Wall adapter mount screw hole Wall mount hole Cable hole (1) Attach the included wall plate to a vertical member in the wall using the wall plate, make 16 holes in 12 locations). (2) Securely fasten the wall adapter to be used. Horizontal - ...
Spacer (1) Washer M6×10 screw (2) ENG-20 Specifications Product name : Wall mount unit Model name : NP04WK Adjustable angles : Vertical angle - ±5°; Dimensional drawing for the screws to the wall plate using the included screws (M6×10), spacers and washers (4 locations). ... for screw positions (units: mm) Wall adapter mount screw hole Wall mount hole Cable hole (1) Attach the included wall plate to a vertical member in the wall using the wall plate, make 16 holes in 12 locations). (2) Securely fasten the wall adapter to be used. Horizontal - ...

NP04WK1 Cautions on Installation
Page 1
Wall Mount Unit NP04WK/NP04WK1 Cautions on Installation
Wall Mount Unit NP04WK/NP04WK1 Cautions on Installation

NP04WK1 Cautions on Installation
Page 2
...yourself and others and damage to do so as follows. Select the language from the left column. * Those using an NP-U300X or NP-U310W series projector can view the cautions on installation and adjustments for the NP04WK at the URL below. Please heed the following... after careful attention is paid to the strength of the mounting location to cautions (including warnings) Concrete cautions are specified in figures. Mounting on a wooden wall Ensure the load is mounted on is dangerous.Also, use of this NEC wall mount unit. If the strength of the constructional material and so...
...yourself and others and damage to do so as follows. Select the language from the left column. * Those using an NP-U300X or NP-U310W series projector can view the cautions on installation and adjustments for the NP04WK at the URL below. Please heed the following... after careful attention is paid to the strength of the mounting location to cautions (including warnings) Concrete cautions are specified in figures. Mounting on a wooden wall Ensure the load is mounted on is dangerous.Also, use of this NEC wall mount unit. If the strength of the constructional material and so...

NP04WK1 Cautions on Installation
Page 3
...in which will adhere to direct sunlight or illuminated light. Horizontal angle - ±5°; Extended vibration may result in the projector and the Wall Mount Unit falling and causing injury. Doing so could damage your dealer. • Do not look into the projection window, mirror or lens when ...the projector is exposed to the optical parts such as near cooking equipment or humidifiers). Doing so may result in the Wall Mount Unit and projector falling and causing injury. When surrounding light directly hits the screen, the image appears washed out and is poor, ...
...in which will adhere to direct sunlight or illuminated light. Horizontal angle - ±5°; Extended vibration may result in the projector and the Wall Mount Unit falling and causing injury. Doing so could damage your dealer. • Do not look into the projection window, mirror or lens when ...the projector is exposed to the optical parts such as near cooking equipment or humidifiers). Doing so may result in the Wall Mount Unit and projector falling and causing injury. When surrounding light directly hits the screen, the image appears washed out and is poor, ...

NP04WK1 Cautions on Installation
Page 20
...。 3. 点击"Wall Mount Unit"。 4."Wall Mount Unit"PDF 对于 Macintosh 1 CD-ROM NEC CD-ROM。 2 NECPJ"(CD-ROM 3. 在"Manual language_menu.pdf"。 开启 Adobe Reader,且"Language Menu 4. 点击"Wall Mount Unit"。 "Wall Mount Unit"PDF * 使用 NP-U300X+ 或 NP-U310W NP04WK http://www.nec-display.com/dl/en...
...。 3. 点击"Wall Mount Unit"。 4."Wall Mount Unit"PDF 对于 Macintosh 1 CD-ROM NEC CD-ROM。 2 NECPJ"(CD-ROM 3. 在"Manual language_menu.pdf"。 开启 Adobe Reader,且"Language Menu 4. 点击"Wall Mount Unit"。 "Wall Mount Unit"PDF * 使用 NP-U300X+ 或 NP-U310W NP04WK http://www.nec-display.com/dl/en...

NP04WK1 Cautions on Installation
Page 22
User's Manual language menu 3'. NEC CD-ROM CD-ROM 2 NECPJ'(CD-ROM 3'. Wall Mount Uni't Wall Mount Uni't PDF * NP-U300X 또는 NP-U310W URL 에서 NP04WK http://www.nec-display.com/dl/en/pj_manual/lineup.html 기호 경고 M6(1/4 M6(1/4 22 Wall Mount Uni't PDF Macintosh 의 경우 1. Wall Mount Uni't 4'. Manua'l language_menu.pdf Adobe Reader Language...
User's Manual language menu 3'. NEC CD-ROM CD-ROM 2 NECPJ'(CD-ROM 3'. Wall Mount Uni't Wall Mount Uni't PDF * NP-U300X 또는 NP-U310W URL 에서 NP04WK http://www.nec-display.com/dl/en/pj_manual/lineup.html 기호 경고 M6(1/4 M6(1/4 22 Wall Mount Uni't PDF Macintosh 의 경우 1. Wall Mount Uni't 4'. Manua'l language_menu.pdf Adobe Reader Language...

NP04WK1 Cautions on Installation
Page 24
...-ROM 3.「Manual language_menu.pdf Adobe Reader Language Menu 4.「Wall Mount Unit Wall Mount Unit の PDF ※ NP-U300XJD、NP-U310WJD URL 先にて NP04WK http://www.nec-display.com/dl/jp/pj/manual/lineup.html ࠂܯ M6(1/4 M6(1/4 NEC 0120-610-161 受付 9:00 〜 12:00...
...-ROM 3.「Manual language_menu.pdf Adobe Reader Language Menu 4.「Wall Mount Unit Wall Mount Unit の PDF ※ NP-U300XJD、NP-U310WJD URL 先にて NP04WK http://www.nec-display.com/dl/jp/pj/manual/lineup.html ࠂܯ M6(1/4 M6(1/4 NEC 0120-610-161 受付 9:00 〜 12:00...

Specification Brochure
Page 3
...PJPX RGBCBL-PJPX NECEW1-MP NECEW2-MP ADVEXON1-MP ADVEXON2-MP ORDERING MODEL NUMBERS NP-UM361X NP-UM351W UM361X / UM351W UM361X: 0.63" LCD with MLA / UM351W: 0.59" LCD with NEC ceiling mounts Table Top Mount Component video adapter converts component video to D-sub 15-pin Power cable RGB ... / -20° - 50°C 802.11b/g/n wireless LAN adapter Replacement lamp Amplified 30-watt speaker Interactive eBeam module and pen Wall mount Replacement remote control Stylus pen Security cable for connection to projector Lightweight adjustable suspended ceiling plate for one year of America, Inc. All...
...PJPX RGBCBL-PJPX NECEW1-MP NECEW2-MP ADVEXON1-MP ADVEXON2-MP ORDERING MODEL NUMBERS NP-UM361X NP-UM351W UM361X / UM351W UM361X: 0.63" LCD with MLA / UM351W: 0.59" LCD with NEC ceiling mounts Table Top Mount Component video adapter converts component video to D-sub 15-pin Power cable RGB ... / -20° - 50°C 802.11b/g/n wireless LAN adapter Replacement lamp Amplified 30-watt speaker Interactive eBeam module and pen Wall mount Replacement remote control Stylus pen Security cable for connection to projector Lightweight adjustable suspended ceiling plate for one year of America, Inc. All...
Installation Manual
Page 7
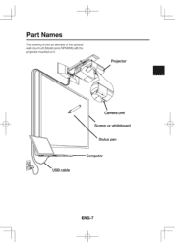
Projector USB cable Camera unit Screen or whiteboard Stylus pen Computer ENG-7 Part Names The drawing shows an example of the optional wall mount unit (Model name: NPO4WK) with the projector mounted on it.
Projector USB cable Camera unit Screen or whiteboard Stylus pen Computer ENG-7 Part Names The drawing shows an example of the optional wall mount unit (Model name: NPO4WK) with the projector mounted on it.
Installation Guide
Page 1
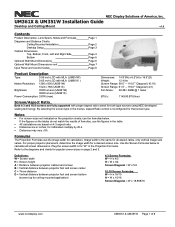
.../10 H = W x 10/16 Screen Diagonal = W x 18.868/16 www.necdisplay.com UM361X & UM351W Page 1 of 8 By selecting the screen type in for both type sources using NEC developed scaling technology. Definitions: W = Screen width H = Screen height A = Distance between projector cabinet and ...UM351W Installation Guide Desktop and Ceiling Mount v1.0 Contents Product Description, Lens Specs, Notes and Formulas Diagrams and Distance Charts Ceiling Mounted Installation Desktop Setup Cabinet Dimensions Top, Bottom, Front, Left and Right Side Bottom Optional Wall Mount Dimensions Optional Wall Mount...
.../10 H = W x 10/16 Screen Diagonal = W x 18.868/16 www.necdisplay.com UM361X & UM351W Page 1 of 8 By selecting the screen type in for both type sources using NEC developed scaling technology. Definitions: W = Screen width H = Screen height A = Distance between projector cabinet and ...UM351W Installation Guide Desktop and Ceiling Mount v1.0 Contents Product Description, Lens Specs, Notes and Formulas Diagrams and Distance Charts Ceiling Mounted Installation Desktop Setup Cabinet Dimensions Top, Bottom, Front, Left and Right Side Bottom Optional Wall Mount Dimensions Optional Wall Mount...
Installation Guide
Page 6
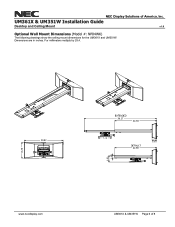
www.necdisplay.com UM361X & UM351W Page 6 of America, Inc. For millimeters multiply by 25.4. NEC Display Solutions of 8 Dimensions are in inches. UM361X & UM351W Installation Guide Desktop and Ceiling Mount v1.0 Optional Wall Mount Dimensions (Model #: NP04WK) The following drawings show the ceiling mount dimensions for the UM361X and UM351W.
www.necdisplay.com UM361X & UM351W Page 6 of America, Inc. For millimeters multiply by 25.4. NEC Display Solutions of 8 Dimensions are in inches. UM361X & UM351W Installation Guide Desktop and Ceiling Mount v1.0 Optional Wall Mount Dimensions (Model #: NP04WK) The following drawings show the ceiling mount dimensions for the UM361X and UM351W.


