
User Guide
Page 1
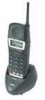
...base above a ceiling that may adversely affect range and reception are at least 15 feet apart. - After installation, change each telephone's channel by pressing CH on the handset. - Some of close to site. Positioning the base close to initial use. •..., always dispose of -site with your cordless telephones. Cordless Telephone User Guide (03.14.00) Please Read - Important Cordless Telephone Installation Information DS1000/2000 900 MHz Cordless Telephone Installation Tips • The cordless telephone base unit plugs into a digital station port. • For best results, the...
...base above a ceiling that may adversely affect range and reception are at least 15 feet apart. - After installation, change each telephone's channel by pressing CH on the handset. - Some of close to site. Positioning the base close to initial use. •..., always dispose of -site with your cordless telephones. Cordless Telephone User Guide (03.14.00) Please Read - Important Cordless Telephone Installation Information DS1000/2000 900 MHz Cordless Telephone Installation Tips • The cordless telephone base unit plugs into a digital station port. • For best results, the...
User Guide
Page 3
...Mounting the Charger 11 Using the Belt Clip 12 Installing the Belt Clip 12 Using the Earloop Style Headset with your Cordless Telephone 13 Installing Headset P/N 750638 (M145 Earloop Style 13 Earloop Installation 13 Ear Cushion Installation 14 Connecting the Headset and Using ...the Controls 15 Using the Headband Style Headset with your Cordless Telephone 16 Installing Headset P/N 750637 (M175 Headband Style 16 Optional Earloop Installation 16 Connecting the Headset and using the Controls 18 Specifications...
...Mounting the Charger 11 Using the Belt Clip 12 Installing the Belt Clip 12 Using the Earloop Style Headset with your Cordless Telephone 13 Installing Headset P/N 750638 (M145 Earloop Style 13 Earloop Installation 13 Ear Cushion Installation 14 Connecting the Headset and Using ...the Controls 15 Using the Headband Style Headset with your Cordless Telephone 16 Installing Headset P/N 750637 (M175 Headband Style 16 Optional Earloop Installation 16 Connecting the Headset and using the Controls 18 Specifications...

User Guide
Page 4
... 35 Trunk (Line) Queuing and Callback 36 Voice Mail 36 Voice Over 37 Volume Control 37 Walking Class of Service 38 Feature Summary 39 Cordless Telephone Feature Summary 39 2 ◆ Table of Contents DS1000/2000 Cordless...
... 35 Trunk (Line) Queuing and Callback 36 Voice Mail 36 Voice Over 37 Volume Control 37 Walking Class of Service 38 Feature Summary 39 Cordless Telephone Feature Summary 39 2 ◆ Table of Contents DS1000/2000 Cordless...
User Guide
Page 5
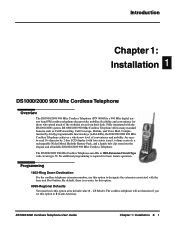
... this option at its default value (1 - Introduction Chapter 1: Installation 1 Introduction DS1000/2000 900 Mhz Cordless Telephone DS1000/2000 900 Mhz Cordless Telephone Overview The DS1000/2000 900 Mhz Cordless Telephone (P/N 80683)is a 900 Mhz digital narrow band FM cordless telephone that provides mobility, flexibility and convenience for those who spend much of convenience and mobility...
... this option at its default value (1 - Introduction Chapter 1: Installation 1 Introduction DS1000/2000 900 Mhz Cordless Telephone DS1000/2000 900 Mhz Cordless Telephone Overview The DS1000/2000 900 Mhz Cordless Telephone (P/N 80683)is a 900 Mhz digital narrow band FM cordless telephone that provides mobility, flexibility and convenience for those who spend much of convenience and mobility...

User Guide
Page 6
Changing Channels If the installation site has more than one DS1000/2000 900 Mhz Cordless Telephone, set up each telephone to operate on its own channel. ■ While on a call, press TALK to hang up as soon as possible so your call is already ...outside number Hanging Up ■ Press TALK or place the handset in your desk extension: Press Cordless to call . 2 ◆ Chapter 1: Installation DS1000/2000 Cordless Telephone User Guide If your desk extension on a call automatically cancels Standby Mode. There are 30 channels max. - Your handset goes into Standby Mode after about...
Changing Channels If the installation site has more than one DS1000/2000 900 Mhz Cordless Telephone, set up each telephone to operate on its own channel. ■ While on a call, press TALK to hang up as soon as possible so your call is already ...outside number Hanging Up ■ Press TALK or place the handset in your desk extension: Press Cordless to call . 2 ◆ Chapter 1: Installation DS1000/2000 Cordless Telephone User Guide If your desk extension on a call automatically cancels Standby Mode. There are 30 channels max. - Your handset goes into Standby Mode after about...
User Guide
Page 7
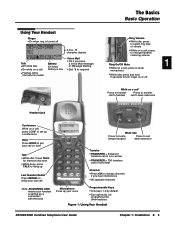
... Intercom dial tone ● While busy, press TALK to hang up Last Number Redial Press REDIAL to redial your last call Line1 Line2 Line3 Line4 80683 - 1 While idle Press to locate (beep) handset Press to call desk extension Transfer ● TRANSFER + Extension transfers call to a co-worker ● TRANSFER + 700 transfers... up your voice Programmable Keys ● Line keys 1-4 by default ● Can optionally be programmed for other features Figure 1: Using Your Handset DS1000/2000 Cordless Telephone User Guide Chapter 1: Installation ◆ 3
... Intercom dial tone ● While busy, press TALK to hang up Last Number Redial Press REDIAL to redial your last call Line1 Line2 Line3 Line4 80683 - 1 While idle Press to locate (beep) handset Press to call desk extension Transfer ● TRANSFER + Extension transfers call to a co-worker ● TRANSFER + 700 transfers... up your voice Programmable Keys ● Line keys 1-4 by default ● Can optionally be programmed for other features Figure 1: Using Your Handset DS1000/2000 Cordless Telephone User Guide Chapter 1: Installation ◆ 3

User Guide
Page 8
...as required. 6. Plug the AC adaptor into the modular jack. ■ The DS1000/2000 900 Mhz Cordless Telephone auto-IDs in line-of cross-connect wire between an available digital station port pins on the modular jack. 4. Positioning the base close to the RED and GRN lugs on the... ■ If the Power LED is on the back of 24 AWG station cable from the handset. 4 ◆ Chapter 1: Installation DS1000/2000 Cordless Telephone User Guide Installing the base close to site. Some of an available standard (NEMA 5-15R) 120 VAC outlet. 2. Terminate the station cable WHT/BLU ...
...as required. 6. Plug the AC adaptor into the modular jack. ■ The DS1000/2000 900 Mhz Cordless Telephone auto-IDs in line-of cross-connect wire between an available digital station port pins on the modular jack. 4. Positioning the base close to the RED and GRN lugs on the... ■ If the Power LED is on the back of 24 AWG station cable from the handset. 4 ◆ Chapter 1: Installation DS1000/2000 Cordless Telephone User Guide Installing the base close to site. Some of an available standard (NEMA 5-15R) 120 VAC outlet. 2. Terminate the station cable WHT/BLU ...

User Guide
Page 9
mize interference between your cordless telephones. One-Pair Cross Connect (To digital keyset port) 1 Station Block YEL BLU-WHT Cross Connect Block RED 625 Modular Jack Digital Keyset Jack BLK WHT-BLU GRN 80683 - 3 AC Adaptor Line out Line in the same site: - Be sure the base units are at least... 15 feet apart. • After installation, change each telephone's channel by pressing CH on the handset...
mize interference between your cordless telephones. One-Pair Cross Connect (To digital keyset port) 1 Station Block YEL BLU-WHT Cross Connect Block RED 625 Modular Jack Digital Keyset Jack BLK WHT-BLU GRN 80683 - 3 AC Adaptor Line out Line in the same site: - Be sure the base units are at least... 15 feet apart. • After installation, change each telephone's channel by pressing CH on the handset...

User Guide
Page 10
Installation Installing the Base 80683 - 7 Correct line-of-site installation, away from devices that cause interference or locations that can be closed, tinted windows or one way glass Figure 4: Incorrect Installation Methods 6 ◆ Chapter 1: Installation DS1000/2000 Cordless Telephone User Guide Figure 3: Correct Installation Methods Foil backed insulated ceiling Metal studs 80683 - 6 Too close to another device that emits EMI Too close to other 900 Mhz devices Behind a door that block signal.
Installation Installing the Base 80683 - 7 Correct line-of-site installation, away from devices that cause interference or locations that can be closed, tinted windows or one way glass Figure 4: Incorrect Installation Methods 6 ◆ Chapter 1: Installation DS1000/2000 Cordless Telephone User Guide Figure 3: Correct Installation Methods Foil backed insulated ceiling Metal studs 80683 - 6 Too close to another device that emits EMI Too close to other 900 Mhz devices Behind a door that block signal.

User Guide
Page 11
...base. 2. Unplug the line cord and AC adaptor cord from the base. Using suitable fasteners, attach the wall-mount bracket to the base. 1 80683 - 14 Mounting ear Line cord in wide channel Mounting tab AC adaptor cord in the wide wire channel as shown, but do not plug it...line cord in narrow channel Wall Figure 5: Mounting the Base on the Wall): 1. Snap the base onto the wall-mount bracket. - DS1000/2000 Cordless Telephone User Guide Chapter 1: Installation ◆ 7 Connect the base line cord and AC adaptor cord to the wall in the narrow wire channel as shown, ...
...base. 2. Unplug the line cord and AC adaptor cord from the base. Using suitable fasteners, attach the wall-mount bracket to the base. 1 80683 - 14 Mounting ear Line cord in wide channel Mounting tab AC adaptor cord in the wide wire channel as shown, but do not plug it...line cord in narrow channel Wall Figure 5: Mounting the Base on the Wall): 1. Snap the base onto the wall-mount bracket. - DS1000/2000 Cordless Telephone User Guide Chapter 1: Installation ◆ 7 Connect the base line cord and AC adaptor cord to the wall in the narrow wire channel as shown, ...

User Guide
Page 12
... the short line cord from the base. 4. Plug the other end of the wall plate. 2. Slide the wall-mount bracket onto the wall plate. 80683 - 15 Mounting ear Line cord in wide channel Mounting tab AC adaptor cord in the narrow wire channel as shown and plug it into the... base. 3. Press the mounting tabs to release the wall-mount bracket from the base. 8 ◆ Chapter 1: Installation DS1000/2000 Cordless Telephone User Guide Run the AC adaptor cord in narrow channel Wall Plate Wall Figure 6: Mounting the Base to a Standard Wall Plate): 1. Slide the wall-mount...
... the short line cord from the base. 4. Plug the other end of the wall plate. 2. Slide the wall-mount bracket onto the wall plate. 80683 - 15 Mounting ear Line cord in wide channel Mounting tab AC adaptor cord in the narrow wire channel as shown and plug it into the... base. 3. Press the mounting tabs to release the wall-mount bracket from the base. 8 ◆ Chapter 1: Installation DS1000/2000 Cordless Telephone User Guide Run the AC adaptor cord in narrow channel Wall Plate Wall Figure 6: Mounting the Base to a Standard Wall Plate): 1. Slide the wall-mount...

User Guide
Page 13
.... 2. Be sure to fit into the battery compartment. 4. Slide the battery cover back onto the handset until it fits into battery compartment Black wire 80683 - 2 Figure 7: Installing the Handset Battery DS1000/2000 Cordless Telephone User Guide Chapter 1: Installation ◆ 9 Turn the battery around to it snaps into the battery connector.
.... 2. Be sure to fit into the battery compartment. 4. Slide the battery cover back onto the handset until it fits into battery compartment Black wire 80683 - 2 Figure 7: Installing the Handset Battery DS1000/2000 Cordless Telephone User Guide Chapter 1: Installation ◆ 9 Turn the battery around to it snaps into the battery connector.
User Guide
Page 14
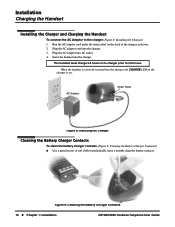
...(once a month) clean the battery contacts. Figure 9: Cleaning the Battery Charger Contacts 10 ◆ Chapter 1: Installation DS1000/2000 Cordless Telephone User Guide Plug the AC adaptor into the charger, the CHARGE LED on the charger is correctly inserted into AC outlet. 4. AC Adaptor... Strain Relief 80683 - 4 Figure 8: Installing the Charger Cleaning the Battery Charger Contacts To clean the battery charger contacts (Figure 9: Cleaning the Battery Charger ...
...(once a month) clean the battery contacts. Figure 9: Cleaning the Battery Charger Contacts 10 ◆ Chapter 1: Installation DS1000/2000 Cordless Telephone User Guide Plug the AC adaptor into the charger, the CHARGE LED on the charger is correctly inserted into AC outlet. 4. AC Adaptor... Strain Relief 80683 - 4 Figure 8: Installing the Charger Cleaning the Battery Charger Contacts To clean the battery charger contacts (Figure 9: Cleaning the Battery Charger ...

User Guide
Page 15
... charger wall-mount bracket within 6 feet of the charger, then plug the cord into the AC outlet. 1 1-3/16" Wall 80683 - 11 80683 - 13 Wall Figure 10: Wall-Mounting the Charger DS1000/2000 Cordless Telephone User Guide Chapter 1: Installation ◆ 11 Run the AC adaptor cord through the rectangular cutout in the bottom of...
... charger wall-mount bracket within 6 feet of the charger, then plug the cord into the AC outlet. 1 1-3/16" Wall 80683 - 11 80683 - 13 Wall Figure 10: Wall-Mounting the Charger DS1000/2000 Cordless Telephone User Guide Chapter 1: Installation ◆ 11 Run the AC adaptor cord through the rectangular cutout in the bottom of...
User Guide
Page 16
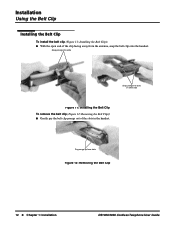
...; Gently pry the belt clip prongs out of the clip facing away from slots Figure 12: Removing the Belt Clip 80683 - 10 12 ◆ Chapter 1: Installation DS1000/2000 Cordless Telephone User Guide 80683 - 9 80683 - 8 Installation Using the Belt Clip Using the Belt Clip Installing the Belt Clip To install the belt clip (Figure 11...
...; Gently pry the belt clip prongs out of the clip facing away from slots Figure 12: Removing the Belt Clip 80683 - 10 12 ◆ Chapter 1: Installation DS1000/2000 Cordless Telephone User Guide 80683 - 9 80683 - 8 Installation Using the Belt Clip Using the Belt Clip Installing the Belt Clip To install the belt clip (Figure 11...
User Guide
Page 17
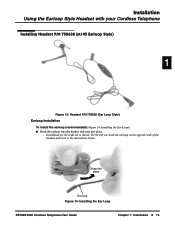
... left ear, hook the earloop on the opposite side of the headset and reverse the microphone boom. 80683 - 17 Snap into place. - Installation Using the Earloop Style Headset with your Cordless Telephone UHseiandgsetht ewEitahrlyoooupr SCtoyrldeless Telephone Installing Headset P/N 750638 (M145 Earloop Style) 1 Figure 13: Headset P/N 750638 (Ear Loop Style) Earloop... ■ Hook the earloop onto the headset and snap into place Ear loop Figure 14: Installing the Ear Loop DS1000/2000 Cordless Telephone User Guide Chapter 1: Installation ◆ 13 Installation for the right ear is shown.
... left ear, hook the earloop on the opposite side of the headset and reverse the microphone boom. 80683 - 17 Snap into place. - Installation Using the Earloop Style Headset with your Cordless Telephone UHseiandgsetht ewEitahrlyoooupr SCtoyrldeless Telephone Installing Headset P/N 750638 (M145 Earloop Style) 1 Figure 13: Headset P/N 750638 (Ear Loop Style) Earloop... ■ Hook the earloop onto the headset and snap into place Ear loop Figure 14: Installing the Ear Loop DS1000/2000 Cordless Telephone User Guide Chapter 1: Installation ◆ 13 Installation for the right ear is shown.

User Guide
Page 18
Ear cushion Pull over the earpiece. Installation Using the Earloop Style Headset with your Cordless Telephone Ear Cushion Installation To install the ear cushion (Figure 15: Installing the Ear Cushion): ■ Pull the ear cushion over earpiece 80683 - 18 Figure 15: Installing the Ear Cushion 14 ◆ Chapter 1: Installation DS1000/2000 Cordless Telephone User Guide
Ear cushion Pull over the earpiece. Installation Using the Earloop Style Headset with your Cordless Telephone Ear Cushion Installation To install the ear cushion (Figure 15: Installing the Ear Cushion): ■ Pull the ear cushion over earpiece 80683 - 18 Figure 15: Installing the Ear Cushion 14 ◆ Chapter 1: Installation DS1000/2000 Cordless Telephone User Guide
User Guide
Page 19
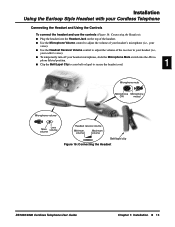
phone Muted position. ■ Clip the Belt/Lapel Clip to secure the headset cord. 1 80683 - 16 Microphone mute Microphone Microphone ON muted Microphone volume Less More volume volume Headset receive vloume Minimum volume Maximum volume Belt/lapel clip Figure 16: Connecting the Headset DS1000/2000 Cordless Telephone User Guide Chapter 1: Installation ◆ 15 Installation...
phone Muted position. ■ Clip the Belt/Lapel Clip to secure the headset cord. 1 80683 - 16 Microphone mute Microphone Microphone ON muted Microphone volume Less More volume volume Headset receive vloume Minimum volume Maximum volume Belt/lapel clip Figure 16: Connecting the Headset DS1000/2000 Cordless Telephone User Guide Chapter 1: Installation ◆ 15 Installation...
User Guide
Page 20
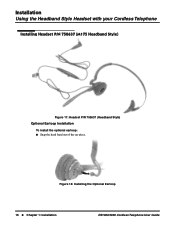
Installation Using the Headband Style Headset with your Cordless Telephone Using the Headband Style Headset with your Cordless Telephone Installing Headset P/N 750637 (M175 Headband Style) Figure 17: Headset P/N 750637 (Headband Style) Optional Earloop Installation To install the optional earloop: ■ Snap the head band out of the ear piece. 80683 - 19 Figure 18: Installing the Optional Earloop 16 ◆ Chapter 1: Installation DS1000/2000 Cordless Telephone User Guide
Installation Using the Headband Style Headset with your Cordless Telephone Using the Headband Style Headset with your Cordless Telephone Installing Headset P/N 750637 (M175 Headband Style) Figure 17: Headset P/N 750637 (Headband Style) Optional Earloop Installation To install the optional earloop: ■ Snap the head band out of the ear piece. 80683 - 19 Figure 18: Installing the Optional Earloop 16 ◆ Chapter 1: Installation DS1000/2000 Cordless Telephone User Guide
User Guide
Page 21
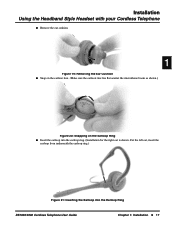
...the Earloop into the earloop ring. (Installation for the right ear is shown. Installation Using the Headband Style Headset with your Cordless Telephone ■ Remove the ear cushion. 80683 - 20 1 Figure 19: Removing the Ear Cushion ■ Snap on the earloop ring. (Make sure the earloop ring ...lies flat against the microphone boom as shown.) 80683 - 21 Figure 20: Snapping on the Earloop Ring ■ Insert the earloop into the Earloop Ring DS1000/2000 Cordless Telephone User Guide Chapter 1: Installation ◆ 17
...the Earloop into the earloop ring. (Installation for the right ear is shown. Installation Using the Headband Style Headset with your Cordless Telephone ■ Remove the ear cushion. 80683 - 20 1 Figure 19: Removing the Ear Cushion ■ Snap on the earloop ring. (Make sure the earloop ring ...lies flat against the microphone boom as shown.) 80683 - 21 Figure 20: Snapping on the Earloop Ring ■ Insert the earloop into the Earloop Ring DS1000/2000 Cordless Telephone User Guide Chapter 1: Installation ◆ 17

