User Manual
Page 3
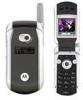
... Activate speakerindependent voice recognition. Power/End Key Turn phone on/off, end phone calls, exit menus. Send Key Make & answer calls, view recently dialed calls. Microphone 1 Press K key in center to the world of Motorola digital wireless communications! Record voice records & contacts....functions identified by right display prompt. Volume Keys Adjust earpiece & ringer volume. We are pleased that you have chosen the Motorola V265 wireless phone. Camera Key Menu Key Right Soft Key Perform functions identified by left display prompt. Smart/ Speakerphone Key Select menu items,...
... Activate speakerindependent voice recognition. Power/End Key Turn phone on/off, end phone calls, exit menus. Send Key Make & answer calls, view recently dialed calls. Microphone 1 Press K key in center to the world of Motorola digital wireless communications! Record voice records & contacts....functions identified by right display prompt. Volume Keys Adjust earpiece & ringer volume. We are pleased that you have chosen the Motorola V265 wireless phone. Camera Key Menu Key Right Soft Key Perform functions identified by left display prompt. Smart/ Speakerphone Key Select menu items,...

User Manual
Page 4
Send the photo to others & use on your phone. External Display View caller ID & status icons. Check It Out! Headset Jack Camera Lens Take photos to send to a phone number Press STORE (+) > Send In Message. 2 Feature Take Photo Send Photo Description Open the phone, press the camera key f to activate the camera, point lens at subject, press the camera key f or CAPTURE (+) to take a photo.
Send the photo to others & use on your phone. External Display View caller ID & status icons. Check It Out! Headset Jack Camera Lens Take photos to send to a phone number Press STORE (+) > Send In Message. 2 Feature Take Photo Send Photo Description Open the phone, press the camera key f to activate the camera, point lens at subject, press the camera key f or CAPTURE (+) to take a photo.
User Manual
Page 6
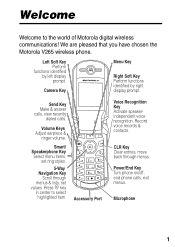
...390-6456 (TTY/TDD United States for a particular purpose, are registered in Motorola's user's guides is ." All other product or service names are the property of their respective owners. © Motorola, Inc. 2004 The information contained in the US Patent & Trademark Office. Caution... of merchantability and fitness for hearing impaired) 1-800-461-4575 (Canada) www.motorola.com (United States) www.motorola.ca (Canada) MOTOROLA and the Stylized M Logo are made in the radio phone, not expressly approved by applicable law, no warranties of any information or specifications without...
...390-6456 (TTY/TDD United States for a particular purpose, are registered in Motorola's user's guides is ." All other product or service names are the property of their respective owners. © Motorola, Inc. 2004 The information contained in the US Patent & Trademark Office. Caution... of merchantability and fitness for hearing impaired) 1-800-461-4575 (Canada) www.motorola.com (United States) www.motorola.ca (Canada) MOTOROLA and the Stylized M Logo are made in the radio phone, not expressly approved by applicable law, no warranties of any information or specifications without...

User Manual
Page 7
...Charging the Battery 11 Removing a Flip Cover 12 Attaching a Flip Cover 12 Turning On Your Phone 12 Adjusting Volume 13 Making a Call 14 Answering a Call 14 Changing the Call Alert 15 Viewing Your Phone Number 16 Highlight Features 17 Taking and Sending a Photo 17 Sending a Multimedia Message 19 ...Receiving a Multimedia Message 23 TTY Operation 23 Learning to Use Your Phone 26 Using the Display 26 Using the 5-Way Navigation Key 28 Using Menus 29 Entering Text 32 Using the Handsfree Speaker 41 Using the...
...Charging the Battery 11 Removing a Flip Cover 12 Attaching a Flip Cover 12 Turning On Your Phone 12 Adjusting Volume 13 Making a Call 14 Answering a Call 14 Changing the Call Alert 15 Viewing Your Phone Number 16 Highlight Features 17 Taking and Sending a Photo 17 Sending a Multimedia Message 19 ...Receiving a Multimedia Message 23 TTY Operation 23 Learning to Use Your Phone 26 Using the Display 26 Using the 5-Way Navigation Key 28 Using Menus 29 Entering Text 32 Using the Handsfree Speaker 41 Using the...

User Manual
Page 8
Setting Up Your Phone 47 Storing Your Name and Phone Number 47 Setting an Alert Style 47 Setting Answer Options 48 Setting a Wallpaper Image 49 Setting a Screen Saver Image 50 Setting Display Contrast 51 Adjusting ... Returning an Unanswered Call 58 Using the Notepad 59 Attaching a Number 60 Calling with Speed Dial 60 Calling with 1-Touch Dial 60 Using Voicemail 61 Phone Features 63 Main Menu 63 Calling Features 65 Messages 65 Contacts 67 Personalizing Features 70 Menu Features 77 6
Setting Up Your Phone 47 Storing Your Name and Phone Number 47 Setting an Alert Style 47 Setting Answer Options 48 Setting a Wallpaper Image 49 Setting a Screen Saver Image 50 Setting Display Contrast 51 Adjusting ... Returning an Unanswered Call 58 Using the Notepad 59 Attaching a Number 60 Calling with Speed Dial 60 Calling with 1-Touch Dial 60 Using Voicemail 61 Phone Features 63 Main Menu 63 Calling Features 65 Messages 65 Contacts 67 Personalizing Features 70 Menu Features 77 6

User Manual
Page 10
Optional Features This label identifies an optional network or 032380o subscription-dependent feature that requires an optional Motorola Original® accessory. Contact your phone. 8 Installing the Battery You must install and charge the battery to use your service provider for the ...at the back of this guide. 032259o About This Guide This guide describes the basic features of your Motorola wireless phone. Getting Started Getting Started CAUTION: Before using the phone for more information. Optional Accessories This label identifies a feature that may not be offered by all ...
Optional Features This label identifies an optional network or 032380o subscription-dependent feature that requires an optional Motorola Original® accessory. Contact your phone. 8 Installing the Battery You must install and charge the battery to use your service provider for the ...at the back of this guide. 032259o About This Guide This guide describes the basic features of your Motorola wireless phone. Getting Started Getting Started CAUTION: Before using the phone for more information. Optional Accessories This label identifies a feature that may not be offered by all ...

User Manual
Page 11
Action 1 Press the release button on the battery cover. 2 Slide the cover back, then lift it away from the phone. 3 Insert the battery with the tabs toward the front and facing down. 4 Lower the battery cover onto the phone, then slide it forward until it clicks into place. 9 Getting Started Your phone is designed to use only Motorola Original batteries and accessories.
Action 1 Press the release button on the battery cover. 2 Slide the cover back, then lift it away from the phone. 3 Insert the battery with the tabs toward the front and facing down. 4 Lower the battery cover onto the phone, then slide it forward until it clicks into place. 9 Getting Started Your phone is designed to use only Motorola Original batteries and accessories.

User Manual
Page 12
...: Never dispose of batteries in a cool, dark, dry place, such as a refrigerator. It is probably time to charge. Before using your phone, read the battery safety information in the "Safety and General Information" section included in your local recycling center for a long time may explode. ...it is normal for batteries to temperatures below -10°C (14°F) or above 45°C (113°F). If you use Motorola Original™ batteries and chargers. Never expose batteries to gradually wear down and require longer charging times. Getting Started Battery Use Battery life...
...: Never dispose of batteries in a cool, dark, dry place, such as a refrigerator. It is probably time to charge. Before using your phone, read the battery safety information in the "Safety and General Information" section included in your local recycling center for a long time may explode. ...it is normal for batteries to temperatures below -10°C (14°F) or above 45°C (113°F). If you use Motorola Original™ batteries and chargers. Never expose batteries to gradually wear down and require longer charging times. Getting Started Battery Use Battery life...

User Manual
Page 13
...batteries perform best after charging is complete. Action 1 Plug the travel charger connected to the phone after several full charge/discharge cycles. Before you can safely leave the travel charger into your phone with the release tab facing up. 2 Plug the other end of the battery level indicator...right corner of the display shows how much of the charging process is complete. Note: When you need to ensure full phone functionality while charging. 11 At least 1 segment of the travel charger. Getting Started Charging the Battery New batteries are shipped partially charged.
...batteries perform best after charging is complete. Action 1 Plug the travel charger connected to the phone after several full charge/discharge cycles. Before you can safely leave the travel charger into your phone with the release tab facing up. 2 Plug the other end of the battery level indicator...right corner of the display shows how much of the charging process is complete. Note: When you need to ensure full phone functionality while charging. 11 At least 1 segment of the travel charger. Getting Started Charging the Battery New batteries are shipped partially charged.

User Manual
Page 14
... cover down to remove it into the slots at the base of the flip cover, then firmly pull up and lift the cover from the phone. Considerable force is attached tightly to remove a flip cover. Using tools to remove a flip cover will damage the cosmetic appearance of the cover into place.... Notes: • Do not use tools to the phone. Getting Started Removing a Flip Cover Action Insert your phone. 12 Attaching a Flip Cover Action Insert the tabs at the top of the...
... cover down to remove it into the slots at the base of the flip cover, then firmly pull up and lift the cover from the phone. Considerable force is attached tightly to remove a flip cover. Using tools to remove a flip cover will damage the cosmetic appearance of the cover into place.... Notes: • Do not use tools to the phone. Getting Started Removing a Flip Cover Action Insert your phone. 12 Attaching a Flip Cover Action Insert the tabs at the top of the...

User Manual
Page 15
Getting Started Action 2 Press and hold the power key for 3 seconds. Power Key 3 If necessary, enter your 4-digit unlock code (the last 4 digits of your phone number) and press OK (+) to : Volume Keys • increase or decrease earpiece volume during a call • increase or decrease the ringer volume setting when the home screen is visible (flip must be open-see "Adjusting Volume" on . Adjusting Volume Press the up or down volume keys to unlock the phone. The phone may require several seconds to power on page 13) • turn off an incoming call alert 13
Getting Started Action 2 Press and hold the power key for 3 seconds. Power Key 3 If necessary, enter your 4-digit unlock code (the last 4 digits of your phone number) and press OK (+) to : Volume Keys • increase or decrease earpiece volume during a call • increase or decrease the ringer volume setting when the home screen is visible (flip must be open-see "Adjusting Volume" on . Adjusting Volume Press the up or down volume keys to unlock the phone. The phone may require several seconds to power on page 13) • turn off an incoming call alert 13

User Manual
Page 16
Press to answer the call . Answering a Call When you must dial the phone number from the home screen. Note: You must unlock it to send call . Getting Started Tip: You can also close the flip to end the ...call . Tip: If you make the call. 3 Press P to end the call . Note: If the phone is locked, you receive an incoming call, your phone rings and/ or vibrates and displays an incoming call . 14 Phone Flip Open Action 1 Open the flip to answer. 2 Close the flip to delete the last digit...
Press to answer the call . Answering a Call When you must dial the phone number from the home screen. Note: You must unlock it to send call . Getting Started Tip: You can also close the flip to end the ...call . Tip: If you make the call. 3 Press P to end the call . Note: If the phone is locked, you receive an incoming call, your phone rings and/ or vibrates and displays an incoming call . 14 Phone Flip Open Action 1 Open the flip to answer. 2 Close the flip to delete the last digit...

User Manual
Page 17
... alert. Press to answer call alert volume, then switch to scroll Speakerphone through the alert styles: Loud, Key Soft, Vibrate, Vibe & Ring, and Silent. Phone Flip Closed Action 1 Press N to answer. 2 Press P to Answer. Press the up or down volume key to switch to the lowest alert volume setting.... The alert styles are shown on the external display. 15 Phone Flip Closed Volume Keys Press the up volume key to cycle back from silent alert to vibrate and then to Volume Keys lower call . ...
... alert. Press to answer call alert volume, then switch to scroll Speakerphone through the alert styles: Loud, Key Soft, Vibrate, Vibe & Ring, and Silent. Phone Flip Closed Action 1 Press N to answer. 2 Press P to Answer. Press the up or down volume key to switch to the lowest alert volume setting.... The alert styles are shown on the external display. 15 Phone Flip Closed Volume Keys Press the up volume key to cycle back from silent alert to vibrate and then to Volume Keys lower call . ...

User Manual
Page 18
Viewing Your Phone Number To view your phone number from the home screen, press M #. Numbers. 16 Getting Started After scrolling to the desired alert style, press the up or down volume key to save the setting and return to the home screen. While you are on a call, press M > My Tel.
Viewing Your Phone Number To view your phone number from the home screen, press M #. Numbers. 16 Getting Started After scrolling to the desired alert style, press the up or down volume key to save the setting and return to the home screen. While you are on a call, press M > My Tel.

User Manual
Page 19
The active viewfinder image appears on your phone's highlights. This section describes some of your phone's display. (O \ uyÉ Msg 1/143 Press S up to zoom in, down to zoom out. M CAPTURE Press S right to lower contrast, left to open Pictures Menu. Highlight Features Highlight Features You can do much more with your phone's camera. Taking and Sending a Photo From the home screen, press the camera key f to take a photo. 17 BACK Press M to add contrast. Press CAPTURE (-) to activate your phone than make and receive calls!
The active viewfinder image appears on your phone's highlights. This section describes some of your phone's display. (O \ uyÉ Msg 1/143 Press S up to zoom in, down to zoom out. M CAPTURE Press S right to lower contrast, left to open Pictures Menu. Highlight Features Highlight Features You can do much more with your phone's camera. Taking and Sending a Photo From the home screen, press the camera key f to take a photo. 17 BACK Press M to add contrast. Press CAPTURE (-) to activate your phone than make and receive calls!

User Manual
Page 20
perform the storage option of your phone. 18 The Pictures Menu can include the following options: Option Go To Pictures Description View pictures and photos stored on your choice Pictures Menu Options ...
perform the storage option of your phone. 18 The Pictures Menu can include the following options: Option Go To Pictures Description View pictures and photos stored on your choice Pictures Menu Options ...
User Manual
Page 21
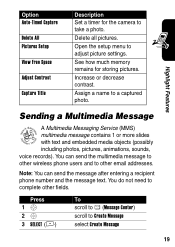
...storing pictures. Assign a name to take a photo. Increase or decrease contrast. Note: You can send the multimedia message to other wireless phone users and to complete other email addresses. You do not need to other fields. Highlight Features Sending a Multimedia Message A Multimedia Messaging Service... voice records). See how much memory remains for the camera to a captured photo. You can send the message after entering a recipient phone number and the message text. Delete all pictures. Open the setup menu to Create Message select Create Message 19 Press 1S 2S 3...
...storing pictures. Assign a name to take a photo. Increase or decrease contrast. Note: You can send the multimedia message to other wireless phone users and to complete other email addresses. You do not need to other fields. Highlight Features Sending a Multimedia Message A Multimedia Messaging Service... voice records). See how much memory remains for the camera to a captured photo. You can send the message after entering a recipient phone number and the message text. Delete all pictures. Open the setup menu to Create Message select Create Message 19 Press 1S 2S 3...

User Manual
Page 22
... CONTACTS (+), S, then ADD (+) and DONE (-) 7 keypad keys 8M 9 SELECT (+) 10 S 11 SELECT (+) 12 M 13 S To scroll to New MMS Message select New MMS Message enter a phone number open the menu scroll to Insert 20 open the menu to insert a new slide display a list of items you can insert scroll to New...
... CONTACTS (+), S, then ADD (+) and DONE (-) 7 keypad keys 8M 9 SELECT (+) 10 S 11 SELECT (+) 12 M 13 S To scroll to New MMS Message select New MMS Message enter a phone number open the menu scroll to Insert 20 open the menu to insert a new slide display a list of items you can insert scroll to New...

User Manual
Page 25
..., or unknown file type). To open the message Highlight Features Multimedia messages that you receive can use an optional TTY device with your phone displays the X (message waiting) indicator and a New Message notification, and sounds an alert. Receiving a Multimedia Message When you receive ...a multimedia message or 032380o letter, your phone to send and receive calls. You must plug the TTY device into 23 Press READ (+) To open the attachment, highlight the file indicator...
..., or unknown file type). To open the message Highlight Features Multimedia messages that you receive can use an optional TTY device with your phone displays the X (message waiting) indicator and a New Message notification, and sounds an alert. Receiving a Multimedia Message When you receive ...a multimedia message or 032380o letter, your phone to send and receive calls. You must plug the TTY device into 23 Press READ (+) To open the attachment, highlight the file indicator...

User Manual
Page 26
... be at least 12 inches (30 centimeters) from the TTY device. Placing the phone too close to level 4 (middle setting) for proper operation. Highlight Features the phone's headset jack and set your phone to a TTY mode, it operates in 1 of incorrect characters, adjust the volume as needed to minimize the error ...rate. Note: Set the phone to the TTY device may cause high error rates. Find the Feature M > Settings > Initial Setup Press 1S 2 CHANGE (-) 3S 4 SELECT (-) To scroll to TTY...
... be at least 12 inches (30 centimeters) from the TTY device. Placing the phone too close to level 4 (middle setting) for proper operation. Highlight Features the phone's headset jack and set your phone to a TTY mode, it operates in 1 of incorrect characters, adjust the volume as needed to minimize the error ...rate. Note: Set the phone to the TTY device may cause high error rates. Find the Feature M > Settings > Initial Setup Press 1S 2 CHANGE (-) 3S 4 SELECT (-) To scroll to TTY...


