
User Manual
Page 3
Headset Jack 1 We are pleased that you have chosen the Motorola V220 GSM wireless phone. Welcome Welcome to the world of Motorola digital wireless communications! Power Connector Voice Key Power & End Key Turn phone on/off, end calls, exit menu system. Volume Keys Camera / Smart Key Take pictures, select items. Send Key Make & answer calls. Menu Key 5-Way Navigation Key Scroll through menus & lists. Left Soft Key Perform function in lower left display. 032471a Right Soft Key Perform function in lower right display.
Headset Jack 1 We are pleased that you have chosen the Motorola V220 GSM wireless phone. Welcome Welcome to the world of Motorola digital wireless communications! Power Connector Voice Key Power & End Key Turn phone on/off, end calls, exit menu system. Volume Keys Camera / Smart Key Take pictures, select items. Send Key Make & answer calls. Menu Key 5-Way Navigation Key Scroll through menus & lists. Left Soft Key Perform function in lower left display. 032471a Right Soft Key Perform function in lower right display.
User Manual
Page 5
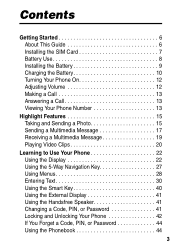
... 6 Installing the SIM Card 7 Battery Use 8 Installing the Battery 9 Charging the Battery 10 Turning Your Phone On 12 Adjusting Volume 12 Making a Call 13 Answering a Call 13 Viewing Your Phone Number 13 Highlight Features 15 Taking and Sending a Photo 15 Sending a Multimedia Message 17 Receiving a Multimedia ...Message 19 Playing Video Clips 20 Learning to Use Your Phone 22 Using the Display 22 Using the 5-Way Navigation Key 27 Using Menus 28 Entering Text 30 Using the Smart Key 40 Using ...
... 6 Installing the SIM Card 7 Battery Use 8 Installing the Battery 9 Charging the Battery 10 Turning Your Phone On 12 Adjusting Volume 12 Making a Call 13 Answering a Call 13 Viewing Your Phone Number 13 Highlight Features 15 Taking and Sending a Photo 15 Sending a Multimedia Message 17 Receiving a Multimedia ...Message 19 Playing Video Clips 20 Learning to Use Your Phone 22 Using the Display 22 Using the 5-Way Navigation Key 27 Using Menus 28 Entering Text 30 Using the Smart Key 40 Using ...
User Manual
Page 6
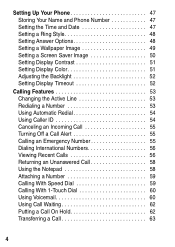
Setting Up Your Phone 47 Storing Your Name and Phone Number 47 Setting the Time and Date 47 Setting a Ring Style 48 Setting Answer Options 48 Setting a Wallpaper Image 49 Setting a Screen Saver Image 50 ...
Setting Up Your Phone 47 Storing Your Name and Phone Number 47 Setting the Time and Date 47 Setting a Ring Style 48 Setting Answer Options 48 Setting a Wallpaper Image 49 Setting a Screen Saver Image 50 ...
User Manual
Page 8
Contact your Motorola wireless phone. To obtain the More Here guide for your phone's features in all geographical areas. Optional Features This label identifies an optional network, SIM card, or subscription-dependent feature that describes your phone, or another copy of this guide. Note: A More Here ...describes the basic features of your service provider for more detail. Getting Started Getting Started About This Guide Caution: Before using the phone for the first time, read the Important Safety and Legal Information included in the gray-edged pages at the back of this...
Contact your Motorola wireless phone. To obtain the More Here guide for your phone's features in all geographical areas. Optional Features This label identifies an optional network, SIM card, or subscription-dependent feature that describes your phone, or another copy of this guide. Note: A More Here ...describes the basic features of your service provider for more detail. Getting Started Getting Started About This Guide Caution: Before using the phone for the first time, read the Important Safety and Legal Information included in the gray-edged pages at the back of this...
User Manual
Page 9
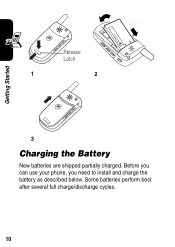
Avoid exposing your SIM card. Caution: Do not bend or scratch your SIM card to static electricity, water, or dirt. 032472o Release Latch 1 2 3 4 7 Installing the SIM Card Your SIM (Subscriber Identity Module) card contains your phone number, service details, and phonebook/message memory. Getting Started Optional Accessories This label identifies a feature that requires an optional Motorola Original™ accessory.
Avoid exposing your SIM card. Caution: Do not bend or scratch your SIM card to static electricity, water, or dirt. 032472o Release Latch 1 2 3 4 7 Installing the SIM Card Your SIM (Subscriber Identity Module) card contains your phone number, service details, and phonebook/message memory. Getting Started Optional Accessories This label identifies a feature that requires an optional Motorola Original™ accessory.
User Manual
Page 10
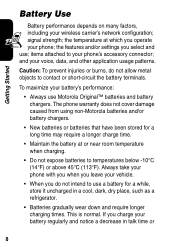
The phone warranty does not cover damage caused from using non-Motorola batteries and/or battery chargers. • New batteries or batteries that have been stored for a long time may require a longer charge time. • Maintain the ... and/or settings you do not allow metal objects to your vehicle. • When you select and use Motorola Original™ batteries and battery chargers. Always take your phone with you when you leave your phone's accessory connector; Getting Started Battery Use Battery performance depends on many factors, including your voice, data, and...
The phone warranty does not cover damage caused from using non-Motorola batteries and/or battery chargers. • New batteries or batteries that have been stored for a long time may require a longer charge time. • Maintain the ... and/or settings you do not allow metal objects to your vehicle. • When you select and use Motorola Original™ batteries and battery chargers. Always take your phone with you when you leave your phone's accessory connector; Getting Started Battery Use Battery performance depends on many factors, including your voice, data, and...
User Manual
Page 11
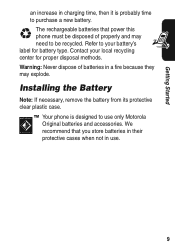
... disposal methods. Warning: Never dispose of properly and may need to your local recycling center for battery type. Getting Started an increase in use only Motorola Original batteries and accessories. Installing the Battery Note: If necessary, remove the battery from its protective clear plastic case. Refer to be disposed of batteries... you store batteries in their protective cases when not in charging time, then it is designed to purchase a new battery. We recommend that power this phone must be recycled. Your phone is probably time to use . 9
... disposal methods. Warning: Never dispose of properly and may need to your local recycling center for battery type. Getting Started an increase in use only Motorola Original batteries and accessories. Installing the Battery Note: If necessary, remove the battery from its protective clear plastic case. Refer to be disposed of batteries... you store batteries in their protective cases when not in charging time, then it is designed to purchase a new battery. We recommend that power this phone must be recycled. Your phone is probably time to use . 9
User Manual
Page 12
Getting Started 032472o Release Latch 1 2 032474o 032473o 3 Charging the Battery New batteries are shipped partially charged. Before you can use your phone, you need to install and charge the battery as described below. Some batteries perform best after several full charge/discharge cycles. 10
Getting Started 032472o Release Latch 1 2 032474o 032473o 3 Charging the Battery New batteries are shipped partially charged. Before you can use your phone, you need to install and charge the battery as described below. Some batteries perform best after several full charge/discharge cycles. 10
User Manual
Page 13
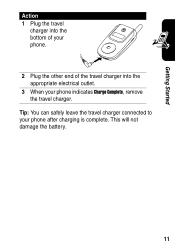
Tip: You can safely leave the travel charger connected to your phone indicates Charge Complete, remove the travel charger into the appropriate electrical outlet. 3 When your phone after charging is complete. Getting Started Action 1 Plug the travel charger into the bottom of your phone. 032478o 2 Plug the other end of the travel charger. This will not damage the battery. 11
Tip: You can safely leave the travel charger connected to your phone indicates Charge Complete, remove the travel charger into the appropriate electrical outlet. 3 When your phone after charging is complete. Getting Started Action 1 Plug the travel charger into the bottom of your phone. 032478o 2 Plug the other end of the travel charger. This will not damage the battery. 11

User Manual
Page 14
Caution: If you enter an incorrect PIN code 3 times in a row, your SIM card is visible Volume Keys 12 032480o Turning Your Phone On Action 1 Press and hold O for 2 seconds to turn on volume keys to: • increase or decrease earpiece volume during a call • increase or... decrease the ringer volume setting when the home screen is disabled and your phone displays SIM Blocked. 3 If necessary, enter your 4-digit unlock code and press OK (+) to unlock the SIM card. Adjusting Volume Press up or down...
Caution: If you enter an incorrect PIN code 3 times in a row, your SIM card is visible Volume Keys 12 032480o Turning Your Phone On Action 1 Press and hold O for 2 seconds to turn on volume keys to: • increase or decrease earpiece volume during a call • increase or... decrease the ringer volume setting when the home screen is disabled and your phone displays SIM Blocked. 3 If necessary, enter your 4-digit unlock code and press OK (+) to unlock the SIM card. Adjusting Volume Press up or down...
User Manual
Page 15
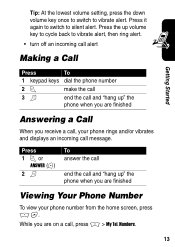
While you are finished Answering a Call When you receive a call, your phone number from the home screen, press M #. Press it again to switch to...incoming call alert Making a Call Getting Started Press To 1 keypad keys dial the phone number 2N make the call 3O end the call and "hang up " the phone when you are on a call message. Numbers. 13 Tip: At the lowest ... ANSWER (-) 2O To answer the call end the call and "hang up " the phone when you are finished Viewing Your Phone Number To view your phone rings and/or vibrates and displays an incoming call , press M > My Tel.
While you are finished Answering a Call When you receive a call, your phone number from the home screen, press M #. Press it again to switch to...incoming call alert Making a Call Getting Started Press To 1 keypad keys dial the phone number 2N make the call 3O end the call and "hang up " the phone when you are on a call message. Numbers. 13 Tip: At the lowest ... ANSWER (-) 2O To answer the call end the call and "hang up " the phone when you are finished Viewing Your Phone Number To view your phone rings and/or vibrates and displays an incoming call , press M > My Tel.

User Manual
Page 16
To store your SIM card to use this feature. Getting Started Note: Your phone number must be stored on your phone number on the SIM card, see page 47. If you do not know your phone number, contact your service provider. 14
To store your SIM card to use this feature. Getting Started Note: Your phone number must be stored on your phone number on the SIM card, see page 47. If you do not know your phone number, contact your service provider. 14

User Manual
Page 17
Point the camera lens at the photo subject, then: 15 Press S : to change zoom, or bc to open subscreen. Return to previous Press M to change brightness. IMAGE AREA 0323480a32481o BACK CAPTURE Take a photo. menu. Taking and Sending a Photo To activate your phone's camera: Find the Feature M > Multimedia > Camera The active viewfinder image appears on your phone's highlight features. This section describes some of your display. Highlight Features Highlight Features You can do much more with your phone than make and receive calls!
Point the camera lens at the photo subject, then: 15 Press S : to change zoom, or bc to open subscreen. Return to previous Press M to change brightness. IMAGE AREA 0323480a32481o BACK CAPTURE Take a photo. menu. Taking and Sending a Photo To activate your phone's camera: Find the Feature M > Multimedia > Camera The active viewfinder image appears on your phone's highlight features. This section describes some of your display. Highlight Features Highlight Features You can do much more with your phone than make and receive calls!
User Manual
Page 18
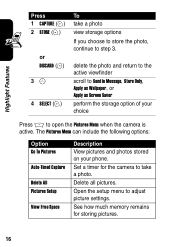
... step 3. Open the setup menu to Send in Message, Store Only, Apply as Wallpaper, or Apply as Screen Saver perform the storage option of your phone. Delete all pictures. See how much memory remains for the camera to take a photo view storage options If you choose to store the photo, continue...
... step 3. Open the setup menu to Send in Message, Store Only, Apply as Wallpaper, or Apply as Screen Saver perform the storage option of your phone. Delete all pictures. See how much memory remains for the camera to take a photo view storage options If you choose to store the photo, continue...
User Manual
Page 19
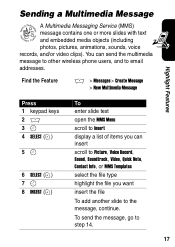
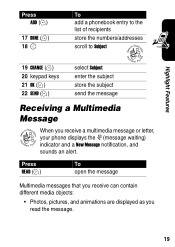
... 8 INSERT (+) To enter slide text open the MMS Menu scroll to Insert display a list of items you can send the multimedia message to other wireless phone users, and to email addresses. You can insert scroll to Picture, Voice Record, Sound, Soundtrack, Video, Quick Note, Contact Info, or MMS Templates select the...
... 8 INSERT (+) To enter slide text open the MMS Menu scroll to Insert display a list of items you can send the multimedia message to other wireless phone users, and to email addresses. You can insert scroll to Picture, Voice Record, Sound, Soundtrack, Video, Quick Note, Contact Info, or MMS Templates select the...

User Manual
Page 20
... [New Phonebook Entry] and enter a number/address store the message scroll to a Send To option: • Highlight [One Time Entry] to enter one or more phone numbers and/or email addresses. • Highlight [New Phonebook Entry] to enter a number/address and add it to enter contents for the new slide.
... [New Phonebook Entry] and enter a number/address store the message scroll to a Send To option: • Highlight [One Time Entry] to enter one or more phone numbers and/or email addresses. • Highlight [New Phonebook Entry] to enter a number/address and add it to enter contents for the new slide.
User Manual
Page 21
... messages that you receive can contain different media objects: • Photos, pictures, and animations are displayed as you receive a multimedia message or letter, 032380o your phone displays the r (message waiting) indicator and a New Message notification, and sounds an alert. Highlight Features Press ADD (+) 17 DONE (-) 18 S To add a phonebook entry to...
... messages that you receive can contain different media objects: • Photos, pictures, and animations are displayed as you receive a multimedia message or letter, 032380o your phone displays the r (message waiting) indicator and a New Message notification, and sounds an alert. Highlight Features Press ADD (+) 17 DONE (-) 18 S To add a phonebook entry to...

User Manual
Page 22
... You can download video clips with the micro-browser, and send and receive video clips in the text to play a video clip stored on your phone: Find the Feature M > Multimedia > Videos Press 1S 2 PLAY (+) To scroll to the end of the message. To play a sound file or video clip. • Attached...
... You can download video clips with the micro-browser, and send and receive video clips in the text to play a video clip stored on your phone: Find the Feature M > Multimedia > Videos Press 1S 2 PLAY (+) To scroll to the end of the message. To play a sound file or video clip. • Attached...

User Manual
Page 24
... service provider may look different from the display shown above. If you are not on a call or using the menu. Learning to Use Your Phone Learning to dial a phone number. Using the Display The home screen displays when you select a menu icon by mistake, press O to return to select one of 22... may hide the menu feature icons to allow a better view of the menu feature icons. You must be in the home screen to Use Your Phone See page 1 for a basic...
... service provider may look different from the display shown above. If you are not on a call or using the menu. Learning to Use Your Phone Learning to dial a phone number. Using the Display The home screen displays when you select a menu icon by mistake, press O to return to select one of 22... may hide the menu feature icons to allow a better view of the menu feature icons. You must be in the home screen to Use Your Phone See page 1 for a basic...
User Manual
Page 25
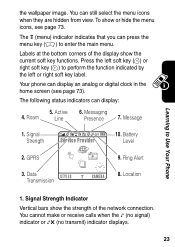
... receive calls when the 0 (no signal) indicator or 0> (no transmit) indicator displays. 23 To show or hide the menu icons, see page 73). Your phone can press the menu key (M) to perform the function indicated by the left soft key (-) or right soft key (+) to enter the main menu. The... show the strength of the network connection. Active 6. Roam Line 03235P5r1eosence 7. GPRS 3. Message 1. the wallpaper image. Messaging 4. Signal Strength 2. Location Learning to Use Your Phone 1. Signal Strength Indicator Vertical bars show the current soft key functions.
... receive calls when the 0 (no signal) indicator or 0> (no transmit) indicator displays. 23 To show or hide the menu icons, see page 73). Your phone can press the menu key (M) to perform the function indicated by the left soft key (-) or right soft key (+) to enter the main menu. The... show the strength of the network connection. Active 6. Roam Line 03235P5r1eosence 7. GPRS 3. Message 1. the wallpaper image. Messaging 4. Signal Strength 2. Location Learning to Use Your Phone 1. Signal Strength Indicator Vertical bars show the current soft key functions.


