User Manual
Page 4
... the Belt Clip 17 Removing the Belt Clip 17 Turning Your Radio On and Off . . . . . .17 Setting the Volume 17 Setting a Channel 18 Channels and Frequencies 19 Talking and Listening 20 Talk Range 20 Checking the Channel Before Transmitting 20 2 Special Features 21 Interference Eliminator Code 21 Push to Talk Timeout Timer 21 Locking the Keypad 22 Scanning Channels (Models T5620, T5700, T5710 Only 22 Scan Advance 23 Removing Channels from the Scan List (Nuisance Delete Feature 23 Alerts 24 Channel Busy Indicator 24 Setting and Transmitting Call Tones . . 24 Transmitting a Talk...
... the Belt Clip 17 Removing the Belt Clip 17 Turning Your Radio On and Off . . . . . .17 Setting the Volume 17 Setting a Channel 18 Channels and Frequencies 19 Talking and Listening 20 Talk Range 20 Checking the Channel Before Transmitting 20 2 Special Features 21 Interference Eliminator Code 21 Push to Talk Timeout Timer 21 Locking the Keypad 22 Scanning Channels (Models T5620, T5700, T5710 Only 22 Scan Advance 23 Removing Channels from the Scan List (Nuisance Delete Feature 23 Alerts 24 Channel Busy Indicator 24 Setting and Transmitting Call Tones . . 24 Transmitting a Talk...
User Manual
Page 5
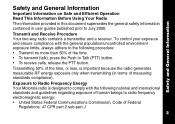
... human beings to radio frequency electromagnetic energy: • United States Federal Communications Commission, Code of Federal Regulations; 47 CFR part 2 sub-part J 3 Exposure to Radio Frequency Energy Your Motorola radio is important because the radio generates measurable RF energy exposure only when transmitting (in user guides published prior to Talk (PTT) button. • To receive calls, release the PTT button. Transmit and Receive Procedure Your two-way radio contains a transmitter and a receiver. Safety and General...
... human beings to radio frequency electromagnetic energy: • United States Federal Communications Commission, Code of Federal Regulations; 47 CFR part 2 sub-part J 3 Exposure to Radio Frequency Energy Your Motorola radio is important because the radio generates measurable RF energy exposure only when transmitting (in user guides published prior to Talk (PTT) button. • To receive calls, release the PTT button. Transmit and Receive Procedure Your two-way radio contains a transmitter and a receiver. Safety and General...
User Manual
Page 6
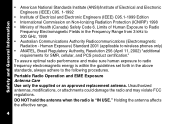
...Code 6. To assure optimal radio performance and make sure human exposure to radio frequency electromagnetic energy is "IN USE." Portable Radio Operation and EME Exposure Antenna Care Use only the supplied or an approved replacement antenna. Unauthorized antennas, modifications, or attachments could damage the radio and may violate FCC...requirements for SMR, cellular, and PCS product certification." DO NOT hold the antenna when the radio is within the guidelines set forth in the Frequency Range from 3 kHz to 300 GHz, 1999 • Australian Communications Authority Radiocommunications ...
...Code 6. To assure optimal radio performance and make sure human exposure to radio frequency electromagnetic energy is "IN USE." Portable Radio Operation and EME Exposure Antenna Care Use only the supplied or an approved replacement antenna. Unauthorized antennas, modifications, or attachments could damage the radio and may violate FCC...requirements for SMR, cellular, and PCS product certification." DO NOT hold the antenna when the radio is within the guidelines set forth in the Frequency Range from 3 kHz to 300 GHz, 1999 • Australian Communications Authority Radiocommunications ...
User Manual
Page 7
... use one of nonMotorola-approved accessories may exceed FCC/Health Canada RF exposure guidelines. If you wear a radio on your body when transmitting, always place the radio in a Motorola-supplied or approved clip, holder, holster, case, or body harness for electromagnetic compatibility. 5 Safety and General Information Two-Way Radio Operation When using your radio as a traditional two-way radio, hold the radio in a vertical position with the microphone...
... use one of nonMotorola-approved accessories may exceed FCC/Health Canada RF exposure guidelines. If you wear a radio on your body when transmitting, always place the radio in a Motorola-supplied or approved clip, holder, holster, case, or body harness for electromagnetic compatibility. 5 Safety and General Information Two-Way Radio Operation When using your radio as a traditional two-way radio, hold the radio in a vertical position with the microphone...
User Manual
Page 10
... especially qualified for use any portable radio that has a damaged antenna. Safety and General Information Potentially Explosive Atmospheres Turn off your radio prior to entering any area with potentially explosive atmospheres are near electrical blasting caps, in a blasting area, or in areas posted: "Turn off twoway radio." Obey all signs and instructions. Do not remove, install, or charge batteries in such areas...
... especially qualified for use any portable radio that has a damaged antenna. Safety and General Information Potentially Explosive Atmospheres Turn off your radio prior to entering any area with potentially explosive atmospheres are near electrical blasting caps, in a blasting area, or in areas posted: "Turn off twoway radio." Obey all signs and instructions. Do not remove, install, or charge batteries in such areas...
User Manual
Page 11
... by a qualified electrician. Battery Charger Safety Instructions Save these Instructions 1. To reduce the risk of damage to the cord or plug, pull the plug rather than the cord when disconnecting the charger from the outlet before attempting any way. 3. Do not operate or disassemble the charger if it inside a pocket, purse, or other container with the unit. To reduce the risk...
... by a qualified electrician. Battery Charger Safety Instructions Save these Instructions 1. To reduce the risk of damage to the cord or plug, pull the plug rather than the cord when disconnecting the charger from the outlet before attempting any way. 3. Do not operate or disassemble the charger if it inside a pocket, purse, or other container with the unit. To reduce the risk...
User Manual
Page 13
... instructions. To comply with FCC requirements, transmitter adjustments should not be made only by or under the supervision of a person certified as technically qualified to perform transmitter maintenance and repairs in the private land mobile and fixed services as certified by an organization representative of the user of the Federal Communications Commission (FCC). FCC Licensing Information Your Motorola radio operates on General Mobile Radio Service (GMRS) frequencies...
... instructions. To comply with FCC requirements, transmitter adjustments should not be made only by or under the supervision of a person certified as technically qualified to perform transmitter maintenance and repairs in the private land mobile and fixed services as certified by an organization representative of the user of the Federal Communications Commission (FCC). FCC Licensing Information Your Motorola radio operates on General Mobile Radio Service (GMRS) frequencies...
User Manual
Page 14
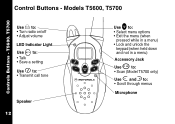
T5700 Use P to: • Turn radio on/off • Adjust volume LED Indicator Light Use M to: • Talk • Save a setting Use ^ to: • Transmit call tone Speaker 12 Use \ to: • Select menu options • Exit the menu (when pressed while in a menu) • Lock and unlock the keypad (when held down and not in a menu) Accessory Jack Use Q to: • Scan (Model T5700 only) Use [ and ]to: • Scroll through menus Microphone T5600. Models T5600, T5700 Controls Buttons - Control Buttons -
T5700 Use P to: • Turn radio on/off • Adjust volume LED Indicator Light Use M to: • Talk • Save a setting Use ^ to: • Transmit call tone Speaker 12 Use \ to: • Select menu options • Exit the menu (when pressed while in a menu) • Lock and unlock the keypad (when held down and not in a menu) Accessory Jack Use Q to: • Scan (Model T5700 only) Use [ and ]to: • Scroll through menus Microphone T5600. Models T5600, T5700 Controls Buttons - Control Buttons -
User Manual
Page 15
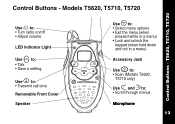
T5620, T5710, T5720 Use P to: • Turn radio on/off • Adjust volume LED Indicator Light Use M to: • Talk • Save a setting Use ^ to: • Transmit call tone Removable Front Cover Speaker Use \ to: • Select menu options • Exit the menu (when pressed while in a menu) • Lock and unlock the keypad (when held down and not in a menu) Accessory Jack Use J to: • Scan (Models T5620, T5710 only) Use [ and ]to: • Scroll through menus Microphone 13 Models T5620, T5710, T5720 Control Buttons - Control Buttons -
T5620, T5710, T5720 Use P to: • Turn radio on/off • Adjust volume LED Indicator Light Use M to: • Talk • Save a setting Use ^ to: • Transmit call tone Removable Front Cover Speaker Use \ to: • Select menu options • Exit the menu (when pressed while in a menu) • Lock and unlock the keypad (when held down and not in a menu) Accessory Jack Use J to: • Scan (Models T5620, T5710 only) Use [ and ]to: • Scroll through menus Microphone 13 Models T5620, T5710, T5720 Control Buttons - Control Buttons -
User Manual
Page 16
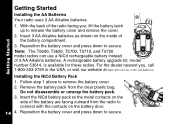
... website at www.motorola.com/talkabout. Remove the battery pack from the radio to secure. Insert the NiCd battery pack so the metal contacts on the side of 3 AA Alkaline batteries. Reposition the battery cover and press down to release the battery cover and remove the cover. 2. Getting Started Getting Started Installing the AA Batteries Your radio uses 3 AA Alkaline batteries. 1. Note: The T5600, T5620, T5700, T5710, and T5720 model radios can use a NiCd rechargeable battery instead of the...
... website at www.motorola.com/talkabout. Remove the battery pack from the radio to secure. Insert the NiCd battery pack so the metal contacts on the side of 3 AA Alkaline batteries. Reposition the battery cover and press down to release the battery cover and remove the cover. 2. Getting Started Getting Started Installing the AA Batteries Your radio uses 3 AA Alkaline batteries. 1. Note: The T5600, T5620, T5700, T5710, and T5720 model radios can use a NiCd rechargeable battery instead of the...
User Manual
Page 17
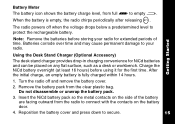
... the radio to protect the rechargeable battery. When the battery is fully charged within 14 hours. 1. Getting Started Note: Remove the batteries before using it for NiCd batteries and can be placed on any flat surface, such as a desk or workbench. Reposition the battery cover and press down to empty a. Turn the radio off when the voltage drops below a predetermined level to connect with...
... the radio to protect the rechargeable battery. When the battery is fully charged within 14 hours. 1. Getting Started Note: Remove the batteries before using it for NiCd batteries and can be placed on any flat surface, such as a desk or workbench. Reposition the battery cover and press down to empty a. Turn the radio off when the voltage drops below a predetermined level to connect with...
User Manual
Page 19
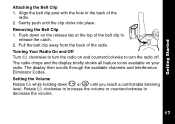
... Off Turn P clockwise to turn the radio on your radio. The radio chirps and the display briefly shows all feature icons available on and counterclockwise to turn the radio off. The display then scrolls through the available channels and Interference Eliminator Codes. Removing the Belt Clip 1. Setting the Volume Rotate P while holding down on the release tab at the top of the belt clip to decrease the volume. 17 Gently push until you reach...
... Off Turn P clockwise to turn the radio on your radio. The radio chirps and the display briefly shows all feature icons available on and counterclockwise to turn the radio off. The display then scrolls through the available channels and Interference Eliminator Codes. Removing the Belt Clip 1. Setting the Volume Rotate P while holding down on the release tab at the top of the belt clip to decrease the volume. 17 Gently push until you reach...
User Manual
Page 22
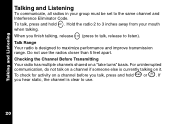
... transmission range. To check for activity on a channel before you talk, press and hold M. Do not use . 20 If you finish talking, release M (press to talk, release to the same channel and Interference Eliminator Code. For uninterrupted communication, do not talk on a channel if someone else is currently talking on a "take turns" basis. Hold the radio 2 to 3 inches away from your group must be set to...
... transmission range. To check for activity on a channel before you talk, press and hold M. Do not use . 20 If you finish talking, release M (press to talk, release to the same channel and Interference Eliminator Code. For uninterrupted communication, do not talk on a channel if someone else is currently talking on a "take turns" basis. Hold the radio 2 to 3 inches away from your group must be set to...
User Manual
Page 23
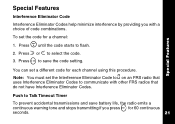
... set the Interference Eliminator Code to 0 on an FRS radio that do not have Interference Eliminator Codes. Special Features Interference Eliminator Code Interference Eliminator Codes help minimize interference by providing you press M for 60 continuous seconds. 21 Push to communicate with a choice of code combinations. Press \ until the code starts to select the code. 3. Press ] or [ to flash. 2. Press M to save battery life, the radio emits a continuous warning tone and stops transmitting if you with other FRS radios that uses Interference Eliminator Codes...
... set the Interference Eliminator Code to 0 on an FRS radio that do not have Interference Eliminator Codes. Special Features Interference Eliminator Code Interference Eliminator Codes help minimize interference by providing you press M for 60 continuous seconds. 21 Push to communicate with a choice of code combinations. Press \ until the code starts to select the code. 3. Press ] or [ to flash. 2. Press M to save battery life, the radio emits a continuous warning tone and stops transmitting if you with other FRS radios that uses Interference Eliminator Codes...
User Manual
Page 24
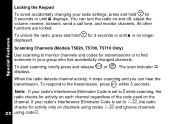
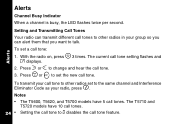
..., adjust the volume, receive, transmit, send a call tone, and monitor channels. Special Features Locking the Keypad To avoid accidentally changing your radio's Interference Eliminator Code is set to 1-38, the radio checks for activity only on channels using codes 1-38 and ignores channels 22 using code 0. You can hear the transmission. All other functions are locked. The scan indicator h displays. Note: If your radio settings, press and hold \ for transmissions or to the transmission, press M within 5 seconds. Scanning Channels (Models T5620, T5700...
..., adjust the volume, receive, transmit, send a call tone, and monitor channels. Special Features Locking the Keypad To avoid accidentally changing your radio's Interference Eliminator Code is set to 1-38, the radio checks for activity only on channels using codes 1-38 and ignores channels 22 using code 0. You can hear the transmission. All other functions are locked. The scan indicator h displays. Note: If your radio settings, press and hold \ for transmissions or to the transmission, press M within 5 seconds. Scanning Channels (Models T5620, T5700...
User Manual
Page 26
... Interference Eliminator Code as your group so you can transmit different call tones to other radios set to set a call tone. With the radio on, press \ 3 times. Notes • The T5600, T5620, and T5700 models have 10 call tones. 24 • Setting the call tone to talk. Setting and Transmitting Call Tones Your radio can alert them that you want to 0 disables the call tones. To set the new call tone: 1. The T5710 and T5720 models have 5 call tone feature...
... Interference Eliminator Code as your group so you can transmit different call tones to other radios set to set a call tone. With the radio on, press \ 3 times. Notes • The T5600, T5620, and T5700 models have 10 call tones. 24 • Setting the call tone to talk. Setting and Transmitting Call Tones Your radio can alert them that you want to 0 disables the call tones. To set the new call tone: 1. The T5710 and T5720 models have 5 call tone feature...
User Manual
Page 27
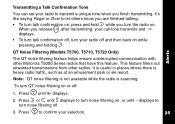
Transmitting a Talk Confirmation Tone You can set your radio to transmit a unique tone when you release M after transmitting, your call tone transmits and ! It is useful in places where there is scanning. Alerts QT Noise Filtering (Models T5700, T5710, T5720 Only) The QT noise filtering feature helps ensure uninterrupted communication with other radios. This feature filters out unwanted transmissions from other Motorola T5000 Series radios that have this feature. Note: QT noise filtering is not...
Transmitting a Talk Confirmation Tone You can set your radio to transmit a unique tone when you release M after transmitting, your call tone transmits and ! It is useful in places where there is scanning. Alerts QT Noise Filtering (Models T5700, T5710, T5720 Only) The QT noise filtering feature helps ensure uninterrupted communication with other radios. This feature filters out unwanted transmissions from other Motorola T5000 Series radios that have this feature. Note: QT noise filtering is not...
User Manual
Page 29
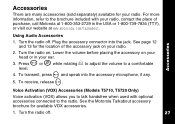
.... 3. Turn the radio off . Accessories Using Audio Accessories 1. Plug the accessory connector into the accessory microphone, if any. 5. See page 12 and 13 for the location of purchase, call Motorola at www.motorola.com/talkabout. See the Motorola Talkabout accessory brochure for your radio. For more information, refer to the brochure included with optional accessories connected to the radio. To transmit, press M and speak into the jack. To receive, release M. Voice Activation (VOX) Accessories (Models...
.... 3. Turn the radio off . Accessories Using Audio Accessories 1. Plug the accessory connector into the accessory microphone, if any. 5. See page 12 and 13 for the location of purchase, call Motorola at www.motorola.com/talkabout. See the Motorola Talkabout accessory brochure for your radio. For more information, refer to the brochure included with optional accessories connected to the radio. To transmit, press M and speak into the jack. To receive, release M. Voice Activation (VOX) Accessories (Models...
User Manual
Page 30
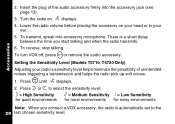
... turn VOX off, press Mor remove the audio accessory. Lower the radio volume before placing the accessory on . Press ] or [ to select the sensitivity level: 3 = High Sensitivity 2 = Medium Sensitivity 1 = Low Sensitivity for quiet environments for most environments for noisy environments Note: When you connect a VOX accessory, the radio is a short delay between the time you start talking and when the radio transmits. 6. To receive, stop talking. Insert the plug of unintended noises...
... turn VOX off, press Mor remove the audio accessory. Lower the radio volume before placing the accessory on . Press ] or [ to select the sensitivity level: 3 = High Sensitivity 2 = Medium Sensitivity 1 = Low Sensitivity for quiet environments for most environments for noisy environments Note: When you connect a VOX accessory, the radio is a short delay between the time you start talking and when the radio transmits. 6. To receive, stop talking. Insert the plug of unintended noises...
User Manual
Page 33
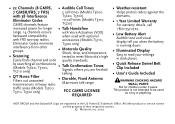
... settings in dark places. • Quick Release Swivel Belt Clip Included • User's Guide Included PWARNING CHOKING HAZARD SMALL PARTS Not for longer • Talk Handsfree range. 14 channels ensure with Voice Activation (VOX) backward compatibility when used as a toy or plaything. • 22 Channels (8 GMRS, • Audible Call Tones 7 GMSR/FRS, 7 FRS) 5 call tones (Models T5600, with 38 Interference T5620, T5700) Eliminator Codes GMRS channels feature 10 call 1-800-353-2729. • Low Battery Alert Audible tone and visual display...
... settings in dark places. • Quick Release Swivel Belt Clip Included • User's Guide Included PWARNING CHOKING HAZARD SMALL PARTS Not for longer • Talk Handsfree range. 14 channels ensure with Voice Activation (VOX) backward compatibility when used as a toy or plaything. • 22 Channels (8 GMRS, • Audible Call Tones 7 GMSR/FRS, 7 FRS) 5 call tones (Models T5600, with 38 Interference T5620, T5700) Eliminator Codes GMRS channels feature 10 call 1-800-353-2729. • Low Battery Alert Audible tone and visual display...


