
User Guide
Page 2
Contents Introduction 8 Copyrights 8 Trademarks 8 Statement 8 Screen Shots 8 Minimum system requirements 9 Contacts 10 Corporate Headquarters ...10 Sales ...10 Technical support ...10 Web sites ...10 Telephone number and e-mail address 10 Updates on documentation and comments 10 Live Update 11 Getting started 12 Installing/Uninstalling mobile PhoneTools 12 Installing mobile PhoneTools 12 Starting the installation 12 Installation Wizard ...12 Online registration ...13 Choosing a user profile 14 Installing the mobile phone 14 Mobile Phone Connection Instructions: USB Cable and...
Contents Introduction 8 Copyrights 8 Trademarks 8 Statement 8 Screen Shots 8 Minimum system requirements 9 Contacts 10 Corporate Headquarters ...10 Sales ...10 Technical support ...10 Web sites ...10 Telephone number and e-mail address 10 Updates on documentation and comments 10 Live Update 11 Getting started 12 Installing/Uninstalling mobile PhoneTools 12 Installing mobile PhoneTools 12 Starting the installation 12 Installation Wizard ...12 Online registration ...13 Choosing a user profile 14 Installing the mobile phone 14 Mobile Phone Connection Instructions: USB Cable and...

User Guide
Page 7
... Importing a video clip file 82 Editing video clip ...82 Adding/editing text ...83 Adding/editing sound ...84 Save a movie ...86 Transfer a movie ...86 Inbox and Outbox 87 Overview ...87 Inbox and Outbox folder ...87 Inbox Folder ...87 Outbox folder ...88 Pending e-mail folder ...88 Finished transmissions folder 88 Failed transmissions folder 88 Managing Sent/Received messages 88 Viewing messages ...88 Printing messages ...89 Saving messages...89 Changing messages status 89 Deleting messages ...89 Modifying a pending transmission 89 Reactivating messages 90 Deactivating messages...
... Importing a video clip file 82 Editing video clip ...82 Adding/editing text ...83 Adding/editing sound ...84 Save a movie ...86 Transfer a movie ...86 Inbox and Outbox 87 Overview ...87 Inbox and Outbox folder ...87 Inbox Folder ...87 Outbox folder ...88 Pending e-mail folder ...88 Finished transmissions folder 88 Failed transmissions folder 88 Managing Sent/Received messages 88 Viewing messages ...88 Printing messages ...89 Saving messages...89 Changing messages status 89 Deleting messages ...89 Modifying a pending transmission 89 Reactivating messages 90 Deactivating messages...

User Guide
Page 13
...guide you step-by the mobile PhoneTools software installation wizard. 2.1.1.1 Starting the installation To install mobile PhoneTools on the taskbar . 1. The Installation Wizard's Welcome window is displayed. 12 The Setup Type window is displayed. 2. mobile PhoneTools - Select the Run command from the Start menu (accessible from the CD-ROM, the installation program starts automatically. Select the CD-ROM drive or type D:SETUP (where D: is displayed. 3. During the installation procedure, the program files are copied to Install mobile PhoneTools. The License Agreement window...
...guide you step-by the mobile PhoneTools software installation wizard. 2.1.1.1 Starting the installation To install mobile PhoneTools on the taskbar . 1. The Installation Wizard's Welcome window is displayed. 12 The Setup Type window is displayed. 2. mobile PhoneTools - Select the Run command from the Start menu (accessible from the CD-ROM, the installation program starts automatically. Select the CD-ROM drive or type D:SETUP (where D: is displayed. 3. During the installation procedure, the program files are copied to Install mobile PhoneTools. The License Agreement window...
User Guide
Page 16
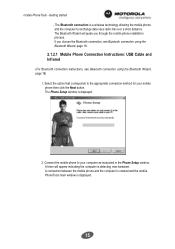
... installation process. Connect the mobile phone to the appropriate connection method for your computer as instructed in the Phone Setup window. A connection between the mobile phone and the computer is created and the mobile PhoneTools main window is displayed. 2. The Bluetooth Wizard will appear indicating the computer is a wireless technology allowing the mobile phone and the computer to exchange data via a radio link over a short distance. Select the option...
... installation process. Connect the mobile phone to the appropriate connection method for your computer as instructed in the Phone Setup window. A connection between the mobile phone and the computer is created and the mobile PhoneTools main window is displayed. 2. The Bluetooth Wizard will appear indicating the computer is a wireless technology allowing the mobile phone and the computer to exchange data via a radio link over a short distance. Select the option...

User Guide
Page 24
... lines which are automatically added to the Signature scrolling list. The signature you to save records contained in your PC and vice versa, prior to the hard disk drive in the Designation field. 3. Basic Configuration 1. The Signature dialog box is displayed. 2. mobile PhoneTools - Click the button to identify you write an e-mail message. Click the Enter button then close the window. Select...
... lines which are automatically added to the Signature scrolling list. The signature you to save records contained in your PC and vice versa, prior to the hard disk drive in the Designation field. 3. Basic Configuration 1. The Signature dialog box is displayed. 2. mobile PhoneTools - Click the button to identify you write an e-mail message. Click the Enter button then close the window. Select...
User Guide
Page 31
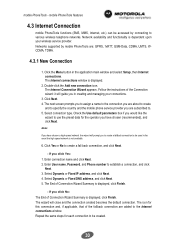
... connection to . 5. Click the Menu button in creating and managing your wireless service provider. Enter User name, Password, and Phone number to create a fall back connection, and click Next. - Select Dynamic or Fixed IP address, and click Next. 4. Follow the instructions of Connection Wizard Summary is dependent upon your connections. 3. Click Yes or No to establish a connection, and click Next. 3. If you click Yes: 1. mobile PhoneTools features 4.3 Internet Connection mobile PhoneTools...
... connection to . 5. Click the Menu button in creating and managing your wireless service provider. Enter User name, Password, and Phone number to create a fall back connection, and click Next. - Select Dynamic or Fixed IP address, and click Next. 4. Follow the instructions of Connection Wizard Summary is dependent upon your connections. 3. Click Yes or No to establish a connection, and click Next. 3. If you click Yes: 1. mobile PhoneTools features 4.3 Internet Connection mobile PhoneTools...

User Guide
Page 46
... a new contact to display the updated list. The drop-down list located at the top of the window. the Edit button enables you to select the phonebook folder containing the contacts to edit the record for the selected contact; the Delete button enables you to When you edit a contact in this section depends on the capabilities of your mobile phone while it is connected to create a new file for the selected contact...
... a new contact to display the updated list. The drop-down list located at the top of the window. the Edit button enables you to select the phonebook folder containing the contacts to edit the record for the selected contact; the Delete button enables you to When you edit a contact in this section depends on the capabilities of your mobile phone while it is connected to create a new file for the selected contact...

User Guide
Page 54
... Add task window closes and the task is displayed according to Synchronization, page 54 53 The Edit task window appears. 2. right-click and select the Delete task option from the Tasks window. 4.6.3 Synchronizing Refer to the selected status. 4. mobile PhoneTools features 4.6.2 Managing Tasks 4.6.2.1 Creating Tasks 1. Make the required changes, as described above. 3. click on a task or select it will appear next to confirm and close the window. 4.6.2.3 Deleting Tasks 1. mobile PhoneTools - Click...
... Add task window closes and the task is displayed according to Synchronization, page 54 53 The Edit task window appears. 2. right-click and select the Delete task option from the Tasks window. 4.6.3 Synchronizing Refer to the selected status. 4. mobile PhoneTools features 4.6.2 Managing Tasks 4.6.2.1 Creating Tasks 1. Make the required changes, as described above. 3. click on a task or select it will appear next to confirm and close the window. 4.6.2.3 Deleting Tasks 1. mobile PhoneTools - Click...
User Guide
Page 64
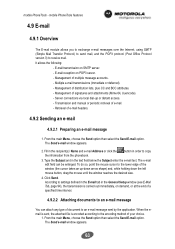
... SMTP server. - Transmission and manual or periodic retrieval of multiple message accounts. - From the main Menu, choose the Send option then select the Send E-mail option. mobile PhoneTools features 4.9 E-mail 4.9.1 Overview The E-mail module allows you to exchange e-mail messages over the Internet, using SMTP (Simple Mail Transfer Protocol) to send mail, and the POP3 protocol (Post Office Protocol version 3) to copy 3. The e-mail edit...
... SMTP server. - Transmission and manual or periodic retrieval of multiple message accounts. - From the main Menu, choose the Send option then select the Send E-mail option. mobile PhoneTools features 4.9 E-mail 4.9.1 Overview The E-mail module allows you to exchange e-mail messages over the Internet, using SMTP (Simple Mail Transfer Protocol) to send mail, and the POP3 protocol (Post Office Protocol version 3) to copy 3. The e-mail edit...

User Guide
Page 65
mobile PhoneTools features 2. The selected file name(s) will appear in the Attached file field in the General Setup window (see EMail Tab, page 94), the transmission is carried out immediately, on demand, or at the end of a specified time interval. 4.9.2.3 Defining a priority mobile PhoneTools can manage five priority levels ranking from "Lowest" to the current e-mail message. If the selected file is displayed, etc. 5. If it is...
mobile PhoneTools features 2. The selected file name(s) will appear in the Attached file field in the General Setup window (see EMail Tab, page 94), the transmission is carried out immediately, on demand, or at the end of a specified time interval. 4.9.2.3 Defining a priority mobile PhoneTools can manage five priority levels ranking from "Lowest" to the current e-mail message. If the selected file is displayed, etc. 5. If it is...
User Guide
Page 68
... not be delivered to use: - From the application main window, click the Menu button, select the Setup option, then SMS Configuration. The SMS Configuration window is received, but the Service Center does not forward the delivery report on to the Inbox folder. - "Empty" messages consist of a header (reply path, validity, etc.) and a message body. mobile PhoneTools features 4.10.2 Sending a Text Message 4.10.2.1 Configuration 4.10.2.1.1 Setting up the messaging function Before sending SMS...
... not be delivered to use: - From the application main window, click the Menu button, select the Setup option, then SMS Configuration. The SMS Configuration window is received, but the Service Center does not forward the delivery report on to the Inbox folder. - "Empty" messages consist of a header (reply path, validity, etc.) and a message body. mobile PhoneTools features 4.10.2 Sending a Text Message 4.10.2.1 Configuration 4.10.2.1.1 Setting up the messaging function Before sending SMS...

User Guide
Page 70
... Short Message window, click Tools > Options. 2. A calendar of the current month is connected to access the Inbox folder and click Tools > Send/Receive > Retrieve SMS... Make sure you can: • Press the F4 key on your correspondent's mobile phone will be identical to open it is displayed. to adjust the time. 6. Otherwise click Close to return to display a different month. 4. Click OK. When sent, the text message is...
... Short Message window, click Tools > Options. 2. A calendar of the current month is connected to access the Inbox folder and click Tools > Send/Receive > Retrieve SMS... Make sure you can: • Press the F4 key on your correspondent's mobile phone will be identical to open it is displayed. to adjust the time. 6. Otherwise click Close to return to display a different month. 4. Click OK. When sent, the text message is...

User Guide
Page 71
... the application allows you direct access to locate and select the file (containing the image, photo, sound, video clip, or melody) that is selected. The interface includes five parts: Menus and buttons The view that you mobile phone. The file selection screen This screen located in addition to what is similar in the function panel to the selected file can create and modify melodies using Melody Studio or photographs using Image Studio, and use . It...
... the application allows you direct access to locate and select the file (containing the image, photo, sound, video clip, or melody) that is selected. The interface includes five parts: Menus and buttons The view that you mobile phone. The file selection screen This screen located in addition to what is similar in the function panel to the selected file can create and modify melodies using Melody Studio or photographs using Image Studio, and use . It...

User Guide
Page 80
... Media Files selection screen This screen, located in the center part of the main window, displays the local explorer It lets you locally select the video clips or the files (containing the image, text, music track, or sound) you just have to save by default the information concerning the MMS network used. Once the file is sent. 4.11.5 Video Studio module 4.11.5.1 Overview This module provides basic easy-to-use movie making and editing...
... Media Files selection screen This screen, located in the center part of the main window, displays the local explorer It lets you locally select the video clips or the files (containing the image, text, music track, or sound) you just have to save by default the information concerning the MMS network used. Once the file is sent. 4.11.5 Video Studio module 4.11.5.1 Overview This module provides basic easy-to-use movie making and editing...

User Guide
Page 81
... View Deletes the selected item (video, image, text, or sound) Lets you increase the general timeline view Lets you reduce the general timeline view Displays the Audio Balance window Displays the Title Management window Lets you have dragged and dropped from the Media Files selection screen. The video clips will be displayed in two different modes: Storyboard View or Edit View. It allows you can change the order of appearance of the selected item. By maintaining the click on a trim point...
... View Deletes the selected item (video, image, text, or sound) Lets you increase the general timeline view Lets you reduce the general timeline view Displays the Audio Balance window Displays the Title Management window Lets you have dragged and dropped from the Media Files selection screen. The video clips will be displayed in two different modes: Storyboard View or Edit View. It allows you can change the order of appearance of the selected item. By maintaining the click on a trim point...

User Guide
Page 84
... end of the selected file appears there when the time scale bar (timeline) is pasted before pasting, then the copied/ cut /copy/paste video clips and images: 1. If a video clip has been selected before . To delete a video clip or an image: 1. To delete several video clips/images, click on them while pressing the Ctrl key. 2. Select the Delete option from the Edit menu. The video clip or image disappears from the storyboard/timeline. 4.11.5.4 Adding/editing text To import a text: 1. In the File selection screen, click on...
... end of the selected file appears there when the time scale bar (timeline) is pasted before pasting, then the copied/ cut /copy/paste video clips and images: 1. If a video clip has been selected before . To delete a video clip or an image: 1. To delete several video clips/images, click on them while pressing the Ctrl key. 2. Select the Delete option from the Edit menu. The video clip or image disappears from the storyboard/timeline. 4.11.5.4 Adding/editing text To import a text: 1. In the File selection screen, click on...

User Guide
Page 98
...; Either using the following settings option. If your Internet service provider. 5.1.4.4.3 Reception tab From this window by entering different settings. To do that server. If you choose the second option, you can configure the following settings. 5.1.4.4.3.1 Choosing the server type for incoming e-mail Choose the server type from your e-mail server requires a login during the connection, you will be prompted for a user name and password. From the Advanced Options window, select the Reception tab. 2. mobile PhoneTools...
...; Either using the following settings option. If your Internet service provider. 5.1.4.4.3 Reception tab From this window by entering different settings. To do that server. If you choose the second option, you can configure the following settings. 5.1.4.4.3.1 Choosing the server type for incoming e-mail Choose the server type from your e-mail server requires a login during the connection, you will be prompted for a user name and password. From the Advanced Options window, select the Reception tab. 2. mobile PhoneTools...

User Guide
Page 105
... 73 Customize tab 91 User settings 91 D Deactivating messages 90 Default account 95 Deferring a transmission 64, 69 Define a default user profile 62 Delay 33 Delete a Group 43 Delete a Mailbox 88, 99 Delete a message 89 Delete a phonebook 39 Delete a record 41 Delete a signature 100 Delete a task 53 Delete an e-mail account 94 Delete an event 52 Delete logs 36 Delete Phone data 24 Dialing properties 93 Dial-up-Networking 101 Disabling default retrieval of email headers 96 Display...
... 73 Customize tab 91 User settings 91 D Deactivating messages 90 Default account 95 Deferring a transmission 64, 69 Define a default user profile 62 Delay 33 Delete a Group 43 Delete a Mailbox 88, 99 Delete a message 89 Delete a phonebook 39 Delete a record 41 Delete a signature 100 Delete a task 53 Delete an e-mail account 94 Delete an event 52 Delete logs 36 Delete Phone data 24 Dialing properties 93 Dial-up-Networking 101 Disabling default retrieval of email headers 96 Display...

User Guide
Page 106
... Enable default retrieval of e-mail headers 96 Event 51 Event Management 51 Add an event 51 Copy an event 51 Delete an event 52 Modify an event 51 Search for an event 52 Export logs 36 Export wizard 48 Exportation 47 Text files with delimiters 47 Exporting to an external file 47 Exporting to Outlook, Exchange, or Lotus Notes 48 F Failed transmissions folder 88 Fast search 42 File selection screen...
... Enable default retrieval of e-mail headers 96 Event 51 Event Management 51 Add an event 51 Copy an event 51 Delete an event 52 Modify an event 51 Search for an event 52 Export logs 36 Export wizard 48 Exportation 47 Text files with delimiters 47 Exporting to an external file 47 Exporting to Outlook, Exchange, or Lotus Notes 48 F Failed transmissions folder 88 Fast search 42 File selection screen...

User Guide
Page 108
... e-mail messages 97 License 12 Live Update 11 Configuration 11 Location Tab 93 Dialing properties 93 Logs 28 Archiving 29 Clear entries 29 Connection logs 35 Delete connection logs 36 Display by entries 36 Export connection logs 36 Filtering logs 36 Print 29 Reception log 28 Transmission log 28 View 28 M Mailbox 22 Create 87 Delete 88 Rename 87 Mailbox management 22, 98 Create a mailbox 87 Delete a mailbox 99 New mailbox 98 Rename a mailbox 98 Making...
... e-mail messages 97 License 12 Live Update 11 Configuration 11 Location Tab 93 Dialing properties 93 Logs 28 Archiving 29 Clear entries 29 Connection logs 35 Delete connection logs 36 Display by entries 36 Export connection logs 36 Filtering logs 36 Print 29 Reception log 28 Transmission log 28 View 28 M Mailbox 22 Create 87 Delete 88 Rename 87 Mailbox management 22, 98 Create a mailbox 87 Delete a mailbox 99 New mailbox 98 Rename a mailbox 98 Making...