User Guide
Page 7
... Contents Welcome i Important Safety Instructions vii FCC Information xi Getting Started 1 Battery Safety Instructions 1 Charging the Battery 2 Installing Backup Batteries 4 Using the Handset 5 Using the Handset Display 5 Using the Soft Keys 6 Using the Navigation Key 7 Installation 9 Installing the Phone on a Desk 9 Installing the Phone on the Wall 10 Setting Up 13 Personalizing Your Handset 13...
... Contents Welcome i Important Safety Instructions vii FCC Information xi Getting Started 1 Battery Safety Instructions 1 Charging the Battery 2 Installing Backup Batteries 4 Using the Handset 5 Using the Handset Display 5 Using the Soft Keys 6 Using the Navigation Key 7 Installation 9 Installing the Phone on a Desk 9 Installing the Phone on the Wall 10 Setting Up 13 Personalizing Your Handset 13...
User Guide
Page 19
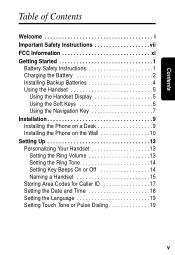
Use only the battery that came with an incorrect battery type. Battery Safety Instructions • Do not burn, disassemble, mutilate, or puncture the battery. Contact your phone or an authorized replacement recommended by -step instructions you will need to make or answer calls, you replace the battery with your local recycling center for battery type. The battery contains toxic...
Use only the battery that came with an incorrect battery type. Battery Safety Instructions • Do not burn, disassemble, mutilate, or puncture the battery. Contact your phone or an authorized replacement recommended by -step instructions you will need to make or answer calls, you replace the battery with your local recycling center for battery type. The battery contains toxic...

User Guide
Page 20
Charging the Battery 1 Remove the battery door. 2 Insert the battery into the battery compartment. 3 Plug the battery connector into the receptacle in the battery compartment and replace the battery door. 4 Plug the power cord into the back of the base and into an outlet. 2 Getting Started
Charging the Battery 1 Remove the battery door. 2 Insert the battery into the battery compartment. 3 Plug the battery connector into the receptacle in the battery compartment and replace the battery door. 4 Plug the power cord into the back of the base and into an outlet. 2 Getting Started
User Guide
Page 21
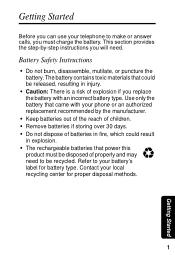
Note: Every time a battery is fully charged. 5 Rest the handset in the base for the phone to the phone line until the handset is plugged in, the phone must be charged in the base so the charge/page LED lights. 6 For the initial charge, charge the battery for at least 10 seconds for at least 16 hours. Do not connect the base station to properly restart. 3 Getting Started
Note: Every time a battery is fully charged. 5 Rest the handset in the base for the phone to the phone line until the handset is plugged in, the phone must be charged in the base so the charge/page LED lights. 6 For the initial charge, charge the battery for at least 10 seconds for at least 16 hours. Do not connect the base station to properly restart. 3 Getting Started
User Guide
Page 22
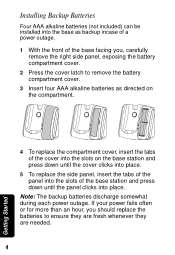
... into the base as backup incase of a power outage. 1 With the front of the base facing you should replace the batteries to remove the battery compartment cover. 3 Insert four AAA alkaline batteries as directed on the compartment. 4 To replace the compartment cover, insert the tabs of the cover into the slots on the... the panel clicks into place. If your power fails often or for more than an hour, you , carefully remove the right side panel, exposing the battery compartment cover. 2 Press the cover latch to ensure they are fresh whenever they are needed. 4 Getting Started Note: The backup...
... into the base as backup incase of a power outage. 1 With the front of the base facing you should replace the batteries to remove the battery compartment cover. 3 Insert four AAA alkaline batteries as directed on the compartment. 4 To replace the compartment cover, insert the tabs of the cover into the slots on the... the panel clicks into place. If your power fails often or for more than an hour, you , carefully remove the right side panel, exposing the battery compartment cover. 2 Press the cover latch to ensure they are fresh whenever they are needed. 4 Getting Started Note: The backup...

User Guide
Page 27
Installing the Phone on a Desk Once the battery is fully charged and ready for use, you will need to a wall. Installation Installation Once your MA750 is fully charged, plug the phone cord into the back of the phone and then into the phone jack on a desktop or mounted to install the phone. This section provides the step-by-step instructions you can install it on the wall. 9
Installing the Phone on a Desk Once the battery is fully charged and ready for use, you will need to a wall. Installation Installation Once your MA750 is fully charged, plug the phone cord into the back of the phone and then into the phone jack on a desktop or mounted to install the phone. This section provides the step-by-step instructions you can install it on the wall. 9
User Guide
Page 58
... evidence of NonMotorola branded or certified Products, Accessories, Software or other peripheral equipment are excluded from coverage. or (d) other than Motorola, or its authorized service centers, are excluded from coverage. 40 Warranty Abuse & Misuse. Applies only to the consumer, whichever is...or (d) nonconforming or non-Motorola housings, or parts, are excluded from the date of Non-Motorola Products and Accessories. Only batteries whose fully charged capacity falls below 80% of their rated capacity and batteries that embodies the copy of Motorola, are Repaired or Replaced...
... evidence of NonMotorola branded or certified Products, Accessories, Software or other peripheral equipment are excluded from coverage. or (d) other than Motorola, or its authorized service centers, are excluded from coverage. 40 Warranty Abuse & Misuse. Applies only to the consumer, whichever is...or (d) nonconforming or non-Motorola housings, or parts, are excluded from the date of Non-Motorola Products and Accessories. Only batteries whose fully charged capacity falls below 80% of their rated capacity and batteries that embodies the copy of Motorola, are Repaired or Replaced...


