User Guide
Page 7
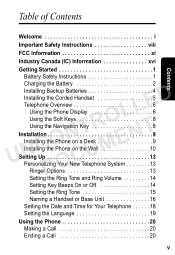
... Industry Canada (IC) Information xvi Getting Started 1 Battery Safety Instructions 1 Charging the Battery 2 Installing Backup Batteries 4 Installing the Corded Handset 5 LLED Telephone Overview 6 Using the Phone Display 6 Using the Soft Keys 8 NTRO Using the Navigation Key 8 UNCO ENT Installation 9 Installing the Phone on a Desk 9 CUM Installing the Phone on the Wall 10 Setting Up 13 Personalizing... the Ring Tone 15 Naming a Handset or Base Unit 16 Setting the Date and Time for Your Telephone 18 Setting the Language 19 Using the Phone 20 Making a Call 20 Ending a Call 20 v
... Industry Canada (IC) Information xvi Getting Started 1 Battery Safety Instructions 1 Charging the Battery 2 Installing Backup Batteries 4 Installing the Corded Handset 5 LLED Telephone Overview 6 Using the Phone Display 6 Using the Soft Keys 8 NTRO Using the Navigation Key 8 UNCO ENT Installation 9 Installing the Phone on a Desk 9 CUM Installing the Phone on the Wall 10 Setting Up 13 Personalizing... the Ring Tone 15 Naming a Handset or Base Unit 16 Setting the Date and Time for Your Telephone 18 Setting the Language 19 Using the Phone 20 Making a Call 20 Ending a Call 20 v

User Guide
Page 21
...Caution: There is a risk of children. The battery contains toxic materials that power this product must charge the battery. Battery Safety Instructions • Do not burn, disassemble, mutilate, or puncture the battery. Refer to your battery's label for proper disposal methods. 1 Getting Started ...Getting Started Before you can use your telephone to make or answer calls, you replace LLED the battery with your local recycling center for battery type. Contact your phone or ...
...Caution: There is a risk of children. The battery contains toxic materials that power this product must charge the battery. Battery Safety Instructions • Do not burn, disassemble, mutilate, or puncture the battery. Refer to your battery's label for proper disposal methods. 1 Getting Started ...Getting Started Before you can use your telephone to make or answer calls, you replace LLED the battery with your local recycling center for battery type. Contact your phone or ...

User Guide
Page 22
Charging the Battery 1 Remove any stickers if present. 2 Remove the battery door. 3 Insert the battery into the battery compartment. 4 Plug the battery connector into the receptacle in the battery compartment and replace the battery door. UNCDOONCTURMOELNLTED Red Black 2 Getting Started
Charging the Battery 1 Remove any stickers if present. 2 Remove the battery door. 3 Insert the battery into the battery compartment. 4 Plug the battery connector into the receptacle in the battery compartment and replace the battery door. UNCDOONCTURMOELNLTED Red Black 2 Getting Started

User Guide
Page 23
UNCONTROELNLTED Charge LED 6 Rest the handset in the base for at least 10 seconds for DO at least 16 hours. Note: Every time a battery is plugged in, the phone must be charged in the base so the charging CUM LED lights. 7 For the initial charge, charge the battery for the phone to properly restart. 3 Getting Started 5 Plug the power cord into the back of the charging base and into an outlet.
UNCONTROELNLTED Charge LED 6 Rest the handset in the base for at least 10 seconds for DO at least 16 hours. Note: Every time a battery is plugged in, the phone must be charged in the base so the charging CUM LED lights. 7 For the initial charge, charge the battery for the phone to properly restart. 3 Getting Started 5 Plug the power cord into the back of the charging base and into an outlet.
User Guide
Page 24
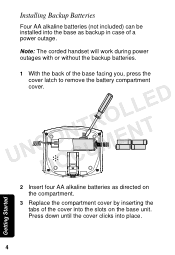
Note: The corded handset will work during power outages with or without the backup batteries. 1 With the back of the base facing you, press the cover latch to remove the battery compartment UNcovCer.DOONCTURMOELNLTED 2 Insert four AA alkaline batteries as backup in case of the cover into the slots on the compartment. 3 Replace the compartment cover by inserting the tabs of a power outage. Installing Backup Batteries Four AA alkaline batteries (not included) can be installed into the base as directed on the base unit. Press down until the cover clicks into place. 4 Getting Started
Note: The corded handset will work during power outages with or without the backup batteries. 1 With the back of the base facing you, press the cover latch to remove the battery compartment UNcovCer.DOONCTURMOELNLTED 2 Insert four AA alkaline batteries as backup in case of the cover into the slots on the compartment. 3 Replace the compartment cover by inserting the tabs of a power outage. Installing Backup Batteries Four AA alkaline batteries (not included) can be installed into the base as directed on the base unit. Press down until the cover clicks into place. 4 Getting Started

User Guide
Page 25
LLED Note: The backup batteries discharge somewhat during each power outage. If your power fails often or for more than an hour, you should replace the NTRO batteries to show status of the backup batteries. Installing the Corded Handset CUM Connect the coiled cord between the corded handset DO and base as shown. 5 Getting Started The base display has a battery meter to ensure they are fresh whenever they UNCO ENT are needed.
LLED Note: The backup batteries discharge somewhat during each power outage. If your power fails often or for more than an hour, you should replace the NTRO batteries to show status of the backup batteries. Installing the Corded Handset CUM Connect the coiled cord between the corded handset DO and base as shown. 5 Getting Started The base display has a battery meter to ensure they are fresh whenever they UNCO ENT are needed.

User Guide
Page 26
...LLED Line 1/Line 2 indicators Number of your preferences. DO Note: Caller ID information is supplied only if you can set up your phone. This section describes how to use these components so you subscribe to select the various features and functions of calls NTRO Answering machine status ...UNCO ENT Function Date Battery meter Device name Line 1/Line 2 messages Ringer off icon Function CUM When the phone is not in use, the standby screen is on setting personal preferences, see "Setting Up." ...
...LLED Line 1/Line 2 indicators Number of your preferences. DO Note: Caller ID information is supplied only if you can set up your phone. This section describes how to use these components so you subscribe to select the various features and functions of calls NTRO Answering machine status ...UNCO ENT Function Date Battery meter Device name Line 1/Line 2 messages Ringer off icon Function CUM When the phone is not in use, the standby screen is on setting personal preferences, see "Setting Up." ...
User Guide
Page 69
...(cracks, scratches, etc.) to abnormal usage or conditions; Communication Services. NTRO Motorola branded or certified Products, Accessories, Software or other peripheral equipment are excluded from coverage. Altered Products. Only batteries whose fully charged capacity falls below 80% of tampering; (c) mismatched board serial ... 49 Warranty No warranty is excluded from coverage. Batteries. or (d) Acts of God or nature, LLED or other than Motorola, or its authorized service centers, are not the fault of Non-Motorola Products and Accessories. Defects or damage that the...
...(cracks, scratches, etc.) to abnormal usage or conditions; Communication Services. NTRO Motorola branded or certified Products, Accessories, Software or other peripheral equipment are excluded from coverage. Altered Products. Only batteries whose fully charged capacity falls below 80% of tampering; (c) mismatched board serial ... 49 Warranty No warranty is excluded from coverage. Batteries. or (d) Acts of God or nature, LLED or other than Motorola, or its authorized service centers, are not the fault of Non-Motorola Products and Accessories. Defects or damage that the...


